Transcription
Getting to Know Your2016 Equinoxwww.chevrolet.comReview this Quick Reference Guide for an overview of some importantfeatures in your Chevrolet Equinox. More detailed information canbe found in your Owner Manual. Some optional equipment describedin this guide may not be included in your vehicle. For easy reference,keep this guide with your Owner Manual in your glove box.1
Instrument PanelDriverInformationCenterTurn Signal Lever/Exterior Lamp ControlCruise Control/Forward CollisionAlertF/LaneDeparture WarningFButtonsInstrument PanelIlluminationControlTilt/TelescopicSteering WheelLeverWindshieldWipers LeverAudioSteeringWheelControlsFCenter VentOpen/CloseControlSymbolsSafety Belt Reminder2Check EngineAntilock BrakeSystem WarningLow Tire PressureCharging SystemBrake System WarningOil PressureAirbag ReadinessSecurityFog Lamps
InfotainmentSystem/NavigationSystemFAccessoryPower OutletCruise Control On/SetTraction Control OffStabiliTrak/TractionControl OffHazardWarningFlashers ButtonDriverInformationCenter ControlsClimate Controls/Heated SeatButtonsFCenter VentOpen/CloseControlStabiliTrak/TractionControl WarningLights OnLTZ model shownRefer to your Owner Manualto learn about the informationbeing relayed by the lights,gauges and indicators of theinstrument cluster.See In Brief in your Owner Manual.F Optional equipment3
Remote Keyless Entry TransmitterUnlockPress to unlock the driver’sdoor. Press again to unlock alldoors and the liftgate.The Unlock setting canbe changed in the VehicleSettings menu.LockPress to lock all doors andthe liftgate. The driver’s doorwill not lock if open.LiftgatePress and hold to open/stop/close the power liftgateF.Vehicle Locator/Panic AlarmPress and release to locate yourvehicle. The turn signal lamps willflash and the horn will sound.Press and hold to activate the alarm. Theturn signal lamps will flash and the hornwill sound until the button is pressedagain or the ignition is turned on.Remote Vehicle StartFPress and release the Lock button andthen press and hold thebutton untilthe turn signal lamps flash to start theengine from outside the vehicle. Afterentering the vehicle, turn the ignition tothe On position.– During a remote start, the enginewill run for 10 minutes.– Repeat these steps for an additional 10 minutes. A remote startcan be extended once.– Press and hold thebuttonuntil the parking lamps turn off to cancel a remote start.TIP: To change the remote lock,unlock, and remote start settings, goto Remote Lock, Unlock, Start in theVehicle Settings menu.See Keys, Doors and Windows in your Owner Manual.Tilt/Telescopic Steering WheelWith the vehicle in Park, push down the lever on the left side of the steering column toadjust the steering wheel. The steering wheel can then be moved up or down and in orout. After adjustment, pull up the lever to lock the steering wheel in place.See Instruments and Controls in your Owner Manual.4F Optional equipment
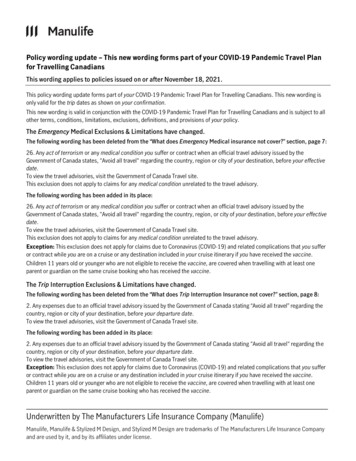
Driver’s Seat AdjustmentsManual Driver’s SeatABCA. Seat Fore/Aft AdjustmentLift the handle under the front of theseat to manually slide the seat forwardor rearward.B. Seat Height AdjustmentPress the vertical control to raise orlower the seat.C. Lumbar AdjustmentPress the horizontal control to adjustthe amount of lumbar support.D. Seatback Recline AdjustmentLift the lever to manually recline orraise the seatback.DPower Driver’s SeatFABCA. Seat AdjustmentMove the front horizontal control tomove the seat forward or rearward andto raise, lower or tilt the seat.B. Seatback Recline AdjustmentMove the vertical control to recline orraise the seatback.C. Lumbar AdjustmentPress the rear horizontal control toadjust the amount of lumbar support.Memory Driver’s SeatFSet Memory Positions1. Adjust the driver’s seat and power outside mirrors to the desired position.2. Press and hold the MEM button and button 1 on the outboard side of the driver’s seatuntil a beep sounds.3. Repeat these steps using button 2 for a second driver.Recall Memory PositionsPress and hold button 1 or 2 until the memory position is reached.Note: To change the memory recall and exit settings, go to Comfort and Convenience in the VehicleSettings menu.See Seats and Restraints in your Owner Manual.F Optional equipment5
Rear Seat AdjustmentsABA. Seat Fore/Aft AdjustmentLift the bar under the front of the seatto manually slide the seat forward orrearward.B. Folding/Reclining SeatbackUnbuckle the rear safety belts andplace the front seatbacks in the uprightposition. Lift the lever on top of eachseatback to fold down the seatback.Lift and hold the lever to adjust the seat back to any of three recline positions.See Seats and Restraints in your Owner Manual.Exterior/Interior LightingAutomatic Headlamp SystemHeadlampsManual operation of the headlamps.Parking LampsManual operation of the parking lamps.Rotate the outer band to operate the exterior lamps.TIP: Push the lever to turn on the high beamheadlamps; pull the lever to return to low beamoperation. Pull the lever to activate the flash-topass feature.Instrument Panel LightingThe control knob is located on the left sideof the instrument panel.Dome LampThe dome lamps are controlled by athree-position switch on the front overhead console.TIP: The second-row dome lamps also can beturned on/off using the buttons by the lamps.6F Optional equipmentAUTO Automatic Headlamp SystemActivates the Daytime Running Lamps(DRLs) in the daytime and the headlampsand other exterior lamps at night or whennecessary.Off/OnFog LampsFRotate the inner band to turn the foglamps on or off.Instrument Panel BrightnessTurn the knob to increase or decreasethe instrument panel lighting.Dome Lamp Override/OffDoor Open (Default position)OnSee Lighting in your Owner Manual.
Wipers and WashersWindshield Wipers and WasherMove the lever up or down to operate thewindshield wipers.HI Continuous High SpeedLO Continuous Low SpeedINT IntermittentRotate the band to adjust the delaybetween wipes.AOFFB1x MistCWasher FluidPull the lever toward you to spray washerfluid on the windshield.Rear Wiper and WasherThe rear wiper switch is located on theend of the wiper lever.A. ON Continuous Low SpeedB. OFFC. INT IntermittentWasher FluidPush the lever away from you to spraywasher fluid on the rear window.See Instruments and Controls in your Owner Manual.Power Programmable LiftgateFMAXFully open the liftgate.3/4Open the liftgate to the programmedheight.OFFOperate the liftgate manually.F Optional equipmentProgramming the Liftgate Height1. Turn the power liftgate switch to the3/4 mode position.2. Open the liftgate by pressing the RKEtransmitter liftgate button or thetouchpad on the center of the liftgate.3. Stop the liftgate at the desired heightby pressing any liftgate button. Adjustmanually to the desired height if necessary.4. To save the setting, press and hold thebutton next to the liftgate latch forthree seconds. The taillamps will flashwhen the setting is saved.See Keys, Doors and Windows in your Owner Manual.7
Audio SystemRefer to your Owner Manual for important safety information about using the infotainment systemwhile driving.Power/VolumeFAVDisplay pagesof favoriteradio stationsSEEKPrevious/Next radiostation or track8SOURCESelect radio1–6:HOMEHOME:band orPreset radioMain screenauxiliary source stationsDESTFRPTFOpen theRepeatNavigation NavigationDestinationvoicemenuguidanceF Optional equipmentNAVFMapscreenPhone/MuteBACKMove backone level inthe menusMENU/SELTune radiostations/Open andselect a menuCONFIGASINFOConfigurePLAY/ Autostore DisplaysystemPAUSE presets availablesettingslistsonginformationSee your Infotainment System Owner Manual.
Audio SystemSetting the Time1. Press theClock button.2. Touch the Set Time screen button.3. Touch the (plus) or – (minus) screen button to adjust the hours, minutes or date.4. Touch the OK screen button to confirm the setting.Storing Favorite StationsRadio stations from all bands (AM, FM or XMF) can be stored, in any order, on up to sixpages of favorites.1. Tune in the desired radio station.2. Press the FAV button to display the page where the station is to be stored.3. Press and hold one of the six preset screen buttons until a beep is heard.4. Repeat the steps for each desired station.Portable Audio DevicesAn accessory power outlet, 3.5-mm auxiliary input jack and a USB portF are located in thecenter console.An iPod , iPhone , MP3 Player, a USBflash drive or a USB mass storage devicecan be connected to the USB port.Chevrolet MyLinkF will read the device,build a list of voice commands, and fillin missing song information and albumgraphics. Search for music on-screen orby voice commands.A portable audio device connected tothe auxiliary input jack can be controlled only by using the portable device controls. To optimize speaker volume,fully increase the volume level of theportable device.Active Noise Cancellation (4-cylinder models only)The Active Noise Cancellation (ANC) system monitors and effectively cancels out potentially undesirable vehicle noises at certain vehicle speeds. For optimal ANC performance,do not block the rear speaker located on the right side of the cargo area.See your Infotainment System Owner Manual.F Optional equipment9
Bluetooth SystemBefore using a Bluetooth-enabled device in the vehicle, it must be paired with the in-vehicle Bluetooth system. Not all devices will support all functions. The pairing processis disabled when the vehicle is moving. For more information about Bluetooth pairing,device compatibility and text messaging, visit my.chevrolet.com/learn.Pair a Phone1. To use voice recognition, press thePush to Talk button on the steering wheel;after the beep, say “Pair.”To use the screen buttons, press the CONFIG button and then touch Phone Settings Pair Device.2. Start the pairing process on the phone. Locate your vehicle name or MyLink on thephone.3. Enter the four-digit code that appears on the touch screen into the phone or confirmthe six-digit code on the phone.4. If your phone prompts you to accept the connection or phone book download, selectAlways Accept and Allow.Text MessagingFText messages can be displayed or played back over the audio system; or a predefinedmessage can be sent. Only SMS text messages are supported.1. Touch the Messages screen button on the home page.2. Once all messages are retrieved, the Text Message Inbox displays.3. Select a text message to view (available only if the vehicle is not in motion) or listen to.A pop-up screen will display when there is an incoming text message.See your Infotainment System Owner Manual.Audio Steering Wheel ControlsFNext/PreviousRotate up or down to go to the next orpre vious favorite radio station or track.Push to TalkPress to answer an incoming call oruse voice recognition. VOL – VolumePress or – to adjust the volume.SRC SourcePress to select an audio source.10F Optional equipmentEnd Call/MutePress to end or reject a call.Press to mute the vehicle speakers.See Instruments and Controls in your Owner Manual.
Chevrolet MyLinkFMyLink uses a Bluetooth or USB connection to link a compatible smartphone, cell phone,USB flash drive or portable audio player/iPod to the touch screen infotainment display.It offers a variety of entertainment options and features enhanced hands-free voice control, music information and the ability to play music files from a USB flash drive.For assistance with the operation of the MyLink system, contact Customer Assistance at1-855-4-SUPPORT (855-478-7767) or visit my.chevrolet.com/learn.PANDORA Internet RadioListen to personalized radio stations based on favorite artists or genres.Download the Pandora app to your smartphone. Restart the smartphone and sign into Pandora.Create a station on your phone to listen to a customized song list in the vehicle.Connect your smartphone/device to the system by Bluetooth or, for Apple devices,by a USB cable.Touch the Pandora icon on the touch screen to access Pandora. A slight delay mayoccur when loading a song or changing a station.Stitcher SmartRadio Stream favorite podcasts, radio shows and news to your vehicle.Download the Stitcher app to your smartphone. Restart the smartphone and sign into Stitcher.Select a category to listen to.If you like the station, touch the Star screen button to add it to your Favorites list.SiriusXM Satellite RadioF (subscription required)SiriusXM provides access to over 180 channels of commercial-free music, sports, talk,entertainment, comedy and weather using the radio controls or voice commands. XM Travel Link includes fuel locations and prices, weather, and movies with theaterlocations. Additional subscription fee required. XM Tune Select finds your favorite artists or songs on all XM stations and alerts you.Voice Pass-Thru and Siri Eyes FreeVoice pass-thru allows access to the voice recognition commands on a compatible cellphone; i.e. Siri or Voice Command. Visit my.chevrolet.com/learn for more information.To activate phone voice recognition, press and hold thePush to Talk button on thesteering wheel for two seconds.Not all features and commands are available. Some of the tasks you can perform includemaking a hands-free phone call to contacts within your phone, playing songs from yourmusic library, listening to a text message or sending a text message to someone in yourcontacts, and accessing your calendar.See your Infotainment System Owner Manual.F Optional equipment11
Chevrolet MyLinkFVoice RecognitionControl the music source and make phone calls hands-free (after pairing your Bluetoothenabled phone) using the enhanced voice recognition system.1. Press thePush to Talk button on the steering wheel.2. The radio will say “Please say a command,” followed by a beep.3. After the beep, say what you want it to do. Phone (using your paired phone):– “Pair” or “Connect”– “Dial” or “Call [number]”– “Dial” or “Call [phone book name]”Example command: “Call Amanda” or “Dial 555-1212” Media Music Device Search:– “Play USB”– “Play Bluetooth audio”Example command: “Play artist [name]” or “Play song [name]” Radio Control:Example command: “Tune FM 104.3” or “Tune Classic Vinyl”Example command: “Tune Pandora” (Pandora app required) Quick Tips:– Say “Help” for voice recognition assistance.– To start speaking immediately without waiting for the beep, press theTalk button twice.Push toSee your Infotainment System Owner Manual.OnStar with 4G LTE and Wi-Fi FIf equipped with OnStar 4G LTE and Wi-Fi, up to seven devices (smartphones, tabletsand laptops) can be connected to high-speed Internet through the vehicle’s built-in Wi-Fihotspot.To retrieve the SSID and password for the hotspot, press the OnStar Voice Commandbutton on your overhead console or rearview mirror, wait for the prompt, and then say“Wi-Fi settings.” The information will be displayed on the screen.For assistance or to change the SSID and password, press the blue OnStar button or call1-888-4-ONSTAR (1-888-466-7827) to connect to an OnStar Advisor.Note: See onstar.com for a detailed instruction guide, vehicle availability, details, and system limitations. Services and apps vary by make, model, year, carrier, availability, and conditions. 4G LTEservice is available in select markets. 4G LTE performance is based on industry averages and vehiclesystems design. Some services require a data plan.12F Optional equipmentSee your Infotainment System Owner Manual.
Navigation SystemFNote: When the vehicle is moving, various on-screen functions are disabled to reduce driver distraction.ControlsA. NAV NavigationPress to view the vehicle’scurrent position on the mapscreen.B. DEST DestinationPress to access the Routescreen to enter a destination orplan a route.C. RPT RepeatPress to repeat the last voiceguidance prompt.To select various functions, touchthe highlighted touch screen buttons in the on-screen menus oruse the MENU/SEL knob.BCAEntering a Destination1. Press the DEST control button.2. Touch one of the Select Destination menu options to plan a route. If you know the specific address, touch the Address Entry screen button.3. Enter the State/Province, City and Street name. Touch the List screen button to selectthe desired name from the generated list for each entry.4. Enter the house number. Touch the DONE screen button.5. If the displayed address is correct, touch the GO screen button.6. Select the route preference and touch the Start Guidance screen button.See your Infotainment System Owner Manual.F Optional equipment13
Climate on Defrost modeDriver’s heatedseat controlFAir delivery r conditioningcontrolREARRear d seatcontrolFAutomatic climate control system with heated seats shownRecirculation ModeThe recirculation mode can help to quickly cool the air inside the vehicle or prevent outside odors from entering the vehicle. It is not available while the defog or defrostmode is selected. When the recirculation mode is used without air conditioning, the airhumidity increases and the windows may fog.Air OutletsUse the thumbwheels below the center outlets to open or close the center outlets.Use the chrome-accented sliding knob on each outlet to direct airflow.Automatic OperationF1. Press AUTO.2. Set the temperature. Allow time for the system to automatically reach the desired temperature.Note: When outside temperature and vehicle temperature are cold, fan speed will not increase untilwarmer air is available.See Climate Controls in your Owner Manual.14F Optional equipment
Driver Information CenterThe Driver Information Center (DIC) on the instrument cluster displays a variety of vehiclesystem information and warning messages.TIP: To display an easy-to-read digital speedometer, open the Trip/Fuel menu and scroll to tab 1.DIC ControlsABA. MENUPress to display the:– Vehicle Information menu (units,tire pressures, remaining oil life).– Trip/Fuel menu (digital speed ometer, trip odometers, fuel range,average fuel economy, instantaneous fuel economy, average vehicle speed, timer, OnStarTurn-by-Turn guidanceF).B.Press the up or down button to scrollthrough the items of each menu.C. SET/CLRPress to set or clear the displayed menuitem or warning message.CSee Instruments and Controls in your Owner Manual.Vehicle PersonalizationVehicle personalization items may include Climate and Air Quality, Comfort and Convenience, Collision/Detection Systems, Language, Lighting, Power Door Locks, RemoteLock/Unlock/Start, or Factory S ettings. Use the controls on the audio system to changethe settings.CBAF Optional equipment1. Press the CONFIG button (A) to enterthe Configuration Settings menu.2. Turn the MENU knob (B) to highlightVehicle Settings, and then press theknob to select it; or use the screen buttons.3. Turn the MENU knob to highlight thedesired menus and settings, and thenpress the knob to select the highlighteditem; or use the screen buttons.4. Press the BACK button (C) to move backwithin a menu.See Instruments and Controls in your Owner Manual.15
Driver Assistance SystemsThe driver assistance systems use advanced technologies to help avoid collisions by providing visual and audible alerts under some imminent collision conditions.Lane Departure WarningF – When crossing a detected lane marking without usinga turn signal in that direction, theLaneDeparture Warning indicator flashes on topof the instrument panel and beeps sound.Press the Lane Departure Warningbutton on the left side of the steeringwheel to turn the system on or off.Forward Collision AlertF – TheVehicleAhead indicator will illuminate in green ontop of the instrument panel when a vehicle isdetected. If your vehicle approaches anothervehicle too rapidly, theCollision Alertwarning flashes and high-pitched beepssound.Press theCollision Alert button on theleft side of the steering wheel to set thealert timing to Far, Medium, Near, or Off.The setting is displayed in the DriverInformation Center.Side Blind Zone AlertF – While driving, the Side Blind Zone Alert displays a warning symbol on the left or right side mirror when a vehicle is detected in that side blind zone area.The warning symbol flashes if a turn signal is activated when a vehicle has been detected.To turn the system on or off, go to the Configuration menu Vehicle Settings Collision/Detection Systems Side Blind Zone Alert.Rear Cross Traffic AlertF – Warns of traffic coming in either direction behind the vehiclewhen in Reverse by displaying a visual alert on the Rear Vision Camera display and sounding beeps on the side of the detected vehicle.To turn the system on or off, go to the Configuration menu Vehicle Settings Collision/Detection Systems Rear Cross Traffic Alert.Rear Parking Assist – When the vehicle is in Reverse, detected objects are indicated byaudible beeps. The interval between beeps becomes shorter as the vehicle gets closer toan object. The system only operates at speeds less than 5 mph.To turn the system on or off, go to the Configuration menu Vehicle Settings Collision/Detection Systems Park Assist.See Driving and Operating in your Owner Manual.16F Optional equipment
Cruise ControlAdjusting Cruise ControlRES Resume/AccelerateRotate the thumbwheel up to resume aset speed.When the system is active, rotate thethumbwheel up to increase speed.Setting Cruise Control1. Press theON/OFF button. TheCruise Control symbol will illuminate inwhite in the instrument cluster.2. When traveling at the desired speed,rotate the SET– thumbwheel downto set the speed. Thesymbol willilluminate in green in the instrumentcluster.SET– Set/CoastWhen the system is active, rotate thethumbwheel down to decrease speed.CANCELPress to cancel the cruise controlbut retain the set speed in memory.The cruise control set speed is erasedwhen cruise control or the vehicle ignitionis turned off.See Driving and Operating in your Owner Manual.Automatic Transmission FeaturesFuel Economy (eco) ModeThe Fuel Economy (eco) mode (on4-cylinder models only) can improve thevehicle’s fuel economy by changing thetransmission shift points, adjusting climatecontrol operation and making sev eral otherfuel-saving adjustments. When eco modeis engaged, transmission shifts may bemore noticeable and more noise and vibration at idle may be experienced.Press the eco button by the shift leverto turn the eco mode on or off. The ecolight will illuminate on the instrumentcluster when active.Electronic Range Select (ERS) ModeThe Electronic Range Select mode allowsthe driver to manually select the range ofgear positions. This feature can be usedto limit the top gear while towing or todownshift when driving on a downhillgrade to provide engine braking. ERS is notdesigned to provide sportier performanceor to be used to shift gears similar to amanual transmission.Move the shift lever to the Manual (M)position.Press the /– button on the shift leverto increase/decrease the gear rangeavailable. All gears below the selectedgear will be available to use.If vehicle speed is too high or too low forthe requested gear, the shift will not occur.See Driving and Operating in your Owner Manual.17
StabiliTrak /Traction Control SystemsThe traction control system limits wheelspin and the StabiliTrak stability control systemassists with directional control of the vehicle in difficult driving conditions. Both systemsturn on automatically every time the vehicle is started.Traction control should be turned off if thevehicle is stuck and rocking the vehicle isrequired.Press the StabiliTrak/TractionControl button. The Traction ControlOff light will illuminate in the instrument cluster. Press the button again toturn on the system.See Driving and Operating in your Owner Manual.Accessory Power OutletsThere are four accessory power outlets in the vehicle — located below the audio system,inside the center console, on the rear of the center console, and in the rear cargo area. Allof the outlets except the rear cargo area outlet are not powered when the vehicle is off toavoid draining the battery. Always unplug electrical equipment when not in use.See Instruments and Controls in your Owner Manual.Passenger Presence SystemThe passenger’s frontal airbag On indicator located on the overhead console may illuminateif an object, such as a handbag, briefcase, notebook computer or other electronic device,is on the unoccupied front seat. If this is not desired, remove the object from the seat.See Seats and Restraints in your Owner Manual.Parking BrakeTo set the parking brake, hold down the regular brake pedal; then push down the arking brake pedal.pTo release the parking brake, hold down the regular brake pedal; then push down theparking brake pedal until you feel the pedal release.See Driving and Operating in your Owner Manual.18
Wind NoiseIf a rear window is open, there may be a buffeting wind noise inside the vehicle. Opening afront window slightly when a rear window is open will prevent this noise from occurring.See Keys, Doors and Windows in your Owner Manual.Roof Rack Cross RailsFThe roof rack cross rails can be secured in four positions along the roof rack side rails.When adjusting the cross rails, slide each cross rail slightly back and forth until the lockpins fully engage the holes. An audible click will be heard.To help reduce wind noise when not in use, move the front cross rail to the forwardmost position and the rear cross rail to the rearwardmost position.See Storage in your Owner Manual.Tire Pressure MonitorTheLow Tire Pressure warning light on the instrument cluster illuminates when oneor more of the vehicle’s tires is significantly underinflated. Fill the tires to the proper tirepressures as listed on the Tire and Loading Information label, located below the driver’sdoor latch. Current tire pressures can be viewed in the Driver Information Center.Tire pressure is affected by cold weather and distance driven. If the low tire pressure warning light illuminates when the vehicle is first started in cooler temperatures andthen turns off as the vehicle is driven, check for the proper tire pressures.Refer to your Owner Manual for additional information about normal monthly tire maintenance.See Vehicle Care in your Owner Manual.Engine Oil Life SystemThe Oil Life System calculates engine oil life based on vehicle use and displays ChangeEngine Oil Soon on the Driver Information Center when it’s necessary to change theengine oil and filter. The Oil Life System should be reset to 100% only following anoil change.See Vehicle Care in your Owner Manual.Refueling the VehicleTo open the fuel door, press the dimple in the center of the rear edge of the door. Thefuel door will pop out. Pull the door open.When tightening the fuel cap after refueling, turn it clockwise until it clicks. If the cap isnot properly installed, the Check Engine light will illuminate on the instrument cluster.See Driving and Operating in your Owner Manual.F Optional equipment19
Roadside Assistance1-800-CHEV-USATTY Users: 1-888-889-2438(1-800-243-8872)As the owner of a new Chevrolet, your vehicle is automatically enrolled in the ChevroletRoadside Assistance program for 5 years/60,000 miles, whichever occurs first, at noexpense to you. Chevrolet’s Roadside Assistance toll-free number is staffed by a team oftrained advisors who are available 24 hours a day, 365 days a year, to provide minor repairinformation or make arrangements to tow your vehicle to the nearest Chevrolet dealer.Roadside Assistance and OnStarIf you have a current OnStar subscription, press the OnStar button and the vehicle willsend your current GPS location to an OnStar Advisor who will speak to you, assess yourproblem, contact Roadside Assistance and relay your exact location so you will get thehelp you need.myChevrolet and OnStar Mobile AppsThe myChevrolet and OnStar mobile apps connect owners to a varietyof vehicle information and services, such as a searchable OwnerManual, real-time fuel information and Roadside Assistance, as well asenabling users to perform Remote Keyless Entry transmitter commands,including locking and unlocking the doors and starting the vehicle.An active OnStar account is required to use the OnStar mobile app.Visit onstar.com for more information. Download the mobile apps from your compatibledevice’s app store.Chevrolet Owner CenterThe Chevrolet Owner Center, a complimentary service for Chevrolet owners, is a one-stopresource designed to enhance your Chevrolet ownership experience. Exclusive memberbenefits include online service reminders, vehicle maintenance tips, online owner manualand special privileges. Sign up today at my.chevrolet.com.We recommend always using ACDelco or genuine GM service parts.Certain restrictions, precautions and safety procedures apply to your vehicle. Please read your Owner Manualfor complete instructions. All information contained herein is based on the latest information available at thetime of printing and is subject to change without notice. Copyright 2015 General Motors. All rights reserved.!23170179!2023170179 B
1. Adjust the driver's seat and power outside mirrors to the desired position. 2. Press and hold the MEM button and button 1 on the outboard side of the driver's seat until a beep sounds. 3. Repeat these steps using button 2 for a second driver. Recall Memory Positions Press and hold button 1 or 2 until the memory position is reached.