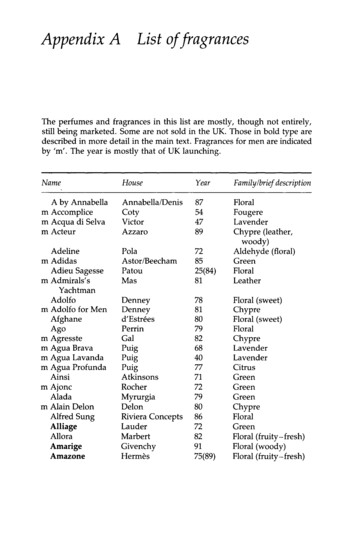
Transcription
A floral centerpiece can set the mood of a room or an event and also give insight into the personality of the host. Floral paintings can do much the same thing. They can also give one alook at the personality and attitude of the artist.
The “Wet on Wet” painting technique and “Masking Fluid” will beutilized for this painting, so I recommend the use of 300# paper.(Note: NEVER APPLY MASKINGFLUID TO DAMP PAPER. IT WILLBECOME ALMOST IMPOSSIBLE TOREMOVE.)Step 1: After lightly sketching the subject onto the paper, apply maskingfluid to the flowers, including theleaves and stems. This will save thewhite areas that will be needed later.Allow the masking fluid to dry completely. (DO NOT USE YOUR GOOD BRUSHES TO APPLY MASKING FLUID).Step 2: (To achieve the desired results, step 2 must be completed whilethe paper is wet.) When the maskingfluid is completely dry, wet the entirepaper and begin laying in areas ofstrong color. Make the areas closestto the flowers the strongest and letthe colors get lighter as you work tothe edge of the paper. DO NOT COMPLETELY MIX THE COLORS ONYOUR PALETTE. Let the colors flowtogether on the paper. In this demonstration, I used Alizarin Crimson, Ultramarine Blue, a touch of Cadmium Redand Hookers Green. However, thereare many pleasing color combinationsthat will work with this painting technique. Experiment and have fun! Work quickly to make surethat the paper remains wet and allow the colors to blend together.Once you are satisfied, with your color arrangement, quickly moveon to the next step.Step 3: While the paper is still wet, crumple a piece of white giftwrapping tissue a that is large enough to cover the entire paintingand place it onto the wet surface. Evenly press it firmly onto thepainting using the ends of your fingers (DO NOT RUB IT). At thispoint, LEAVE THE TISSUE ALONE and let the painting continueto dry. Watch the painting closely so the tissue can be removedBEFORE the surface is completely dry. (IF THE PAINTINGDRIES COMPLETELY BEFORE THE TISSUE IS REMOVED, ITWILL NOT BE POSSIBLE TO REMOVE IT). When the tissue isremoved, allow the painting to dry completely.
Step 4: Once the painting is dry, take a few minutes to determine which parts of the textured areas, that have been createdby the tissue paper, are going to be depicted as foliage. Isometimes use a pencil to define these areas to save confusion later. These are only guide lines and will likely change aswork on the background progresses. Using “Negative painting”techniques, and darker values of the same color mixtures thatyou previously used, begin to emphasize the leaf arrangementthat will become the background for the flowers. Continue todo this until the composition is pleasing to you, and again letthe painting dry completely. Do not be concerned aboutcompleting the background at this point, as it will be further defined and enhanced in the final stages of the painting.Step 5: Once the painting isagain completely dry, mix a thinwash of one of the dark colorsused previously (in this example,I used Alizarin Crimson) andlightly brush it over the entirepainting and immediately blot itoff with a soft paper towel. Allowthe wash to remain a bit strongerin the center area of the painting.This will promote unity in thecomposition and prevent background from appearing “toobusy”. Again let it dry completely.Things to Remember when usingMasking Fluid: DO NOT USE YOUR GOOD BRUSHESCLEAN YOUR BRUSHES OFTEN WITH SOAPDO NOT USE THE SAME “PAINTING WATER”TO CLEAN YOUR BRUSHESDO NOT PUT MASKING FLUID ON WET PAPERDO NOT GET IT ON YOUR GOOD CLOTHES
Step 6: After the painting is dry, carefullyremove the masking film and lightly restatethe guidelines in the petals and centers ofthe daisies. Then, using mixtures of thesame colors used in the backgroundwashes, cleanup the rough edges of theflowers, leaves and stems. Use clear waterto blend the touched up areas into thebackground.Step 7: Introduce pale yellow into the centers of the flowers and a light green mixture to the leaves andstems. Continue to define the flower centers and stems.Using a thin mixture of pale cobalt blue, begin to define thepetals of the daisies and continue to emphasize the centers. Add a bit of reddish color to the flower centers toshow the texture and contours. Using a thin dark wash,brush over the leaves and stems to subdue them, beingcareful not to wash them out too much. Continue to redefine all areas of the painting using “Negative painting” techniques. Take your time doing this step and keep an eye onthe development of the overall composition.Step 8: Continue to add details until you are please withthe painting. (DO NOT OVER DO IT). Finally, sign yourname, sit back and enjoy your accomplishments.
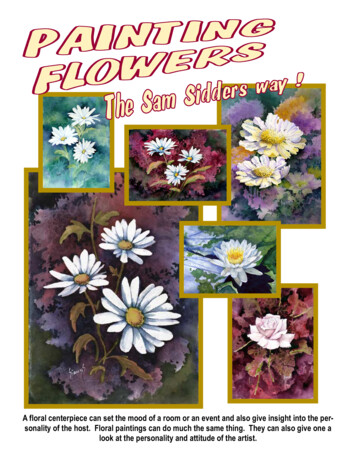
These are just a few reference photos for painting flowers. These photos werefound by doing an image search on the internet. Many more are available online.
Watercolor paper :COLD PRESS 300#, handmade paper such as Arches or Saunders-WaterfordI highly recommend the use of 300 # paper to eliminate the need for stretchingPaint: I recommend tubes of the following 10 colors that I use regularly:Raw Umber, Alizarin Crimson, Burnt Sienna, Raw Sienna, Yellow Ochre, Thalo Green (PhthaloGreen), Ultramarine Blue, Cobalt Blue, Cadmium Red Lt., Cadmium Yellow Light.Other watercolor paints that you may wish to add:Cadmium Orange, Burnt Umber, Sap Green, Indigo, Cerulean Blue, Sepia, Hookers Green., Payne’sGray, Davies Gray, Lemon Yellow, New Gamboage and a small tube or bottle of white watercolor orGouache.Brushes:I personally feel that the quality of brushes used in watercolor painting is a large factor in the qualityof the completed painting and I suggest that you do NOT purchase the absolute cheapest brushes thatyou can buy,#8 Pointed Round , #6 Pointed Round, #2 Pointed Round, #0 Pointed Round,#1 or #2 Rigger (Script Liner), ¾” or 1” Flat Wash brush (these brushes should be of the “Soft” hairtype)1 ½” to 2” Hake Flat (for wetting the paper and can be of the house painting variety)Other Items that are used regularly:Eraser (Vinyl), Paper Towels, Pencil (2B), Spray Bottle, white watercolor palette with mixing area,Liquid Frisket (Masking fluid - I prefer “Masque Pen“ or “Incredible White Mask”), Masking Tape(¾” or 1”), Razor Blade (Single Edge), Water container, Liquid Detergent,Table salt, Natural sponge, Small hair dryer, Frisket remover, Old or very inexpensive small artistbrushes for use with FrisketEmail: seent@pldi.net or SamSidders@yahoo.comPersonal website: www.SamSidders.comOther sites: iles/sam-sidders
The "Wet on Wet" painting tech-nique and "Masking Fluid" will be utilized for this painting, so I recom-mend the use of 300# paper. (Note: NEVER APPLY MASKING FLUID TO DAMP PAPER. IT WILL BECOME ALMOST IMPOSSIBLE TO REMOVE.) Step 1: After lightly sketching the sub-ject onto the paper, apply masking fluid to the flowers, including the