Transcription
Pioneering Merit BadgeVersion 4 August 2020
Index1.2.3.4.5.6.7.Merit Badge RequirementsMerit Badge IntroHazardsFirst AidGearWaterFood8. Navigation9. Leave No Trace10.Preparation11.Getting Out There12.Final Thoughts13.Resources14.Instructor’s Corner
3Copyright NoticeThis presentation is protected by US and International copyright laws.Reproduction and distribution of this presentation without writtenpermission of the sponsor is prohibited. 2021
4Copyright NoticeDo NOT post or upload copies of thispresentation on the WEB!
5Terms and Conditions of UseThis slide set was designed to aid Merit Badge Counselors to deliver aMerit Badge course and to aid Scouts in completion of a Merit Badge.Scouts, Merit Badge Counselors and other Scouters are free us use thismaterial for teaching and learning Merit Badge requirements. Use ofmaterial in other scout related classes is also acceptable.You may modify (add, delete, change) the slides for your ownpersonalized use.Do not post original or modified versions of these slides on the internet.Questions? Contact the owner.
Merit BadgeRequirements
8RequirementsRequirements Merit Badge requirements are taken from:2019 Scouts BSA Requirements Book
9RequirementsRequirements1. Do the following:a. Explain to your counselor the most likely hazards you might encounter while participating in pioneeringactivities and what you should do to anticipate, help prevent, mitigate, and respond to these hazards.b. Discuss the prevention of, and first aid treatment for, injuries and conditions that could occur while workingon pioneering projects, including rope splinters, rope burns, cuts, scratches, insect bites and stings,hypothermia, dehydration, heat exhaustion, heatstroke, sunburn, and falls.2. Do the following:a. Demonstrate the basic and West Country methods of whipping a rope. Fuse the ends of a rope.b. Demonstrate how to tie the following knots: clove hitch, butterfly knot, roundturn with two half hitches,rolling hitch, water knot, carrick bend, sheepshank, and sheet bend.c. Demonstrate and explain when to use the following lashings: square, diagonal, round, shear, tripod, andfloor lashing.3. Explain why it is useful to be able to throw a rope, then demonstrate how to coil and throw a 40-foot length of1/4- or 3/8-inch rope. Explain how to improve your throwing distance by adding weight to the end of your rope.
10RequirementsRequirements4. Explain the differences between synthetic ropes and natural-fiber ropes. Discuss which types of rope aresuitable for pioneering work and why. Include the following in your discussion: breaking strength, safe workingloads, and the care and storage of rope.5. Explain the uses for the back splice, eye splice, and short splice. Using 1/4- or 3/8-inch three-stranded rope,demonstrate how to form each splice.6. Using a rope-making device or machine, make a rope at least 6 feet long consisting of three strands, each havingthree yarns. Whip the ends.7. Explain the importance of effectively anchoring a pioneering project. Describe to your counselor the 1-1-1anchoring system and the log-and-stake anchoring methods.
11RequirementsRequirements8. With the approval of your counselor, demonstrate and use a rope tackle. Be sure the rope tackle is securedproperly. Explain the advantages and limitations of using a rope tackle. Describe the potential damage thatfriction can do to a rope.All pioneering projects constructed for this merit badge must comply with height standards as outlined in theGuide to Safe Scouting.9. By yourself, build a trestle using square and diagonal lashings. Explain why trestles are used when constructingpioneering projects.
12RequirementsRequirements10. With the approval of your counselor and using appropriate lashings and pioneering techniques, build and useone full-size pioneering project from either group A or group B. Your project must comply with the requirementsof the Guide to Safe Scouting. (Requirement 10 may be done at summer camp, at district or council events, oron a troop camp outing.)a. Tower OR bridgeAnchor your project as appropriate and necessary. Explain how your anchoring system works.Group A projects may be worked on in a group and with others.b. Camp chair OR camp tableGroup B projects must be worked on individually.
Merit BadgeIntro
14Merit Badge IntroInstructor Introduction
15Merit Badge IntroNeeded for Course Merit Badge Blue Card filled out and signed by your Scoutmastero or other virtual agreement Merit Badge Pamphlet Scout Uniform A positive Scouting focus and attitude
16Merit Badge IntroVirtual Meetings Use your REAL Name and Troop Number if you want creditThis is how we take attendance MUTE yourself unless speaking to the group Please turn your video on so we can see you No Chat SPAMMING If you need to go pee, go If something isn’t working, please let us know!
17Merit Badge IntroVirtual Meetings We can’t do ALL the requirements virtually Option 1 – Partial Completion Option 2 – Completion – need proof Please send completed homeworkAFTER the final class Tell us who we should CC about completion
18Merit Badge IntroCourse Overview We will cover most of the requirements for this Merit Badge in class We need proof that you completed these requirementso Please turn in a completed Workbook if possibleThis makes is easier on the counseloro If you can’t complete a Workbook, pleasecontact your councilor for alternatives
19Merit Badge IntroWhat is Pioneering?Pioneering is the knowledge and skill of how to use simple materials tobuild structures for a wide range of Scouting activitiesIt is a big part of bushcraft and has been a core of skill in scoutingIt can also be a huge amount of FUN!
20Merit Badge IntroWhat is Pioneering?“Pioneering is practical and character building:the two essential ingredients of any program material for Scouts.”(Lord Baden-Powell)
21Merit Badge IntroWhat is Pioneering?“Pioneering develops initiative and resourcefulness.Additionally it gives practice in team work and discipline.”(Lord Baden-Powell)
22Merit Badge IntroWhat is Pioneering?The hope is that you will learn these skills and share them with your unitsShow others how much FUN pioneering can be!
Hazards
24HazardsRequirement 1a – HazardsExplain to your counselor the most likely hazards you might encounterwhile participating in pioneering activities and what you should do toanticipate, help prevent, mitigate, and respond to these hazards.
25HazardsHazards EnvironmentalInjuriesFloraFaunaPioneering Specific
39HazardsHazards – Pioneering Building a scale model of a pioneering project involves few risks Constructing full-sized towers and bridges carries some risko Fallso Falling objectso Crush injurieso Traction injuries
40HazardsHazards – Pioneering Safety Guidelines Wear gloves to protect your hands Do pioneering work only when it is nice outsideo Wet conditions make ropes and spars slippery
41HazardsHazards – Pioneering Safety Guidelines Improperly sized or damaged rope can break, resulting in injury Use appropriate ropes and materialso Good conditiono Properly sized for task Coil and store ropes when they are not in use
42HazardsHazards – Pioneering Safety Guidelines Improper lifting and pulling can result in injury Practice good body mechanics when lifting and haulingo Lift no more weight than you can handle safely Avoid wrapping rope around arm/waist when dragging or lifting a load
43HazardsHazards – Pioneering Safety Guidelines Tripping over or getting tangled in rope is dangerous Use flagging tape to marko Anchor lineso Ropes stretched between treeso Hanging loops of ropeo Cords or ropes that could trip or entangle someone
44HazardsHazards – Pioneering Safety Guidelines A tensioned rope may snap back if it breaks, a knot comes loose, or ananchor gives way Stand clear of any weight suspended by a rope Stay off to the side of a rope that is tensioned (under strain from a load).
First Aid
46First AidRequirement 1b – First AidDiscuss the prevention of, and first aid treatment for, injuries andconditions that could occur while working on pioneering projects,including:Rope splintersRope burnsCutsScratchesInsect bites and stingsHypothermiaDehydrationHeat exhaustionHeatstrokeSunburnFalls
47Minor Wounds and InjuriesSimple Cuts and Scrapes (Abrasions) Cut – outer layers of skin is torn or laceratedo May bleed a loto Risk of infectiono Commonly associated with scout knifeImage Source: U.S. Army Medical Department Center and School Fort Sam Houston, TX 78234-6100 Wound Care Subcourse MD05762019 First-Aid Merit Badge Pamphlet Page 34-35
48Minor Wounds and InjuriesSimple Cuts and Scrapes (Abrasions) Abrasion – outer layers of skin rubbed or scraped offo Such as Rope Burn Bicyclist falls on pavemento Risk of infectionImage Source: U.S. Army Medical Department Center and School Fort Sam Houston, TX 78234-6100 Wound Care Subcourse MD05762019 First-Aid Merit Badge Pamphlet Page 34-35
49Minor Wounds and InjuriesSimple Cuts and Scrapes (Abrasions) Prevention (cuts and abrasions)o Dress appropriately for activityo Jeans, boots, gloves, long sleeved shirtso Knife safetyImage Source: U.S. Army Medical Department Center and School Fort Sam Houston, TX 78234-6100 Wound Care Subcourse MD05762019 First-Aid Merit Badge Pamphlet Page 36
50Minor Wounds and InjuriesSimple Cuts and Scrapes (Abrasions) First-Aid (cuts and abrasions)o Flush with water for at least 5 minuteso Scrub gently if neededo Apply antibiotic ointmento Cover with dry, sterile dressingor adhesive bandageImage Source: U.S. Army Medical Department Center and School Fort Sam Houston, TX 78234-6100 Wound Care Subcourse MD05762019 First-Aid Merit Badge Pamphlet Page 36
51Minor Wounds and InjuriesRope Splinters Splinter – Fiber embedded in/under skino Hurtso Risk of infectionImage Source: U.S. Army Medical Department Center and School Fort Sam Houston, TX 78234-6100 Wound Care Subcourse MD05762019 First-Aid Merit Badge Pamphlet Page 34-35
52Minor Wounds and InjuriesRope Splinters Preventiono Wear GlovesImage Source: U.S. Army Medical Department Center and School Fort Sam Houston, TX 78234-6100 Wound Care Subcourse MD05762019 First-Aid Merit Badge Pamphlet Page 34-35
53Minor Wounds and InjuriesRope Splinters Treatment – Remove Fibero Use Tweezers or Duct Tapeo Wash area with soap and waterRequirement 12, 1 (2nd-6; T-4a and T-4b)Image Source: U.S. Army Medical Department Center and School Fort Sam Houston, TX 78234-6100 Wound Care Subcourse MD05762019 First-Aid Merit Badge Pamphlet Page 34-35
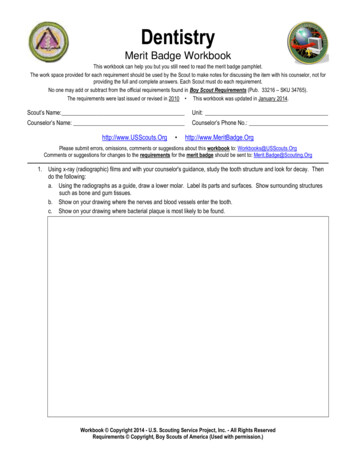
54Cold Weather InjuriesBody Temperature102 F The human body operates best around 98.6 F101 FHeat Stroke100 F If body loses heat faster than it can generate it,it will fail to function99 F98 F If body overheats and is unable to cool itself,it will fail to functionaHypothermia97 F96 F95 F94 F2019 First-Aid Merit Badge Pamphlet Page 51-55
55Cold Weather InjuriesHypothermia102 F Occurs when body loses heat faster than it can generate it101 F100 F Danger if inadequately dressed for cold environment99 F98 FaHypothermia97 F96 F95 F94 F2019 First-Aid Merit Badge Pamphlet Page 51
56Cold Weather InjuriesHypothermia Danger compounded by:o Raino Windo Hungero Exhaustiono Dehydration Being wet and cold is a dangerous combination102 F101 F100 F99 F98 FaHypothermia97 F96 F95 F94 F2019 First-Aid Merit Badge Pamphlet Page 51
57Cold Weather InjuriesHypothermia – Symptoms NumbnessFatigueIrritabilitySlurred speechUncontrollable shiveringPoor judgement or decision making2019 First-Aid Merit Badge Pamphlet Page 51
58Cold Weather InjuriesHypothermia – First-Aid Get the victim’s body warm again!o Move to building or tent Remove wet clothing Dry off Warm dry clothes and/or blanketso Warm, sweet liquids if consciouso Warm water in water bottles, wrapped in towel and place in armpitso Observe NEVER Immerse in Warm/Hot Water – this can be lethal!2019 First-Aid Merit Badge Pamphlet Page 51-52
59Cold Weather InjuriesFrostbite Frostbite is when skin and tissues freeze and form ice crystals Exposed areas at high risk:o Earso Noseo Cheekso Fingers and handso Toes and feet2019 First-Aid Merit Badge Pamphlet Page 51-52
60Cold Weather InjuriesFrostbite With continuous exposure, frostbite can freeze deeper tissue This causes significant damage and cuts off blood circulationo Can lead to: Tissue death Gangrene2019 First-Aid Merit Badge Pamphlet Page 51-52
61Cold Weather InjuriesFrostbite – Symptoms Victim may Feel:o Pain then numbness in effected body parto May not notice anything2019 First-Aid Merit Badge Pamphlet Page 52
62Cold Weather InjuriesFrostbite – Symptoms May See:o Grayish-white patches on skino Blisters or dark skin suggest severe stages of frostbite2019 First-Aid Merit Badge Pamphlet Page 52
63Cold Weather InjuriesFrostbite – First-Aid Best treatment is to AVOID Getting It – it is generally preventable If you suspect frostbite:o Remove wet clothingo Wrap injured area in dry blanketo Get victim to medical care as soon as possible2019 First-Aid Merit Badge Pamphlet Page 53
64Cold Weather InjuriesFrostbite – First-Aido Rewarming is an option Do NOT rewarm if there is risk of refreeze! This is BAD! Place affected area in warm (100-105 F) water Allow affected area to regain color and warmth Dry off and bandage looselywith dry dressing between digits2019 First-Aid Merit Badge Pamphlet Page 53
65Cold Weather InjuriesDehydration The body is made up of 70% waterProper hydration is required for basic body functionsDehydration increases the risk of both cold and heat injuriesCold and heat both increase the risk of Dehydration2019 First-Aid Merit Badge Pamphlet Page 53
66Cold Weather InjuriesDehydration Water is lost via:o Breathingo Sweatingo Digestiono Urination2019 First-Aid Merit Badge Pamphlet Page 53
67Cold Weather InjuriesDehydration – Symptoms Signals of Mild dehydrationo Fatigueo Increased thirsto Dry lipso Dark yellow urine2019 First-Aid Merit Badge Pamphlet Page 53
68Cold Weather InjuriesDehydration – Symptoms Signals of Moderate and Severe dehydrationo Dry mouth with little salivao Muscle crampso Dry skino Loss of appetiteo Weaknesso Decreased sweatingo Dizzinesso Decreased urine productiono Confusiono Less frequent urineo Nauseao Dark brown urineo Fainting2019 First-Aid Merit Badge Pamphlet Page 53
69Cold Weather InjuriesDehydration – First-Aid For Mild Dehydration:o Drink plenty of water or sports drinks Drink 1-2 quart/liters over 2-4 hourso Rest for 24 hours and continue to hydrateo Avoid excessive physical activityo May take 36 hours to replace lost fluids2019 First-Aid Merit Badge Pamphlet Page 53
70Cold Weather InjuriesDehydration – First-Aid Moderate/Severe dehydration requires Emergency Careo Needs to be treated in hospitalo Needs IV fluids2019 First-Aid Merit Badge Pamphlet Page 53
71Cold & Heat Conditions & InjuriesHeat Exhaustion Brought on by warm weather Often associated with dehydration orinadequate acclimation to heat Common during outdoor activitiesin hot environments2019 First-Aid Merit Badge Pamphlet Page 53
72Cold & Heat Conditions & InjuriesHeat Exhaustion – Symptoms Symptoms of Heat Exhaustion include:o Severe lack of energyo General weaknesso Headacheo Nauseao Faintnesso Sweatingo Cool, pale, moist skino Rapid pulse2019 First-Aid Merit Badge Pamphlet Page 53
73Cold & Heat Conditions & InjuriesHeat Exhaustion – First-Aid First-Aid includes:o Get victim in Shadeo Encourage to drink fluidso Apply cool, wet towels or cloths to the skino Wet victim’s clothing with cool water and fano Raising legs can help them feel better Victim should feel better in two or three hourso Take it easy the rest of the day2019 First-Aid Merit Badge Pamphlet Page 54
74Cold & Heat Conditions & InjuriesHeat Stroke Body overheats to the point of beinglife-threatening (105 F)102 F101 FHeat Stroke100 F99 F Body loses ability to cool itself98 F May occur with over-exertion in hot weather Also occurs with elderly in hot climatesa97 F96 F95 F94 F2019 First-Aid Merit Badge Pamphlet Page 54
75Cold & Heat Conditions & InjuriesHeat Stroke - Symptoms? Symptoms include:o Hot sweaty (but sometimes dry) skino Confusiono Disorientationo Rapid pulseo Shallow breathingo Vomitingo Seizures2019 First-Aid Merit Badge Pamphlet Page 55
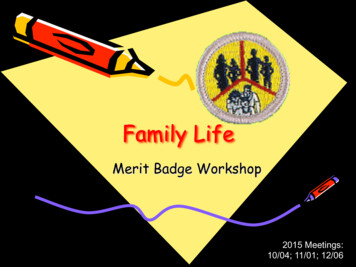
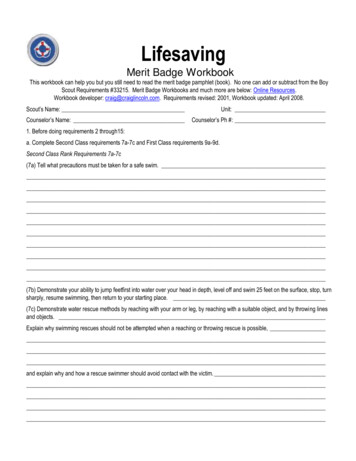
Irritability, Ataxia (balance problems), orConfusion are hallmark signs of Heat Stroke76Heat InjuriesHeat ExhaustionFaint or dizzyExcessive SweatingCool, pale,clammy skinHeat StrokeThrobbing HeadacheNo SweatingRed, hotdry skinNausea or vomitingNausea or vomitingRapid, weak pulseRapid, strong pulseMuscle crampsMay loseconsciousnessor have seizures 104
77Cold & Heat Conditions & InjuriesHeat Stroke – First-Aid ?This is LIFE-THREATENINGCool immediately!Call 911! Do it NOW!Cooling includes:o Immersion or spray of cold watero Ice packs wrapped in cloth in armpits and skino Fanningo AC2019 First-Aid Merit Badge Pamphlet Page 55
78Heat InjuriesHeat Stroke – First-Aid
79Fast-food forlunch?
80Bites and StingsBites of Ticks Tick bites are irritating and can transmit diseases2019 First-Aid Merit Badge Pamphlet Page 74
81Bites and StingsBites of Ticks Preventiono Wear pants and long-sleeved shirts in tick infested areaso Button up collaro Tuck pants in boots or socks2019 First-Aid Merit Badge Pamphlet Page 74
82Bites and StingsBites of Ticks First-Aido Inspect self dailyo Remove ticks as soon as you find themo Wash wound with soap and watero Seek medical care if you become sick or develop a rash after bite2019 First-Aid Merit Badge Pamphlet Page 74
83Bites and StingsTicks – Removal – Tweezers Use fine-tipped tweezers to grasp the tick close to the skin's surfaceDon’t squeeze bodyPull upward with steady, even pressureDon't twist or jerk the tick orthe mouth-parts may break offTick Image: CDCcdc.gov/ticks/removing a tick
84How aboutbuffet forlunch?
85Bites and StingsBites or Stings of Insects & Things with 4 Legs Bites can itch and irritate Some bug bites include venom which cause other problems2019 First-Aid Merit Badge Pamphlet Page 74-75
90Bites and StingsBites or Stings of Insects & Things with 4 Legs First-Aido Wash area with soap and watero Watch and treat for Anaphylaxis (discussed later)o Avoid scratching bite areao Seek medical attention if:o Become illo Difficulty breathingo Severe pain and swelling2019 First-Aid Merit Badge Pamphlet Page 74-75
91Bites and StingsBites or Stings of Insects - Bees Bees leave a venom sac behind Wasps and hornets can inject venom multiple times All REALLY hurt!2019 First-Aid Merit Badge Pamphlet Page X
93Bites and StingsBites or Stings of Insects - Bees First-Aido If stinger is left behind, brush off with flat-surfaced objecto Wash area with soap and watero Watch and treat for Anaphylaxis (discussed later)o An ice pack is nice2019 First-Aid Merit Badge Pamphlet Page X
94Sun BurnsBurns – Severity – 1st Degree Sunburn Only affects the outer most layer of skin Symptomso Painfulo Reddened skinImage Source: U.S. Army Medical Department Center and School FortSam Houston, TX 78234-6100 Wound Care Subcourse MD05762019 First-Aid Merit Badge Pamphlet Page 56
95Sun BurnsBurns – Severity – 1st Degree Sunburn First-Aido Generally does not requiremedical treatment unless Covers more than 20% body surfaceImage Source: U.S. Army Medical Department Center and School FortSam Houston, TX 78234-6100 Wound Care Subcourse MD05762019 First-Aid Merit Badge Pamphlet Page 56
96Sun BurnsBurns – Severity – 1st Degree Sunburn First-Aido Best Treatment Avoidance and prevention Cover exposed skinImage Source: U.S. Army Medical Department Center and School FortSam Houston, TX 78234-6100 Wound Care Subcourse MD05762019 First-Aid Merit Badge Pamphlet Page 56
97FallsFalls Can result in Fractures and back or head injuries These need to be evaluated in hospitalAAAH !2019 First-Aid Merit Badge Pamphlet Page 41
98FracturesBroken Bones (Fractures) – Splinting It is best to allow medical providers to stabilize and transport someonewith a broken bone to the hospital If trained medical staff is not available and the victim must be moved,you may need to splint the fractureDon’t do this whenmoving a victim2019 First-Aid Merit Badge Pamphlet Page 42
99FracturesBroken Bones (Fractures) – Splinting Goal of splinting is to reduce further damage by reducing movemento Pad well to reduce further injuryo Immobilize the joint above and below the fracture2019 First-Aid Merit Badge Pamphlet Page 42
Rope
101RopeRequirement 2a – Whipping RopeDemonstrate the basic and West Country methods of whipping a rope.Fuse the ends of a rope.
102RopeWhipping – Basic Methods – Whipping and Fusingwww.youtube.com/watch?v FUou5sJqi2Q
103RopeWhipping – West Country Methodwww.youtube.com/watch?v Z8kH6EybMSw
104RopeRequirement 2b – KnotsDemonstrate how to tie the following knots: Clove hitch Butterfly knot Roundturn with two half hitches Rolling hitch Water knot Carrick bend Sheepshank Sheet bend
105RopeKnots – Clove Hitch
106RopeKnots – Clove Hitchwww.youtube.com/watch?v NnD1Ge0HPpY
107RopeKnots – Butterfly Hitch
108RopeKnots – Butterfly Knotwww.youtube.com/watch?v dpV19dQoAUo
109RopeKnots – Roundturn with Two Half Hitches
110RopeKnots – Roundturn with Two Half Hitcheswww.youtube.com/watch?v NERCeTzAMY0
111RopeKnots – Rolling Hitch
112RopeKnots – Rolling Hitchwww.youtube.com/watch?v 8ml134ncxWU
113RopeKnots – Water Knot
114RopeKnots – Water Knotwww.youtube.com/watch?v q8y9-F-B9P0
115RopeKnots – Carrick Bend
116RopeKnots – Carrick Bendwww.youtube.com/watch?v -y4BdECnbg4
117RopeKnots – Sheepshank
118RopeKnots – Sheepshankwww.youtube.com/watch?v q5KWxqQ7JFU
119RopeKnots – Sheet Bend
120RopeKnots – Sheet Bendwww.youtube.com/watch?v X7jv0Hd9F5A
121RopeRequirement 2c – LashingsDemonstrate and explain when to use the following lashings: Square Diagonal Round Shear Tripod Floor lashing
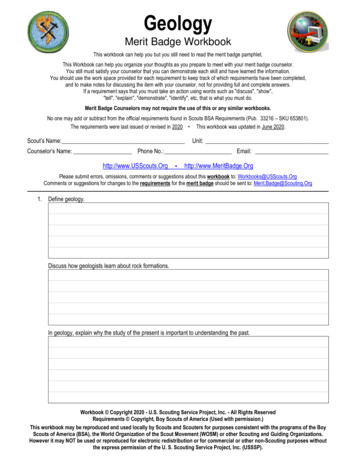
122RopeLashings – Square LashingTwist upfree endWrap 3timesFinish withClove HitchWrapFrapCloveHitchFrapTwice
123RopeLashings – Square Lashingwww.youtube.com/watch?v KYZIaqoCHSQ
124RopeLashings – Diagonal LashingTwist upfree endFinish withClove HitchWrap 3timesWrapCloveHitchWrap 3timesFrapTwice
125RopeLashings – Diagonal Lashingwww.youtube.com/watch?v XqT4pSpUQb4
126RopeLashings – Round LashingCloveHitch
127RopeLashings – Round Lashingwww.youtube.com/watch?v Pf4ZTMS0kp4
128RopeLashings – Sheer LashingWrap aroundboth spars2 FrapsWrapAROUNDsparsCloveHitch
129RopeLashings – Shear Lashingwww.youtube.com/watch?v iwZjTdw9il0
130RopeLashings – Tripod LashingWeave Betweenspars2 FrapsWEAVEBetweensparsCloveHitch
131RopeLashings – Tripod Lashingwww.youtube.com/watch?v 6HJMGr1IqKo
132RopeLashings – Floor LashingStart on Insideof lower sparClove HitchMake LoopHook Loopover end ofupper sparRepeatEnd WithClove Hitch
133RopeLashings – Floor Lashingwww.youtube.com/watch?v GF9fYiKadjI
134RopeRequirement 3 – Throwing RopeExplain why it is useful to be able to throw a rope, then demonstrate howto coil and throw a 40-foot length of 1/4- or 3/8-inch rope.Explain how to improve your throwing distance by adding weight to theend of your rope.
135RopeThrowing Rope – Coiling Coiling the Rope is important to keep rope from tangling As you loop rope over non-throwing hando Make each successive coil smaller than the coil before ito This helps with tanglingHold in NonThrowing ingmeritbadge.org/coiling-and-throwing-rope
136RopeThrowing Rope – Coiling If needed, anchor end of ropeAnchor neeringmeritbadge.org/coiling-and-throwing-rope
137RopeThrowing Rope – Preparing to Throw the Rope Take about 2/3rds of the coiled rope into your throwing hand Release one loop from your non-throwing hando This creates slack between hands Hold nonthrowing hand outo Allows rope to peel off easilyHold inThrowing HandHold in NonThrowing ingmeritbadge.org/coiling-and-throwing-rope
138RopeThrowing Rope – Throwing Swing Throwing arm in an arc a couple of times to get a feel of rope Determine your release point and release rope Released rope will pull rope from non-throwing ingmeritbadge.org/coiling-and-throwing-rope
139RopeThrowing Rope – Throwing Weighting the end of rope will make it easier to throw Place sand in sock or stuff sack and tie to end of ingmeritbadge.org/coiling-and-throwing-rope
140RopeRequirement 4 – Rope MaterialsExplain the differences between synthetic ropes and natural-fiber ropes.Discuss which types of rope are suitable for pioneering work and why.Include the following in your discussion: Breaking strength Safe working loads The care and storage of rope
141RopeRope Materials – Natural Fiber Rope Naturalo Manilao Sisalo Cottono Coir
142RopeRope Materials – Synthetic Rope Generally stronger than natural ropes Rot resistant Some are vulnerable to sunlight
143RopeRope Materials – Synthetic Rope Polyester (usually braided)o UV resistant rope Nylon (twisted or braided)o Stretches but recovers Parachute cord (braided nylon 550lbs breaking strength)o Suitable for small projects Polypropyleneo Slippery and not suitable for knots Polyethyleneo Kinks and not suitable for pioneering projects Kernmantleo Excellent climbing rope
144RopeRope Materials – Strength The working load is usually less than 20% of breaking strengthApproximate SafeWorking Load in Pounds*Approximate BreakingStrength in 2,440Polyethylene4103,7253/8” Rope*For more accurate load and strength ratings – see manufacture’s specs
145RopeRequirement 5 – SplicesExplain the uses for the Back splice Eye splice Short spliceUsing 1/4- or 3/8-inch three-stranded rope, demonstrate how to formeach splice.
146RopeBack splicewww.youtube.com/watch?v HDSZzakW9us
147RopeBack splice – Crown KnotBack Splice startswith a Crown Knot
148RopeEye splicewww.youtube.com/watch?v LQCXq0dVuKw
149RopeShort splicewww.youtube.com/watch?v 6RnaOo4icSI
150RopeRequirement 6 – Making RopeUsing a rope-making device or machine, make a rope at least 6 feet longconsisting of three strands, each having three yarns.Whip the ends.
151RopeMaking Ropewww.youtube.com/watch?v ope
152RopeMaking RopeHookSeparatorPaddleBase pe
Pioneering Projects
154Pioneering ProjectsRequirement 7 – AnchoringExplain the importance of effectively anchoring a pioneering project.Describe to your counselor the 1-1-1 anchoring system and the log-andstake anchoring methods.
155Pioneering ProjectsAnchoringwww.youtube.com/watch?v P0Yz 9Kr7VE
156Pioneering ProjectsRequirement 8 – Rope TackleWith the approval of your counselor, demonstrate and use a rope tackle.Be sure the rope tackle is secured properly.Explain the advantages and limitations of using a rope tackle.Describe the potential damage that friction can do to a rope.All pioneering projects constructed for this merit badge must comply withheight standards as outlined in the Guide to Safe Scouting.
157Pioneering ProjectsRope Tacklewww.youtube.com/watch?v KowvHTu-8SQ
158Pioneering ProjectsRequirement 9 – TrestleBy yourself, build a trestle using square and diagonal lashings.Explain why trestles are used when constructing pioneering projects.
159Pioneering ProjectsTrestle A trestle is the basic componentfor building a variety of bridges It’s used to support the badge.org/the-trestle
160Pioneering ProjectsRequirement 10 - Full-Size Pioneering ProjectWith the approval of your counselor and using appropriate lashings andpioneering techniques, build and use one full-size pioneering project fromeither group A or group B. Your project must comply with therequirements of the Guide to Safe Scouting. (Requirement 10 may be doneat summer camp, at district or council events, or on a troop camp outing.)a. Tower OR bridgeAnchor your project as appropriate and necessary. Explain how youranchoring system works.Group A projects may be worked on in a group and with others.b. Camp chair OR camp tableGroup B projects must be worked on individually.
161Pioneering ProjectsFull-Size Pioneering Project – Group A – Tower 14′ Double Ladder Signal TowerClimbing Towers at the JamboreeThe Hourglass Tower at the JamboreeThe Stilt Tower at the JamboreeThe AT&T Spoof “Signal” Tower at the JamboreeTower Gateway (4 Flag Tower)14' Climbing Tower at Scout Camp
162Pioneering ProjectsFull-Size Pioneering Project – Group A – Bridge Pioneering Bridges and the Saga of the Bridge of Fifteen NationsSingle A-Frame BridgeSingle A-Frame Bridge Pictorial and CommentaryA-Frame Bridges at the JamboreeSingle Lock BridgeSingle Lock Bridge Photos and CommentarySingle Trestle BridgeSingle Trestle Bridge Photos and CommentaryBridge WalkwaysDouble A-Frame Monkey BridgeDouble A-Frame Monkey Bridge DetailsThe Monkey Bridge at the JamboreeDouble Platform Monkey BridgePrestressed Triple Walkway Bridge
163Pioneering ProjectsFull-Size Pioneering Project - Group
It is a big part of bushcraft and has been a core of skill in scouting It can also be a huge amount of FUN! 19. Merit Badge Intro What is Pioneering? 20 . 101 F 102 F 95 F 96 F 97 F 94 F a Hypothermia. Cold Weather Injuries Hypothermia Danger compounded by: o Rain o Wind o Hunger