Transcription
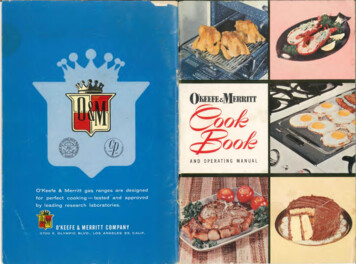
j PRQ AND OPERATINGO'Keefe & Merritt gas ranges are designedFor perfect cooking — tested and approvedby leading research laboratories.KEEFE & MERRITT COMPANY3700E. OLYMPICBLVD., LOSANGELES23, CALIF.MANUAL
munTABLE OF CONTENTSOPERATING SECTIONPAGEHow to light top burner pilots.Location of Safety Valves (Natural orMfg. Gas) (LP Gas).To light or relight oven pilot (Natural Gas)To light or relight oven pilot (LP Gas). .To light or relight high broiler (Naturalor Mfg. Gas and LP Gas).How to use your top burners.How to use the Harper Center simmerburner .For ranges without Harper Center simmerburners .If top burner does not light.How to use griddle.How to use your oven.Your oven control.Operation of the O'Keefe & MerrittAutomatic Oven Signal Light.How to use your broiler.How to remove the grillevator for deepbroiling.Use of the low broiler (below oven).Care of the broiler.Care of porcelain finish .Care of chrome plated surfaces.Care of griddle.Care of top burners and griddle burners. .Care of the oven .Automatic Burner Control (A.B.C.)(How to use) (How to set).Instructions for installing and removingHI-VUE glass and flue deflector.To remove HI-VUE glass .To replace HI-VUE glass .To clean reflector mirror.To clean chrome vent deflector.PAGE1Instructions for removing and replacingoven glass in HI-VUE models.112For easy cleaning under range. 10222333344445566677889999ur new9How to use the automatic oven timer.10Your automatic oven timer.Buzzer timer.To use the timer for fully automaticoperation .After the cooking operation is completed. . .To use the timer for semi-automaticoperation.After the cooking operation is completed.Timed convenience outlet.For semi-automatic operation .1010Your automatic oven timer.Buzzer timer.To use the timer for fully automaticoperation .After the cooking operation is completed .To use the timer for semi-automaticoperation .After the cooking operation is completed. . .Timed convenience outlet .For semi-automatic operation.Electric signal timer.If you have a hand-wound timer.How to use your Temp'N Time Control. .How to level your range.Your oven light bulb.Baking Problems and Solutions.Cake difficulties .Pie difficulties.Cookie and biscuit problems.Bread baking problems.Miscellaneous .Care 616OkIEIEAUTOMATIC GAS RANGEHOW TO LIGHT TOP BURNER PILOTSMost ranges have two top burner pilots located near the burners they ignite. Whenonly one pilot is used it is located in a central point between the (4) four burners.1. If your range has a one piece top, remove griddle and top grates and raisetop from front. A support is provided to hold the top up.2. If you have a two piece top and griddle or three piece top, remove all threepieces.3. Light pilots with a match and replace top parts.PILOT ADJUSTMENT: Your O’Keefe & Merritt range is equipped with “pin-point”pilots for a cooler kitchen. The pilot flame should be about 3/16" high. If the pilotsare set too high, poor ignition and sooting will result. You will find the pilot adjust ment by following the pilot tubing back to a point where it connects to the “Y”fitting or to the manifold or main feed pipe.LOCATION OF SAFETY VALVES (Natural or Mfg. Gas)Depending on the model of your range the red button safety will be located in oneof the following locations:a. Under left and right cook topsb. In storage compartment on ranges with long storage door on left of range.RECIPESPAGEGENERAL COOKING INFORMATION.17Oven Cooking Chart.17General20Information—Hints and Short-cuts.Meat Cookery.28Broiling .36Complete Meals .42Spanish-Mexican Dishes .47LOCATION OF SAFETY VALVES (LP Gas)On LP ranges with high broiler or double oven, the safety valves are located underthe broiler. Gain access by opening storage drawer. The valve on the left is for thebroiler and the one on the right for the oven.TO LIGHT or RELIGHT OVEN PILOT (Natural Gas)1. Open pilot door below oven. Pilot will be found near rear of burner on left sidefacing range.2. With oven control dial in “OFF” position, light pilot, located at rear, withmatch.3. Wait not less than 1 minute and push in firmly on oven safety valve and release.Oven should then be ready to light by turning oven control dial to desiredtemperature.1
TO LIGHT or RELIGHT OVEN PILOT (LP Gas)TO LIGHT or RELIGHT HIGH BROILER (Natural or Mfg. Gas)3. to simmer: After food reaches boiling point, turn the valve handle clockwiseuntil you hear a click. This is the center simmer position on the burner and thissetting provides the correct amount of heat for “simmer cooking” of many foods.4. The ajnount of heat that is,needed to complete cooking after the boiling pointis reached depends on the size and type of the utensil and the kind arid* quantityof food being prepared. You may adjust the size of the flame to maintain anyintermediate cooking heat.1. With the broiler valve in the “OFF” position, light broiler pilot with match.Pilot is at rear of burner.2. Wait not less than 1 minute and then push in on broiler safety valve and release.3. The broiler burner should now be ready to light by turning on the broiler valve.knob.5. KEEP-WARM setting: Harper Center Simmer Burners have the additional fea ture of a keep-warm setting. After cooking has been completed, you may turnthe valve handle on to another “click” setting. Small flames in the center por tion of the burner, supply just enough heat to keep foods at “second serving”temperature. This flame is for keeping foods warm after cooking and should beused only when the burner is heated.TO LIGHT or RELIGHT HIGH BROILER (LP Gas)Caution: Never Light the Top Burners When the Vanishing Shelf Cover is Down1. Remove oven tray and oven bottom.2. Push in firmly on red button on oven safetyHold match over hole at rear of baffle plate which covers oven burner. Keeppressure on recMBWHSBfiSS flMMM 1 minute or until pilot flame iMMlHHB1 With the broiler valve in the “OFF” position, push in firmly on the red buttonof the broiler safety valve and light pilot with match. Pilot is at rear of burner.Keep pressure on red button for at least 1 minute or until pilot flame remains lit.2. The broiler burner should now be ready to light by turning on the broilervalve knob.Pilot Adjustment: Your O'Keefe & Merritt Range is equipped with "pin-point" pilots.Adjust safety pilots to not over 5/16" flame. High yellow flame on pilots will result inpoor ignition and sooting. You will find the pilot adjustment by following the pilottubing up into the range to a point where it connects with the manifold or main feedpipe.FOR RANGES WITHOUT HARPER CENTER SIMMER BURNERSSingle burners have no separate simmer center burners—they are equipped with“high-low” valves. After food reaches boiling point, simply adjust to a low flameposition by changing the size of the visible flame.IF TOP BURNER DOES NOT LIGHTRaise top to see if pilot is lit. If pilot is lit and burner does not light, examineburner to make sure that burner port pointing directly into flash tube is notclogged. Clean port with fine wire or straightened paper clip and replace burner.See “CARE of TOP BURNERS”HOW TO USE YOUR TOP BURNERSALL top burners on your O’Keefe & Merritt gas range light automatically whenthe valve is turned on—and since they are all built to GIANT-BURNER specifi cations they give you fast, full heat for speedy cooking.HOW TO USE THE HARPER CENTER SIMMER BURNERSome of the O’Keefe & Merritt models are equipped with the Harper CenterSimmer Burners. If your range is so equipped, use them according to the followingdirections:Center SimmerHOW TO USE GRIDDLEGeneral Use:—1. Avoid overheating—fats should never reach the smoking point.2. Preheat to cooking temperature by turning flame on low while preparing food(flame height can be determined by looking into the chrome reflector directlyunder the slot at the front of the griddle).3. When griddle heat indicator needle reaches the “bake” position, griddle isready to use.4. Adjust flame to maintain desired temperature. (Low to medium for mostfrying.)5. Have foods at room temperature.6. Use unsalted fat in minimum amounts for frying. (Butter and margarine havelow smoking points and burning or sticking may occur.) When these fats areused for grilling sandwiches, etc., keep the griddle heat a little lower.Full Flame PositionPositionIntermediate PositionKeep Warm Position1. TO start COOKING: Turn burner valve handle counter-clockwise until you hear7. CAUTION: Never allow heat indicator to go into red margin indicating too hot!HOW TO USE YOUR OVENa click. (This is the center flame position and this part of the burner serves asa pilot to the rest of the burner)2. Then turn the valve handle further counter-clockwise to the full flame positionUse this flame to bring most foods to a fast boiling point.The best results in oven cooking depend on accuracy in measurement of theingredients, regulation of the oven temperature and the time.Your oven control will automatically regulate the oven flame and maintainany selected oven temperature.23
YOUR OVEN CONTROLthe floor of the broiler compartment and your range is ready for deep-broiling.FOR RANGES WITH AUTOMATIC LIGHTING: Simply press in andturn dial on desired temperature. Thus, with one simple ‘‘turn of the wrist” youturn the gas and set the oven control to the desired temperature.FOR RANGES WITH NON-AUTOMATIC LIGHTING: On ranges withmatch lighting, hold a lighted match to the lighter tube at the front of the oven(marked: “LIGHT HERE”) and push in on dial and turn to 500 or higher. Assoon as the oven burner has been lighted, turn dial to the temperature required.NOTE: Should you desire to use your oven again after it has been turnedoff only a short time, turn the control dial to a setting higher thanthat of previous one. Then, as soon as the burner lights, reset thedial to the temperature required.PREPARE FOOD WHILE OVEN IS HEATING: Unless the recipe spe cifically directs to the contrary, it is desirable to allow the oven to reach theproper temperature before placing food in it.On certain models the end of the preheat period is indicated by the “OvenReady” signal. On ranges without the signal this can be determined bynoting when the large flame in the oven cuts down to a small flame.To assure the best results from your oven control, minimum flame and pilotadjustments must be made at the time of installation. This cannot be doneat the factory due to variations of gas pressure in different localities. Yourdealer or gas company from whom you purchased your range will makethe proper adjustment.OPERATION OF THE O'KEEFE & MERRITT AUTOMATIC OVENSIGNAL LIGHTSome O’Keefe & Merritt models are equipped with the new automatic “OvenSignal Light” located in the clock housing. One light indicates that the ovenis turned on; two lights indicate that the oven has reached the temperaturefor which it has been set. The red light also serves as a visual reminder toturn off the gas to the oven when the baking is finished.HOW TO USE YOUR BROILERTo replace Grillevator:1. After cleaning the broiler compartment when you have finished broiling, placeGrillevator Drawer unit into the compartment so that the two rollers on thebottom rear of the Grillevator slip into the track on the floor of the broilercompartment.Push the entire unit forward in the track until the retainer knobs on the for ward ends of the rods line up with the openings on the rod-fasteners on thebroiler door. Then insert the knobs into the openings, lift up and push forwardon the rods, and the Grillevator is back into proper position.USE OF THE LOW BROILER (BELOW OVEN)Remove drip pan and arrange food on cold grid. Set oven heat regulator at550 or “B” position. Preheat broiler compartment 5 to 8 minutes if oven hasnot been in use.Turn gas knob handle marked “Broiler” to full “on” position. No preheatingis necessary. Broiler should be closed while broiling.Casserole dishes, roast, fowl and vegetables require low flame. To set lowflame in broiler, turn broiler to full “on” position, open broiler door and observeflame in broiler grid handle which acts as a mirror. The visible flame can thenbe adjusted to suit your need.See “Broiling” in “General Cooking” section of this book.HOW TO REMOVE THE GRILLEVATOR FOR DEEP BROILINGO’Keefe & Merritt models equipped with the waist-high Grillevator can bequickly and easily adapted for deep-broiling simply by removing the Grillevatorunit. Thus, in one simple operation, your range is ready to deep-broil hams, fowlor larger roasts with flame-kissed barbecue effect. To remove the Grillevator,observe the following instructions:CARE OF THE BROILER1. Preheating of the broiler area may be desired for some broiling operations.DO NOT PREHEAT THE BROILER PAN AND GRID.2. As soon as broiling is finished, turn off broiler flame and remove pan and grid.3. After food is removed, sprinkle soiled parts of broiler grid with soap chips andcover with wet dish cloth or paper towel. When cooled, wash as you wouldany other pan.4. Clean interior surfaces of broiler compartment with soap and water. Addhousehold ammonia to soapy water, if desired.1. Grasp the forward ends of the rods on each side of the Grillevator, connectingit with the broiler door.2. Lift up and pull full forward until the rods slide into position where they canbe disengaged from the fastener plate on the broiler door.3. Now, a slight motion of the hands inward (toward the center of the broilerdoor) will free the forward ends of the rods.4. With the rods free, grasp the body of the Grillevator firmly, lift up two or threeinches and pull forward. The Grillevator unit will slide out of the broiler com partment and can be placed aside.5. Remove the broiler drip pan and grill from the Grillevator unit, place them on45
CARE OF PORCELAIN FINISHThe Titanium Porcelain Enamel on your O’Keefe & Merritt Range is essen tially glass fused on metal. It is extremely durable and easy to clean, but it mustbe used with reasonable care to avoid chipping. By following a few simple rulesyou can keep your range looking like new.CARE OF TOP BURNERS AND GRIDDLE BURNERSThe top grates, burner trays and top burners are easily removed for cleaningin a dish pan.1. To remove top burners, remove or raise top and then disengage flash tubes atpilot lighter cup. Grasp rear of burner support until pilot flash tubes are freefrom pilot cup. Push back burner until front is free from valves.2. If desired, the top burners may be washed with soda water solution (a table spoon of soda to a gallon of water). Be sure that no ports are clogged. Drainall water from burners and dry them by placing in 300 oven forhour.3. Top of burners should be cleaned frequently by wiping with a damp cloth. Besure that no ports are clogged to insure good lighting and a clear blue flame.Use a pipe cleaner or straightened paper clip.4. DON’T use toothpicks or match sticks to clean burner openings as theymay break off and clog the port. A razor blade may be used to clean lighting1. Never wash enamel parts while the range is hot —allow porcelain parts to coolto easy-handling temperatures before washing. Sudden changes in tempera ture may cause cracking or chipping.2. Even though the Titanium finish on your range is acid resisting, do not allowfruit juices, milk, vinegar or any other acid food to remain in contact with therange —wipe them off with a warm damp cloth as soon as possible to avoida stain which cannot be removed.3. Do not use harsh, gritty cleaning powders as they will dull the finish in time.CARE OF CHROME PLATED SURFACES1. Do not use harsh abrasives at any time —soap and water does most of thecleaning of chrome surfaces. Stubborn spots may need extra attention; scrub bing with a cut lemon or scouring with baking soda applied with a damp clothusually does the trick.2. Soap and water streaks come off easily — simply dampen a clean paper toweland go over the chrome tops.3. Heat discoloration may occur if top-burner pilots are too high. (See top burnerpilot instructions.) Adjust pilots and clean discolored area with chrome orsilver polish.slots on the center simmer burners.CARE OF THE OVEN1. Clean interior of oven frequently. Use crumpled paper towel to wipe greasespatters from oven while it is still warm. Place a shallow dish of full-strengthhousehold ammonia on oven bottom for a few hours before cleaning oven. Theammonia evaporates and helps to soften soil for easier removal. Use soapywater with a little household ammonia added to wash surfaces.CARE OF GRIDDLE1. While griddle is still warm, wipe off grease and bits of food with crumpledpaper towel. If griddle seems quite soiled, sprinkle soiled area with soap chipsand cover with wet dish cloth or paper towel. Let set for 10 to 15 minutesbefore washing.2. If fruit pies, scalloped potatoes, etc., should boil over onto oven bottom, cleanthoroughly before oven is used again. (When such boil-overs occur, a generoussprinkling of dry table salt will stop the smoking while the cooking continues.3. Use only mild cleaners on porcelain parts. There are oven cleaners which aresold for home use; follow directions carefully.4. If oven racks are chrome finished, clean frequently, especially when foods havecooked over on racks.2. Wash thoroughly with soap and water. Use a slice of lemon if griddle is stained.3. Rinse and dry.65. DON’T use a knife or sharp instrument to scrape spots.7
TO REMOVE HI-VUE GLASSAUTOMATIC BURNER CONTROL (A. B. C.)Some O’Keefe & Merritt ranges are equipped with an A.B.C. Timer. This timermay be used to control the right front top burner for timed cooking operations.In addition, it will serve as a reminder for other household duties when the timedburner is not in use.Pull straight forward on chrome frame and glass will drop out.TO REPLACE HI-VUE GLASSAssemble frame and glass and push this assembly into place so that the studswill lock into the spring clips in the backguard.HOW TO USE ITTO SET1. Press chrome button in centerof timer to release gas to rightfront burner.2. Ignite burner and adjust to de sired heat.3. Turn timer past 10 (to wind)and then set to required cook ing time from 1 to 60 minutes.TO CLEAN REFLECTOR MIRRORRemove Hi-Vue glass as per instructions above and clean mirror with soft cloth.TO CLEAN CHROME VENT DEFLECTORThe chrome vent deflector which is located on the backguard (left side) is easilyremoved for cleaning in the same manner as your Hi-Vue glass. Clean vent withsoap and water, using mild cleaner if necessary, and replace.INSTRUCTIONS FOR REMOVING AND REPLACING OVEN GLASSIN HI-VUE MODELS4. At the end of the set time, bellwill ring and burner will go out.(This is the glass located in top of oven)5. Press chrome button again sothat right front burner may beused in the normal manner.NOTE: Right front burner will not operate unless center button ofA.B.C. Timer is depressed.INSTRUCTIONS FOR INSTALLING AND REMOVING HI-VUEGLASS & FLUE DEFLECTORThe Hi-Vue glass and the vent deflector in your O’Keefe & Merritt Hi-Vue rangehave been designed so that they are easily removed for convenience in cleaningthe range.TO REMOVE GLASS:1. Turn two rear cams to unlock position.2. Place one hand under glass and turn two front cams to unlock position. Be surethat they are turned completely away from glass.3. Slide glass toward rear of range to free front edge and remove.TO REPLACE OVEN GLASS:1. Be sure that all finger prints left on top part of glass are removed beforeinstalling.2. Glass measures 12 inches from front to rear and 11% inches across and mustbe installed in this position.3. Place glass on palm of hand and insert rear edge in back lining underneathfiber glass cord. Push front of glass into place.4. Holding glass firmly in place, turn two front cams until you feel them lock overglass. Turn two rear cams into lock position.89
FOR EASY CLEANING UNDER RANGEThe front base strip of your range is a separate piece of enamel simplyclipped in place. To remove for cleaning under range:1. Grasp base strip with both hands and pull straight forward.2. To replace base strip — Center two locaters in the spring catch on range andwith a cleanched hand rap base strip sharply at back end forcing locaters intoclips. DO NOT hammer with a hard object.CAUTION: Be sure base strip is properly positioned before replacing to avoiddamage to enamel. If clips are too tight open them slightly with ascrew driver.HOW TO USE THE AUTOMATIC OVEN TIMERThe following pages illustrate and explain various clocks. You will readily recog nize which clock is identical to the one in your range.If your O’Keefe & Merritt range is equipped with an Automatic Oven Timer, itwill save you many hours in the kitchen-you can cook while you are away.DON’T forget-Your Automatic Oven Timer is also a dependable kitchen clockand a buzzer timer.Operation of the clock is simple when you study and follow the easy instructions.YOUR AUTOMATIC OVEN TIMER2. Now turn Automatic Cooking Control in opposite direction until the numberof hours you want the food to cook is shown opposite the red arrow “B”. Inthe illustration, 1% hours (cooking hours) are shown.3. Turn inner knob of “SET” control all the way to the right (clockwise) untilthe letter “A” (for Automatic) is straight up. The timer is now set to turn ovenon and off at the time selected. At the start of the cooking period, inner knobof “SET” control will advance automatically until the letter “C” (for “Cook”)is upright. At the end of the cooking period, inner knob of “SET” control willadvance automatically until the letter “O” (for “Off”) is straight up.4. Turn oven Heat Control to desired cooking temperature.AFTER THE COOKING OPERATION IS COMPLETEDA. Turn oven heat control (thermostat) to “OFF”.B. Turn inner knob of “SET” control until letter “M” (for “Manual”) on theknob is straight up. This is important! Unless the letter “M” is straight up, theoven cannot be used for manual operation.TO USE THE TIMER FOR SEMI-AUTOMATIC OPERATIONIf you desire to start cooking immediately and use the timer to stop cooking ata later time, follow instructions in paragraph 1, (“TO USE THE TIMER FORFULLY AUTOMATIC OPERATION”). Now turn inner knob until letter “C”(for “Cook”) on the knob is straight up. (In this setting it makes no differencewhat number of hours is shown at “B”. The timer will shut off the oven at thetime indicated by pointer “A”.) Next follow instruction 4, in using the Timerfor Fully Automatic Operation.AFTER THE COOKING OPERATION IS COMPLETEDA. TURN OVEN HEAT CONTROL (THERMOSTAT) TO “OFF”.B. TURN INNER KNOB UNTIL LETTER “M” (FOR “MANUAL”) ONTHE KNOB IS STRAIGHT UP. THIS IS IMPORTANT. UNLESS THELETTER “M” IS STRAIGHT UP THE OVEN CANNOT BE USED FORMANUAL OPERATION.TIMED CONVENIENCE OUTLETTO SET CLOCK TO CORRECT TIME:Turn outer ring of “SET” control until hands show correct time.BUZZER TIMERThe buzzer timer is a non-automatic time reminder which may be used totime cooking and other household activities up to 60 minutes.TO USE BUZZER TIMER:Certain model ranges have two convenience outlets, one of them marked“timed”. Appliances plugged into this outlet may be controlled automatically.Use it for your electric coffee maker so that your coffee will be ready when youarise. If your electric roaster does not have an automatic clock, plug it into the“timed” outlet on your range and it becomes automatic.HOW TO SET TIMED OUTLET — FOR FULLY AUTOMATIC OPERA TION (Where it is desired for the appliance to be turned “on” and “off” auto matically) follow instructions in paragraphs 1, 2, and 3 in clock instructions for“Fully Automatic Operation”. NOTE: Be sure oven thermostat is in “off”position.When letter “A” is straight up on inner knob of “SET” control, there is noenergy in the convenience outlet. At the start of the cooking period, knob willadvance to “C”. The outlet now becomes energized. When the time reaches the“STOP” pointer “A” on the clock dial, the inner knob will advance automaticallyto the letter “O” for “OFF” and the convenience outlet will no longer beenergized.FOR SEMI-AUTOMATIC OPERATIONTurn Minute Timer Control, center knob, to the left (counterclockwise)until the red hand points to the desired number of minutes on the red dial. (Inthe illustration, the timer is set for 60 minutes.)When the pointer returns to zero the buzzer will sound until shut off. To shutoff buzzer turn the pointer from zero to “OFF”.TO USE THE TIMER FOR FULLY AUTOMATIC OPERATION1. Turn Automatic Cooking Control in either direction until the “Stop At”pointer “A” is opposite the time you wish to stop cooking. In the illustration,the stop cooking time is 6:30 o’clock.10(Where it is desired to turn the appliance “On” manually and have it turned“Off” automatically), follow instructions in paragraph i, of instructions forFully Automatic Operation. Now turn inner knob of “SET” control until letter“C” (for “Cook”) is straight up. (In this setting it makes no difference whatnumber of hours is shown at “B”. The timer will shut off the appliance at thetime indicated by the pointer “A”.) Next turn the appliance “On” or if it is aroaster, turn the heat control on the roaster to desired cooking temperature.IMPORTANT! After using automatic timer, always turn inner knob of “SET”control back to “M” (For manual).11
YOUR AUTOMATIC OVEN TIMER3. Turn inner knob of “SET” control all the way to the right (clockwise) untilthe letter “A” (for “Automatic”) is straight up. The timer is now set to turnoven on and off at the time selected. At the start of the cooking period, innerknob of “SET” control will advance automatically until the letter “C” (for“Cook”) is upright. At the end of the cooking period, inner knob of “SET”control will advance automatically until the letter “O” (for “Off”) is straightup.4. Turn Oven Heat Control to desired cooking temperature.AFTER THE COOKING OPERATION IS COMPLETEDA. TURN OVEN HEAT CONTROL (THERMOSTAT) TO “OFF”.B. TURN INNER KNOB OF “SET” CONTROL UNTIL LETTER “M”(FOR “MANUAL”) ON THE KNOB IS STRAIGHT UP. THIS IS IM PORTANT! UNLESS THE LETTER “M” IS STRAIGHT UP, THEOVEN CANNOT BE USED FOR MANUAL OPERATION.TO USE THE TIMER FOR SEMI-AUTOMATIC OPERATIONMinute Timer HandTO SET CLOCK TO CORRECT TIME—Push in and turn outer ring of “SET” control until hands show correct time.If you desire to start cooking immediately and use the timer to stop cooking at alater time, follow instructions in paragraph 1, (“TO USE THE TIMER FORFULLY AUTOMATIC OPERATION”). Now turn inner knob until letter “C”(for “Cook”) on the knob is straight up. (In this setting it makes no differencewhat number of hours is shown at “B”. The timer will shut off the oven at thetime indicated by pointer “A”). Next follow instruction 4, in using the Timer forFully Automatic Operation.AFTER THE COOKING OPERATION IS COMPLETEDA. TURN OVEN HEAT CONTROL (THERMOSTAT) TO “OFF”.B. TURN INNER KNOB UNTIL LETTER “M” (FOR “MANUAL”) ONTHE KNOB IS STRAIGHT UP. THIS IS IMPORTANT! UNLESS THELETTER “M” IS STRAIGHT UP THE OVEN CANNOT BE USED FORMANUAL OPERATION.TIMED CONVENIENCE OUTLETBUZZER TIMERThe buzzer timer is a non-automatic time reminder which may be used to timecooking and other household activities up to 55 minutes.TO USE BUZZER TIMER:Turn Minute Timer Control, center knob, to the left (counterclockwise) untilthe red hand points to the desired number of minutes on the red dial. (In theillustration, the timer is set for 20 minutes.)When the pointer returns to zero the buzzer will sound until shut off. To shutoff buzzer turn the pointer from zero to “off”.TO USE THE TIMER FOR FULLY AUTOMATIC OPERATION1. Turn outer ring of “SET” control (without pushing in) in either directionuntil the “STOP AT” pointer “A” is opposite the time you wish to stop cook ing. In the illustration, the stop cooking time is 6:30 o’clock.2. Now turn outer ring of “SET” control (without pushing in) in the oppositedirection until the number of hours you want the food to cook is shown op posite the red arrow “B”. In the illustration 1% cooking hours are shown.Certain model ranges have two convenience outlets, one of them marked “timed”.Appliances plugged into this outlet may be controlled automatically. Use it foryour electric coffee maker so that your coffee will be ready when you arise. Ifyour electric roaster does not have an automatic clock, plug it into the “timed”outlet on your range and it becomes automatic.HOW TO SET TIMED OUTLET—FOi? FULLY AUTOMATIC OPERA TION (Where it is desired for the appliance to be turned “on” and “off” auto matically) follow instructions in paragraphs 1, 2, and 3 in clock instructions for“Fully Automatic Operation”. NOTE: Be sure oven thermostat is in “off” posi tion.When letter “A” is straight up on inner knob of “SET” control, there is noenergy in the convenience outlet. At the start of the cooking period, knob willadvance to “C”. The outlet now becomes energized. When the time reaches the“STOP” pointer “A” on the clock dial, the inner knob will advance automaticallyto the letter “O” for “OFF” and the convenience outlet will no longer beenergized.FOR SEMI-AUTOMATIC OPERATION(Where it is desired to turn the appliance “On” manually and have it turned“Off” automatically), follow instructions in paragraph 1, of instructions for“Fully Automatic Operation”. Now turn inner knob of “SET” control until letter“C” (for “Cook”) is straight up. (In this setting it makes no difference what num ber of hours is shown at “B”. The timer will shut off the appliance at the timeindicated by the pointer “A”.) Next turn the appliance “On” or if it is a roaster,turn the heat control on the roaster to desired cooking temperature.IMPORTANT! After using automatic timer, always turn inner knob of “SET”control back to “M” (For “Manual”).Here's a short, simple formula to helpyou remember the correct sequence insetting your automatic clock for con trolled oven cooking:1213
THE FORMULA IS "W-H-A-T"W for When—“When do we eat?” Set this time opposite the“Stop” pointer.H for Hours—“How many h
Cookie and biscuit problems. 16 . . Miscellaneous . 16 . RECIPES . PAGE . GENERAL COOKING INFORMATION. 17 . Oven Cooking Chart. 17 . General Information—Hints and Short-cuts. 20 . Meat Cookery . 28 . Spanish-Mexican Dishes 2. 47 . Care and . mun . ur new . OkIEIE. AUTOMATIC GAS RANGE TO LIGHT TOP BURNER PILOTS. Most ranges have two top .