Transcription
TEACHERSEDITION
Words From the Author24 pt20pt spent my entire life sharing my passion for guitar with others; both as a musician and instructor.I haveFor more than 30 years the Rock House Method has been proven to work. I have personally taughtthousands of students one-on-one, authored more than 40 books and DVDs and produced over 100instructional products coaching guitar greats to teach in their own instructional programs. Now for thefirst time ever, I am sharing all of my knowledge of how I get results for the people who trust and relyon me to deliver a successful learning experience. If you follow my method, I truly believe that yourstudents will enjoy the same level of success that mine have. Your business will become moreprofitable and your students will attain their dream of playing guitar. I have designed and carefullydesigned this curriculum to help you effectively utilize my learning system, a modern method based ontoday’s guitar player’s needs. Whether you are a seasoned instructor like me or someone who is justthinking about starting an instructional business, you will be able to effectively teach each lesson toyour students. Below are the sections that will correspond with each lesson.Lesson Quick Tips – These are great to review before each lesson to insure the important topics arecovered in the lesson. There are many new and creative ideas on ways to present each lesson.Teacher Notes – Features full descriptions of how to present each lesson. If you are new to teaching,it will give you a blueprint to effectively teach each lesson. For experienced teachers, this is a goodreview to help spark new ideas.Teacher Play Along – One of the most effective ways to help students learn is to play along with them.I have included examples that will allow you to easily interact with each student. This interaction alsobenefits the student by preparing them to play with other musicians.Music Assignment – The Rock House Method is based upon a system of applied learning. Theseassignments will give your student the opportunity to apply what you have taught them in a musicalmanner.As a teacher you have the gift of showing people how to be creative and speak the language of music.Be mindful you are running a business, so it is important for the continued success of that businessthat your students reach their goals. The following pages contain helpful information that will assistyou in creating a positive educational experience for your students. You will learn more about teacheretiquette, how to set up a great teaching environment, interacting with parents and tips on how to builda student base. I am honored to share the Rock House Method with you.John McCarthy2
Table of Contents24 pt20 ptThe Staff .8The Musical Alphabet 9Staff Symbols . 9Names of the Open Strings & Tuning . 11Picking Symbols . . .11Counting Beats . .12Music Notes . .13First String Notes . . .14Whole Notes . . .14Half Notes . .14Quarter Notes . 14Rests . .161st String Etude . 16Second String Notes . 172nd String Etude .17Hot Cross Buns . .18By the Sil’very Moonlight .19Amanda Lynn .19Good King Wenceslas .19Go Tell Aunt Rudy . .20Two String Combo .20Pick Up Notes . . .20A Tisket, A Tasket 21Dotted Half Notes / 3/4 Timing .21I Saw Three Ships . 22Runaway Train . . .22Third & Fourth String Notes . 233rd & 4th String Etude . .24Aura Lee . 24Mystic Haze . . .25Johnny Blues . . 25Rockin the Bells . 26The Tie .26Oh When the Saints . 27The High A Note . .28Bottoms Up . 28Amazing Grace . 29Playing More than OneNote at a Time .29Surprise Symphony . 306We Three Kings .31Double Down . 31Jolly Old Saint Nick . .32Fifth & Sixth String Notes . 335th & 6th String Etude .3412 Bar Blues .34Reading Chord Charts .35Your First Chords . .36Strumming Chords 37Eighth Notes .38Two for One 39My Melody .39The Arkansas Traveler .40C Blues .41Beethoven’s 5th .42The Notes in the First Position .43Hitting All Six 44The C Major Scale .45C Major Scale Pattern . .45C Major Scale Study in 3rds 46Full Form Chords .46Rhythm NotationChord Strum Slashes .47Song Chord Progressions 48Canon/Rehearsal Marks .49Bass Note Strum Studies .51Dynamics in Music/This Land is Your Land .53Dotted Quarter Notes/Kum-Ba-Ya 54The New Years Song 55Using the Metronome to Practice/Finger Flexing #1 56Ode to Joy 57My Country tis of Thee .58Triplet Timing .586 String Triplet Pattern . 59Intervals/Sharps & Flats .60The G Major Scale - Two Octaves . 61G Major Lead Pattern - Eighth Notes& Triplets . .62
24Chordspt of G Major/Alternate Strumming .63G Major Lead Pattern - Triplets . .6520pt in G .Minuet66Minuet in G - Rhythm Solo 67G Boogie Blues . 68G Major Bass Note Strum . .69The Star Spangled Banner /The Fermata 70Finger Flexing #2 .71Relative Minor Theory .72The A Minor Scale .73Minor Scale Pattern in A . 73Solo Guitar in A Minor . 74Home on the Range . 75I - IV - V Progression .76First & Second Endings .77Greensleeves .78House of the Rising Sun .79The A Minor Pentatonic ScaleOpen Position . 80Pentatonic Lead Pattern :Eighth Notes/Triplets .81Pentatonic Lead Melody .8312 Bar Blues in A . .83Lead Techniques Bending . .84Pentatonic Lead Riffs .85The Chromatic Scale .86The Major Scale Formula .87Student Worksheets .89Blank Papers .107About the Author . 1127
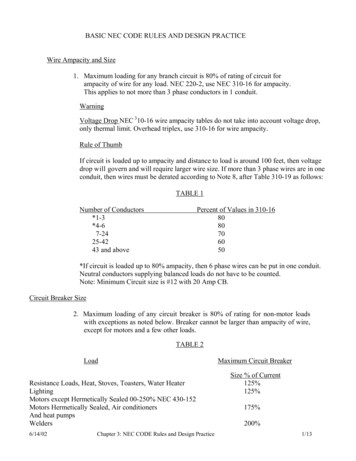
Treble11 Clef24 pt&20 pt LessonQuickTips 21 & Time Signature & 44 Number of beats per measure. A Quarter note receiving one11 beat. & Explain to your student that you know they are very excited to get startedplaying the guitar but before they start there are some important thingsthey need to get familiar with so they can progress quickly. Bar lines are vertical lines on the staff that separate the staff into smallsections that are called measures.31beatsIndicates fourFour beats per measure.21 The treble clef is found atAlsothe beginningof music thatper measure.known as “commontime.”can be played on& & guitar or piano. It is also called a G clef because it circles around the Gstaff line. Tell students to concentrate only on the top number in a time signaturethat signifies how many beats that will be in each measure. The bottomnumber will be discussed further in another level.41 31 & Every new student wants to play and they don’t want to learn theory; but, it is importantthat you explain these are the basics that will help them learn quickly and have fun. Hereare some tips for teaching the staff symbols:&Treble Clef – Simply say that this symbol will be found on all notation music that can beplayed by guitar. Explain that piano and keyboard also reads the same music.Measures & Bar Lines – When teaching bar lines explain that these vertical lines separate the staff intosmall sections called measures. There will be a certain equal number of beats in each measure thatwill be signified by the time signature.51& 41 & Time Signature – Students focus on the top number. The number of beats per measure. In 4/4 timingthere will be 4 beats in each measure. In ¾ timing there will be 3 beats in each measure. 4/4 timingcan also be shown in music with a capitol letter C. This stands for common time since 4/4 timing is themost common time signature.106151
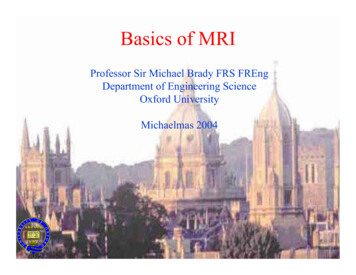
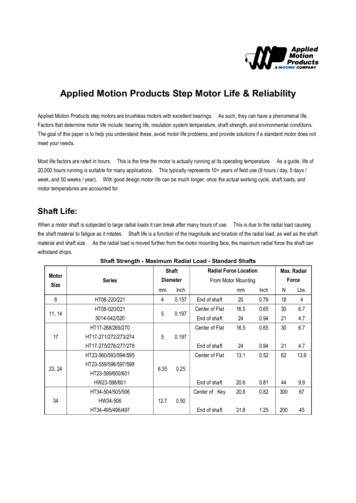
This song combines whole, half and quarter note timing with the 1st stringnotes.24 ptLesson20 Quickpt This will be the first time there is a backing track that students can use to playover. Make sure to have the track ready for the student in the lesson.Tips Make sure students know what the backing track icon looks like so they canfind the backing tracks for future songs. A quarter and half note rest are used on the second line. Demonstrate how tomute the strings with your hands. All down picks should be used when playing this song.Have the backing track for this song ready to use with the student for this lesson. This isthe first time the student will be using a backing track to play along with so demonstratehow to play the song with the track. They will play whole, half and quarter notes as wellas a quarter and half note rest in this song. Show the student how to mute the stringwhen playing the rests and make sure there is no sound at all ringing out. For now havethe student use all down picks throughout the song. Make sure they are holding the pickproperly and the guitar is angled in the proper direction.Second String Notes WBCDOpen2nd String1st Finger1st Fret2nd String3rd Finger3rd Fret2nd String 2nd String EtudeCD Track8etc.Count:1122334411223341421324314212334417
24 ptLesson As with the 1st string notes, have the student play each note and say out loud threethings:20 Quickpt1. The note name.2. The location on the string.3. The staff location.Tips There are 10 songs that will contain notes on the 1st and 2nd strings in this section.There will be theory they will learn to apply within these songs as they progress. Makesure to go through each theory section before they play the song. I have put the metronome icon with the “2nd String Etude.” Have the students playalong with a metronome in the lessons and at home. If they don’t have a metronomethey can download one from the support website.Have the student play each note and say out loud the following for each note as they didwith the 1st string notes:1. The note name.2. The location on the string.3. The staff location.In the “2nd String Etude” students will play whole, half and quarter notes on the 2nd string notes. I haveincluded the metronome icon for this song. It is important for students to start getting a strong sense oftiming at this point. Play along with a metronome at the lesson and encourage the student to practice withone at home as well.Most of the next two string examples have accompaniment chords for you to play along with the studentand you should enforce that they practice at home along with the CD. This is the start of the student beingable to interact with other musicians and will help them get used to playing in a band settingHot Cross BunsC 18 CD Track 9-10
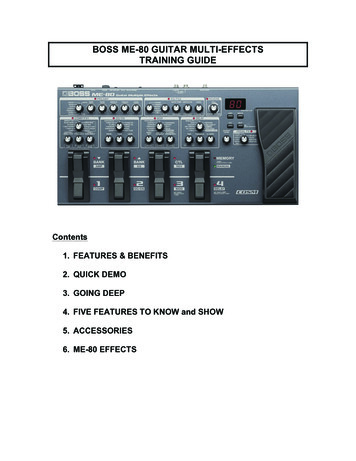
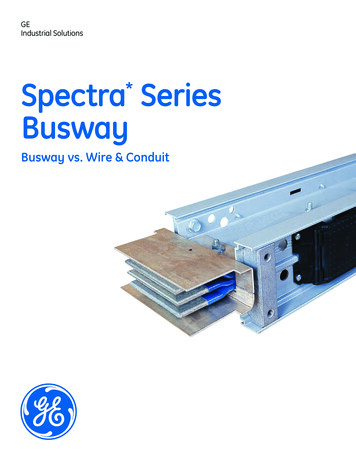
24 ptThird & Fourth String NotesW20 pt4th StringDD LessonQuickTips3rd StringEF E Open4th StringSecond Finger2nd Fret4th StringOpen4th String2nd Finger2nd Fret4th StringGF Third Finger3rd Fret4th String3rd Finger3rd Fret4th StringAGA Open3rd StringSecond Finger2nd Fret3rd StringOpen3rd String2nd Finger2nd Fret3rd String As in the past, have the student play each note and recite the note name, stringlocation and staff position. Most of the songs in this section will have a backing track rhythm for the studentsto play along with. If they don’t have the backing track the student still should playalong with a metronome or the audio demonstration track. Now that the students have learned the first four strings, quiz the student tomake sure they have them memorized.Now that the student has learned the notes in the first position on the first four strings it istime to quiz them. Here is a great way to do this:- Tell the student to play a note by giving the location such as, play the note on the 2ndstring 1st fret.- As they play that note they must tell you the name of the note and where it is located onthe staff. So their answer should have been “C note, 3rd space on the staff.”Do this for a few minutes with random notes across the four strings.23
HazeMystic Johnny Blues 24 pt20 pt CD Track 29This song will let the student hear a minor melody. It is a D minor melody. No backing track for this songbut you can strum a D minor chord over the entire song as a backing rhythm. CD Track29-30This song is in ¾ timing and there is a pick-up note at the beginning so the count will be 1 – 2 – 3 – 1 – 2leading into the song. There is a backing track for the student to play along Count: 12GEmAmD7 3GEmA7AmD7GD7 EmGEm AmD7G 25
CD Track24 ptAmazingGrace20 pt Count: G123 D7Count:C 1G C G 231 2337-38 4 D7 GG Playing More than One Note at a Time Notes stacked on top of each other vertically will be played together.LessonQuickTips Talk to students about playing more then one note together and how to strum themwith one swift pick swing. Have the student play the examples.Explain that in music there will be times where notes will be played together. In thesecases the notes will be stacked on top of each other vertically. Show how to play the noteswith one swing of the pick in a strumming motion. Show the student in the next song thatthere will be two and three notes played together.Explain that these are small form chords. A chord is when you play multiple notes at thesame time. Also make sure the student uses only the tip of the pick when hitting multiple notes together.29
24 ptReading Music for Guitar - Quiz 120 ptHave your students take the quiz on-line at home. Review the quiz results with thestudents and work with them on any lessons they need help with.CD TrackSurprise Symphony40-41In this song the students will play two and three notes at the same time. Have the student play thesemultiple note combinations first before they play the song. Use the backing track for this song. C CG7 G7CTeachers Inspiration“The best teachers wear a large invisible button that reads “I Give a Damn.”Myron Brenton30
CD Track24 pt5th& 6th String Etude20 pt47Here students play only the notes on these two strings to get familiar with them. Havethe student use a metronome to play along with to help keep a steady time. I like to havestudents call out the name of each note after they can play it steady from beginning toend without mistakes. 12 Bar Blues CD Track48-49Before the student plays this song have a discussion about blues music with them. Here are a fewthings to cover:1. Blues music has influenced almost every genre of music from rock to pop and from countryto metal.2. Having a good understanding of the blues will make them a better overall player.3. Many hit songs have been written using the 12 bar blues progression structure.This is a simple basic single note blues progression; get the student started by playing only the firstmeasure. When they can play the first measure, have them go through the entire progression. Be sureto demonstrate playing the progression over the bass and drum backing track for the student.You may find mixed reactions to this lesson. I say this because if you have a student in front of youwhose favorite bands are heavy metal or who loves classical music, they may shake their head a bitwhen they hear the term “The Blues.” Have no fear; this is normal if you have not encountered it before.It is your job to pump up the excitement about studying a variety of styles of music. In this case youcan explain to the student how other music is derived from the blues, etc. It is an advantage as a guitarplayer to have a firm base in the blues for almost every genre of music. You will find that a majority ofyour adult students like the blues and blues influenced music. This is an essential genre of music tobring to your students.34
During24pt the studies of this lesson it is going to be of the utmost importance to explain and demonstratethe difference between the straight eighth feel and the shuffle feel. A common example of straighteighths20 pt is “Johnny B. Goode” from Chuck Berry and a good example of the shuffle feel is the introsection of “Bring it on Home” by Led Zeppelin. Reading Chord ChartsChord NameStringNotPlayedXX XCOpen StringX1FingerLocation6th String(Thickest)LessonQuickTips22Nut1Frets1. The Finger2. The Fret3. The String1st String(Thinnest) Hold your guitar in front of you standing from floor to ceiling with the headstockhighest, this emulates the same position that the chord chart references the guitar. Explain that the dots on the chart are where you place your fingers on the neck. Quiz students on the three steps to finding any note on a chord chart: a) string b)fret c) finger. Explain that an “O” below a string represents an open string and an “X” below astring represents a string note strummed.35
24 ptCBlues20 ptCD Track58-59 This song incorporates eighth notes in a blues progression.LessonQuickTips Alternate picking should be used throughout the song. As the student is learning each section strum the chord changes over the notes asthey are playing. Tell your student that guitarists of all genres have blues influences and learningthe blues will make them a better guitarist. Give examples of songs from the genre they like that are blues influenced.This is a blues song using eighth notes. It is a common blues pattern so it should soundfamiliar to students. Enforce alternate picking and have the student tap their foot along inthe same direction as the pick. Strum the chords along with the student at the lesson andhave them use the backing track with bass and drums to work on at home. This is veryfun for students.41
24 ptWTheNotes in the First Position20 ptString:6th5th4th3rd2nd1st Frets:LessonQuickTips013023023020130135EF G ABCDEFGABCDEFGA Go through all the names of the notes in the first position across all sixstrings, starting with the open strings. Homework – Have your student write them out on paper. These must bememorized. (See worksheet) Blank music sheets are available at the Lesson Support Site.Have your student begin from the open strings and play the notes across all 6 strings. Irecommend that you have students write out the notes on a blank piece of sheet musicand write the letter name over each to help memorize the notes. Quiz them until they knowthese notes cold.Here is a great exercise to give your student as they are getting to know the notes. Callrandom note’s names out and have the student play all these notes in the first position.For example, if it was an “E” they would play the open 6th string, 2nd fret of the 4th stringand open 1st string. In the beginning of this exercise it will be difficult but will ensure that the studenthas the first position notes memorized.Have the student do the worksheet for this lesson.Student Inspirational Quote“Music is enough for a lifetime, but a lifetime is not enough for music”Sergei Rachmaninov43
24 ptLesson20 QuickptTips Explain that scales are a group of notes that all come from the same family andthey are used to make songs and melodies. Tell students that the key of “C” major is the only natural key that doesn’t havesharps or flats. Let students that they will go through the theory of the major scale at the end ofthis book. Have students call out the name of each note as they play it.This is the first time a student will play a scale. You must explain that a scale is a groupof notes that come from the same family. They sound good when played together and willbe used to create melodies and to write songs. Although they have not learned sharps orflats yet you can start to plant the seed and talk about them and explain that the key of “C”major will be the only natural key that has no sharps or flats. Tell them that they will learnthe theory behind making major scales at the end of this book.C Major Scale PatternCD Track62Now students will apply the C major scale in a pattern. This scale pattern goes up in four note intervalsthrough the scale. This is important because it helps students see scales as a creative tool rather then justa group of notes played in a row. At this point you should give a demonstration of how to improvise usingthe scale. Play a series of simple melodies nothing too fast or flashy. Explain that they will eventually beable to use scales to write their own, melodies, leads and complete songs. Teachers Inspiration“The mediocre teacher tells. The good teacher explains. The superior teacherdemonstrates. The great teacher inspires.”William Arthur Ward45
CD Track24 ptCMajor Scale Study in 3rds20 pt63This song is a series of 3rds up the C major scale. It is all eighth notes. Alternate picking should beused. Explain how this pattern goes up in 3rds the following way: the first note is C the second note isE, if they look at the C major scale note they just learned C is the first note E is the 3rd note. The E isthree scale degrees up from C. It continues this pattern with D to F, F is three scale degrees up from D.The pattern continues throughout this exercise.CD TrackFull Form ChordsCXG71XAm112364223233 Go through each chord note by note with the student.LessonQuickTips Explain that these chords all are in the key of “C” major and can be used togetherto create songs in this key. Talk about the relationship each chord fingering has to the others. For instance:Am to C they just move the 3rd finger up to the 5th string 3rd fret. Make sure the student has all four chords memorized for the next week’s lesson.Quiz them by calling the chord names out randomly and they should fret the chordas quickly as possible. Demonstrate the three progressions over the backing track so the student can seeand hear them.46
24 ptC 2 20 ptCGAmEmFG43FC Canon is a very popular song progression that has been used in many songs.LessonQuickTips Point out to the student that the chord progression is above the staff. Strum thechords through the progression before the student plays it. There will be alternate fingers used in this song. They are designated by fingernumbers written next to the note. Rehearsal marks are used in this song to show where the three variations of thesong begin. They are the letters A, B and C in boxes. Have the student go through each variation slowly and help guide them throughthe alternate fingerings. As they are able to play the song smoothly from beginning to end strum the chordswith them to create a little jam session.This is a common classical progression that has been used in many songs in all genres.Strum the chords above the staff and play the progression for the student so they canhear how it sounds. This progression has a distinct sound.Explain that rehearsal marks are placed at the beginning of each variation of the songto help see where each begins. They are the letters A, B and C in boxes above the staff.Go through the alternate fingerings before they start so they understand what hand shifts they willneed to do. Explain that they are playing the notes of the chords in an arpeggios fashion, whichmeans picking them out separately.After they can play this smoothly have your student try to create their own picking pattern. Alwaysencourage creativeness.50
24 ptUsingthe Metronome to Practice/20 ptFinger Flexing #1CD Track87 LessonQuickTips Read through and explain the tips I have included in the book for using themetronome to practice with the student. Apply these tips while teaching the “Finger Flexing #1” lesson. Reinforce the use alternate picking, consistently, throughout this exercise. Have students find a slow tempo that they can play this exercise at the lesson.Then have the student increase their speed gradually each day while practicing.56
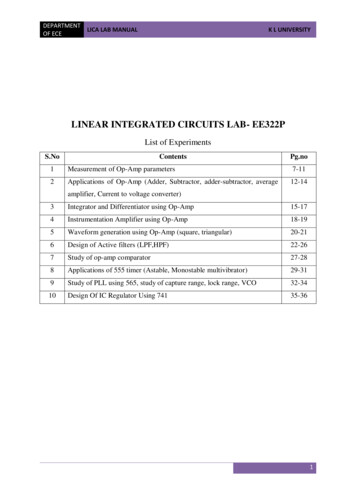
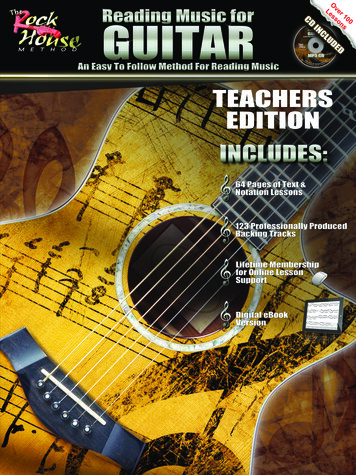
24 ptWIntervals/Sharps& Flats20 ptHalf Steps BC EFWhole StepsBCF G GACD C#/DbEG#FG#F#/GbA DA#/BbCDbA A A A A#A A#A A#A#A#D A#D DDbD DbDBDbDbGDbG GDG D#/EbG#G G#G G#G# G G#/Ab AAB C b Flat # SharpAA#DDbGG#A#/BbC#/Db 2ndOpen1st Explain that an interval is the distance between two notes.LessonQuickTips A half step is one fret on the guitar; a whole step is two frets. Have students playhalf and whole steps. Show how a sharp and flat work to raise and lower a note. Explain enharmonic notes i.e. C# & Db. Show the chromatic scale starting with each string open, up to the 12th fret. Quiz students to find the names of the notes on the guitar. For example, “What isthe name of the 7th fret of the 3rd string.” Have the student write out the chromatic scale on a blank sheet of paper duringthe next week’s lesson.Start with a basic explanation of half and whole steps. Play them on your guitar then havethem play random half and whole steps on their guitar for you.Explain what a sharp and flat are and demonstrate them on your guitar. Then have themshow you on their guitar as well. Explain that there are two natural half steps in music thatare B to C and E to F and between all other notes there will be a whole step or two fretson the guitar. Tell them that the 12 notes that make up the Chromatic scale are all the notes that makeup every song they have ever heard just mixed up and combined in different ways.A good rule to follow here is repetition. Have the students write the complete chromatic scale severaltimes on a piece of notebook paper over the course of the next week. When they come in for their nextlesson, look at it and quiz them. If they still don’t have it down cold, make them write it again. Writingthings down will make it stick in their mind.60D
24 ptCD TrackMinuetin G20 pt99-100Andante G mpCG D7 GGD7GD7 CG D7GD7G This is a popular classical piece written by Bach.LessonQuickTips Play the song for the student so they can hear the song and see how to play it. Make sure to point out the F# notes that they will be playing. Students should play along with the backing track.This is a very popular classical song written by J.S. Bach. Play the same for the studentso they can hear how it sounds and see the fingering. There are a few F# notes within thesong, you should point out where all these are and have the student play each before theybegin. Make sure the students use the backing track to play along with. During the lessonyou should strum the accompaniment chords under as they play the melody. This will createa full sound and a solid base for the student to play over.66
24 pt20 ptRelative Minor TheoryLessonQuickTips Teach the basic concept of a relative minor scale. Say that every major scale has arelative minor scale. This scale is built from the 6th degree of the major scale. The key signature of both the major and relative minor scale will be the same. Demonstrate how A minor is relative to C major. Play both scales back to back sothe student can hear how the same notes can have a totally different sound whenplayed in a different order.Here you must teach the basic concept of relative minor theory. You don’t want to gettoo deep at this point, just give them enough information so they know the connectionthese two scales have. Here are the points to make clear with your students:1. Every major scale has a relative minor scale that is built from the 6th degree of themajor scale. Demonstrate this with the key of “C” major. Play the C major scale up sixnotes to A, tell them that is the relative minor scale. Next play the A minor scale.2. The key signature of both scales will be the same. So let them know that in C majorthere were no sharps or flats; therefore, A minor will also have no sharps or flats. In thekey of “G” major there is one sharp F#, the relative minor scale to G major is E minorand it will also have one sharp F#.3. Even though both scales contain the same exact notes by having a different startingnote or “Root Note” the scale will take on a totally different sound.4. Often times within a song it can change from the major scale key to the relativeminor key. This helps to give emotion and dynamics to a song.72
24 ptWTheA Minor Scale20 ptA BCDEFGAAGFEDCBA A minor is relative to C major and will have no sharps or flats.LessonQuickTips This scale has a sad tone or sound. This is characteristic of minor keys.This is the first minor scale your student is playing, you must let them hear the minorsound it creates. Do this by playing an A major scale then immediately play the Aminor scale.
playing the guitar but before they start there are some important things they need to get familiar with so they can progress quickly. Bar lines are vertical lines on the staff that separate the staff into small sections that are called measures. The treble clef is found at the beginning of music that can be played on guitar or piano.