Transcription
FLIGHT MULTI PANELProfessional Autopilot Cockpit Simulation ControllerUSER GUIDElogitechG.com
4ENGLISH73MAGYAR8DEUTSCH78ČESKÁ �ССКИ133TÜRKÇE68PO POLSKU العربية 3138
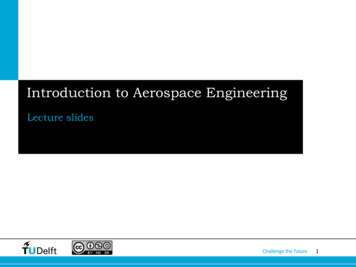
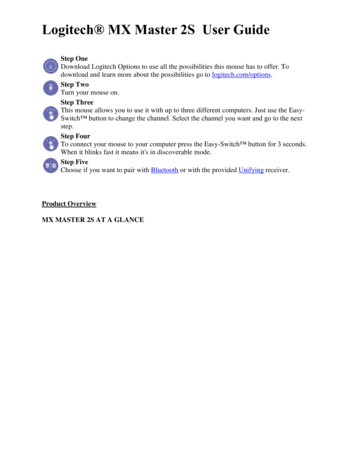
INTRODUCTIONThe Multi Panel interacts with Microsoft Flight Simulator X to controla range of functions, including auto pilot settings, flaps and trim controls.SETTINGS ADJUSTMENT WHEELAUTO THROTTLE ARMAUTOPILOT SETTINGS SELECTORPITCH TRIMROTARY CONTROLFLAPS RETRACT (UP)OR EXTEND (DOWN)AUTOPILOT FUNCTIONSBUTTONS4 English
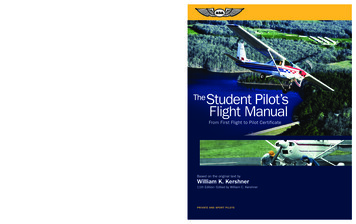
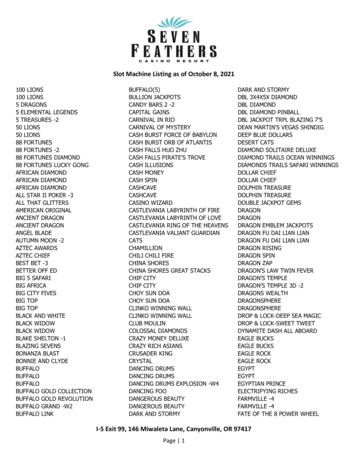
INSTALLATIONFix the Multi Panel to the supplied mounting bracket. Insert the screws throughthe holes at the corners of the Panel into the bracket behind and tighten.If you already own a Logitech G Flight Yoke System, you can mount the Paneland bracket on top of the Yoke unit using the screws provided.123INSTALLATION FOR WINDOWS 10, WINDOWS 8.1AND WINDOWS 7DRIVER INSTALLATION1 Visit logitech.com/support/multi-panel to download the latest drivers and softwarefor your operating system.2 With device disconnected, follow the onscreen instructions to complete theinstallation.3 At the Driver Setup screen, only when prompted, insert USB cable into one ofyour computer’s USB ports, then click Next.5 English
USING THE LOGITECH G FLIGHT MULTI PANELButtonAPHDGNAVIASALTVSAPRREVAutopilot functionMaster switch to engage or disengage the autopilotPlane will fly to selected compass headingPlane will fly to selected NAV1 frequency or GPSPlane will fly at selected indicated airspeedPlane will fly to and maintain selected altitudePlane will climb or descend at selected vertical speedPlane will fly on approach to runway localizerPlane will fly on a back course from the localizerADJUSTING AUTOPILOT SETTINGSTo change the values of the autopilot settings, first turn the selector switch on the leftside of the Multi Panel to the function you want to adjust. Turn the rotary controlto the right of the LED display to increase or decrease the values for the functionyou have selected.For example, if you want to adjust the altitude setting, first turn the selector switchon the left to ALT and then increase or decrease the desired altitude setting usingthe rotary controls on the right.To engage any of the autopilot functions, first select the function, e.g., HDG, NAV,etc., and then press the autopilot master switch.6 English
It is possible to use each of the autopilot functions individually but more commonto use a combination of functions. For example, if you wanted to fly at 20,000 feet ata speed of 150 knots on a heading of 210 degrees, first select the ALT function with theselector knob on the left and adjust altitude to 20,000 with the right rotary controls.Next, turn the function selector knob to IAS and adjust speed to 150. Now turnthe function selector to HDG and adjust heading to 210. To engage the altitude,speed and heading functions, first switch the autothrottle to “Arm” (this allowsthe autopilot to control the engines to maintain speed), then press the HDG, IAS andALT buttons under the LED screen and press the AP button to engage the autopilot.Your plane should now climb or descend to 20,000 feet, turn to heading 210 degreesand maintain a speed of 150 knots.Please note: Not all aircraft available in Microsoft FSX have the full range of autopilotfunctions. For instance, the Cessna C172SP Skyhawk and many of the smaller aircraftdo not have an autothrottle arm control - using this function on the multi Multi Panelwill have no effect on the aircraft’s autopilot.TROUBLESHOOTINGOnce you have installed the appropriate plug-in for Flight Simulator X (FSX), the nexttime you run FSX it will prompt you that it is attempting to load the Logitech GPanel(s) Plug-in for FSX - click Yes on this screen.After that you should see a Windows security warning asking you if you want to runLogiFlightSimX.exe - click Yes on that screen.Finally, FSX will prompt you if you wish to make LogiFlightSimX.exe a trusted pieceof software - click Yes.Once you have installed the Panel software, the Panel buttons and controls shouldbe automatically configured to control their functions in FSX software. If your FSXsoftware does not recognise the Panel, unplug the USB cable and plug it back in.For further help with other sims or any other questions, check the support pageat logitech.com/support/multi-panel.TECHNICAL SUPPORTOnline Support: support.logitech.com7 English
EINFÜHRUNGDas Multi Panel interagiert mit Microsoft Flight Simulator Xbei der Steuerung verschiedener Funktionen wie AutopilotEinstellungen sowie Klappen- und Trimmungssteuerung.EINSTELLUNG DES REGLERSAUTOTHROTTLE ARMAUSWAHLREGLERFÜR AUTOPILOT-EINSTELLUNGENDREHREGLER FÜRTRIMMUNGSSTEUERUNGKLAPPEN EINFAHREN (HOCH)ODER AUSFAHREN (RUNTER)FUNKTIONSTASTENFÜR AUTOPILOT8 Deutsch
INSTALLATIONBefestige das Multi Panel an der mitgelieferten Halterung. Führe die Schrauben durchdie an den Ecken der Tafel befindlichen Bohrungen und befestige sie an der dahinterliegenden Halterung. Wenn du bereits ein Logitech G Flight Yoke System besitzt,kannst du die Instrumententafel samt Halterung mithilfe der beiliegenden Schraubenam Steuerhorngehäuse befestigen.123INSTALLATION UNTER WINDOWS 10, WINDOWS 8.1UND WINDOWS 7INSTALLATION DES TREIBERS1 Navigiere zur URL: logitech.com/support/multi-panel, um aktuelle Versionenvon Treiber und Software für dein Betriebssystem herunterzuladen.2 Schließe das Gerät zunächst nicht an und befolge die Anweisungen aufdem Bildschirm.3 Wenn auf dem Bildschirm für die Treibereinrichtung eine entsprechendeAufforderung erfolgt, verbinde das USB-Kabel mit einem der USB-Anschlüssedes Computers und klicke auf Weiter.9 Deutsch
VERWENDUNG DES LOGITECH G FLIGHT MULTI auptschalter zum Aktivieren bzw. Deaktivieren des AutopilotenFlugzeug fliegt in die ausgewählte KompassrichtungFlugzeug nimmt Kurs entsprechend NAV1-Frequenz oder GPSFlugzeug fliegt mit ausgewählter, angezeigter FluggeschwindigkeitFlugzeug behält im Flug die ausgewählte Höhe beiFlugzeug steigt oder sinkt mit ausgewählter vertikaler GeschwindigkeitFlugzeug verwendet den Localizer zum Anflug auf die LandebahnFlugzeug fliegt auf dem Localizer entgegengesetzten KursANPASSEN DER AUTOPILOT-EINSTELLUNGENZum Ändern der Autopilot-Einstellungen musst du zunächst den Auswahlschalterlinks am Multi Panel auf die einzustellende Funktion setzen. Mit dem Drehregler rechtsneben der LED-Anzeige kannst du die Werte der ausgewählten Funktion erhöhenbzw. verringern.Wenn du beispielsweise die Höheneinstellung ändern möchtest, stelle zunächstden Auswahlschalter links auf ALT und wählen mit dem Drehschalter rechtsdie gewünschte Höhe aus.10 Deutsch
Zum Anwenden einer der Autopilotfunktionen wähle zunächst die Funktion(z. B. HDG, NAV usw.) aus und drücke dann den Autopilot-Hauptschalter.Jede der Autopilotfunktionen lässt sich einzeln einstellen, es ist jedoch gebräuchlich,eine Kombination der Funktionen zu nutzen. Wenn du beispielsweise auf 20.000Fuß mit einer Geschwindigkeit von 150 Knoten auf einem Kurs von 210 Grad fliegenmöchtest, wähle zunächst mit dem Auswahlschalter links die Funktion ALT aus undstell dann mit dem Drehregler rechts die Höhe auf 20.000 ein.Drehe dann den Funktionsauswahlschalter auf IAS und stell die Geschwindigkeit auf150 ein. Drehe den Funktionsauswahlschalter dann auf HDG und stell den Kurs auf210 ein. Zum Aktivieren der Funktion für Höhe, Geschwindigkeit und Kurs musst du dieAutothrottle zunächst auf „Arm“ stellen (der Autopilot kann dadurch die Triebwerkesteuern, um die Geschwindigkeit zu halten), drücke anschließend die Tasten HDG,IAS und ALT unter der LED-Anzeige und drücke dann die AP-Taste, um den Autopiloteneinzuschalten. Dein Flugzeug sollte nun auf 20.000 Fuß steigen bzw. sinken, einen Kursvon 210 Grad nehmen und eine Geschwindigkeit von 150 Knoten beibehalten.Hinweis: Nicht alle in Microsoft FSX verfügbaren Flugzeuge sind mit allenAutopilotfunktionen ausgestattet. Zum Beispiel die Cessna C172SP Skyhawk undviele der kleineren Flugzeuge besitzen keine „Arm“-Einstellung für die Autothrottle.Wenn diese Funktion auf dem Multi Panel eingestellt wird, hat dies keine Auswirkungauf den Autopiloten des Flugzeugs.11 Deutsch
FEHLERBEHEBUNGNachdem du das entsprechende Plug-In für Flight Simulator X (FSX) installiert hast,wird beim nächsten Start von FSX eine Abfrage zum Laden des Logitech G PanelPlug-In für FSX angezeigt. Klicke auf diesem Bildschirm auf „Ja“.Anschließend sollte eine Sicherheitswarnung von Windows mit einer Abfrage zumAusführen von LogiFlightSimX.exe angezeigt werden. Klicke auf diesem Bildschirmauf „Ja“.Schließlich erfolgt von FSX die Abfrage, ob es sich bei LogiFlightSimX.exe umvertrauenswürdige Software handelt. Klicke auf „Ja“.Nach Installation der Software für die Instrumententafel sollten deren Tastenund Bedienelemente automatisch zur Steuerung der Funktionen der FSX-Softwarekonfiguriert sein. Wenn deine FSX-Software die Tafel nicht erkennt, zieh das USB-Kabelheraus und steck es dann wieder ein.Hilfe zu anderen Simulationen und Antworten auf sonstige Fragen findest du aufder Supportseite unter logitech.com/support/multi-panel.TECHNISCHER SUPPORTOnline-Support: support.logitech.com12 Deutsch
INTRODUCTIONLe boîtier interagit avec Microsoft Flight Simulator X pour contrôlertoute une gamme de fonctions, dont les paramètres de pilotageautomatique, les volets et les commandes de compensation.BOUTON DE RÉGLAGE DES PARAMÈTRESSÉLECTEUR DES PARAMÈTRESDE PILOTAGE AUTOMATIQUEACTIVATION DE L'AUTOMANETTECOMMANDE ROTATIVEDE LA COMPENSATIONEN TANGAGERÉTRACTATION (HAUT)OU EXTENSION (BAS) DES VOLETSBOUTONS DES FONCTIONSDE PILOTAGE AUTOMATIQUE13 Français
INSTALLATIONFixez le boîtier au support d'installation fourni. Insérez les vis dans les trous au niveaudes angles du boîtier dans le support à l'arrière et serrez-les. Si vous possédez déjàun système Logitech G Flight Yoke, vous pouvez monter le boîtier et le support surle dessus de l'unité du manche en utilisant les vis fournies.123INSTALLATION POUR WINDOWS 10, WINDOWS 8.1ET WINDOWS 7INSTALLATION DES PILOTES1 Rendez-vous sur logitech.com/support/multi-panel pour télécharger les dernierspilotes et le logiciel compatibles avec votre système d'exploitation.2 Déconnectez le dispositif et suivez les instructions à l'écran pour terminerl'installation.3 À l'affichage de l'écran de configuration des pilotes, lorsque vous y êtes invité,insérez le câble USB dans l'un des ports USB de votre ordinateur et cliquezsur Suivant.14 Français
UTILISATION DE LOGITECH G FLIGHT MULTI PANELBoutonAPHDGNAVIASALTVSAPRREVFonction pilotage automatiqueInterrupteur principal pour activer ou désactiver le pilotage automatiqueL'avion volera selon le cap compas sélectionnéL'avion volera selon la fréquence NAV1 ou la direction GPS sélectionnéeL'avion volera à la vitesse sélectionnéeL'avion volera à l'altitude sélectionnée et la maintiendraL'avion s'élèvera ou descendra à la vitesse verticale sélectionnéeL'avion volera en mode approche vers un radiophare d'alignement de pisteL'avion volera en mode approche en alignement arrière à partird'un radiophare d'alignement de piste15 Français
RÉGLAGE DES PARAMÈTRES DE PILOTAGE AUTOMATIQUEPour modifier les valeurs des paramètres de pilotage automatique, tournez d'abordle sélecteur à gauche du boîtier jusqu'à atteindre la fonction à régler. Tournez lacommande rotative à droite de l'écran à témoin lumineux pour augmenter ou réduireles valeurs de la fonction que vous avez sélectionnée.Par exemple, si vous souhaitez régler l'altitude, tournez d'abord le sélecteur à gauchedu bouton ALT puis augmentez ou réduisez la valeur d'altitude souhaitée en utilisantles commandes rotatives à droite.Pour activer une fonction de pilotage automatique, sélectionnez d'abord la fonction,par exemple HDG, NAV, etc., puis appuyez sur l'interrupteur principal du pilotageautomatique.Vous pouvez utiliser chaque fonction de pilotage automatique individuellement maisil est plus fréquent d'utiliser un ensemble de fonctions. Par exemple, si vous souhaitezvoler à 20 000 pieds à une vitesse de 150 nœuds sur un cap de 120 degrés, sélectionnezd'abord la fonction ALT avec le sélecteur à gauche et réglez l'altitude sur 20 000 avecles commandes rotatives de droite.Ensuite, tournez le sélecteur de fonction sur IAS et réglez la vitesse sur 150.Tournez maintenant le sélecteur de fonction sur HDG et réglez le cap sur 210.Pour activer les fonctions d'altitude, de vitesse et de cap, tournez d'abordl'automanette sur "Activé" (qui permet au pilotage automatique de contrôlerles moteurs afin de maintenir la vitesse), puis appuyez sur les boutons HDG,IAS et ALT sous l'écran à témoin lumineux et sur le bouton AP pour lancer le pilotageautomatique. Votre avion s'élèvera ou descendra à 20 000 pieds, prendra un capà 210 degrés et maintiendra une vitesse de 150 nœuds.Remarque: tous les appareils disponibles sur Microsoft FSX ne possèdent pastoute la gamme de fonctions de pilotage automatique. Par exemple, le CessnaC172SP Skyhawk et un grand nombre d'appareils plus petits ne disposent pas dela commande du bras à automanette. L'utilisation de cette fonction sur le boîtiern'aura aucun impact sur le pilotage automatique de l'appareil.16 Français
DÉPANNAGEAprès avoir installé le module d'extension approprié pour Flight Simulator X (FSX),à la prochaine exécution de FSX, vous recevrez un message indiquant que le logicielessaie de charger le module d'extension du ou des panneaux Logitech G pour FSX:cliquez sur Oui.Ensuite, vous devriez recevoir un message d'avertissement de sécurité Windowsvous demandant si vous souhaitez exécuter LogiFlightSimX.exe: cliquez sur Oui.Enfin, FSX vous demandera si vous souhaitez que LogiFlightSimX.exe soit considérécomme un élément approuvé du logiciel: cliquez sur Oui.Après avoir installé le logiciel du panneau, les boutons et les commandes devraientêtre automatiquement configurés sur les fonctions prévues dans le logiciel FSX.Si votre logiciel FSX ne reconnaît pas le panneau, débranchez puis rebranchezle câble USB.Pour recevoir de l'aide à propos d'autres simulateurs ou de toutes autres questions,consultez la page de support sur logitech.com/support/multi-panel.SUPPORT TECHNIQUESupport en ligne: support.logitech.com17 Français
INTRODUZIONEIl riquadro multiplo interagisce con Microsoft Flight Simulator Xper consentire di controllare un'ampia gamma di funzioni, tra cuiimpostazioni pilota automatico e comandi per flap e inclinazione.ROTELLA DI REGOLAZIONE IMPORTAZIONISELETTORE IMPOSTAZIONIPILOTA AUTOMATICOINTERRUTTORE INNESTOACCELERAZIONE AUTOMATICACOMANDO ROTANTEREGOLAZIONEINCLINAZIONERETRAZIONE (SU)O ESTENSIONE FLAP (GIÙ)PULSANTI FUNZIONIPILOTA AUTOMATICO18 Italiano
INSTALLAZIONEFissare il riquadro multiplo alla staffa di montaggio fornita. Inserire le viti attraversoi fori negli angoli del riquadro per fissarlo alla staffa posteriore e serrarle. Se si possiedegià Logitech G Flight Yoke System, è possibile installare il riquadro e la staffa sopral'unità barra di comando servendosi delle viti fornite.123INSTALLAZIONE PER WINDOWS 10, WINDOWS 8.1E WINDOWS 7INSTALLAZIONE DEI DRIVER1 Accedere al sito Web logitech.com/support/multi-panel per scaricare i drivere il software più recenti per il sistema operativo in uso.2 Con il dispositivo scollegato, seguire le istruzioni visualizzate sullo schermoper completare l'installazione.3 Nella schermata di installazione dei driver, solamente quando richiesto,inserire il cavo USB in una delle porte USB del computer, quindi fare clic su Avanti.19 Italiano
USO DI LOGITECH G FLIGHT MULTI PANELPulsanteAPHDGNAVIASALTVSAPRREVFunzione pilota automaticoPulsante principale per inserire o disinserire il pilota automaticoIl velivolo procede nella direzione selezionata tramite la bussolaIl velivolo procede verso la frequenza NAV1 o le coordinate GPS selezionateIl velivolo procede alla velocità all'aria selezionataIl velivolo procede all'altitudine selezionata e la mantieneIl velivolo sale o scende applicando la velocità verticale selezionataIl velivolo si avvicina al localizzatore di pistaIl velivolo vola sulla rotta inversa a partire dal localizzatoreREGOLAZIONE DELLE IMPOSTAZIONI DEL PILOTA AUTOMATICOPer modificare i valori delle impostazioni del pilota automatico, ruotare in primoluogo il selettore sul lato sinistro del riquadro multiplo fino a raggiungere la funzioneda regolare. Ruotare quindi il comando rotante a destra del display LED peraumentare o diminuire i valori per la funzione selezionata.Ad esempio, se si desidera regolare l'impostazione dell'altitudine, ruotare primail selettore a sinistra su ALT quindi aumentare o diminuire l'impostazione di altitudineutilizzando i comandi rotanti a destra.20 Italiano
Per innestare una delle funzioni del pilota automatico, selezionare prima la funzione,come ad esempio HDG, NAV, ecc., quindi premere il pulsante principale del pilotaautomatico.È possibile utilizzare ognuna delle funzioni del pilota automatico individualmentema è più comune l'uso di più funzioni combinate. Ad esempio, se si desideravolare a 20.000 piedi a una velocità di 150 nodi e su una rotta di 210 gradi,selezionare in primo luogo la funzione ALT con il selettore a sinistra, quindi regolarel'altitudine su 20.000 con i comandi rotanti.Quindi, ruotare il selettore della funzione su IAS e regolare la velocità sul valore150. Infine, ruotare il selettore della funzione su HDG e regolare la rotta su 210.Per innestare le suddette funzioni di altitudine, velocità e rotta, impostare comeprima cosa l'accelerazione automatica su "Arm" (ciò consente al pilota automatico dicontrollare i motori affinché mantengano la velocità), quindi premere i pulsanti HDG,IAS e ALT sotto lo schermo LED e il pulsante AP per innestare il pilota automatico.Il velivolo ora dovrebbe alzarsi o scendere a quota 20.000 piedi, procedere versola rotta 210 e mantenere una velocità di 150 nodi.Nota: non tutti i velivoli disponibili in Microsoft FSX dispongono della gammacompleta di funzioni pilota automatico. Ad esempio, il Cessna C172SP Skyhawke molti dei velivoli più piccoli non dispongono del controllo di attivazione accelerazioneautomatica, pertanto se si utilizza questa funzione nel riquadro multiplo non siriscontreranno effetti sul pilota automatico del velivolo.21 Italiano
RISOLUZIONE DEI PROBLEMIUna volta installato il plug-in adeguato per Flight Simulator X (FSX), all'avviosuccessivo di FSX verrà visualizzato un messaggio che indica che il programma stacercando di caricare il plug-in Logitech G per FSX - Fare clic su Sì in questa schermata.In seguito dovrebbe comparire un avviso di sicurezza di Windows che richiedel'autorizzazione per l'esecuzione di LogiFlightSimX.exe - Fare clic su Sì in questaschermata.Infine, FSX richiederà se si desidera impostare LogiFlightSimX.exe come componentesoftware affidabile - Fare clic su Sì.Una volta installato il software del riquadro, i pulsanti e i comandi del riquadrodovrebbero essere configurati automaticamente per controllare le relative funzioninel software FSX. Se il software FSX non riconosce il riquadro, scollegare il cavo USBe ricollegarlo.Per ulteriore assistenza con altri simulatori o per qualsiasi domanda, consultare lapagina di supporto all'indirizzo logitech.com/support/multi-panel.SUPPORTO TECNICOSupporto online: support.logitech.com22 Italiano
INTRODUCCIÓNEl panel múltiple interactúa con Microsoft Flight Simulator X para controlardiversas funciones entre ellas las de piloto automático, flaps y cabeceo.PALANCA DE ACELERACIÓNAUTOMÁTICARUEDA DE AJUSTE DE VALORESSELECTOR DE FUNCIONESDE PILOTO AUTOMÁTICOCONTROL GIRATORIODE COMPENSACIÓNDE CABECEOREPLIEGUE (ARRIBA)O DESPLIEGUE DE FLAPS (ABAJO)BOTONES DE FUNCIONESDE PILOTO AUTOMÁTICO23 Español
INSTALACIÓNAcopla el panel múltiple al soporte de montaje suministrado. Inserta y aprietalos tornillos a través de los orificios de las esquinas del panel. Si ya tienes LogitechG Flight Yoke System, puedes montar el panel y el soporte sobre la unidad de palancade mandos, mediante los tornillos suministrados.123INSTALACIÓN PARA WINDOWS 10, WINDOWS 8.1Y WINDOWS 7INSTALACIÓN DE CONTROLADORES1 Ve a logitech.com/support/multi-panel para descargar el softwarey los controladores más recientes para el sistema operativo.2 Con el dispositivo desconectado, sigue las instrucciones en pantalla paracompletar la instalación.3 Cuando se te indique en la pantalla de configuración del controlador,inserta el cable USB en uno de los puertos USB del ordenador y haz clicen Siguiente.24 Español
USAR LOGITECH G FLIGHT MULTI PANELBotónAPHDGNAVIASALTVSAPRREVFunción de piloto automáticoConmutador principal para activar o desactivar el piloto automáticoLa nave volará con el rumbo seleccionado en la brújulaLa nave volará con el valor de GPS o frecuencia NAV1 seleccionadoLa nave volará con la velocidad aerodinámica seleccionadaLa nave volará y se mantendrá a la altitud seleccionadaLa nave ascenderá o descenderá a la velocidad vertical seleccionadaLa nave volará con el localizador de aproximación a pistaLa nave seguirá el rumbo posterior del localizador25 Español
AJUSTAR LA CONFIGURACIÓN DE PILOTO AUTOMÁTICOPara cambiar los valores de configuración de piloto automático, primero debes usarel conmutador situado en la parte izquierda del panel múltiple para seleccionarla función que ajustar. Mueve el control giratorio situado a la derecha de la pantallaLED para aumentar o reducir los valores de la función que has seleccionado.Por ejemplo, si quieres ajustar el valor de altitud, primero coloca el conmutadorizquierdo en la posición ALT y luego aumenta o reduce el valor de altitud mediantelos controles giratorios de la derecha.Para activar una de las funciones de piloto automático, primero debes seleccionarla función (por ejemplo, HDG o NAV) y luego pulsar el conmutador principal de pilotoautomático.Aunque es posible usar cada función de piloto automático individualmente,es más habitual usar una combinación de funciones. Por ejemplo, si quieres volar auna altitud de 20.000 pies con una velocidad de 150 nudos y un rumbo de 210 grados,primero debes elegir la función ALT con el selector de la izquierda y ajustar la altituden 20.000 con los controles giratorios de la derecha.A continuación, coloca el selector de función en la posición IAS y ajusta la velocidaden 150. Ahora gira el selector de función a la posición HDG y ajusta el rumbo en 210.Para activar las funciones de altitud, velocidad y rumbo, primero coloca la aceleraciónautomática en la posición “Arm” (que permite el control de los motores medianteel piloto automático para mantener la velocidad) y luego pulsa los botones HDG,IAS y ALT bajo la pantalla LED y el botón AP para activar el piloto automático.La nave ascenderá o descenderá hasta los 20.000 pies, tomará el rumbo de 210 gradosy mantendrá una velocidad de 150 nudos.Nota: Puede que algunas naves disponibles en Microsoft FSX no tengan todaslas funciones de piloto automático. Por ejemplo, Cessna C172SP Skyhawk y muchasde las avionetas ligeras no tienen un control Arm de aceleración automáticay el uso de esa función en el panel múltiple no tendrá efecto en el piloto automáticode la nave.26 Español
RESOLUCIÓN DE PROBLEMASDespués de instalar el complemento requerido para Flight Simulator X (FSX),la próxima vez que ejecutes FSX, te indicará que está intentando cargarel complemento de paneles Logitech G para FSX. Haz clic en Sí en esta pantalla.A continuación Windows te preguntará si quieres ejecutar LogiFlightSimX.exe.Haz clic en Sí.Por último, FSX te preguntará si quieres que LogiFlightSimX.exe se considere comosoftware de confianza. Haz clic en Sí.Después de instalar el software del panel, los botones y controles de éste deberíanestar configurados automáticamente para controlar las funciones correspondientesen el software FSX. Si el software FSX no reconoce el panel, desconecta el cable USBy vuelve a conectarlo.Si necesitas más ayuda con otros simuladores o tienes alguna consulta, ve a la páginade logitech.com/support/multi-panel.ASISTENCIA TÉCNICAServicio de asistencia online: support.logitech.com27 Español
INTRODUÇÃOO Multi Panel interage com o Microsoft Flight Simulator Xpara controlar várias funções, incluindo as definições dopiloto automático, flaps e o controlos de compensação.SELECTOR DE AJUSTE DAS DEFINIÇÕESSELECTOR DE DEFINIÇÕESDO PILOTO AUTOMÁTICOACTIVAÇÃO DO ACELERADORAUTOMÁTICOCONTROLO GIRATÓRIODE COMPENSAÇÃODE INCLINAÇÃORETRACÇÃO (PARA CIMA)OU EXTENSÃO (PARA BAIXO)DOS FLAPSBOTÕES DE FUNÇÕESDO PILOTO AUTOMÁTICO28 Português
INSTALAÇÃOFixe o Multi Panel ao suporte de montagem fornecido. Introduza os parafusosnos orifícios nos cantos do Painel para fixar o suporte atrás e aperte-os. Se já temo Flight Yoke System da Logitech G, pode montar o Painel e o suporte sobre a unidadeYoke utilizando os parafusos fornecidos.123INSTALAÇÃO PARA WINDOWS 10, WINDOWS 8.1E WINDOWS 7INSTALAÇÃO DE CONTROLADORES1 Visite logitech.com/support/multi-panel para transferir os controladores e softwaremais recentes para o seu sistema operativo.2 Com o dispositivo desligado, siga as instruções no ecrã para concluir a instalação.3 No ecrã Configuração do controlador, apenas quando for solicitado,introduza o cabo USB numa das portas USB do computador e clique Seguinte.29 Português
UTILIZAR O FLIGHT MULTI PANEL DA LOGITECH GBotão de funçãoAPHDGNAVIASALTVSAPRREVde Piloto AutomáticoInterruptor principal para activar ou desactivaro Piloto AutomáticoO avião voa para o rumo seleccionado na bússolaO avião voa para a frequência NAV1 ou GPS seleccionadasO avião voa à velocidade seleccionadaO avião voa e mantém a altitude seleccionadaO avião sobe ou desce à velocidade vertical seleccionadaO avião voa na abordagem ao localizador da pistaO avião voa numa rota inversa desde o localizador30 Português
AJUSTAR DEFINIÇÕES DO PILOTO AUTOMÁTICOPara alterar os valores das definições do piloto automático, primeiro rode o interruptorde selecção à esquerda no Multi Panel para a função que pretende ajustar.Rode o controlo giratório à direita no ecrã LED para aumentar ou diminuir os valoresda função que seleccionou.Por exemplo, se pretende ajustar a definição de altitude, primeiro, rode o interruptorde selecção à esquerda para ALT e, em seguida, aumente ou diminua a definiçãode altitude pretendida utilizando os controlos giratórios à direita.Para activar qualquer uma das funções do piloto automático, seleccione primeiroa função, por exemplo, HDG, NAV, etc. e, em seguida, prima o interruptor principaldo piloto automático.É possível utilizar cada uma das funções do piloto automático individualmente,mas é mais comum utilizar uma combinação de funções. Por exemplo, se pretendevoar a 20 000 pés a uma velocidade de 150 nós num rumo de 210 graus, seleccioneprimeiro a função ALT com o selector à esquerda e ajuste a altitude para 20 000 comos controlos giratórios à direita.Em seguida, rode o selector para IAS e ajuste a velocidade para 150. Em seguida,rode o selector para HDG e ajuste o rumo para 210. Para activar as definiçõesde altitude, velocidade e rumo, ligue o acelerador automático para "Arm"(isto permite que o piloto automático controle os motores para manter a velocidade)e, em seguida, prima os botões HDG, IAS e ALT no ecrã LED e prima o botão AP paraactivar o piloto automático. O avião deve subir ou descer para 20 000 pés, girar parao rumo 210 graus e manter a velocidade a 150 nós.Note: Nem todas as aeronaves disponíveis no Microsoft FSX possuem a gama totalde funções do piloto automático. Por exemplo, o Cessna C172SP Skyhawk e muitasaeronaves mais pequenas não têm um controlo activação do acelerador automático– utilizar esta função no Multi Panel não produz nenhum efeito no piloto automáticoda aeronave.31 Português
RESOLUÇÃO DE PROBLEMASApós instalar o plug-in adequado para o Flight Simulator X (FSX), na próxima vezque executar o FSX, será avisado que está a tentar carregar o plug-in do Painelda Logitech G para FSX – clique Sim neste ecrã.Em seguida, deve ver um aviso de segurança do Windows perguntando se pretendeexecutar LogiFlightSimX.exe – Clique Sim nesse ecrã.Finalmente, o FSX pergunta se pretende considerar o LogiFlightSim.exe como softwarefidedigno – clique Sim.Após instalar o software do Painel, os botões e controlos do Painel devem serconfigurados automaticamente para controlar as funções no software FSX.Se o software FSX não reconhecer o Painel, desligue o cabo USB e ligue-o novamente.Para obter ajuda adicional com outros simuladores ou outras dúvidas,consulte a página de suporte em logitech.com/support/multi-panel.SUPORTE TÉCNICOSuporte online: support.logitech.com32 Português
INLEIDINGHet Multi Panel is met Microsoft Flight Simulator X verbondenom verschillende functies te bedienen, waaronder de instellingenvoor de automatische piloot en klep- en trimbediening.DRAAIKNOP VOOR INSTELLINGENKEUZESCHAKELAARINSTELLINGEN AUTOMATISCHEPILOOTAUTOTHROTTLE INEN UITSCHAKELENDRAAIKNOP PITCH-TRIMKLEPPEN INTREKKEN (UP)OF UITSCHUIVEN (DOWN)FUNCTIEKNOPPENAUTOMATISCHE PILOOT33 Nederlands
INSTALLATIEZet het Multi Panel vast op de meegeleverde bevestigingsbeugel. Duw de schroevendoor de gaten in de hoeken van het paneel in de beugel erachter en draai ze vast.Als je al een Logitech Flight Yoke System hebt, kun je het paneel en de beugel metde meegeleverde schroeven bovenop de stuurkolom bevestigen.123INSTALLATIE VOOR WINDOWS 10, WINDOWS 8.1,EN WINDOWS 7BELANGRIJK: INSTALLEER EERST DE DRIVERS ALVORENS DE SOFTWARETE INSTALLERENDRIVERINSTALLATIE1 Ga naar logitech.com/support/multi-panel om de recentste drivers en softwarevoor je besturingssysteem te downloaden.2 Koppel het apparaat los
AUTO THROTTLE ARM PITCH TRIM ROTARY CONTROL AUTOPILOT SETTINGS SELECTOR AUTOPILOT FUNCTIONS BUTTONS FLAPS RETRACT (UP) OR EXTEND (DOWN) 5 English INSTALLATION Fix the Multi Panel to the supplied mounting bracket. Insert the screws through the holes at the corners of the Panel into the bracket behind and tighten.