Transcription
CNA E-TOOLUSER GUIDEVERSION 3.01
TABLE OF CONTENTSCNA INTRODUCTION . 3CNA PROCESS OVERVIEW . 7SECTION I: DASHBOARD SCREENS . 11CHAPTER 1: HOME SCREEN . 12CHAPTER 2: SEARCH . 16SECTION II: CNA INPUT SCREENS . 20CHAPTER 3: OPTIONS . 21CHAPTER 4: CNA SUMMARY . 26CHAPTER 5: ASSESSMENT SCOPE . 33CHAPTER 6: PARTICIPANTS . 36CHAPTER 7: SITES . 39CHAPTER 8: UNIT TYPES . 44CHAPTER 9: BUILDINGS . 48CHAPTER 10: UNIT AND COMMON SPACES . 56CHAPTER 11: PARKING. 64CHAPTER 12: UTILITY TYPES AND RATES . 70CHAPTER 13: UNITS INSPECTED . 73CHAPTER 14: COMPONENTS, ALTERNATIVES, AND RECOMMENDATIONS . 79CHAPTER 15: NARRATIVES .101CHAPTER 16: FINANCIAL FACTORS .105CHAPTER 17: REPAIR REPLACE DECISION .109SECTION III: VALIDATION SCREENS .116CHAPTER 18: FLAGS .118CHAPTER 19: REPAIR NEEDS, FUTURE NEEDS, FINANCIAL SCHEDULE,AND ESTIMATED PERIOD RECAP.122APPENDICES . 130TABLE OF CONTENTS2
CNA INTRODUCTIONHOW TO USE THIS GUIDEThis instructional guide is a companion to the Capital Needs Assessment (CNA) e-Tool created by theU.S. Department of Housing and Urban Development (HUD) and the U.S. Department of Agriculture(USDA). This version of the guide applies to version 3.0 of the e-Tool, a fully web-based applicationwith a single user interface. This guide will assist you in understanding the CNA process flow,entering information into CNAs, editing CNAs, finding and sending CNAs, and validating the dataentered into CNAs.The CNA e-Tool is comprised of three types of screens: (1) Dashboard, (2) CNA Input, and(3) Validation screens. From the Dashboard screens, you will be able to locate and open CNAsquickly using the Search function and preset Filters. In the CNA Input screens, you will enter allthe relevant data and information about the property. The Validation screens will show you thecalculated results of the entered data and allow you to respond to flags.This guide contains a separate section for each type of screen. The sections on the Dashboard, CNAInput, and Validation screens will provide you with information on how to enter data into the e-Tooland understand how to use the e-Tool’s functionality. Each section describes how the screens areorganized and what information is required. In addition, this guide also provides a Process Overviewchapter and Appendices with supplemental information.SCREEN TYPE SECTIONSBelow is a brief summary of the three screen types and their corresponding sections.DASHBOARD SCREENSAfter logging into the CNA e-Tool, you will first see your personalized Dashboard. The Dashboard isthe default home screen of the CNA e-Tool for external users. It displays CNAs that are relevant toyou. This section describes the Dashboard screen views and functionality. From your Dashboard youcan quickly access CNAs that are in your possession, are in your partner firm’s possession, or havebeen submitted to your Approving Agency, such as HUD.This section also describes the left menu bar of the screen, which is divided into two tabs: My CNAs — provides quick preset filters based on the types and statuses of CNAs you yourselfare working on; and Search — allows you to search for all CNAs that are being worked on within your firm ororganization.A user opens a CNA displayed on the Dashboard screen by clicking on the Assessment ID of theCNA. The Dashboard is also where a CNA is initiated—or first created.CNA INTRODUCTION3
CNA INPUT SCREENSOnce you open a CNA, there are numerous input screens that you and your partner complete, aswell as an Options menu that allows you to take actions that affect the CNA as a whole. This sectionprovides detailed instructions for entering information into the CNA. Each CNA screen is describedin a separate chapter, as is the Options menu. The individual chapters in this section are as follows:1. Options — details the actions that a user can take from the Options menu, which differ slightlydepending on the User type and CNA type. This chapter describes the actions available from theOptions menu, including: submitting a CNA, sending a CNA to a partner, creating a new versionof a CNA, exporting a CNA to an Excel file, and importing portions of another CNA to the oneon which you are currently working.2. CNA Summary — defines how the CNA Submitter/Initiator selects the Approving Agency,CNA type, and program type or event, which ultimately determines the users’ roles and thescreens each user will be able to enter and edit.3. Assessment Scope — provides instructions on how to enter information that defines the scopeand purpose of the CNA, including information about units inspected, vacancies, energy audits,and special inspections required.4. Participants — describes how to enter information about the parties involved in developing theCNA, such as the owner, purchaser, needs assessor, lender, architect, etc.5. Sites — explains how to enter information about individual property sites. A site usuallycontains one or more buildings. However, a property may have multiple scattered sites oran owner may have acquired a site for ancillary purposes, such as parking.6. Unit Types — describes how to enter information about all the unique unit types withina property.7. Buildings — describes how to enter all of a property’s buildings for each site that has structureson it. Buildings are assigned to sites on this screen as well.8. Units and Common Spaces — explains how to assign unit types to individual buildings.The chapter also instructs users on how to add information about all of the common spacesassociated with that site and/or building, both interior and exterior.9. Parking — describes how to enter information on covered and uncovered surface parking,common garages, and in-unit garage parking.10. Utility Types and Rates — describes how to list all of the utilities used in the property by typeand who pays for them (residents or owners), as well as the unit of measure and cost associatedwith each.11. Units Inspected — describes how to enter information about which specific units are to be and/or were inspected.12. Components, Alternatives, and Recommendations — explains where and how to list all theproperty’s physical attributes, assign one or more Alternatives for each Component, and indicatethe recommended Alternative.13. Narratives and Attachments — describes how to enter any narrative that is pertinent to theCNA. The chapter also describes how to upload documents with supplemental informationas attachments.CNA INTRODUCTION4
14. Financial Factors — provides detailed information about how the CNA Submitter specifiesthe parameters used to structure the Financial Plan for funding recommended future repairsand replacements.15. Repair Replace Decision — describes how the CNA Submitter records final decisions to alterany of the Preparer’s Recommendations on Components and Alternatives. The Submittercan select a Component, review the Component Alternatives that were recommended by thePreparer, and select a different Alternative as the final decision.Each chapter includes snapshots of the screen and describes how to complete the various fields.Some chapters contain a More Information subsection, which provides additional context andinstructions for the screen highlighted in that particular chapter.VALIDATION SCREENSThis section describes how to validate the data entered into a CNA and how to view related findingsand reports. It describes how to validate the CNA using the button at the top right side of each of theCNA input screens, as well as how to interpret information available under the Validation tab, whichis available at the top of the left sidebar. Under the Validation tab, you can view different areas ofvalidated results. These views include: Flags View — displays validation flags and is where a user can enter responses to those flags. Repair Needs View (read only) — displays a summary of repair needs. Future Needs View (read only) — displays a summary of future needs. Financial Schedule and Estimate Period Recap (read only) — displays a financial summaryand schedule. Reports — displays links to generate reports such as Property Insurance Schedule andAssessment Summary Report.OTHER USER GUIDE SECTIONSPROCESS OVERVIEWThe Process Overview section provides information about the CNA process flow, the types of CNAe-Tool users, user roles within the system, and various user pathways. It describes how the systemworks as a whole.APPENDICESThis section contains additional information that will assist you in understanding how to completethe fields in the CNA input screens and other important items that require more detailedinstructions, including the following: Copy/Paste function — allows you to add, edit, and delete data from a CNA using Excel, so youcan copy data from and paste data into a CNA. Identifying Unit and Parking types — clarifies the distinction between in-unit garage spacesand common garage spaces.CNA INTRODUCTION5
Data Fields by User path — shows how some input fields on screens vary depending on theuser type and CNA type.PLEASE NOTE: Within the CNA e-Tool, what the user sees for a particular field or fields is dependentupon the user type, CNA type, and program or event type. This affects a relatively small percentageof the fields. These dependencies are noted in the CNA Dependency User Path Matrix located in theAppendix. To alert users about these dependencies, so that they are not concerned if a particular fieldlooks different from what is shown in this Guide, an asterisk is visible next to the description of theapplicable fields.ADDITIONAL RESOURCESIf you cannot find the information you are looking for, please see the additional resources below: For more information about Multifamily Accelerated Processing, see the MAP Guide. For CNA e-Tool trainings, see the Capital Needs Assessment Training Curriculum on theHUD Exchange. If you have questions related to the CNA e-Tool, please submit them to the Ask a Questionsupport desk on the HUD Exchange.CNA INTRODUCTION6
CNA PROCESS OVERVIEWThis section provides an overview of the CNA completion and submission process within the CNAe-Tool and is divided into three sections: The CNA Process Flow shows how developing and completing a Capital Needs Assessment (CNA)in the CNA e-Tool fits in the larger CNA process. The User Roles section explains the various roles and permissions in the CNA e-Tool and whofulfills these roles for a given CNA. The User Pathways section provides a framework for anyone who touches the CNA anddetermines the user’s responsibilities. The design of version 3.0 of the CNA e-Tool is predicatedon the “User Path” approach — meaning, who the user is, the CNA type, and the HUD programfor which the CNA is being prepared determine:- What information is requested on the screens;- What screens the user can view;- What screens users may edit, and are responsible for entering data; and- Who can submit a completed CNA to the Approving Agency.CNA PROCESS FLOWThis chart shows how the CNA e-Tool fits in the larger Capital Needs Assessment process. It explainswhich role performs which function. Steps 2 through 4 below are completed using the CNA e-Tool.Steps 5 through 7 are completed by the Approving Agency after the CNA is submitted.CNA PROCESS OVERVIEW7
USER ROLESThere are three primary user roles in the CNA e-Tool (the Submitter, Preparer, and Approving Agency).The users for each of these roles will depend on the type of CNA that is being submitted. For example,a 213 Cooperative Asset Development CNA will have a lender as the Submitter, a needs assessor asthe Preparer, and HUD as the Approving Agency. In some cases, the Submitter and Preparer will be thesame user. Find your program in the table below to see the users who fulfill each role per program type. The Approving Agency reviews the CNA once it is submitted. The Approving Agency will be HUDor USDA. The Submitter initiates the CNA by creating a new CNA in the e-Tool and submits it to the ApprovingAgency. The Submitters will generally be lenders, Participating Administrative Entities (PAEs),and Public Housing Agency (PHA) users. For a select group of programs, the needs assessorscan be Submitters. The Preparer fills out most of the input screens but does not initiate or submit the CNA. The Preparersare typically the needs assessors, but at times may be the PHAs. As mentioned above, for someprograms the needs assessors can both prepare and submit the CNA to the Approving Agency.Approving Agency ProgramHUDSubmitterPreparerLenderNeeds AssessorNeeds AssessorNeeds AssessorM2MPAENeeds AssessorRAD-PH RehabPHANeeds AssessorRAD-PH New ConstructionPHANeeds Assessor orPHA213 Cooperative220 Redevelopment221(d)(4)LIHTC 221(d)(4) Pilot223(a)(7) Limited Refi223(f) Refi-Acq223(f) Refi of 202231 Elderly241(a) Supplemental10 yr update, insured mtgPPC/Loan Mod, insured mtgTPA, assumption of insured mtgPRACsHAP RenewalRent Increase/HAP amendmentChange of Ownership UninsuredOther Asset ManagementRAD – MFRAD – PRACPost-M2MOther Asset RecapitalizationRAD-PH Sub RehabCNA PROCESS OVERVIEW8
USDAAs – IsAs - ImprovedPost RehabNeeds AssessorNeeds AssessorConstruction CNACNA PROCESS OVERVIEW9
USER PATHWAYSSubmitters and Preparers have different responsibilities in the CNA process depending on the CNA type,as well as the program type. There are three CNA types related to HUD programs. These are as follows: Asset Development Asset Management Asset RecapitalizationFind your CNA type and program type in the left column in the chart below to see how the CNA movesbetween the different users. If the Preparer and Submitter are the same user (i.e., needs assessor),then the CNA does not need to be sent between steps 1, 2, and 3.Step 1. The Submitter initiates the CNA by first creating it and sends it to the Preparer.Step 2. The Preparer drafts and validates the CNA and sends it back to the Submitter.Step 3. The Submitter reviews the CNA, makes a decision on each Component, enters the financialfactors information, and submits the CNA to the Approving Agency.CNA PROCESS OVERVIEW10
SECTION I:DASHBOARD SCREENSThe Dashboard screens are the firstscreens a user sees upon logging into theCNA e-Tool.The left sidebar portion of the screen hastwo tabs: My CNAs SearchThe My CNAs tab contains quick pre-setfilters, which allow you to see the CNAsyou are or were in possession of, by CNAType & Program, and by Status. You mayclick on a filter to only display CNAs in thatparticular category. You can also filter byCNA status.The Search tab also has quick filters, byCNA Type and programs. In the searchview, the filters account for all the CNAswithin your organization. Above the setof quick filters, you can also search byselecting your own parameters.
CHAPTER 1:HOME SCREENOVERVIEWThe Home screen is the main home pageof the CNA e-Tool Dashboard. Fromhere you can access CNAs that you, yourorganization, or your partner organizationpossess. New CNAs are also created onthe Home screen.The CNAs in “My CNAs” are the CNAs thatare most relevant to you. This includesCNAs that are waiting to be assigned toan individual in your organization, arealready in your possession, are in yourpartner organization’s possession, or havebeen submitted. This view will only showCNAs that have been modified in the lastsix months.
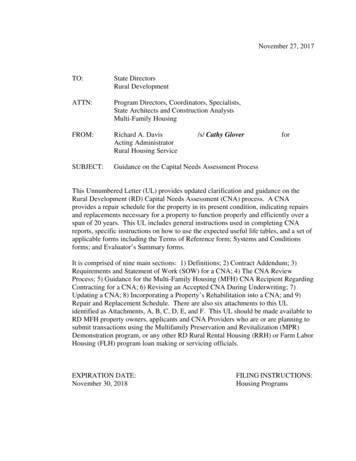
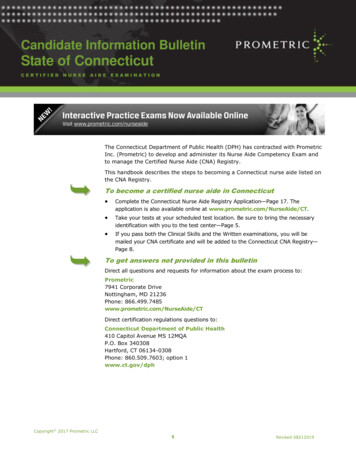
DASHBOARD VIEW —MY CNAs1263784951START NEW ASSESSMENT6TYPE & PROGRAM2NEW ASSIGNMENTS RECEIVED7USDA3MY DESK8NON-USDA OR HUD4MY PARTNER’S DESK9STATUS5WITH AGENCYHOME SCREEN13
NEW CNA11. START NEW ASSESSMENTClick on this button to create a newassessment. The CNA will not be createduntil you fill out and save the CNASummary section.DASHBOARD SECTIONS22. NEW ASSIGNMENTS RECEIVEDThis contains CNAs that have beensent to your organization by a partnerorganization and have not been claimedby anyone within your organization.Once a CNA is edited by a memberof your organization, it will appear inthat person’s My Desk section. Thissection appears for Preparers only.3. MY DESK3This contains CNAs that are currentlyin your possession. CNAs are in yourpossession if you create a new CNAor make any edit on a CNA within yourorganization.454. MY PARTNER’S DESKThis contains CNAs that are currentlypossessed by your partner organization.A partnership is established when aCNA is sent from the Submitter toa partner organization selected fromthe “Options” menu to be the Preparer.See Chapter 3: Options for how to senda CNA to a partner organization.5. WITH AGENCYThis contains CNAs that have beensubmitted to the Approving Agency.See Chapter 3: Options for how tosubmit a CNA.HOME SCREEN14
DASHBOARD FILTERSClicking on a filter button will narrow down the dashboardresults and only display CNAs that match the filter.676. TYPE & PROGRAMThese options will filter the resultsbased on the type of CNA (AssetDevelopment/Asset Recapitalization/Asset Management) or the programfor which the CNA is being prepared.This only contains CNAs with HUD asthe Approving Agency.7. USDAThis option filters the results based onthe type of USDA CNA.898. NON-USDA OR HUDThis option filters the results for CNAsthat do not have HUD or USDA as theApproving Agency.9. STATUSThis filters the results based on thestatus of the CNA. CNAs can have thefollowing statuses: Draft–Unclaimed – The CNA wassent from a partner but has notbeen assigned or claimed. Draft–On My Desk – The CNA hasnot been submitted and has notbeen sent to a partner. Draft–On Partner's Desk – TheCNA has been sent to a partner buthas not yet been submitted. Submitted – The CNA has beenofficially submitted to the ApprovingAgency for review. Returned – The CNA has beenreturned by the Approving Agency. Approved – The CNA has beenapproved by the Approving Agency.HOME SCREEN15
CHAPTER 2:SEARCHOVERVIEWIf you need to locate CNAs yourorganization is working on that do notappear under My CNAs, go to the Searchtab. The Search tab shows all CNAs relatedto your organization and has additionalfilters to help narrow down the results.Each CNA displays high-level informationthat you can use to identify theassessment, including: Assessment IDProperty NameLocationLast Date Modified — This is the datethe CNA was last edited.Sent/Status Date — This is the date theCNA was submitted or changed status.Partner — This is the name of yourpartner organization and its individualmember who last edited the CNA.
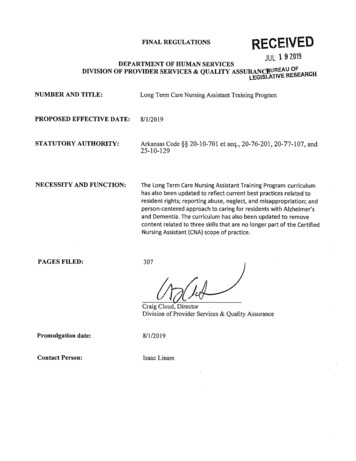
SEARCH122A2B34561SEARCH RESULTS4USDA2SEARCH YOUR ORGANIZATION/AGENCY CNAs5NON-USDA OR HUD6STATUS3TYPE & PROGRAMSEARCH17
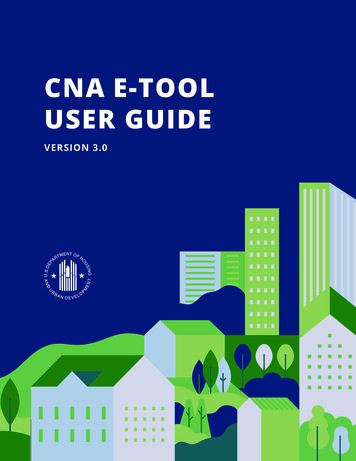
SEARCH11. SEARCH RESULTSThis displays CNAs from your firmbased on the keyword search andfilters selected.SEARCH FILTERSClicking on a filter button will narrow down the search to onlydisplay CNAs that match the filter.2. SEARCH YOUR ORGANIZATION/AGENCY CNAsUse this filter to search through yourfirm’s CNAs.2A. SEARCH CRITERIA2ASelect which CNA field you would liketo search by. This includes: Date Range Property Name State FHA Number Property ID RAD PIC Number AMAS Number Staff Name Partner Number2B. KEY WORD SEARCH2B3Type in a keyword. The system willsearch for CNAs containing this keyword in the specified data field.3. TYPE & PROGRAMFilter the results by CNA typesor programs.4. USDA4Filter the results by USDA typesor programs.SEARCH18
5. NON-USDA OR HUD5Filter the results by non HUD orUSDA programs.6. STATUS6This filter shows the results based onthe status of the CNA. CNAs can havethe following statuses: Draft – Unclaimed – The CNA wassent from a partner but has notbeen assigned or claimed. Draft – On My Desk – The CNA hasnot been submitted and has notbeen sent to a partner. Draft – On Partner’s Desk – TheCNA has been sent to a partner buthas not yet been submitted. Submitted – The CNA has beenofficially submitted to the ApprovingAgency for review. Returned – The CNA has beenreturned by the Approving Agency. Approved – The CNA has beenapproved by the Approving Agency.SEARCH19
SECTION II:CNA INPUT SCREENSOnce a CNA is initiated (created), you cannavigate to different data and informationscreens by using the navigation sidebartabs. Preparers and Submitters enterall of the information required on eachof the screens listed to prepare the CNAfor submission.
CHAPTER 3:OPTIONSOVERVIEWUse the “Options” menu at the top of aCNA to complete the following actions: Delete CNA Import data from an existing CNA Export data from CNA Create a new version of the CNA Send the CNA to a partner Submit the CNA
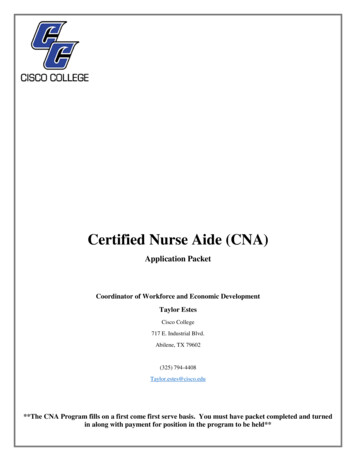
INSTRUCTIONS ONENTERING DATA1234561DELETE THIS CNA4CREATE A NEW VERSION OFTHE CNA2IMPORT DATA FROM ANEXISTING CNA5SEND THE CNA TO A PARTNERFIRM3EXPORT DATA FROM CNA6SUBMIT THE CNAOPTIONS22
1. DELETE THIS CNA1Click “Delete this CNA” to delete aCNA. After clicking, a confirmationscreen will appear. Click “Cancel” or“Confirm.”Note: Only the Submitter organizationthat initiated the CNA can delete it whilehaving possession of it. This actionwill delete the CNA from the partner’sDashboard also. Deleting a CNA isirreversible.22. IMPORT DATA FROM ANEXISTING CNAYou can import data from an existingCNA into the current CNA. You canchoose to import data from selectedsections.2BNote: Importing data from a CNA willadd to the existing data within a section.Existing data will not be overwritten.2A. Click “Import from a CNA” and theimport screen will appear.2C2B. The screen will list all the CNAsyou can import from. You can searchfor a CNA by entering the criteria.2C. Click on the CNA you would liketo import data from.2D. Click the check box next to thesection(s) you would like to importdata from. These include: Unit Types Buildings Components Alternatives2D2E. Click “Import Data.”2EOPTIONS23
3. EXPORT DATA FROM CNA3Click “Export CNA” to export data fromselected sections. Check the section(s)that you would like to export. If youwant to export all data, check “SelectAll.” Next, click “Export.” Data is exported in an Excel format. Each section appears as a differenttab in the Excel file. Each data field appears on aseparate column within a tab. Each row represents a differentpiece of data. For example, on theBuildings tab, each row representsdata for a specific building.44. CREATE A NEW VERSION OFTHE CNAClick “Create a New Version” toduplicate the CNA. This will create aseparate CNA with a new AssessmentID and it will appear in “My Desk.” Thisnew version will preserve the samepartner organization, selected agency,and CNA type as designated in theoriginal CNA that cannot be changed.Other data can be edited freely.Note: Both the Submitter and thePreparer partners can create anew version, regardless of who is inpossession. When a new version ofa CNA is created by either partner,that CNA will appear in both partners’Dashboards.OPTIONS24
5. SEND THE CNA TO A PARTNERFIRM5Click “Send this CNA” to send the CNAto your partner firm.5A5A. First, select the partner firm tosend the CNA to.5BNote: Once a partner firm is selectedit cannot be changed. If you send thisCNA or select “Create New Version,”in the future, the partner firm will beautomatically selected.5B. Next, click “Send CNA.”6. SUBMIT THE CNAClick “Submit CNA” to submit acompleted CNA to the ApprovingAgency. This can only be done if thereare no severe flags. All warning flagsshould be addressed with comments.Note: The submitted version of a CNAcannot be edited. If the agency returns asubmitted CNA, the returned CNA cannotbe edited either. “Create New Version”should be selected, as the new versionmay be edited to address the reasonsthe agency returned the CNA.6OPTIONS25
CHAPTER 4:CNA SUMMARYOVERVIEWThe CNA summary screen is whereusers define the basic scope of the CNA,including the Approving Agency, CNA type,and program/event.The selection of Approving Agency, CNAtype, and program/event will determinewhich information will be required in theassessment. Certain data fields will appearor be hidden accordingly.
INSTRUCTIONS ONENTERING DATA11A1B1C2341CNA SUMMARY INFORMATION3FAMILY/ELDERLY INDICATOR2PROPERTY IDENTIFIER4FEDERALLY ASSISTED INDICATORCNA SUMMARY27
If Asset Recapitalization is selected as the CNA type:5If user is associated with multiple organizations:65HIRING OUTSIDE NEEDSASSESSOR6MULTIPLE ORGANIZATIONSCNA SUMMARY28
1. CNA SUMMARY INFORMATION:1A. APPROVING AGENCYThis is the agency to which the CNA willbe submitted for approval.1A1B1C1B. CNA TYPEUSDA and HUD each have certainCNA types. Select the one that fits thepurpose for the CNA.1C. PROGRAM/EVENTFor HUD CNA types, identify the specificprogram or event for which the CNA willbe used.22. PROPERTY IDENTIFIERThe following data fields will appeardepending on your previous selections.PROPERTY IDEnter the iREMS property ID number(i.e., the number assigned by HUD’sasset management system to eachasset in the portfolio). If the property isnot already insured or assisted by HUD,this is not required.USDA AMAS IDEnter the Automated Multi-FamilyAccounting System (AMAS) ID number.This is required for USDA submissions.HUD FHA #Enter the Federal HousingAdministration (FHA) loan applicationnumber. This is required for HUD FHAinsurance programs.RAD-PICEnter the Rental AssistanceDemonstration (RAD) Public and IndianHousing Information Center (PIC)number.Within the CNA e-Tool, displayed data entry field(s) may vary depending on the user’sselection of CNA type and program or event type. Due to these dependencies, users maysee screens that look different from those shown in this Guide. To alert users about thesepossible variations, fields with dependencies are marked with an asterisk. This affects arelatively small percentage of the fields. For a complete listing of dependencies, see theCNA Dependency User Path Matrix located at the end of this Guide.CNA SUMMARY29
33. FAMILY/ELDERLY INDICATORIf 50% or more of the units arerestricted to occupancy by personsages 55 or disabled adults, select“Yes.” Otherwise, select “No.” SeeConsiderations for the Family or ElderlyIndicator for more information.44. FEDERALLY ASSISTED INDICATORSection 504 of the Rehabilitation Actof 1973 applies to recipients of “federalfinancial assistance.” Determinewhether the property is federallyassisted and select “YES” or “NO.”This field only appears for HUD AssetDevelopment and Asset ManagementCNAs for properties with insuredloans. See Considerations for FederallyAssisted Indicator for more information.55. HIRING OUTSIDE NEEDS ASSESSORSelect either “YES” or “No” to indicatewhether you are hiring an outside needsassessor to prepare this assessment.This field appears only for RentalAssistance Demonstration (RAD)Public Housing (PH) New Constructionand RAD-PH Rehabilitation (Rehab)programs.6. MULTIPLE ORGANIZATIONS6Within the CNA e-Tool, displayed data entry field(s) may vary depending on the user’sselection of CNA type and program or event type. Due to these dependencies, users maysee screens that look different from those shown in this Guide. To alert users about thesepossible variations, fields with dependencies are marked with an asterisk. This affects arelatively small percentage of the fields. For a complete listing of dependencies, see theCNA Dependency User Path Matrix located at the end of this Guide.If the user’s ID is associated withmultiple organizations, then a questionwill appear asking for which of theseorganizations the CNA is beingprepared.Note: Some PHAs employ consultants forbusiness functions and some consultantsprovide
Within the CNA e-Tool, what the user sees for a particular field or fields is dependent upon the user type, CNA type, and program or event type. This affects a relatively small percentage of the fields. These dependencies are noted in the