Transcription
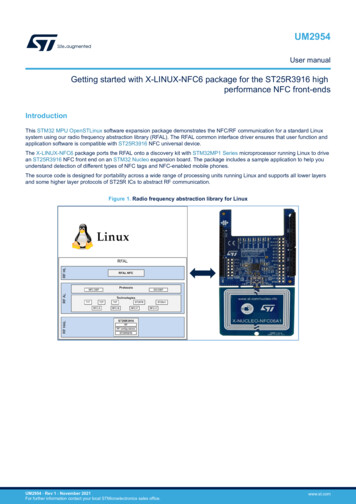
UM2954User manualGetting started with X-LINUX-NFC6 package for the ST25R3916 highperformance NFC front-endsIntroductionThis STM32 MPU OpenSTLinux software expansion package demonstrates the NFC/RF communication for a standard Linuxsystem using our radio frequency abstraction library (RFAL). The RFAL common interface driver ensures that user function andapplication software is compatible with ST25R3916 NFC universal device.The X-LINUX-NFC6 package ports the RFAL onto a discovery kit with STM32MP1 Series microprocessor running Linux to drivean ST25R3916 NFC front end on an STM32 Nucleo expansion board. The package includes a sample application to help youunderstand detection of different types of NFC tags and NFC-enabled mobile phones.The source code is designed for portability across a wide range of processing units running Linux and supports all lower layersand some higher layer protocols of ST25R ICs to abstract RF communication.Figure 1. Radio frequency abstraction library for LinuxUM2954 - Rev 1 - November 2021For further information contact your local STMicroelectronics sales office.www.st.com
UM2954Overview1Overview1.1Main featuresThe X-LINUX-NFC6 software expansion package includes the following features: 1.2Complete Linux user space driver (RF abstraction layer) to build NFC enabled applications using theST25R3916 NFC front-end IC.Linux host communication with the ST25R3916 via high-speed SPI interface.Complete RF/NFC abstraction (RFAL) for all major technologies and higher layer protocols:–NFC-A (ISO14443-A)–NFC-B (ISO14443-B)–NFC-F (FeliCa)–NFC-V (ISO15693)–P2P (ISO18092)–ISO-DEP (ISO data exchange protocol, ISO14443-4)–NFC-DEP (NFC data exchange protocol, ISO18092)–Proprietary technologies (ST25TB, Kovio, B’, iClass, Calypso, etc.)Sample implementation available with the X-NUCLEO-NFC06A1 expansion board plugged on anSTM32MP157F-DK2Sample application to detect several NFC tag types and mobile phones supporting P2PPackage architectureThe software package runs on the A7 core of the STM32MP1 series microprocessor. The X-LINUX-NFC6interacts with the lower layers libraries and SPI lines exposed by the Linux software framework.Figure 2. X-LINUX-NFC6 application architecture in Linux environmentUM2954 - Rev 1page 2/15
UM2954Hardware setup2Hardware setupHardware requirements: PC/virtual-machine with Ubuntu 18.04 or higherSTM32MP157F-DK2 board (discovery kit)X-NUCLEO-NFC06A18 GB micro SD card to boot the STM32MP157F-DK2SD card reader/LAN connectivityUSB Type-A to Type-micro-B USB cableUSB Type-A to Type-C USB cableUSB PD compliant 5 V 3 A power supplyThe PC/Virtual-machine forms the cross-development platform to build the RFAL library and application code todetect and communicate with NFC devices through the ST25R3916 IC.2.1How to connect the hardwareStep 1.Plug the X-NUCLEO-NFC06A1 expansion board onto the Arduino connectors on the bottom side of theSTM32MP157F-DK2 discovery board.Figure 3. STM32 Nucleo expansion board and discovery board Arduino connectors1. X-NUCLEO-NFC06A1 expansion board2. STM32MP157F-DK2 discovery board3. Arduino connectors123Step 2.UM2954 - Rev 1Connect the ST-LINK programmer/debugger embedded on the discovery board to your host PC via theUSB micro B type port (CN11).page 3/15
UM2954How to connect the hardwareStep 3.Power the discovery board through the USB Type C port (CN6).Figure 4. Full hardware connection setupUM2954 - Rev 1page 4/15
UM2954Software setup3Software setupBefore you begin, power the STM32MP157F-DK2 discovery kit via a USB PD compliant 5 V, 3 A power supplyand install the Starter Package according to the instructions in the STM32MP157x-DK2 Getting Started wiki. Youneed a minimum 8 GB microSD card to flash the bootable images.To run the application, update the platform configuration by updating the device tree to enable the relevantperipherals. You can do this quickly by using the prebuilt images available, or you can develop the device tree andbuild your own kernel images.You can also (optionally) build this software package by including the Yocto layer (meta-nfc6) in the ST distributionpackage. This operation builds the source code and includes the device-tree modifications along with compiledbinaries in the final flashable images. For detailed steps describing the process, see Section 3.5 .You can connect to the discovery kit from the host PC via TCP/IP network using ssh and scp commands, orthrough serial UART or USB links using tools like minicom for Linux or Tera Term for Windows.RELATED LINKSRefer to these instructions for installing the starter package onto the discovery kit3.1 Steps for quick evaluation of software on page 53.2 How to update the platform configuration in the developer package on page 54 How to transfer files using Tera Term on page 8Refer to this wiki page for alternative ways of estashing PC communication with the board3.1Steps for quick evaluation of softwareStep 1.Flash the starter package on the SD card.Step 2.Boot the board with the starter package.Step 3.Enable Internet connectivity on the board via Ethernet or Wi-Fi.Step 4.Download prebuilt images from the X-LINUX-NFC6 web page on the ST website.Step 5.Use the following commands to copy the device tree blob and update the new platform configuration.If network connectivity is not available, you can transfer the files locally from your Windows PC to thediscovery kit using Tera Term.PC PC PC BoardBoardBoardStep 6.cd X-LINUX-NFC6 v1.0.0/STM32MP157F-DK2 DeviceTree/Binariesscp stm32mp157f-dk2.dtb root@ ip address of board :/boot/ssh root@ ip address of board /sbin/depmod –a sync rebootAfter the board boots up, copy the application binary and the shared lib to the discovery kit.PC PC PC PC BoardBoardBoardcd X-LINUX-NFC6 v1.0.0\NFCPollerApplication\Binariesscp ./nfcpoller st25r3916 root@ ip address of board :/usr/binscp ./librfal st25r3916.so root: ip address of board :/usr/libssh root@ ip address of board cd /usr/bin chmod x nfc poller st25r3916 ./nfc poller st25r3916The application starts running once these commands are executed.Note:In case network connectivity is not available, refer to Section 4 for instructions on how to transfer the filelocally.3.2How to update the platform configuration in the developer packageFollow the procedure below to set up the development environment.UM2954 - Rev 1page 5/15
UM2954How to build the RFAL Linux application codeStep 1.Download the developer package and install the SDK in the default folder structure on your Ubuntumachine.You can find the instructions here: Install SDKStep 2.Open the device tree file ‘stm32mp157f-dk2.dts’ in the developer package source code and add thecode snippet below to the file:This updates the device tree to enable and configure the SPI4 driver interface.&spi4 {pinctrl-names "default", "sleep";pinctrl-0 &spi4 pins b ;pinctrl-1 &spi4 sleep pins b ;/*status "disabled";*/cs-gpios &gpioe 11 0 ;status "okay";spidev@0x00 {compatible "semtech,sx1301";spi-max-frequency 5000000 ;reg 0 ;};};Step 3.Compile the developer package to get the stm32mp157f-dk2.dtb file.Refer to the following link for help: Modify, rebuild and reload the Linux kernel.3.3How to build the RFAL Linux application codeBefore you begin, you have to download the SDK, install and enable it. Download the application from X-LINUXNFC6.Step 1.Run the commands below to cross-compile the code:These commands build the following files:––the example application: nfc poller st25r3916shared lib for running the example application: librfal st25r3916.soPC sudo apt-get install cmakePC cd X-LINUXNFC6 v1.0.0\NFCPollerApplication\Source\Linux RFAL st25r3916 v2.4.0\linux demo\buildPC cmake .PC make3.4How to run the RFAL Linux application on STM32MP157F-DK2Step 1.Copy generated binaries onto the discovery kit using the below commands.PC scp X-LINUX-NFC6 v1.0.0/NFCPollerApplication/Source/Linux RFAL st25r3916 v2.4.0/linux demo/build/nfc poller/nfc poller st25r3916root@ board ip address :/usr/binPC scp X-LINUX-NFC6 v1.0.0/NFCPollerApplication/Source/Linux RFAL st25r3916 v2.1.0/linux demo/build/rfal/st25r3916/librfal st25r3916.so root@ board ip address :/usr/libStep 2.Open terminal on the discovery kit board or use ssh login and run the application using the followingcommands.PC ssh root@ board ip address Board cd /usr/bin/ #enter directory where where binaries were copiedBoard ./nfc poller st25r3916 # Run the applicationAfter the execution of this code, the below message appears on the screen:Welcome to the ST25R3916 NFC Poller Demo on Linux. Scanning for NFCTechnologies .UM2954 - Rev 1page 6/15
UM2954How to include meta-nfc6 layer in the distribution packageStep 3.Bring an NFC tag is near the NFC receiver to make the screen display the UID and NFC tag type.Figure 5. Discovery kit running the nfcPoller application3.5How to include meta-nfc6 layer in the distribution packageStep 1.Download and compile the distribution package on your Linux machine.Step 2.Follow the default directory structure suggested by ST wiki page to follow this document synchronously.Step 3.Download the X-LINUX-NFC6 application package:PC tar -xvf X-LINUX-NFC6 v1.0.0.tar.xzPC cp –rf X-LINUX-NFC6 v1.0.0/NFCPollerApplication/Source/meta-nfc6/ nstlinux-5.10-dunfell-mp1-21-03-31/layersPC cd enstlinux-5.10-dunfellmp1-21-03-31/Step 4.Set up the build configuration.PC DISTRO openstlinux-weston MACHINE stm32mp1 source layers/meta-st/scripts/envsetup.shStep 5.Add the meta-nfc6 layer to the build configuration of the distribution package configuration.PC bitbake-layers add-layer ./layers/meta-nfc6Step 6.Update the configuration to add new components in your image.PC echo 'IMAGE INSTALL append "nfc6"' nfStep 7.Build your layer separately and then build the complete distribution layer.PC bitbake st-image-westonNote:UM2954 - Rev 1Building the distribution page for the first time may take several hours. However, it takes only few minutes tobuild meta-nfc6 layer and install the executables in the final images. Once the build is complete, the images arepresent in the following directory: build- distro - machine /tmp-glibc/deploy/images/stm32mp1.Step 8.Follow instructions on ST wiki page Flashing the built image to flash the new-built images onto thediscovery kit.Step 9.Run the application as mentioned in step 2 of Section 3.4 .page 7/15
UM2954How to transfer files using Tera Term4How to transfer files using Tera TermYou can use a Windows terminal emulator application like Tera Term to transfer files from your PC to thediscovery kit.Step 1.Plug the power cable to power the board.Step 2.Connect the discovery kit to your PC via the USB micro-B type connector (CN11).Step 3.Check the virtual COM port number in the device manager.In the screenshot below, the COM port number is 14.Figure 6. Screenshot of device manager showing virtual com portStep 4.Open Tera Term on your PC and select the COM port identified in the previous step.The baud rate should be 115200 baud.The virtual terminal (remote access) appears as shown below.Figure 7. Snapshot of remote terminal via Tera TermUM2954 - Rev 1page 8/15
UM2954How to transfer files using Tera TermStep 5.To transfer a file from the host PC to the discovery kit, select [File] [Transfer] [ZMODEM] [Send] inthe top left corner of the Tera Term window.Figure 8. Tera Term file transfer menuUM2954 - Rev 1page 9/15
UM2954How to transfer files using Tera TermStep 6.Select the file to be transferred in the file browser and select [Open].Figure 9. File browser window for sending filesA progress bar shows the status of file transfer.Figure 10. File transfer progress barUM2954 - Rev 1page 10/15
UM2954Revision historyTable 1. Document revision historyUM2954 - Rev 1DateRevision02-Nov-20211ChangesInitial release.page 11/15
UM2954ContentsContents12Overview . . . . . . . . . . . . . . . . . . . . . . . . . . . . . . . . . . . . . . . . . . . . . . . . . . . . . . . . . . . . . . . . . . . . . . . . . .21.1Main features . . . . . . . . . . . . . . . . . . . . . . . . . . . . . . . . . . . . . . . . . . . . . . . . . . . . . . . . . . . . . . . . . . 21.2Package architecture . . . . . . . . . . . . . . . . . . . . . . . . . . . . . . . . . . . . . . . . . . . . . . . . . . . . . . . . . . . 2Hardware setup. . . . . . . . . . . . . . . . . . . . . . . . . . . . . . . . . . . . . . . . . . . . . . . . . . . . . . . . . . . . . . . . . . . .32.134How to connect the hardware . . . . . . . . . . . . . . . . . . . . . . . . . . . . . . . . . . . . . . . . . . . . . . . . . . . . 3Software setup . . . . . . . . . . . . . . . . . . . . . . . . . . . . . . . . . . . . . . . . . . . . . . . . . . . . . . . . . . . . . . . . . . . .53.1Steps for quick evaluation of software . . . . . . . . . . . . . . . . . . . . . . . . . . . . . . . . . . . . . . . . . . . . . 53.2How to update the platform configuration in the developer package . . . . . . . . . . . . . . . . . . . . 53.3How to build the RFAL Linux application code . . . . . . . . . . . . . . . . . . . . . . . . . . . . . . . . . . . . . . 63.4How to run the RFAL Linux application on STM32MP157F-DK2 . . . . . . . . . . . . . . . . . . . . . . . 63.5How to include meta-nfc6 layer in the distribution package . . . . . . . . . . . . . . . . . . . . . . . . . . . . 7How to transfer files using Tera Term . . . . . . . . . . . . . . . . . . . . . . . . . . . . . . . . . . . . . . . . . . . . . . 8Revision history . . . . . . . . . . . . . . . . . . . . . . . . . . . . . . . . . . . . . . . . . . . . . . . . . . . . . . . . . . . . . . . . . . . . . . .11List of tables . . . . . . . . . . . . . . . . . . . . . . . . . . . . . . . . . . . . . . . . . . . . . . . . . . . . . . . . . . . . . . . . . . . . . . . . . .13List of figures. . . . . . . . . . . . . . . . . . . . . . . . . . . . . . . . . . . . . . . . . . . . . . . . . . . . . . . . . . . . . . . . . . . . . . . . . .14UM2954 - Rev 1page 12/15
UM2954List of tablesList of tablesTable 1.Document revision history . . . . . . . . . . . . . . . . . . . . . . . . . . . . . . . . . . . . . . . . . . . . . . . . . . . . . . . . . . . . . 11UM2954 - Rev 1page 13/15
UM2954List of figuresList of figuresFigure 1.Figure 2.Figure 3.Figure 4.Figure 5.Figure 6.Figure 7.Figure 8.Figure 9.Figure 10.UM2954 - Rev 1Radio frequency abstraction library for Linux . . . . . . . . . . . . . . . . . . . . .X-LINUX-NFC6 application architecture in Linux environment . . . . . . . . . .STM32 Nucleo expansion board and discovery board Arduino connectors .Full hardware connection setup . . . . . . . . . . . . . . . . . . . . . . . . . . . . . .Discovery kit running the nfcPoller application . . . . . . . . . . . . . . . . . . . .Screenshot of device manager showing virtual com port . . . . . . . . . . . . .Snapshot of remote terminal via Tera Term. . . . . . . . . . . . . . . . . . . . . . .Tera Term file transfer menu . . . . . . . . . . . . . . . . . . . . . . . . . . . . . . . . .File browser window for sending files. . . . . . . . . . . . . . . . . . . . . . . . . . .File transfer progress bar . . . . . . . . . . . . . . . . . . . . . . . . . . . . . . . . . . . 1. 2. 3. 4. 7. 8. 8. 91010page 14/15
UM2954IMPORTANT NOTICE – PLEASE READ CAREFULLYSTMicroelectronics NV and its subsidiaries (“ST”) reserve the right to make changes, corrections, enhancements, modifications, and improvements to STproducts and/or to this document at any time without notice. Purchasers should obtain the latest relevant information on ST products before placing orders. STproducts are sold pursuant to ST’s terms and conditions of sale in place at the time of order acknowledgement.Purchasers are solely responsible for the choice, selection, and use of ST products and ST assumes no liability for application assistance or the design ofPurchasers’ products.No license, express or implied, to any intellectual property right is granted by ST herein.Resale of ST products with provisions different from the information set forth herein shall void any warranty granted by ST for such product.ST and the ST logo are trademarks of ST. For additional information about ST trademarks, please refer to www.st.com/trademarks. All other product or servicenames are the property of their respective owners.Information in this document supersedes and replaces information previously supplied in any prior versions of this document. 2021 STMicroelectronics – All rights reservedUM2954 - Rev 1page 15/15
STM32MP157x-DK2 Getting Started wiki. Refer to these instructions for installing the starter package onto the discovery kit. Refer to this wiki page for alternative ways of estashing PC communication with the board. starter package. X-LINUX-NFC6. Section
