Transcription
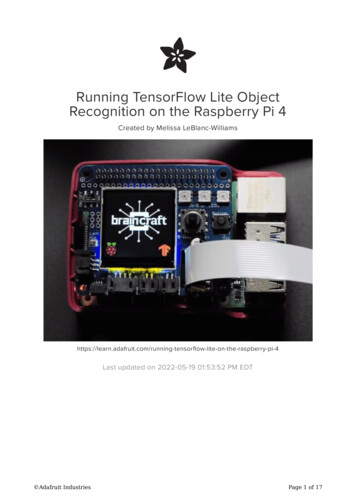
Running TensorFlow Lite ObjectRecognition on the Raspberry Pi 4Created by Melissa -tensorflow-lite-on-the-raspberry-pi-4Last updated on 2022-05-19 01:53:52 PM EDT Adafruit IndustriesPage 1 of 17
Table of ContentsOverview3 34567Raspberry Pi 4 Computer & CameraAll-in One BrainCraft HATDisplay OutputCooling It DownCamera Extension CableInitial Setup8 99910Enable NetworkingEnable InterfacesUpdate the Raspberry PiUpgrade ScriptDisplay Setup11 Option 1. BrainCraft HAT Setup Option 2. PiTFT Setup1111Camera Test13TensorFlow Lite 2 Setup14 1414151617Install requirementsInstall rpi-visionInstall TensorFlow 2.xRunning the Graphic Labeling DemoSpeech Output Adafruit IndustriesPage 2 of 17
OverviewWant to up your robotics game and give it the ability to detect objects? Maybeimplement a security camera that can see and identify certain items? Now that theRaspberry Pi is fast enough to do machine learning, adding these features is fairlystraightforward.This guide will show you the steps to get TensorFlow 2 and TensorFlow Lite runningon your Raspberry Pi 4 along with an object detection demo.There are two main setup paths to choose from. The first option is with a PiTFT if youwant to have a larger display. The second option is with the BrainCraft HAT, which hasa built-in display and audio along several other components such as DotStar LEDs, aJoystick, and ports.Raspberry Pi 4 Computer & CameraTo start with, you will need a Raspberry Pi 4. Since TensorFlow object detection isprocessing intensive, we recommend at least the 4GB model.You really need a Pi 4 or better, TensorFlow vision recognition will not run onanything slower! Adafruit IndustriesPage 3 of 17
Raspberry Pi 4 Model B - 4 GB RAMThe Raspberry Pi 4 Model B is the newestRaspberry Pi computer made, and the PiFoundation knows you can always make agood thing better! And what could makethe Pi 4 better.https://www.adafruit.com/product/4296You will need a camera for the Raspberry Pi to see with.Raspberry Pi Camera Board v2 - 8MegapixelsSnap, snap! The Camera v2 is the newofficial camera board released by theRaspberry Pi Foundation!The Raspberry PiCamera Board v2 is a high quality 8.https://www.adafruit.com/product/3099All-in One BrainCraft HATIf you want to get a HAT that has everything you need besides the camera includingdisplay, sound, and cooling, you'll want to pick up the BrainCraft HAT.Adafruit BrainCraft HAT - MachineLearning for Raspberry Pi 4The idea behind the BrainCraft HAT is thatyou’d be able to “craft brains” for MachineLearning on the EDGE, withMicrocontrollers & Microcomputers.On ASK.https://www.adafruit.com/product/4374 Adafruit IndustriesPage 4 of 17
Display OutputYou will also need a display so you can see what it's detecting. You can use any of ourdisplays with the Raspberry Pi, but the 3.5" display is our biggest.PiTFT - Assembled 480x320 3.5"TFT Touchscreen for Raspberry PiIs this not the cutest, little display for theRaspberry Pi? It features a 3.5" displaywith 480x320 16-bit color pixels and aresistive touch overlay so is.https://www.adafruit.com/product/2097But our other PiTFT's will also work just finePiTFT Plus 320x240 3.2" TFT ResistiveTouchscreenIs this not the cutest little display for theRaspberry Pi? It features a 3.2" displaywith 320x240 16-bit color pixels and aresistive touch overlay. The plate uses thehigh.https://www.adafruit.com/product/2616PiTFT Plus Assembled 320x240 2.8" TFT Resistive TouchscreenIs this not the cutest little display for theRaspberry Pi? It features a 2.8" displaywith 320x240 16-bit color pixels and aresistive touch overlay. The plate uses thehigh.https://www.adafruit.com/product/2298 Adafruit IndustriesPage 5 of 17
Adafruit PiTFT 2.4" HAT Mini Kit 320x240 TFT TouchscreenIs this not the cutest little display for theRaspberry Pi? It features a 2.4" displaywith 320x240 16-bit color pixels and aresistive touch overlay. The HAT uses thehigh t PiTFT 2.2" HAT Mini Kit 320x240 2.2" TFT - No TouchThe cute PiTFT got even more adorablewith this little primary display forRaspberry Pi in HAT form! It features a2.2" display with 320x240 16-bit colorpixels. The HAT uses the.https://www.adafruit.com/product/2315Cooling It DownSince the Raspberry Pi 4 tends to run a little hot, we recommend the Pimoroni FanSHIM.Pimoroni Fan SHIM for Raspberry PiLooking for another way to keep yourRaspberry Pi cool? Hook up ct/4316Or this mini 5V fan Adafruit IndustriesPage 6 of 17
Miniature 5V Cooling Fan for Raspberry Pi(and Other Computers)Looking for another way to keep yourRaspberry Pi cool? Hook up this 5V r tall heatsinkAluminum Heat Sink for Raspberry Pi 3 or4 - 15 x 15 x 15mmLooking for the best heat sink for yourRaspberry Pi? Check out this nice and tall15x15x15mm Heat.https://www.adafruit.com/product/3082In order to fit the fan/heatsink along with the display, you will need a GPIO stackingheader.GPIO Stacking Header for Pi A /B /Pi 2/Pi3Connect your own PCB to a Raspberry PiB and stack on top with this normalheight female header with extra long pins.The female header part is about 8.5mmtall, good for small.https://www.adafruit.com/product/2223Camera Extension CableThe flex cable that comes with the camera is a bit on the short side, so you may wanta longer cable as well. Adafruit IndustriesPage 7 of 17
Flex Cable for Raspberry Pi Camera orDisplay - 24" / 610mmThis cable will let you swap out the stock150mm long flex cable from a RaspberryPi Camera (either 'classic' or 'NoIR'type) or Raspberry Pi Display for a.https://www.adafruit.com/product/1731Flex Cable for Raspberry Pi Camera orDisplay - 18" / 457mmThis cable will let you swap out the stock150mm long flex cable from a RaspberryPi Camera (either 'classic' or 'NoIR' type)or Raspberry Pi Display for a tial SetupThe latest Raspberry Pi Bullseye release does not support Picamera anymore,which is needed to run the demos. Until support is added, you will need to usethe Buster release.If using the Raspberry Pi Imager, select Raspberry Pi OS (Other) Raspberry PiOS Lite (Legacy)We're going to get started using the latest Raspbian Lite, we don't need the graphicalsystem which takes up precious CPU cycles. Start by downloading the latestRaspberry Pi OS (formerly Raspbian) Lite operating system image.Latest Raspberry Pi OperatingSystem Downloads Pagehttps://adafru.it/LAW Adafruit IndustriesPage 8 of 17
Burn the operating system image to a Micro SD Card. Directions are available on theRaspberry Pi site (https://adafru.it/jd0).Mount the SD Card on your computer. Go to the boot partition. You want to create anempty file in that partition named ssh. This will tell Raspbian to enable SSH. (https://adafru.it/vbC)Enable NetworkingFor networking, you can use either a cable or WiFi. You can find more informationabout this in our Raspberry Pi Network Setup (https://adafru.it/dDN) guide.Enable InterfacesAfter properly unmounting ("ejecting") your card for you computer, go ahead andplace the microSD card in the Pi and supply power to boot it up. It may take a fewminutes before it's available.On your computer, SSH into the card using the following:ssh pi@raspberrypi.localThis is a great time to change your password.passwdUpdate the Raspberry PiUpdate the Pisudo apt-get updatesudo apt-get upgradeandsudo apt-get install -y python3-pipand Adafruit IndustriesPage 9 of 17
pip3 install --upgrade setuptoolsUpgrade ScriptWe put together a script to easily make sure your Pi is correctly configured and installBlinka. Although Blinka isn't required for this to work, it's nice to have and this scriptalso enables several other interfaces that are required for this project to work. Itrequires just a few commands to run. Most of it is installing the dependencies.cd sudo pip3 install --upgrade adafruit-python-shellwget ry-Pi-Installer-Scripts/master/raspi-blinka.pysudo python3 raspi-blinka.pyIf your system default Python is Python 2(which is likely on a first install), it will askto confirm that you want to proceed.Choose yes.It may take a few minutes to run. When itfinishes, it will ask you if you would like toreboot. Choose yes. Adafruit IndustriesPage 10 of 17
Display SetupOption 1. BrainCraft HAT SetupIf you have the BrainCraft HAT, you'll first want to head over to the Adafruit BrainCraftHAT - Easy Machine Learning for Raspberry Pi (https://adafru.it/NLE) guide and gothrough the setup process there. Specifically, you'll want to follow the Audio Setup, Fan Service Setup, and Display Module Install pages. This will guide you through all thepieces needed to prepare the Pi.Option 2. PiTFT SetupIf you have just a bare PiTFT, you'll want to install the PiTFT Drivers. There is a newinstaller script now, so it can be installed with just a few commands. First, start byinstalling a few dependencies and downloading the repo:cd sudo pip3 install --upgrade adafruit-python-shell click 7.0sudo apt-get install -y gitgit clone -Scripts.gitcd Raspberry-Pi-Installer-ScriptsNext, choose the install command based on your display. For the 2.4", 2.8", or 3.2"Resistive touchscreens, use the following command: Adafruit IndustriesPage 11 of 17
sudo python3 adafruit-pitft.py --display 28r --rotation 90 --install-type fbcpFor the 3.5" Resistive touchscreen, use the following command:sudo python3 adafruit-pitft.py --display 35r --rotation 90 --install-type fbcpFor the 2.8" Capacitive touchscreen, use the following command:sudo python3 adafruit-pitft.py --display 28c --rotation 90 --install-type fbcpWhen you get asked to reboot, reboot!After it reboots, you should now see text on the display. Adafruit IndustriesPage 12 of 17
Camera TestNow to do an initial test with the camera to make sure the hardware is working beforewe dive into TensorFlow. This should display what the camera sees on the display.raspistill -t 0Here's what it looks like on the BrainCraft HAT:Here's what it looks like on the PiTFT: Adafruit IndustriesPage 13 of 17
If you don't see anything on your camera or get an error message, be sure you havethe camera interface enabled in raspi-config. If it is still having issues, you will need toget that working before continuing. Unfortunately troubleshooting a camera setup canbe complex and is beyond the scope of this guide.TensorFlow Lite 2 SetupThere's a LOT of software to install, this can take up to an hourInstall requirementsThere are a few packages that TensorFlow requires that need to be installed:sudo apt-get install -y libatlas-base-dev libhdf5-dev libc-ares-dev libeigen3-devbuild-essential libsdl-ttf2.0-0 python3-pygame festival python3-h5pyVirtual EnvironmentThere are a few dependency requirements to install TensorFlow inside the PythonEnvironment:pip3 install virtualenv Pillow numpy pygameInstall rpi-visionNow to install an Adafruit fork of a program originally written by Leigh Johnson thatuses the MobileNet V2 model to detect objects. This part will take a few minutes tocomplete.cd git clone --depth 1 https://github.com/adafruit/rpi-vision.gitcd rpi-visionpython3 -m virtualenv -p (which python3) .venvsource .venv/bin/activatepip3 install -e . Adafruit IndustriesPage 14 of 17
Install TensorFlow 2.xYou should now be inside a virtual environment. You can tell by the (.venv) on the leftside of the command prompt. While in the virtual environment, you may download andinstall Tensorflow 2.4.0pip3 install inux armv7l.whlIf for some reason this wheel fails to install on your Pi, you may want to try an olderversion from eases (https://adafru.it/dk).After this, go ahead and reboot the Pi.sudo reboot Adafruit IndustriesPage 15 of 17
If you get a warning with "No module named 'rpi vision'", this means Pythoncouldn't load the module. Either the module wasn't installed correctly or thePython binding likely wasn't.Running the Graphic Labeling DemoFinally you are ready to run the detection software. First you want to run as root sothat Python can access the Frame Buffer of the display.sudo bashThen activate the virtual environment again:cd rpi-vision && . .venv/bin/activateTo run a program that will display the object it sees on screen type in the following:python3 tests/pitft labeled output.py --tfliteYou should see a bunch of text scrolling in your SSH window.Now start holding up various items in front of the camera and it should display what itthinks it sees, which isn't actually what the item may be. Some items that it's prettygood about identifying are coffee mugs and animals. Adafruit IndustriesPage 16 of 17
Speech OutputAs an added bonus, you can hook up a pair of headphones or a speaker to theRaspberry Pi and it will actually tell you what it is detecting. Make sure you don't haveany HDMI cords plugged in though or the audio will go through the monitor. Adafruit IndustriesPage 17 of 17
Nov 19, 2021 · This guide will show you the steps to get TensorFlow 2 and TensorFlow Lite running on your Raspberry Pi 4 along with an object detection demo. There are two main setup paths to choose from. The first option is with a PiTFT if you want to have a larger display