Transcription
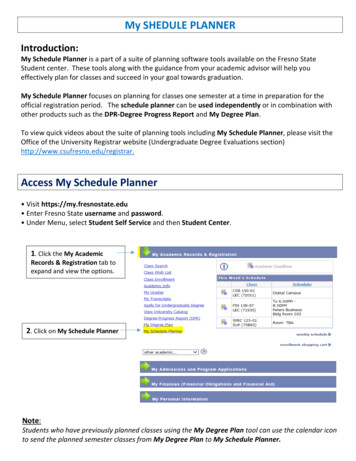
My SHEDULE PLANNERIntroduction:My Schedule Planner is a part of a suite of planning software tools available on the Fresno StateStudent center. These tools along with the guidance from your academic advisor will help youeffectively plan for classes and succeed in your goal towards graduation.My Schedule Planner focuses on planning for classes one semester at a time in preparation for theofficial registration period. The schedule planner can be used independently or in combination withother products such as the DPR-Degree Progress Report and My Degree Plan.To view quick videos about the suite of planning tools including My Schedule Planner, please visit theOffice of the University Registrar website (Undergraduate Degree Evaluations section)http://www.csufresno.edu/registrar.Access My Schedule Planner Visit https://my.fresnostate.edu Enter Fresno State username and password. Under Menu, select Student Self Service and then Student Center.1. Click the My AcademicRecords & Registration tab toexpand and view the options.2. Click on My Schedule PlannerNote:Students who have previously planned classes using the My Degree Plan tool can use the calendar iconto send the planned semester classes from My Degree Plan to My Schedule Planner.
SECTIONS:1. Create a list of classes2. Add Busy Times (optional)3a. Build a schedule - Create Your Own3b. Build a schedule - Auto GenerateSection 1 - Create a list of classesThis panel will show each semester upon your first visit to My Schedule Planner.Verify that you are on theSchedules tab.Select Term Enter Class Subject Search ClassesTIP:For better search results:.Enter Capital Letters.Enter Class Subject/Sub. Abbreviation and Nbr.Example: ANTH 30, ENGL 10, MATH 75.
Continue creating your class list4.Click on Finished Adding Classeswhen you are done creating a class list.1. Enter desired class2. Review the search results3. Select the class ( Class)Click on Details to review classdescription /Co-requisite Info.A confirmation the class has been added tothe course planner cart will temporarilyappear in the top right corner (gray pop-up).Class list displays on the left side.
Section 2 - Add Busy Times(optional Step)Busy Times are blocks of time designated as unavailable for class time (example: work, sport).You can create multiple busy time blocks, these blocks of time are specific for the term. Add Busy TimesOR Skip Step & proceed to builda Schedule5. Finished Adding Busy1.Name the Busy Times - Block2. Busy Time – Start & End Time3. Days of Week4. SaveNote: My Busy Times section is a summaryof the busy time block/s created. You candelete a Busy Time Block from this section.The Busy Times will also display as a graytime block on the calendar view after yousave.
Section 3a - Build a schedule Build a Schedule has two options, Create Your Own or Auto Generate. To Create your Own – Continue on section 3a. To Auto Generate – Review Section 3b.Building a schedule with the Create Your Own option allows you to review the class detail informationand select each class section on you own. Class section information includes Class Title, Days, Times,Class Units, class location, Instructor, class status and waitlist status.Note: You can come back and create schedules using the other option at any time. Build your ScheduleCreate Your OwnNote: The Create Your Own buttoncan also be accessed by clicking onthis Schedules button.
Build a Schedule (Cont.)/ Create Your Own OptionNote: The Schedule Planner and the Student Center Class Search display the class days differently3. Finished Editing Sections1. The drop-down menu contains thelist of classes created in section 1.Select a class from the drop-down menu,this action will generates a table with thedifferent class sections for you to review.2. Add Class ( Sign)Once selected, the class status will changeto a green checkmark ( )Repeat the process with each class onthe drop-down menu.3. When all classes sections have beenadded, click on Finished Editing Classesat the top.Selected classes will display in the calendarview and in the Sections area.To delete a selected class, click on the X.Class Status Reference KeyNote: If you want to delete a class that is already onyour Student Center Wish-List, you will first need toremove it from your Wish-List.
Review the Schedule (Create Your Own Option)3. Push to My Fresno State Wish ListNote: Classes that have been sent toyour wish List will display in the calendarview as “Pre-Enrolled”1. Rename Schedule (Optional)22. Designate as the Primary Schedule.Important: In order to push aschedule to the registration WishList, the schedule must bedesignated as the Primary Schedule.Multiple backup schedules can becreated, however, only one can bedesignated as Primary.A schedule designated as Primarycannot not be deleted.If you wish to delete it, change theprimary designation to anotherbackup schedule.IMPORTANT:The Fresno State Wish-List is generally available approximately three weeks before the semester’sinitial registration week. It is highly recommended that you use the Wish-List during this preregistration period to “Verify” your classes/review class eligibility and clear any holds that mightprevent registration. Placing classes on the My Schedule Planner or on the Wish-List does not reserveyour classes.REMEMBER:You will need to officially enroll in you classes during your assigned registration date & time.
Section 3b - Build a schedule - Auto GenerateBuilding a Schedule with the Auto Generate option involves the schedule builder applicationautomatically generating schedules based your class list and selected preferences.Note: If you added a “Busy Time Block/s (time unavailable for class time) in step 2, classes availableduring your Busy Time Block will not display.Build your ScheduleAuto GenerateNote: The Auto Generate buttoncan also be accessed by clickingon this Schedules button.
Configure Preferences (Build a Schedule – Auto Generate Option)Configure Preferences to auto-generate schedule that are more tailored to your needs.The scheduling application will generate schedules taking into consideration your selected preferences;however, it might display classes outside your preference if there is only one class section available.Note: Busy-Times are blocks of time you don’t want classes & Time Blocks are times you want to take classes.Configure PreferencesOr skip this StepPreference 1:Time-Base preferences include: Number of DaysSelect one of the 3 general preferences. Time BlockDays/times you want for your classes. Click Next to configure additional Pref.OR Save & Finish to Skip additional Pref.Preference 2 (Additional Pref):Select your preference as it relates toIn-Person classes (don’t want, neutral, want). Save & Finish
Select number of schedules to generate - (Build a Schedule – Auto Generate Option)1. Select Nbr. of schedule togenerate/review ( 5 or 10).2. Click on Generate Schedules
Review Generated Schedules – (At a Glance View) Click on View Detailsto review the classsection detail.Repeat step for eachschedule. Note: Schedules may lookthe same when viewed at aglance. When you viewdetails you should noticeddifferent section Nbr. and/ordifferent instructor.Review Generated Schedules – (Detailed View) Return: To go back & review other schedules Save: To save Schedule1. Review class sectioninformation/Sec Nbr. To view more Class detailsincluding instructor click on theMore Icon2. (Optional)If you identify a specific section youwant on your schedule, click on thelock icon and re-generate schedules.Newly generated schedules will havethat section in every option.
Designate your favorite schedule as the Primary Schedule1. Name the Schedule2. Make Primary Schedule3. SAVESaving schedules without checkingthe Make Primary schedule buttonautomatically makes it a backupschedule.4. Return (on next panel)5. Finished Auto-GeneratingSchedulesSend the primary schedule to My Fresno State Wish-ListPush to My Fresno State Wish-ListThe schedule designated as theprimary schedule is located inthis area.Multiple backup schedules can becreated, however, only one canbe designated as Primary. Onlythe primary schedule can bepushed to the registration WishList.A schedule designated as Primarycannot not be deleted.If you wish to delete it, you canchange the primary designationto another backup schedule.Print, Export or Email schedule
ScheduleNote: Classes that have been pushed to the Wish-List will display as “Pre-Enrolled.”Classes displaying with a “Pre-Enrolled” status are not reserved. The Delete button (X) is not displayed when a class has been sent to the Wish-List. If you wish to remove a class displaying as Pre-Enrolled, you will first need toremove the class from the registration system Wish-List, doing this will re-activatethe delete button on the schedule Planner.
Fresno State Student CenterClass Wish ListReg.AppointmentDate & TimeClass Wish List tabVerifyEnrollIMPORTANT:The Fresno State Wish-List is generally available approximately three weeks before the semester’sinitial registration week. It is highly recommended that you use the Wish-List during this period to“Verify” your classes/review class eligibility and clear any holds that might prevent registration.Placing classes on the My Schedule Planner or on the Wish-List does not reserve your classes.REMEMBER:You will need to officially enroll in you classes during your assigned registration date & time.
Note: Students who have previously planned classes using the My Degree Plan tool can use the calendar icon to send the planned semester classes from My Degree Plan to My Schedule Planner. 1. Click the My Academic Records & Registration tab to expand and view the