Transcription
NotesAcid Music Studio How-ToKatie WardrobeMidnight Music2013
Acid Music How-To5Starting a new project5Getting Started5Project Properties5Save and title your project5Acid screen5Project tempo, time signature and key6Zooming6Using loops6Searching for loops6Adding loops to your project7Adding sound effects7A word about snapping7Adjusting the snap setting7Playback7Transport controls7Playback shortcuts8Playback from a specific place8Recording a speaking, singing or live instrumental trackAdd a new audio trackEditing clips889Snapping9Adjusting the snap setting9Turn snapping off9Shortening the beginning or end of a clip9To delete a section in the middle of a clip9Moving multiple clips on a track9To split a clip9Transpose a clip9
Fade-ins and fade-outs (track and project volume)10Fade in/out a single clip10Varied volume on a single track10Overall volume of a single track11Overall volume of the project11PanningVaried panning on a single track1111Changing tempo or key during a project11Recording a MIDI track11Set up your MIDI device11Adding a new MIDI track12Change instrument sound12Prepare to record12Record some music12Quantize12Editing MIDI13Viewing the Piano Roll editor13Editing existing notes13Adding notes13Transpose13Deleting tracksDelete a trackUsing the Chopper141414Open the Chopper window14Creating an event from the Chopper14Video15Add a video to your project15Preview the video15Adding hit points153
Exporting a project16Save a file as an MP3 or WAV file16“Save as type” options16Finding extra loops8-packsGetting help161617Show Me How17Help/Reference174
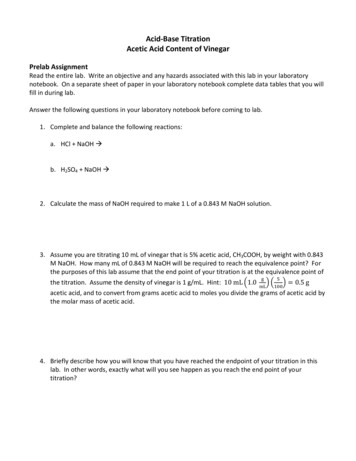
Acid Music How-ToStarting a new projectGetting StartedBefore you start Acid, make sure you’ve plugged in any peripheral gear you might be using such as: Audio interface Microphone MIDI keyboardIf you forget to plug any of these items in before starting Acid, you may need to restart the program oncethey are plugged in.Project PropertiesIn Acid, go to File New. The Project Properties window will open and you can enter information aboutyour project and choose your project audio settings.If you want to skip the Project Properties dialog and use your previously selected project settings, youcan click on the New button on the toolbar.Save and title your projectGo to File Save, give your project a title and choose a saving location.Acid screen5
The Acid screen is made up of the following areas: Track list area Timeline area The Explorer Window To the right of the Explorer Window there is an area which shows one of three windows: the Mixingconsole, Soft Synth Properties or Video Preview (all accessed via the View menu)Project tempo, time signature and keyUnderneath the Track list area you can see the Project settings: tempo - use the slider allows you to increase or decrease the project tempo time signature - click to edit key - click to editZoomingWhen the timeline area is in focus, you zoom in and out using the following options: Use your mouse scroll wheel Click on the zoom in/out buttons at the bottom right corner of the Timeline area Press the or - buttonsUsing loopsSearching for loopsYou can browse for loops or sound effects in the Explorer window at the bottom of the Acid screen.To audition a loop: Turn on the Auto preview button is on (see right) Click on a loop name to “audition” it. It will play backautomatically6
playedatbo9omofthewindow.Adding loops to your projectThere are a couple of ways to add a loop to your project: Drag the loop from Explorer Window straight up to timeline area. A new track header will appearautomatically Double-click on the loop in the Explorer window. A new empty track will appear and you can drawthe loop in to your project using the Pencil toolAdding sound effectsA word about snappingSnapping is a feature that causes loops or recorded audio to “snap” to the beginning of a bar, or to aspecific beat. This is highly useful when you’re doing a music project since you’ll nearly always want themusic to adhere to bars and beats in a song.However, if you are working on podcasting, storytelling, or adding sounds effects to a film scoringproject, it’s unlikely that you’ll want snapping enabled since dialogue and sound effects don’t conform tobars and beats.Adjusting the snap settingYou can turn snapping off by clicking on the Enable Snapping button in the toolbar. If you would like toturn off snapping temporarily, you can hold down Shift to override it.You can also adjust the snapping increment (for use in a music project) by selecting anoption from the drop-down menu (see right).PlaybackTransport controlsUse can the transport controls to play back your project:7
Playback shortcutsYou can also use these shortcuts: Space bar start and stop Enter pausePlayback from a specific placeThe Playback line shows you where playback will start from. Click in the timeline area to place the playback line in a specific position You can nudge the playback line back and forth using the left and right arrow keys on yourcomputer keyboardRecording a speaking, singing or live instrumental trackAdd a new audio track Right-click in Track area and select New audio track or go to Insert Audio track Click in the Timeline area to move the playback line to the place you would like to start recording.If you want to start recording at the beginning, click on the Rewind button Click the Arm for Record button in the track header (see below) If you are recording a music track and you’d like to hear the metronome while you record, click onthe Metronome button on the main toolbar (see below) Place the playback line where you’d like to start recording and press Record. Play your song, orrecord your dialogue if creating a podcast Press space bar (or the stop button) when you’ve finished A dialogue box will appear asking whether you want to keep the recording. Click Done if you’rehappy with the recording. De-select the Arm for Record button in the track header when you’ve finished recording that track8
Editing clipsSnappingAs mentioned in the Adding Sound Effects section above, snapping is a feature that causes loops orrecorded audio to “snap” to the beginning of a bar, or to a specific beat. This is highly useful when you’redoing a music project since you’ll nearly always want the music to adhere to bars and beats in a song.Adjusting the snap settingIt’s important to know that the snap setting will affect how you can move or edit Events (loops and othersnippets of music) on the Timeline.You can adjust the snapping increment by choosing an option from the Enable Snapping dropdown menu. If you’re not sure what the snap setting should be, it’s probably best to stick with8th-note or 16th-note. You can always adjust it again if you need to.Turn snapping offIf you are working on podcasting, storytelling, or adding sounds effects to a film scoring project, it’sunlikely that you’ll want snapping enabled since dialogue and sound effects don’t conform to bars andbeats. You can turn snapping off by clicking on the Enable Snapping button on the toolbar.Shortening the beginning or end of a clip To shorten a clip (delete material at the beginning or end): hold mouse over right end of clip in themiddle until you see the Trim tool (it looks like a square bracket with an arrow) and drag to the leftor rightTo delete a section in the middle of a clip Click on the Eraser tool and erase the unwanted audio Move the remaining audio if necessary by selecting the Pencil tooland dragging it with the mouseMoving multiple clips on a track You can select multiple clips on a track by clicking on the Lasso tool(to the right of the pencil) and clicking/dragging over the clips youwant to selectTo split a clip Place playback line at the place you’d like to split the clip and go to Edit SplitTranspose a clip Select the clip and press the button on the numeric keypad to transpose a clip up by semitones Press the - button on the numeric keypad to transpose down by semitones You can also right-click on the clip and choose Clip Properties. In the dialog that opens, adjust thenumber under Pitch shift9
Rhythmically stretch (or contract) a clipYou can make a clip play back faster or slower by adjusting the stretch setting: Right-click on the clip and choose Clip Properties Click on the Stretch tab and change the setting under Number of beatsFade-ins and fade-outs (track and project volume)Fade in/out a single clip Hover your mouse over top left or right corner of the clip until your cursor changes to roundedtriangle Click and drag mouse down and across to create fade-in or fade-outVaried volume on a single track Create a volume envelope by selecting the track and pressing V. A blue line will appear on thetrack Double-click on the line to add “points”. You can drag the points up or down to adjust the volume.10
Overall volume of a single trackA couple of options: To adjust the overall gain (volume) of a single track, hover at top of clip until it looks like a hand anddrag gain (volume) down or up to adjust On the track header, move the gain slider to increase or decrease the overall track volumeOverall volume of the project To adjust the overall project volume (all tracks), use the Mixer controls to the right of the ExplorerWindow (select the Mixer tab first if necessary)PanningVaried panning on a single trackAdding a panning envelope allows you to vary the amount of sound that plays through one speaker (leftor right) or the other. Panning can be particularly useful when you want to create an effect of footstepsor a car moving from one side to the other. Select the track Press P. A red line will appear on the track Double-click on the line to add “points”. You can drag the points up or down to adjust the panChanging tempo or key during a projectYou can make a change to the tempo or key part-way through project: Place the cursor on the timeline where you want the tempo or key change to occur Press the T on the computer keyboard In the Tempo/Key/Time Signature Change dialog box, set the Tempo change and Key changeto your desired values Click OKPlay back your project. As soon as the playback cursor reaches the T marker, the project's Tempo and Keyshift to match the changes you made.Recording a MIDI trackSet up your MIDI deviceBefore you start recording a MIDI track, you need to make sure your MIDI device is connected, turned onand set up properly. If you need help setting up your MIDI device, see the How To Set Up MIDI Devicessection in the Acid Online Help.11
Adding a new MIDI track Go to Insert MIDI track or right-click in the track header area and choose Insert MIDI track A new track will be created with the default Grand Piano sound Click on the MIDI Input button (see right) to select your MIDIinput device. If you can’t see the MIDI Input button, resize thetrack header area using the splitter between the track headerand timeline areas, or increase the track heightChange instrument soundTo change the instrument sound: Click on the keyboard icon on the track header (see right) Select an alternative sound from the menu that appears.You can audition each sound by playing on your MIDIkeyboardPrepare to record First, make sure your MIDI keyboard is set up (andreachable!) Click on the Arm for Record button on the track header (seeright) If you would like to play along with a metronome, click on theMetronome button next to the transport controls You can also choose how many bars count-off (count-in) you would like by clicking on theMetronome Count-off buttonRecord some music Click in the timeline to choose where your recording should begin. Click on Go To Start if you wantto start at the beginning Click on the Record button (see right), wait for the countin bar (if applicable) and then record the partQuantizeYou can quantize your MIDI part to even-up any uneven playing (!): Right-click on the MIDI clip you recorded and choose Clip Properties In the window that opens, click on the Quantize button and select a Quantize Resolution from thedrop-down menu (choose the smallest note value you played). You can choose whether toquantize the start times of each note and/or the duration of each note12
Click ApplyEditing MIDIViewing the Piano Roll editor Press G to Enable Inline MIDI Editing (or click on the button of that name in the toolbar) Resize the MIDI track - hover your mouse at the bottom edge of the track header and then click anddrag downwards to increase the track height (see below) The MIDI clip will show the notes you recorded. You may need to scroll up or down using the scrollbuttons at the left edge of the track (just above and below the keyboard picture)Editing existing notes Using the Draw tool, select a note and drag it up or down to change the pitch Drag a note left or right to change the rhythmic position Shorten or lengthen the note by dragging the end (see right)Adding notesYou can draw or paint notes into the MIDI clip just the way you would create events in the timeline: Use the Draw tool to insert new notes: click and drag at the desired pitch Use the Paint tool to insert notes of a specific length: select the Paint tool and choose a rhythmicvalue from the Paint tool’s drop-down menu. Click in the grid to create a note of that length orclick and drag the mouse to insert multiple notes at onceTransposeSingle notes or a group of notes can be transposed up or down in the Piano Roll editor: To transpose a single note, select a single note with the Draw tool and drag it up or down13
To transpose a few notes at a time, click on the Select tool, select a group of notes and then dragthem up or down To transpose all of the notes in a MIDI clip, click on the title bar of the clip and then use the or buttons to move the notes up or down by semitoneDeleting tracksDelete a track To delete a track, select it by clicking on the track header and then press Delete.Using the ChopperThe Chopper allows you to use small portions of a clip o
Add a new audio track Right-click in Track area and select New audio track or go to Insert Audio track Click in the Timeline area to move the playback line to the place you would like to start recording. If you want to start recording at the beginning, click on the Rewind button Click the Arm for Record button in the track header (see below)
