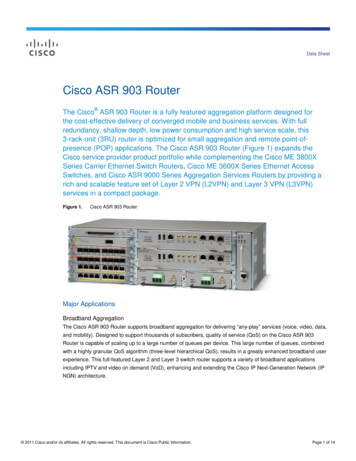
Transcription
PrefaceThis preface describes the objectives and organization of this document and explains how to findadditional information on related products and services. This preface contains the following sections: Objectives, page i Document Revision History, page i Organization, page ii Related Documentation, page ii Document Conventions, page iii Obtaining Documentation and Submitting a Service Request, page ivObjectivesThis document provides an overview of software functionality that is specific to the Cisco ASR 903Series Router. It is not intended as a comprehensive guide to all of the software features that can be runusing the Cisco ASR 903 Series Router, but only the software aspects that are specific to this platform.For information on general software features that are also available on other Cisco platforms, see theCisco IOS XE technology guide for that specific software feature.Document Revision HistoryThe Document Revision History records technical changes to this document. The table shows the CiscoIOS XE software release number and document revision number for the change, the date of the change,and a brief summary of the change.Release No.DateChange SummaryIOS XE 3.5sNovember 2011First release.IOS XE 3.5sFebruary 2012Added Installing and Upgrading Software chapter.IOS XE 3.5.1sFebruary 2012Added information about QoS ACL feature.IOS XE 3.5.2April 2012Added information about egress QoS marking feature.Book TitleOL-xxxxx-xxi
PrefaceOrganizationOrganizationThis document contains the following chapters:ChapterTitleDescription1Using Cisco IOS XE SoftwareProvides an introduction to accessing thecommand-line interface (CLI) and using the Ciscosoftware and related tools.2Console Port, Telnet, and SSHHandlingProvides an overview and configuration options forthe handling of incoming console port, telnet, andSSH traffic.3Using the Management EthernetInterfaceProvides an overview and configuration options forthe Management Ethernet interface.4High Availability OverviewProvides an overview of the High Availabilityarchitecture, behavior, and features.5Installing and Upgrading SoftwareProvides instructions on how to install and upgradesoftware and firmware on the router.6Configuring the Route SwitchProcessorProvides information on configuring the RouteSwitch Processor (RSP).7Configuring Ethernet InterfacesProvides information on configuring the EthernetInterface Module.8Configuring T1/E1 InterfacesProvides information on configuring the T1/E1Interface Module.9Configuring Clocking and TimingProvides information on configuring clocking andtiming features.10Configuring Synchronous Ethernet Provides information on configuring SynchronousESMC and SSMEthernet clock synchronization features.11Configuring PseudowireProvides information on configuring MPLSpseudowire features.12Configuring Quality of ServiceProvides information on configuring QoS features.13Tracing and Trace ManagementProvides an overview of tracing on the Cisco andhow to manage the tracing process and files.The following table is conditioned for the Catalyst 6500 Series Switch for SX release.Related DocumentationThis section refers you to other documentation that also might be useful as you configure yourCisco ASR 903 Series Router. The documentation listed below is available online.Book TitleiiOL-xxxxx-xx
PrefaceDocument ConventionsCisco ASR 903 Series Router DocumentationThe documentation homepage for the Cisco ASR 903 Series Router is:http://www.cisco.com/en/US/products/ps11610/tsd products support series home.htmlThe documentation homepage for Cisco IOS XE contains Cisco IOS XE technology guides and featuredocumentation and can be viewed at:http://cisco.com/en/US/products/ps9587/tsd products support series home.htmlFor information on commands, see one of the following resources: Cisco IOS XE Software Command References Command Lookup Tool (cisco.com login required)Document ConventionsThis documentation uses the following conventions:ConventionDescription or CtrlThe and Ctrl symbols represent the Control key. For example, the keycombination D or Ctrl-D means hold down the Control key while you pressthe D key. Keys are indicated in capital letters but are not case sensitive.stringA string is a nonquoted set of characters shown in italics. For example, whensetting an SNMP community string to public, do not use quotation marks aroundthe string or the string will include the quotation marks.Command syntax descriptions use the following conventions:ConventionDescriptionboldBold text indicates commands and keywords that you enter exactly as shown.italicsItalic text indicates arguments for which you supply values.[x]Square brackets enclose an optional element (keyword or argument). A vertical line indicates a choice within an optional or required set of keywordsor arguments.[x y]Square brackets enclosing keywords or arguments separated by a vertical lineindicate an optional choice.{x y}Braces enclosing keywords or arguments separated by a vertical line indicate arequired choice.Nested sets of square brackets or braces indicate optional or required choices within optional or requiredelements. For example:Book TitleOL-xxxxx-xxiii
PrefaceObtaining Documentation and Submitting a Service RequestConventionDescription[x {y z}]Braces and a vertical line within square brackets indicate a required choicewithin an optional element.Examples use the following conventions:ConventionDescriptionscreenExamples of information displayed on the screen are set in Courier font.bold screenExamples of text that you must enter are set in Courier bold font. Angle brackets enclose text that is not printed to the screen, such as passwords. ![An exclamation point at the beginning of a line indicates a comment line.(Exclamation points are also displayed by the Cisco IOS software for certainprocesses.)]Square brackets enclose default responses to system prompts.The following conventions are used to attract the attention of the reader:CautionNoteMeans reader be careful. In this situation, you might do something that could result in equipmentdamage or loss of data.Means reader take note. Notes contain helpful suggestions or references to materials that may not becontained in this manual.Obtaining Documentation and Submitting a Service RequestFor information on obtaining documentation, submitting a service request, and gathering additionalinformation, see the monthly What’s New in Cisco Product Documentation, which also lists all new andrevised Cisco technical documentation, w/whatsnew.htmlSubscribe to the What’s New in Cisco Product Documentation as a Really Simple Syndication (RSS) feedand set content to be delivered directly to your desktop using a reader application. The RSS feeds are a freeservice and Cisco currently supports RSS version 2.0.Book TitleivOL-xxxxx-xx
CH A P T E R1Using Cisco IOS XE SoftwareThis chapter provides information to prepare you to configure the Cisco ASR 903 Series Router: Understanding Command Modes, page 1-2 Understanding Diagnostic Mode, page 1-3 Accessing the CLI Using a Router Console, page 1-4 Using the Auxiliary Port, page 1-7 Using Keyboard Shortcuts, page 1-7 Using the History Buffer to Recall Commands, page 1-8 Getting Help, page 1-9 Using the no and default Forms of Commands, page 1-12 Saving Configuration Changes, page 1-12 Managing Configuration Files, page 1-12 Filtering Output from the show and more Commands, page 1-14 Powering Off the Router, page 1-14 Finding Support Information for Platforms and Cisco Software Images, page 1-14Book TitleOL-xxxxx-xx1-1
Chapter 1Using Cisco IOS XE SoftwareUnderstanding Command ModesUnderstanding Command ModesThe command modes available in the traditional Cisco IOS CLI are exactly the same as the commandmodes available in Cisco IOS XE.You use the CLI to access Cisco IOS XE software. Because the CLI is divided into many different modes,the commands available to you at any given time depend on the mode that you are currently in. Enteringa question mark (?) at the CLI prompt allows you to obtain a list of commands available for eachcommand mode.When you log in to the CLI, you are in user EXEC mode. User EXEC mode contains only a limitedsubset of commands. To have access to all commands, you must enter privileged EXEC mode, normallyby using a password. From privileged EXEC mode, you can issue any EXEC command—user orprivileged mode—or you can enter global configuration mode. Most EXEC commands are one-timecommands. For example, show commands show important status information, and clear commandsclear counters or interfaces. The EXEC commands are not saved when the software reboots.Configuration modes allow you to make changes to the running configuration. If you later save therunning configuration to the startup configuration, these changed commands are stored when thesoftware is rebooted. To enter specific configuration modes, you must start at global configuration mode.From global configuration mode, you can enter interface configuration mode and a variety of othermodes, such as protocol-specific modes.ROM monitor mode is a separate mode used when the Cisco IOS XE software cannot load properly. Ifa valid software image is not found when the software boots or if the configuration file is corrupted atstartup, the software might enter ROM monitor mode.Table 1-1 describes how to access and exit various common command modes of the Cisco IOS XEsoftware. It also shows examples of the prompts displayed for each mode.Table 1-1Accessing and Exiting Command ModesCommandModeAccess MethodPromptExit MethodUser EXECLog in.Router Use the logout command.PrivilegedEXECFrom user EXEC mode, use theenable EXEC command.Router#To return to user EXEC mode, use the disablecommand.Global configurationFrom privileged EXEC mode, use Router(config)#the configure terminal privilegedEXEC command.To return to privileged EXEC mode fromglobal configuration mode, use the exit or endcommand.Interface configurationFrom global configuration mode,specify an interface using aninterface command.To return to global configuration mode, use theexit command.Router(config-if)#To return to privileged EXEC mode, use theend command.Book Title1-2OL-xxxxx-xx
Chapter 1Using Cisco IOS XE SoftwareUnderstanding Diagnostic ModeTable 1-1Accessing and Exiting Command Modes (continued)CommandModeAccess MethodPromptExit MethodThe router boots up or accessesdiagnostic mode in the followingscenarios:Router(diag)#If the IOS process failing is the reason forentering diagnostic mode, the IOS problemmust be resolved and the router rebooted to getout of diagnostic mode.Diagnostic ROM monitorIn some cases, diagnosticmode will be reached when theIOS process or processes fail.In most scenarios, however,the router will reload. A user-configured accesspolicy was configured usingthe transport-map commandthat directed the user intodiagnostic mode. See the“Console Port, Telnet, andSSH Handling” chapter of thisbook for information onconfiguring access policies. The router was accessed usinga Route Switch Processorauxiliary port. A break signal (Ctrl-C,Ctrl-Shift-6, or the sendbreak command) was enteredand the router was configuredto go into diagnostic modewhen the break signal wasreceived.From privileged EXEC mode, use the reload EXEC command. Pressthe Break key during the first 60seconds while the system isbooting.If the router is in diagnostic mode because of atransport-map configuration, access the routerthrough another port or using a method that isconfigured to connect to the Cisco IOS CLI.If the router is accessed through the RouteSwitch Processor auxiliary port, access therouter through another port. Accessing therouter through the auxiliary port is not usefulfor customer purposes anyway.To exit ROM monitor mode, use the continuecommand.Understanding Diagnostic ModeDiagnostic mode is supported on the Cisco ASR 903 Series Router.The router boots up or accesses diagnostic mode in the following scenarios: The IOS process or processes fail, in some scenarios. In other scenarios, the RSP will simply resetwhen the IOS process or processes fail. A user-configured access policy was configured using the transport-map command that directs theuser into diagnostic mode. The router was accessed using a Route Switch Processor auxiliary port.Book TitleOL-xxxxx-xx1-3
Chapter 1Using Cisco IOS XE SoftwareAccessing the CLI Using a Router Console A send break signal (Ctrl-C or Ctrl-Shift-6) was entered while accessing the router, and the routerwas configured to enter diagnostic mode when a break signal was sent.In diagnostic mode, a subset of the commands that are also available in User EXEC mode are madeavailable to users. Among other things, these commands can be used to: Inspect various states on the router, including the IOS state. Replace or roll back the configuration. Provide methods of restarting the IOS or other processes. Reboot hardware, such as the entire router, an RSP, an IM, or possibly other hardware components. Transfer files into or off of the router using remote access methods such as FTP, TFTP, SCP, and soon.The diagnostic mode provides a more comprehensive user interface for troubleshooting than previousrouters, which relied on limited access methods during failures, such as ROMmon, to diagnose andtroubleshoot IOS problems.The diagnostic mode commands are stored in the non-IOS packages on the Cisco ASR903 Series Router, which is why the commands are available even if the IOS process is not workingproperly. Importantly, all the commands available in diagnostic mode are also available in privilegedEXEC mode on the router even during normal router operation. The commands are entered like any othercommands in the privileged EXEC command prompts when used in privileged EXEC mode.Accessing the CLI Using a Router ConsoleThe following sections describe how to access the command-line interface (CLI) using adirectly-connected console or by using Telnet or a modem to obtain a remote console: Accessing the CLI Using a Directly-Connected Console, page 1-4 Accessing the CLI from a Remote Console Using Telnet, page 1-5 Accessing the CLI from a Remote Console Using a Modem, page 1-7NoteFor more information about connecting cables to the router, see the Cisco ASR 903 HardwareInstallation Guide.NoteFor information about installing USB devices drivers in order to use the USB console port, see the CiscoASR 903 Hardware Installation Guide.Accessing the CLI Using a Directly-Connected ConsoleThis section describes how to connect to the console port on the router and use the console interface toaccess the CLI. The console port is located on the front panel of each Route Switch Processor (RSP).Connecting to the Console PortBefore you can use the console interface on the router using a terminal or PC, you must perform thefollowing steps:Book Title1-4OL-xxxxx-xx
Chapter 1Using Cisco IOS XE SoftwareAccessing the CLI Using a Router ConsoleStep 1Step 2Configure your terminal emulation software with the following settings: 9600 bits per second (bps) 8 data bits No parity 1 stop bit No flow controlConnect to the port using the RJ-45-to-RJ-45 cable and RJ-45-to-DB-25 DTE adapter or using theRJ-45-to-DB-9 DTE adapter (labeled “Terminal”).Using the Console InterfaceEvery RSP on a Cisco ASR 903 Series Router has a console interface. Notably, a standby RSP can beaccessed using the console port in addition to the active RSP in a dual RSP configuration.To access the CLI using the console interface, complete the following steps:Step 1After you attach the terminal hardware to the console port on the router and you configure your terminalemulation software with the proper settings, the following prompt appears:Press RETURN to get started.Step 2Press Return to enter user EXEC mode. The following prompt appears:Router Step 3From user EXEC mode, enter the enable command as shown in the following example:Router enableStep 4At the password prompt, enter your system password. If an enable password has not been set on yoursystem, this step may be skipped.The following example shows entry of the password called “enablepass”:Password: enablepassStep 5When your enable password is accepted, the privileged EXEC mode prompt appears:Router#Step 6You now have access to the CLI in privileged EXEC mode and you can enter the necessary commandsto complete your desired tasks.Step 7To exit the console session, enter the quit command as shown in the following example:Router# quitAccessing the CLI from a Remote Console Using TelnetThis section describes how to connect to the console interface on a router using Telnet to access the CLI.Book TitleOL-xxxxx-xx1-5
Chapter 1Using Cisco IOS XE SoftwareAccessing the CLI Using a Router ConsolePreparing to Connect to the Router Console Using TelnetBefore you can access the router remotely using Telnet from a TCP/IP network, you need to configurethe router to support virtual terminal lines (vtys) using the line vty global configuration command. Youalso should configure the vtys to require login and specify a password.NoteTo prevent disabling login on the line, be careful that you specify a password with the passwordcommand when you configure the login line configuration command. If you are using authentication,authorization, and accounting (AAA), you should configure the login authentication line configurationcommand. To prevent disabling login on the line for AAA authentication when you configure a list withthe login authentication command, you must also configure that list using the aaa authentication loginglobal configuration command. For more information about AAA services, refer to the Cisco IOS XESecurity Configuration Guide, Release 2 and Cisco IOS Security Command Reference publications.In addition, before you can make a Telnet connection to the router, you must have a valid host name forthe router or have an IP address configured on the router. For more information about requirements forconnecting to the router using Telnet, information about customizing your Telnet services, and usingTelnet key sequences, refer to the Cisco IOS Configuration Fundamentals Configuration Guide, Release12.2SR.Using Telnet to Access a Console InterfaceTo access a console interface using Telnet, complete the following steps:Step 1From your terminal or PC, enter one of the following commands: connect host [port] [keyword] telnet host [port] [keyword]In this syntax, host is the router hostname or an IP address, port is a decimal port number (23 is thedefault), and keyword is a supported keyword. For more information, refer to the Cisco IOSConfiguration Fundamentals Command Reference.NoteIf you are using an access server, then you will need to specify a valid port number such as telnet172.20.52.40 2004, in addition to the hostname or IP address.The following example shows the telnet command to connect to the router named “router”:unix host% telnet routerTrying 172.20.52.40.Connected to 172.20.52.40.Escape character is ' ]'.unix host% connectStep 2At the password prompt, enter your login password. The following example shows entry of the passwordcalled “mypass”:User Access VerificationPassword: mypassNoteIf no password has been configured, press Return.Book Title1-6OL-xxxxx-xx
Chapter 1Using Cisco IOS XE SoftwareUsing the Auxiliary PortStep 3From user EXEC mode, enter the enable command as shown in the following example:Router enableStep 4At the password prompt, enter your system password. The following example shows entry of thepassword called “enablepass”:Password: enablepassStep 5When the enable password is accepted, the privileged EXEC mode prompt appears:Router#Step 6You now have access to the CLI in privileged EXEC mode and you can enter the necessary commandsto complete your desired tasks.Step 7To exit the Telnet session, use the exit or logout command as shown in the following example:Router# logoutAccessing the CLI from a Remote Console Using a ModemTo access the router remotely using a modem through an asynchronous connection, connect the modemto the console port.The console port on a Cisco ASR 903 Series Router is an EIA/TIA-232 asynchronous, serial connectionwith no flow control and an RJ-45 connector. The console port is located on the front panel of the RSP.To connect a modem to the console port, place the console port mode switch in the in position. Connectto the port using the RJ-45-to-RJ-45 cable and the RJ-45-to-DB-25 DCE adapter (labeled “Modem”).To connect to the router using the USB console port, connect to the port using a USB Type A-to-Type Acable.For more information about connecting cables to the router, see the Cisco ASR 903 HardwareInstallation Guide.Using the Auxiliary PortThe auxiliary port on the Route Switch Processor does not serve any useful purpose for customers.This port should only be accessed under the advisement of a customer support representative.Using Keyboard ShortcutsCommands are not case sensitive. You can abbreviate commands and parameters if the abbreviationscontain enough letters to be different from any other currently available commands or parameters.Book TitleOL-xxxxx-xx1-7
Chapter 1Using Cisco IOS XE SoftwareUsing the History Buffer to Recall CommandsTable 1-2 lists the keyboard shortcuts for entering and editing commands.Table 1-2Keyboard ShortcutsKeystrokesPurposeCtrl-B orthe Left Arrow key1Move the cursor back one characterCtrl-F orthe Right Arrow key1Move the cursor forward one characterCtrl-AMove the cursor to the beginning of the command lineCtrl-EMove the cursor to the end of the command lineEsc BMove the cursor back one wordEsc FMove the cursor forward one word1. The arrow keys function only on ANSI-compatible terminals such as VT100s.Using the History Buffer to Recall CommandsThe history buffer stores the last 20 commands you entered. History substitution allows you to accessthese commands without retyping them, by using special abbreviated commands.Table 1-3 lists the history substitution commands.Table 1-3History Substitution CommandsCommandCtrl-P or the Up Arrow keyPurpose1Recall commands in the history buffer, beginningwith the most recent command. Repeat the keysequence to recall successively older commands.Ctrl-N or the Down Arrow key1Return to more recent commands in the historybuffer after recalling commands with Ctrl-P or theUp Arrow key.Router# show historyWhile in EXEC mode, list the last severalcommands you have just entered.1. The arrow keys function only on ANSI-compatible terminals such as VT100s.Book Title1-8OL-xxxxx-xx
Chapter 1Using Cisco IOS XE SoftwareGetting HelpGetting HelpEntering a question mark (?) at the CLI prompt displays a list of commands available for each commandmode. You can also get a list of keywords and arguments associated with any command by using thecontext-sensitive help feature.To get help specific to a command mode, a command, a keyword, or an argument, use one of thefollowing commands:Table 1-4Help Commands and PurposeCommandPurposehelpProvides a brief description of the help system in any command mode.abbreviated-command-entry?Provides a list of commands that begin with a particular character string. (No spacebetween command and question mark.)abbreviated-command-entry Tab Completes a partial command name.?Lists all commands available for a particular command mode.command ?Lists the keywords or arguments that you must enter next on the command line.(Space between command and question mark.)Finding Command Options ExampleThis section provides an example of how to display syntax for a command. The syntax can consist ofoptional or required keywords and arguments. To display keywords and arguments for a command, entera question mark (?) at the configuration prompt or after entering part of a command followed by a space.The Cisco IOS XE software displays a list and brief description of available keywords and arguments.For example, if you were in global configuration mode and wanted to see all the keywords or argumentsfor the arap command, you would type arap ?.The cr symbol in command help output stands for “carriage return.” On older keyboards, the carriagereturn key is the Return key. On most modern keyboards, the carriage return key is the Enter key. The cr symbol at the end of command help output indicates that you have the option to press Enter tocomplete the command and that the arguments and keywords in the list preceding the cr symbol areoptional. The cr symbol by itself indicates that no more arguments or keywords are available and thatyou must press Enter to complete the command.Table 1-5 shows examples of how you can use the question mark (?) to assist you in entering commands.Table 1-5Finding Command OptionsCommandCommentRouter enablePassword: password Router#Enter the enable command and password to accessprivileged EXEC commands. You are in privilegedEXEC mode when the prompt changes to a “#” fromthe “ ”; for example, Router to Router#.Router# configure terminalEnter configuration commands, one per line. End with CNTL/Z.Router(config)#Enter the configure terminal privileged EXECcommand to enter global configuration mode. Youare in global configuration mode when the promptchanges to Router(config)#.Book TitleOL-xxxxx-xx1-9
Chapter 1Using Cisco IOS XE SoftwareGetting HelpTable 1-5Finding Command Options (continued)CommandCommentRouter(config)# interface serial ? 0-6 Serial interface numberRouter(config)# interface serial 4 ?/Router(config)# interface serial 4/ ? 0-3 Serial interface numberRouter(config)# interface serial 4/0 ? cr Router(config)# interface serial 4/0Router(config-if)#Enter interface configuration mode by specifyingthe serial interface that you want to configure usingthe interface serial global configuration command.Enter ? to display what you must enter next on thecommand line. In this example, you must enter theserial interface slot number and port number,separated by a forward slash.When the cr symbol is displayed, you can pressEnter to complete the command.You are in interface configuration mode when theprompt changes to Router(config-if)#.Router(config-if)# ?Interface configuration commands:.ipInterface Internet Protocol config commandskeepaliveEnable keepalivelan-nameLAN Name commandllc2LLC2 Interface Subcommandsload-intervalSpecify interval for load calculationfor aninterfacelocaddr-priorityAssign a priority grouploggingConfigure logging for interfaceloopbackConfigure internal loopback on an interfacemac-addressManually set interface MAC addressmlsmls router sub/interface commandsmpoaMPOA interface configuration commandsmtuSet the interface Maximum TransmissionUnit (MTU)netbiosUse a defined NETBIOS access list orenablename-cachingnoNegate a command or set its defaultsnrzi-encodingEnable use of NRZI encodingntpConfigure NTP.Router(config-if)#Enter ? to display a list of all the interface configuration commands available for the serial interface.This example shows only some of the availableinterface configuration commands.Book Title1-10OL-xxxxx-xx
Chapter 1Using Cisco IOS XE SoftwareGetting HelpTable 1-5Finding Command Options (continued)CommandCommentRouter(config-if)# ip ?Interface IP configuration subcommands:access-groupSpecify access control for packetsaccountingEnable IP accounting on this interfaceaddressSet the IP address of an interfaceauthenticationauthentication subcommandsbandwidth-percentSet EIGRP bandwidth limitbroadcast-addressSet the broadcast address of an interfacecgmpEnable/disable CGMPdirected-broadcast Enable forwarding of directed broadcastsdvmrpDVMRP interface commandshello-intervalConfigures IP-EIGRP hello intervalhelper-addressSpecify a destination address for UDPbroadcastshold-timeConfigures IP-EIGRP hold time.Router(config-if)# ipEnter the command that you want to configure forthe interface. This example uses the ip command.Router(config-if)# ip address ?A.B.C.DIP addressnegotiatedIP Address negotiated over PPPRouter(config-if)# ip addressEnter the command that you want to configure forthe interface. This example uses the ip addresscommand.Enter ? to display what you must enter next on thecommand line. This example shows only some ofthe available interface IP configuration commands.Enter ? to display what you must enter next on thecommand line. In this example, you must enter an IPaddress or the negotiated keyword.A carriage return ( cr ) is not displayed; therefore,you must enter additional keywords or arguments tocomplete the command.Router(config-if)# ip address 172.16.0.1 ?A.B.C.DIP subnet maskRouter(config-if)# ip address 172.16.0.1Enter the keyword or argument that you want to use.This example uses the 172.16.0.1 IP address.Enter ? to display what you must enter next on thecommand line. In this example, you must enter an IPsubnet mask.A cr is not displayed; therefore, you must enteradditional keywords or arguments to complete thecommand.Router(config-if)# ip address 172.16.0.1 255.255.255.0 ?secondaryMake this IP address a secondary address cr Router(config-if)# ip address 172.16.0.1 255.255.255.0Enter the IP subnet mask. This example uses the255.255.255.0 IP subnet mask.Enter ? to display what you must enter next on thecommand line. In this example, you can enter thesecondary keyword, or you can press Enter.A cr is displayed; you can press Enter tocomplete the command, or you can enter anotherkeyword.Router(config-if)# ip address 172.16.0.1 255.255.255.0Router(config-if)#In this example, Enter is pressed to complete thecommand.Book TitleOL-xxxxx-xx1-11
Chapter 1Using Cisco IOS XE SoftwareUsing the no and default Forms of CommandsUsing the no and default Forms of CommandsAlmost every configuration command has a no form. In general, use the no form to disable a function.Use the command without the no keyword to re-enable a disabled function or to enable a function thatis disabled by default. For example, IP routing is enab
This document provides an overview of software functionality that is specific to the Cisco ASR 903 Series Router. It is not intended as a comprehensive gu ide to all of the software features that can be run using the Cisco ASR 903 Series Router, but only