Transcription
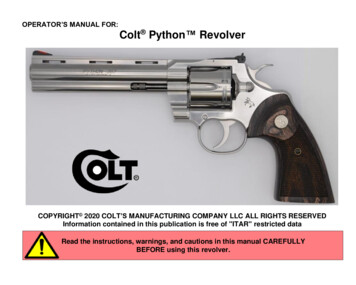
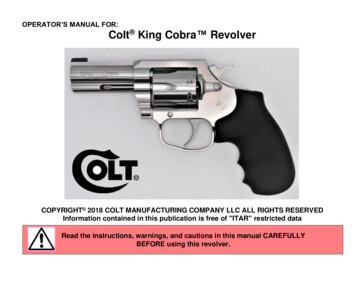
OPERATOR’S MANUAL FOR:Colt King Cobra RevolverCOPYRIGHT 2018 COLT MANUFACTURING COMPANY LLC ALL RIGHTS RESERVEDInformation contained in this publication is free of "ITAR" restricted dataRead the instructions, warnings, and cautions in this manual CAREFULLYBEFORE using this revolver.
SAFETY DEPENDS ON YOUNOTICEColt shall not be responsible for injury, death, or damage to property resulting from either intentional oraccidental discharge of this revolver, or from its function when used for purposes or subjected to treatmentfor which it was not designed. Colt will not honor claims involving this revolver which result from carelessor improper handling, unauthorized adjustment or parts replacement, corrosion, neglect, the use of wrongcaliber ammunition, the use of ammunition other than high quality commercially manufactured ammunitionin good condition, or any combination thereof. Colt will not honor claims involving this revolver for anyreason or cause when such claims are made by the second or subsequent owner.IMPORTANTBefore it left the factory this revolver was tested, carefully inspected, and packaged. Colt cannot controlproduct handling after it leaves the factory; therefore, please examine this revolver carefully at the time ofpurchase to ensure that it is unloaded and undamaged. The dealer will be pleased to assist you in makingthis examination and endeavor to answer your further questions.This instruction manual should always accompany this revolver. When you lend, give, or sell this revolver,be sure this manual goes with it. If you need a replacement manual, see page 40 for advice.READ AND UNDERSTAND ALL THE FOLLOWING WARNINGS AND CAUTIONS BEFOREREMOVING THIS REVOLVER FROM ITS PACKAGE.This Colt product is classified as a Firearm by the Bureau of Alcohol, Tobacco, Firearms, andExplosives. You must follow the safety instructions for your safety and the safety of others.-2-
SAFETY DEPENDS ON YOUAbout WARNINGS and CAUTIONSThroughout this operator’s manual, you will find WARNINGS and CAUTIONS in bold print. All WARNINGS andCAUTIONS must be read carefully and followed completely. WARNINGS discuss issues that could result in damageto your revolver or serious injury or death to you or a bystander. CAUTIONS discuss issues that could result indamage or malfunction of your revolver or cause injury. Read and understand all the WARNINGS and CAUTIONSbefore removing the revolver from its package.WARNING: IF THIS REVOLVER IS CARELESSLY OR IMPROPERLY HANDLED, UNINTENTIONAL DISCHARGECOULD RESULT AND COULD CAUSE INJURY, DEATH, OR DAMAGE TO PROPERTY.WARNING: ALWAYS BE AWARE OF POSSIBLE RISK FROM DROPPING YOUR REVOLVER. SOME PARTS OFTHE MECHANISM COULD BE DAMAGED, ALTHOUGH YOU MAY NOT SEE THE DAMAGE. A DAMAGED REVOLVERCOULD DISCHARGE AND CAUSE INJURY, DEATH, OR DAMAGE TO PROPERTY. If your revolver has beendropped, have your revolver examined by a competent gunsmith or return it to Colt for service.WARNING: DO NOT ALTER PARTS, AS THIS MAY RESULT IN THE PREMATURE WEARING OF PARTS ORREDUCE THE LEVEL OF SAFETY, CAUSING THE REVOLVER TO MALFUNCTION. A MALFUNCTION CAN RESULTIN AN ACCIDENTAL DISCHARGE, WHICH COULD CAUSE SERIOUS INJURY, DEATH, OR DAMAGE TO PROPERTY.If any parts do not function properly, have your revolver examined by a competent gunsmith or return it to Colt forservice.WARNING: WHEN YOU SQUEEZE THE TRIGGER, YOU MUST EXPECT THE REVOLVER TO FIRE, AND YOUMUST TAKE FULL RESPONSIBILITY FOR FIRING IT. YOUR CARE CAN AVOID ACCIDENTAL DISCHARGE, ANDYOU WILL THEREBY AVOID ACCIDENTAL INJURY AND DEATH.WARNING: THIS REVOLVER MAY DISCHARGE ACCIDENTALLY WHEN A ROUND IS IN THE CHAMBER IF ITIS DROPPED OR RECEIVES A BLOW TO THE MUZZLE OR FRONT OF THE REVOLVER. This can occur regardlessof the position of the hammer or any of the various safety devices. Therefore, extra care and strict adherence tothese instructions by the revolver user is mandatory for minimizing the risk of accidents.WARNING: ALWAYS HANDLE YOUR REVOLVER AS IF IT WERE LOADED so that you never fire it accidentallywhen you think it is unloaded.WARNING: NEVER POINT YOUR REVOLVER AT ANYTHING YOU DO NOT INTEND TO SHOOT to prevent injuryor death in the event of an accidental discharge.-3-
SAFETY DEPENDS ON YOUWARNING: NEVER LEAVE A LOADED REVOLVER UNATTENDED. Someone, especially a child, may fire itand cause injury, death, or damage to property.WARNING: NEVER LEAVE A REVOLVER COCKED READY TO FIRE, as this condition is extremely dangerous,and the revolver could easily be accidentally discharged causing injury, death, or damage to property.WARNING: NEVER TAKE ANYONE’S WORD THAT A REVOLVER IS UNLOADED; check for yourself with yourfinger off the trigger and the revolver pointed in a safe direction so that you never fire the revolver accidentallywhen you think it is unloaded.WARNING: ALWAYS BE SURE YOUR BACKSTOP IS ADEQUATE to stop and contain bullets before firing sothat you do not hit anything outside your shooting area. A bullet can travel through or past your target up to threemiles if in doubt, don’t shoot.WARNING: NEVER DRINK ALCOHOLIC BEVERAGES OR TAKE DRUGS BEFORE OR DURING SHOOTING asyour judgment, vision, and motor skills could be seriously impaired, making your revolver handling unsafe.WARNING: NEVER SHOOT AT A HARD SURFACE, SUCH AS ROCK, OR A LIQUID SURFACE, SUCH ASWATER. A bullet may ricochet and travel in any direction to strike you or an object you cannot see causing injury,death, or damage to property.WARNING: NEVER DISCHARGE A REVOLVER NEAR FLAMMABLE MATERIAL. Flame and sparks erupt fromthe revolver when it is discharged, which could ignite flammable materials or cause gasses to explode.WARNING: ALWAYS WEAR AND ENCOURAGE OTHERS TO WEAR EYE AND EAR PROTECTION.-4-
SAFETY DEPENDS ON YOUTABLE OF CONTENTSTITLEPAGE NO.CoverNoticeAbout Warnings and CautionsTable of ContentsIllustration of RevolverDescription:Characteristics of RevolverOperating FeaturesMaintenance:MaintenanceCleaning MaterialsCleaning & ightsLoadingAiming and FiringUnloadingDangerous SituationsMisfiresBore ObstructionsHealth and EnvironmentalStorageRevolver RecordService AgreementServicing and Repair-5-
SAFETY DEPENDS ON YOUILLUSTRATION OF REVOLVERCOLT KING COBRA REVOLVER-6-
SAFETY DEPENDS ON YOUDESCRIPTIONThis operator’s manual describes the Colt King Cobra Revolver and includes information on its features.The Colt King Cobra is a single/double action stainless steel compact revolver. Incorporates a full length, snagfree, ejector shroud and interchangeable front sight on the barrel. The revolver offers excellent accuracy, balance,and controllability. This revolver utilizes an improved action which features a transfer bar which prevents thehammer from striking the firing pin until the trigger is squeezed and held back.CAUTION: Only you can control the configuration of your revolver. Make sure it always complies with federal,state, and local firearms laws and regulations that apply to you. Check that any accessories you may attach, arelegal in your state and the state you intend to use it. If you are unsure, ask a local, licensed firearms dealer.CHARACTERISTICS OF REVOLVERTYPE OF REVOLVER:Colt King Cobra, six shot, single/double action revolver, caliber .357 magnum.Stainless Steel, smooth trigger, shrouded ejector rod, and ramp front sight.AMMUNITION:.357 Magnum38 Special & 38 Special P, can be fired safety from this revolverThe cartridge designation is located on the barrel of the revolver (Figure 1). This indicates the correctammunition that must be used in the revolver.WARNING: NEVER USE AMMUNITION NOT SPECIFICALLY DESIGNATED FOR USE IN YOUR REVOLVER.FAILURE TO USE THE CORRECT TYPE OR CALIBER OF AMMUNITION MAY CAUSE THE REVOLVER JAM, OR TOFAIL TO FIRE, OR GENERATE EXCESSIVE PRESSURE, WHICH CAN DAMAGE OR EVEN RUPTURE THEREVOLVER, CAUSING PERSONAL INJURY, DEATH, OR PROPERTY DAMAGE. To protect you from danger andyour revolver from damage, Colt does not recommend the use of reloads or remanufactured ammunition.-7-
SAFETY DEPENDS ON YOUCHARACTERISTICS OF REVOLVER (Cont.)CARTRIDGE DESIGNATIONFigure 1-8-
SAFETY DEPENDS ON YOUCHARACTERISTICS OF REVOLVER (Cont.)AMMUNITION SELECTION:Your Colt King Cobra Revolver is designed to function with a variety of brands and types of factory manufacturedammunition in the appropriate caliber, but not all ammunition will provide the same results. It is recommended thatyou go to the range and fire different ammunition, once you find the ammunition that functions best, keep using it.Do not use ammunition that has any indications of damage to the cartridge or bullet.It is recommended that you use commercially manufactured ammunition that is manufactured in accordance withthe specifications of the Sporting Arms and Ammunition Manufacturers’ Institute (SAAMI).WARNING: ALWAYS INSPECT THE AMMUNITION BEFORE USING IT. NEVER USE DIRTY, CORRODED, ORDAMAGED AMMUNITION. USING IT CAN DAMAGE OR EVEN RUPTURE THE REVOLVER, CAUSING PERSONALINJURY, DEATH, OR PROPERTY DAMAGE.WARNING: IF AMMUNITION NOT SPECIFIED FOR USE IN YOUR REVOLVER FITS INTO THE CHAMBERFIRING THAT AMMUNITION CAN DAMAGE OR EVEN RUPTURE THE REVOLVER, CAUSING PERSONAL INJURY,DEATH, OR PROPERTY DAMAGE. NEVER LOAD OR FIRE AMMUNITION NOT SPECIFIED FOR YOUR REVOLVER.REVOLVER SPECIFICATIONS:Overall Length:8.00 inches(20.32 cm)Barrel Length:3.0 inches(5.34 cm)Weight (unloaded):1.75 lbs.(.794 kg)-9-(rifling 1 in 14 LH twist)
SAFETY DEPENDS ON YOUCHARACTERISTICS OF REVOLVER (Cont.)FUNCTION:Most revolver models can be fired by Single Action Mode, cocking the hammer manually and then squeezing thetrigger to fire, or by Double Action Mode, squeezing the trigger to rotate the cylinder, cock the hammer and thenfire the revolver.Some revolver models are DAO (Double Action Only) and have the hammer spur removed. They can only be firedby squeezing the trigger fully. There is no sear to hold the hammer back in single action mode.In either mode the functioning sequence is similar, when the trigger or hammer rotates rearward, the triggerunlocks the bolt from the cylinder, while the trigger lifts the hand to rotate the cylinder clockwise, the trigger alsomoves the transfer bar up behind the firing pin. When the hammer is approximately halfway to its cocked positionthe bolt is released from the trigger and rides on the outside of the cylinder. The cylinder continues to rotate untilthe bolt drops into the next cylinder notch assuring proper alignment of the chamber, barrel, and firing pin beforethe hammer is released. Once the hammer is released from the trigger, it rotates forward striking the transfer bartransferring energy to the firing pin to ignite the cartridge in the chamber. Once the trigger is released, the triggerwill rotate back to it’s at rest position pulling the transfer bar down from behind the firing pin, leaving a gap betweenthe firing pin and hammer. Without the trigger holding the transfer bar up behind the firing pin there is no way forthe hammer to contact the transfer bar or firing pin.Single Action Mode: When the hammer is manually cocked, it will remain cocked until the trigger is squeezed tofire the revolver.WARNING: DO NOT ATTEMPT TO HOLSTER, CARRY, OR STORE YOUR REVOLVER WITH THE HAMMERCOCKED. REMEMBER TO KEEP THE REVOLVER POINTED IN A SAFE DIRECTION AND YOUR FINGER OFF THETRIGGER. THE REVOLVER WILL FIRE IF THE TRIGGER IS PULLED.Double Action Mode & DAO (Double Action Only): Pulling the trigger rearward, rotates both the cylinder andhammer until the trigger releases the hammer allowing it to rotate forward striking the transfer bar, transferringenergy to the firing pin to fire the revolver.- 10 -
SAFETY DEPENDS ON YOUOPERATING FEATURESThe operating features section identifies components of the Colt King Cobra Revolvers and provides a descriptionof their function:Trigger (Figures 3 & 4):When pulled fires the revolver. Interacts with the hammer, hammer strut, bolt, hand, and transfer bar.Sights:Used to align revolver with target. The rear sight is a fixed notch in the top strap of the frame (Figure 2). Thefront sight (Figure 3) is used in conjunction with the rear sight notch to provide alignment to target.Hammer (Figures 1, 2, 3 & 4)When released from a cocked position, in either double action or single action mode, rotates to hit thetransfer bar. Transferring energy to the pin firing pin to ignite the cartridge.WARNING: DO NOT ATTEMPT TO CLOSE OR FORCIBLY SLAM THE CYLINDER INTO THE FRAME WITH THEHAMMER COCKED, AS YOU COULD DAMAGE THE MECHANISM.WARNING: DO NOT ATTEMPT TO FORCE THE CYLINDER OPEN WITH THE HAMMER COCKED DOING SOCOULD DAMAGE THE REVOLVER MECHANISM.Transfer Bar (Figure 2):Is a safety mechanism. When it is being held up behind the firing pin and the hammer is released, the hammerhits the transfer bar transferring energy to the firing pin to ignite the cartridge in the chamber. Without thetrigger being held in the firing position, the transfer bar is not held up behind the firing pin. This creates aspace between the hammer and firing pin, preventing the hammer from striking the firing pin until the triggeris squeezed and held back. The revolver will not fire provided the trigger is not in the firing position.Hand:Rotates the cylinder to align the chamber with the barrel and firing pin. However, it serves also as a safetydevice preventing the cylinder from being opened or closed while the hammer is in the cocked position.Barrel (Figure 3):Contains rifling which imparts a stabilizing spin to the bullet so that it will follow a more accurate path to thetarget.Cylinder (Figures 3 & 4):Contains six chambers for loading of up to six cartridges.WARNING: FORCING DAMAGED AMMUNITION INTO THE CYLINDER CHAMBERS COULD DAMAGE YOURREVOLVER AND COULD RESULT IN INJURY, DEATH, OR DAMAGE TO PROPERTY- 11 -
SAFETY DEPENDS ON YOUOPERATING FEATURES (Cont.)Ejector Rod & Ratchet (Figure 4):Provides a means to eject cartridges (fired or unfired) from the cylinder.Cylinder Latch (Figure 4):Locks the cylinder into the frame. When pulled rearward it allows the cylinder to be opened to the left sideof the revolver.REAR SIGHTTRANSFER BARHAMMERFigure 2- 12 -
SAFETY DEPENDS ON YOUOPERATING FEATURES (Cont.)FRONT SIGHTHAMMERBARRELCYLINDERTRIGGERFigure 3- 13 -
SAFETY DEPENDS ON YOUOPERATING FEATURES (Cont.)HAMMERCYLINDER LATCHEJECTOR RODCYLINDERTRIGGERFigure 4- 14 -
SAFETY DEPENDS ON YOUMAINTENANCEMaintenance instructions tell the operator how to clean, lubricate, assemble, and do a functional check on therevolver. Like any other precision mechanism, your revolver will perform better, last longer, and remain saferwhen it is properly maintained. Follow the instructions in this section to keep your revolver in good condition.Tools Required:Materials Required:Cleaning kit for revolversDry, lint free clothBreak-Free CLP or good quality gun oilNote: If the revolver has been used in salt air, water, mud, or sand, it should be completely disassembled, cleaned,and inspected by a competent gunsmith or returned to Colt for service.WARNING: ALWAYS ENSURE THAT THE REVOLVER IS UNLOADED BEFORE CLEANING, LUBRICATING,AND/OR ASSEMBLING. MAKE SURE TO INSPECT ALL CHAMBERS AND MAKE SURE ALL ARE EMPTY. ALWAYSKEEP THE MUZZLE POINTED IN A SAFE DIRECTION. IF THIS REVOLVER IS CARELESSLY OR IMPROPERLYHANDLED, AN ACCIDENTAL DISCHARGE COULD RESULT AND COULD CAUSE SERIOUS INJURY, DEATH, ORDAMAGE TO PROPERTY.WARNING: WEAR SAFETY GLASSES IN CASE YOU LOSE CONTROL OF SOME OF THE SPRING LOADEDCOMPONENTS WHICH COULD CAUSE INJURY.IMPORTANT: DO NOT FIELD STRIP YOUR REVOLVER ANY FURTHER THAN DESCRIBED IN THIS MANUAL. IFYOU DO SO YOU WILL VOID YOUR SERVICE AGREEMENT. IF ADDITIONAL MAINTENANCE IS REQUIRED, MAKESURE THAT THE REVOLVER IS NOT LOADED AND RETURN IT TO COLT FOR SERVICE. FOR SPARE PARTS,SEEK ADVICE FROM THE DEALER, WHO SHOULD HAVE INFORMATION ON HOW TO OBTAIN GENUINE COLTPARTS, OR CONTACT COLT CUSTOMER SERVICE.- 15 -
SAFETY DEPENDS ON YOUCLEANING MATERIALSCleaning should be performed according to instructions in this manual using Break-Free CLP or good quality gunoil.Use a cleaning kit or cleaning equipment designed to clean revolvers. The cleaning kit should contain: a goodquality gun oil, cleaning rods, bore patches, a small brush, a bore brush, and a chamber brush at a minimum.CAUTION: If your firearm has been coated with a decorative finish, it is susceptible to damage from certainchemicals and abrasive surfaces. Do not use solvents, paint thinners, or gun cleaning products to clean thedecorative finish. Do not store the firearm with lubricants or oils on the decorative finishes as they will weakenthe outer protective coating of the decorative finish.CAUTION: If your firearm has been coated with a decorative finish, the best way to care for and maintain thelongevity of the decorative finish is to use a clean and soft cloth dampened with water and gently wiping thedecorative finish. As always, you may use normal gun oil lubricants to clean and maintain the internal componentsof the firearm using care not to get the products on the decorative finish.CLEANING & LUBRICATIONWARNING: ALWAYS UNLOAD YOUR REVOLVER IMMEDIATELY AFTER USE AND PRIOR TO CLEANING ANDSTORING TO MINIMIZE THE RISK OF ACCIDENTAL DISCHARGE. IF THIS REVOLVER IS CARELESSLY ORIMPROPERLY HANDLED, AN ACCIDENTAL DISCHARGE COULD RESULT AND COULD CAUSE SERIOUS INJURY,DEATH, OR DAMAGE TO PROPERTY.WHEN TO CLEAN:After Firing:Clean your revolver as soon as possible. This will lessen the opportunity for corrosion to start.Periodically: It is suggested that you clean your revolver when necessary and at least once or twice a year in atemperate climate, or as often as once a week in a tropical climate. If you get your revolver wet,clean it as soon as possible.- 16 -
SAFETY DEPENDS ON YOUCLEANING & LUBRICATION (Cont.)WARNING: DO NOT ATTEMPT TO FORCE THE CYLINDER OPEN WITH THE HAMMER COCKED DOING SOCOULD DAMAGE THE REVOLVER MECHANISM.1.Keep your finger off the trigger and outside of the trigger guard.2.Ensure that the hammer is not cocked.3.Open revolver by pulling cylinder latch to the rear and pushing the cylinder out to the left of therevolver.4.Push ejector rod rearward forcing out all live rounds or empty cartridge cases from the chambers.When they are clear of the chambers, remove from revolver.NOTE: The ejector rod spring should return the ejector rod to its seated position under its own force.5.Clean bore of barrel. Depending on the level of usage before cleaning a bore brush or cleaningpatch may be used to clean the bore.6.Clean each of the six chambers in the cylinder. Depending on the level of usage before cleaning achamber brush or cleaning patch may be used to clean each chamber.7.Use a small brush with a little cleaning solution to clean the front face of the cylinder, rear face ofthe barrel, and the revolver frame.8.Using a small brush or cleaning cloth with a little cleaning solution clean the rear face of thecylinder and ratchet. Then push the ejector rod rearward and clean behind the ratchet.9.Wipe all cleaning solution from the revolver.10.Lightly oil a bore patch and pass it through the barrel leaving a thin film of oil on the bore.11.Lightly oil a bore patch and pass it through each chamber of the cylinder leaving a thin film of oilin each chamber.- 17 -
SAFETY DEPENDS ON YOUCLEANING & LUBRICATION (Cont.)NOTE: Before use, pass a dry bore patch through the barrel and each chamber to remove as much oil as possiblebefore firing the revolver.12.Close the cylinder by pushing the cylinder into the frame until the cylinder latch moves forwardinto its closed position.NOTE: If necessary, cock the hammer and a few drops of oil may be applied to the internal components.13.Then wipe all external surfaces with a cloth lightly moistened with gun oil.IMPORTANT: DO NOT FIELD STRIP YOUR REVOLVER. IF YOU DO SO YOU WILL VOID YOUR SERVICEAGREEMENT. IF ADDITIONAL MAINTENANCE IS REQUIRED, MAKE SURE THAT THE REVOLVER IS NOT LOADEDAND HAVE IT EXAMINED BY A COMPETENT GUNSMITH OR RETURN IT TO COLT FOR SERVICE. FOR SPAREPARTS, SEEK ADVICE FROM THE DEALER, WHO SHOULD HAVE INFORMATION ON HOW TO OBTAIN GENUINECOLT PARTS, OR CONTACT COLT CUSTOMER SERVICE.- 18 -
SAFETY DEPENDS ON YOUOPERATIONSIGHTSFRONT SIGHT1.The front sight is interchangeable, standard model comes with a fiber optic. Optional sightsconfigurations are available in either a Tritium night sight or a brass bead configuration.2.To change the front sight, insert a .050” allen wrench into the hole just above the muzzle of the barrel.Turn counter-clockwise to loosen the #4-40 set screw and pull up on the front sight to remove it. Inserta new front sight and tighten the #4-40 set screw. It is recommend to use a medium thread locker onthe set screw to prevent it from loosening during shooting (Figure 5).050” ALLEN WRENCHBARREL677#4-40 SET SCREWFRONT SIGHTFigure 5DETAILS OF THE SIGHTS FURNISHED WITH YOUR REVOLVER MAY BE DIFFERENT DEPENDING ON YOURMODEL- 19 -
SAFETY DEPENDS ON YOUSIGHTS (Cont.)REAR SIGHT1.Rear Sight is a fixed notch cut into the upper strap of the frame (Figure 6).REAR SIGHTFigure 6NOTE:While many sights operate in a similar manner to the methodology previously described, if your Coltrevolver is outfitted with optics or accessories other than those depicted in this section, it is suggestedthat you see the manufacturer’s instructions for those optics or accessories.- 20 -
SAFETY DEPENDS ON YOULOADINGWARNING: DO NOT ATTEMPT TO FORCE THE CYLINDER OPEN WITH THE HAMMER COCKED DOING SOCOULD DAMAGE THE REVOLVER MECHANISM.CAUTION: TO MINIMIZE THE RISK OF UNINTENTIONAL DISCHARGE, LOAD LIVE AMMUNITION INTOREVOLVER ONLY WHEN YOU INTEND TO USE IT.WARNING: ALWAYS KEEP MUZZLE POINTING IN A SAFE DIRECTION WHEN LOADING. IF THIS REVOLVERIS CARELESSLY OR IMPROPERLY HANDLED, AN ACCIDENTAL DISCHARGE COULD RESULT AND COULDCAUSE SERIOUS INJURY, DEATH, OR DAMAGE TO PROPERTY.1.Keep your finger off the trigger and outside of the trigger guard (Figure 7).Figure 7- 21 -
SAFETY DEPENDS ON YOULOADING (Cont.)2.Ensure that the hammer is not cocked.3.Open the cylinder by pulling the cylinder latch to the rear and push the cylinder out to the left side ofthe revolver (Figure 8).4.With the cylinder open, check all six chambers to ensure that they are clean and unobstructed (Figure8).Figure 8- 22 -
SAFETY DEPENDS ON YOULOADING (Cont.)5.Insert a round of ammunition into each chamber, making sure to fully seat each cartridge (Figure 9).Figure 9- 23 -
SAFETY DEPENDS ON YOULOADING (Cont.)6.Push the cylinder into the frame until the cylinder latch moves forward into its closed position. Rotatethe cylinder if necessary to ensure that the bolt is engaged with the cylinder preventing free rotationof the cylinder (Figure 10).NOTE: Depending on the position of the cylinder when first pushed into the frame, it is sometimes possible thatthe bolt will not engage the cylinder to lock it. Check for proper bolt engagement by attempting to rotate the cylinderclockwise by hand. If the bolt is engaged properly the cylinder will not rotate. If the cylinder rotates, rotate it untilthe bolt engages the cylinder and prevents further rotation.7.The revolver is now loaded.WARNING: DO NOT ATTEMPT TO CLOSE THE CYLINDER WITH THE HAMMER COCKED. DO NOT SWING ORSLAM THE CYLINDER FORCIBLY INTO PLACE WITH THE HAMMER COCKED. DOING ANY OF THESE ACTIONSCOULD DAMAGE THE REVOLVER MECHANISM.WARNING: THE REVOLVER IS NOW LOADED. ALWAYS KEEP MUZZLE POINTING IN A SAFE DIRECTION.IF THE REVOLVER IS NOT TO BE FIRED, UNLOAD IT AS EXPLAINED ON PAGES 31-32. IF THIS REVOLVER ISCARELESSLY OR IMPROPERLY HANDLED, UNINTENTIONAL DISCHARGE COULD RESULT AND COULD CAUSEINJURY, DEATH, OR DAMAGE TO PROPERTY.BOLT ENGAGEDFigure 10- 24 -
SAFETY DEPENDS ON YOUAIMING AND FIRINGWARNING: KEEP REVOLVER POINTING IN A SAFE DIRECTION. DO NOT TOUCH TRIGGER AND KEEPFINGERS AWAY THE FRONT OF THE CYLINDER. IF THIS REVOLVER IS CARELESSLY OR IMPROPERLYHANDLED, AN ACCIDENTAL DISCHARGE COULD RESULT AND COULD CAUSE SERIOUS INJURY, DEATH, ORDAMAGE TO PROPERTY.WARNING: ALWAYS WEAR EYE AND EAR PROTECTION EVERY TIME YOU DISCHARGE YOUR REVOLVER.WARNING: ALWAYS KEEP YOUR FINGERS AND OTHER BODY PARTS AWAY FROM THE GAP BETWEENTHE CYLINDER AND BARREL OF THE REVOLVER. FAILURE TO DO SO RISKS INJURY FROM HOT GASES AND/ORDEBRIS WHEN FIRING A CARTRIDGE (Figure 11).1.2.3.Figure 11With the loaded revolver pointed in a safe direction, keep your fingers outside the trigger guard.Grip the revolver using a two-hand hold. Keeping hands and fingers away from the barrel/cylinder gap.Never extend your fingers beyond the front of the cylinder when firing a revolver (Figure 11).Take aim by aligning the target with the front and rear sights.- 25 -
SAFETY DEPENDS ON YOUAIMING AND FIRING (Cont.)4.There are two ways to fire your revolver:a. Double Action Mode and DAO (Models) - After aligning the target and sights, squeeze thetrigger fully rearward until it cocks and releases the hammer to fire the revolver. To fire thesecond and subsequent rounds, release the trigger fully and squeeze it again to cock andrelease the hammer. Repeat until you have completed firing, then remove finger from insidethe trigger guard (Figure 12).IMPORTANT: Trigger must be fully returned forward before squeezing it again. Failure to do so canprevent the action from fully cycling and will prevent you from being able to fire the next shot.Figure 12WARNING: NEVER TRY TO COCK THE HAMMER ON THE DAO MODEL, THE HAMMER WITHOUT THE SPURCOULD SLIP OUT OF YOUR GRASP AND CAUSE THE REVOLVER TO DISCHARGE IF THE TRIGGER IS PULLED.- 26 -
SAFETY DEPENDS ON YOUAIMING AND FIRING (Cont.)b. Single Action Mode- After aligning the target and sights, with finger outside the trigger guard,draw the hammer fully back to the cocked position (Figure 13) where it will be held by thesear. Remove thumb or finger from hammer spur and place finger inside trigger guard andgently squeeze trigger until the hammer falls. Repeat procedure until you have completedfiring.IMPORTANT: Trigger travel and pressure is significantly less in single action mode to fire the revolver.So it is your responsibility to exercise care in handling the revolver when firing in single action mode.Figure 13- 27 -
SAFETY DEPENDS ON YOUAIMING AND FIRING (Cont.)IMPORTANT: If you decide to not fire the revolver from the cocked single action position, then lowerthe hammer as follows:c. With your fingers off the trigger and outside the trigger guard, place the thumb of your freehand between the hammer and frame of the revolver to prevent the hammer from movingfully forward (Figure 14).Figure 14- 28 -
SAFETY DEPENDS ON YOUAIMING AND FIRING (Cont.)d. Place the thumb of your firing hand firmly on the hammer spur. You must control the hammerwith your thumb, if you lose control of the hammer and it slips while the trigger is being heldback the revolver will fire (Figure 15).Figure 15- 29 -
SAFETY DEPENDS ON YOUAIMING AND FIRING (Cont.)e. While controlling the hammer gently squeeze the trigger to allow the hammer to moveforward out of its cocked position.f. Release the trigger completely and remove your finger from the trigger guard before loweringthe hammer to its uncocked (at rest) position (Figure 16).WARNING: FAILURE TO REMOVE YOUR FINGER FROM THE TRIGGER GUARD AS SOON AS THE HAMMERIS OUT OF ITS COCKED POSITION COULD CAUSE THE REVOLVER TO FIRE IF YOUR THUMB SLIPS OFF THEHAMMER SPUR.5.Keep revolver pointed in a safe direction and unload revolver as described in the unloading sectionof this manual.WARNING: NEVER LEAVE REVOLVER COCKED READY AND TO FIRE. ONLY PLACE THE REVOLVER INSINGLE ACTION MODE WHEN YOU ARE READY TO FIRE THE REVOLVER.WARNING: IF YOUR REVOLVER FAILS TO FIRE, KEEP IT POINTED IN A SAFE DIRECTION, AND REFER TOTHE MISFIRE SECTION ON PAGE 33. IF THIS REVOLVER IS CARELESSLY OR IMPROPERLY HANDLED, ANACCIDENTAL DISCHARGE COULD RESULT AND COULD CAUSE SERIOUS INJURY, DEATH, OR DAMAGE TOPROPERTY.Figure 16- 30 -
SAFETY DEPENDS ON YOUUNLOADINGWARNING: ALWAYS KEEP MUZZLE POINTING IN A SAFE DIRECTION. IF THIS REVOLVER IS CARELESSLYOR IMPROPERLY HANDLED, AN ACCIDENTAL DISCHARGE COULD RESULT AND COULD CAUSE SERIOUSINJURY, DEATH, OR DAMAGE TO PROPERTY.WARNING: ALWAYS UNLOAD YOUR REVOLVER IMMEDIATELY AFTER USE AND PRIOR TO CLEANING ANDSTORING TO MINIMIZE THE RISK OF ACCIDENTAL DISCHARGE. IF THIS REVOLVER IS CARELESSLY ORIMPROPERLY HANDLED, AN ACCIDENTAL DISCHARGE COULD RESULT AND COULD CAUSE SERIOUS INJURY,DEATH, OR DAMAGE TO PROPERTY.WARNING: DO NOT ATTEMPT TO FORCE THE CYLINDER OPEN WITH THE HAMMER COCKED. DOING SOCOULD DAMAGE THE REVOLVER MECHANISM.1.2.3.Keep your finger off the trigger and outside of the trigger guard.Ensure that the hammer is not cocked.Open the cylinder by pulling the cylinder latch to the rear and push the cylinder out to the left side ofthe revolver.4.With the cylinder open, push the ejector rod rearwards forcing out all of the loaded cartridges (Figure17). With the cartridges clear of the chambers remove them from the revolver. Allow ejector rod toreturn to its seated position in the cylinder.NOTE: The ejector rod spring should return the ejector rod/ratchet to its seated position under its own force.5.With the hammer still in the uncocked position, push the cylinder into the frame until the cylinder latchmoves forward into its closed position.6.After pushing cylinder into frame, the cylinder should be rotated until the bolt engages the cylinder.7.Collect live ammunition for safe storage and properly dispose of any spent cartridge cases.WARNING: DO NOT ATTEMPT TO CLOSE THE CYLINDER WITH THE HAMMER COCKED. DO NOT SWING ORSLAM THE CYLINDER FORCIBLY INTO PLACE WITH THE HAMMER COCKED. DOING ANY OF THESE ACTIONSCOULD DAMAGE THE REVOLVER MECHANISM.WARNING: REVOLVER IS CLEAR ONLY WHEN ALL CHAMBERS ARE EMPTY AND THE HAMMER IS IN THEUNCOCKED
The Colt King Cobra is a single/double action stainless steel compact revolver. Incorporates a full length, snag free, ejector shroud and interchangeable front sight on the barrel. The revolver offers excellent accuracy, balance, and controllability. This revolver utilizes an improve