Transcription
MICROSERVICESMIGRATION
CONTENTSIntroduction to Microservice . 3Benefits of Micro Services . 3Migration of Applications to Microservices Architecture. . 3Breaking Up a Monolithic Application into Microservices . 3Domain Driven Design . 4Anti-corruption layer . 4Presentation layer. 5PoC : Breaking up a Monolith . 6Assumptions and General Guidelines for the PoC . 6Phase One: Set up the environment . 7Step 1: Get the Environment Up . 7Step 2: Download & Open the Project . 8Step 3: Create the Repository . 8Step 4: Build and Push the Docker Image . 9Phase Two - Deploy the Monolith. 10Step 1: Launch ECS Cluster Using CloudFormation . 10Step 2: Check If the Cluster is Running: . 11Step 3: Write a Task Definition . 11Step 4: Configure ALB: Target Group . 12Step 5: Configure the ALB Target Group . 12Step 6: Add a Listener to the ALB . 13Step 7: Deploy the Monolith as a Service . 14Step 8: Test Your Monolith . 15Phase Three - Break the Monolith . 16Architecture Overview . 16STEP 1: Provision the ECR Repositories . 16Step 2: Build and Push image for each Service . 17Phase Four - Deploy Microservices. 18Architecture Overview . 18Step1: Write Task Definitions for your Service: . 19Step2: Configure ALB: Target Groups . 19Step 3. Configure Listener Rules: . 20Step 4. Deploy Microservices. . 21Step 6: Validate Your Deployment: . 23 Pactera EDGE. Confidential. All rights reserved.1
This document is provided “as-is”. The information provide here is for InternalPacteraEdge staff only and not for public distribution. Information and viewsexpressed in this document, including URL and other Internet Web site references,may change without notice. 2020 Pactera Technologies. All rights reserved. Pactera EDGE. Confidential. All rights reserved.2
Introduction to MicroserviceMicroservice is an architectural style software in which applications are composed of small, independentPhases that communicate with each other using well-defined API contracts. These service Phases arehighly decoupled building blocks that are small enough to implement a single functionality. The purposeof microservice architecture is to make the applications easier to develop and scale. Microservicearchitecture foster collaboration between autonomous teams and enable them to bring newfunctionalities to market faster.Benefits of Micro ServicesThe benefits of using microservices architecture are maximized when those applications are built in thecloud, with a wide range of managed services that make it easier to materialize what the microservicespromise. With these services managing infrastructure and scaling as well as improving the way you cando critical processes like deployment or monitoring those solutions, you can maximize the amount ofvalue delivered per cycle. Cloud serverless platforms provide us with a wide range of options for us todeliver that value.Migration of Applications to Microservices Architecture.Microservices architecture brings a host of benefits to the application and the teams working on theapplication as well but there is certain trade-off with the architecture too. Microservices do pose seriousconsequences for operations. While planning the migration to Microservices based architecture, ensurethat the baseline competencies like rapid provisioning, basic monitoring and pipelines for rapidapplication development are met. These imply a cultural shift in the organization towards Dev-Ops.Breaking Up a Monolithic Application intoMicroservicesReplacing a complex system completely can be a huge undertaking. Often, you will need a gradualmigration to a new system, while keeping the old system to handle features that haven't been migratedyet. However, running two separate versions of an application means that clients need to know wherethe features are located. Every time a feature or service is migrated, clients need to be updated aboutthe new location.Solution to the above problem lies in replacing the specific pieces of functionality with new applicationsand services on an incremental basis. Create a proxy that intercepts the requests going to the backendlegacy system. The proxy routes these requests either to the legacy application or to the new services.Existing features can be migrated to the new system gradually, and consumers can continue using thesame interface, without being aware of any migration taken place.This pattern helps to minimize risks from the migration and spreads the development efforts over time.With the proxy safely routing users to the correct application, you can add functionality to the newsystem at whatever pace you like ensuring that the legacy application continues to function. Over time,as the features are migrated to the new system, the legacy system is eventually "strangled" making itno longer essential. Once this process is complete, the legacy system can retire safely.Any migration strategy should allow the teams to refactor the application incrementally into smallerservices, while still providing continuity of service to the end-users. Here's the general approach: Stop adding functionality to the monolith. Pactera EDGE. Confidential. All rights reserved.3
Split the front end from the back end.Decompose and decouple the monolith into a series of microservices.Domain Driven DesignTo help facilitate this decomposition, a software development approach that becomes viable is to applythe principles of domain-driven design (DDD).The DDD approach can be applied retroactively to an existing application, to begin the decompositionof the application.1. Start with a ubiquitous language, a common vocabulary that is shared between all stakeholders.2. Identify the relevant Phases in the monolithic application and apply the common vocabulary to them.3. Define the domain models of the monolithic application. The domain model is an abstract model ofthe business domain.4. Define bounded contexts for the models. A bounded context is a boundary within a domain where aparticular domain model applies. Apply explicit boundaries with clearly defined models andresponsibilities.The bounded contexts identified in step 4 are the candidates for microservice refactoring.Anti-corruption layerWhile this investigative work is carried out to inventory the monolithic application, new functionalitycan be added by applying the principles of DDD as separate services. "Glue code" allows the monolithicapplication to make proxy call to the new service to obtain a new functionality.The glue code (adapter pattern) effectively acts as an anti-corruption layer, ensuring that the newservice is not polluted by data models required by the monolithic application. The glue code helps to Pactera EDGE. Confidential. All rights reserved.4
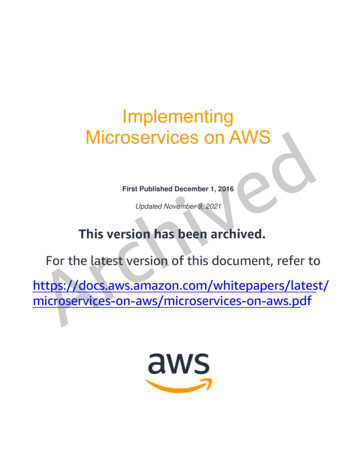
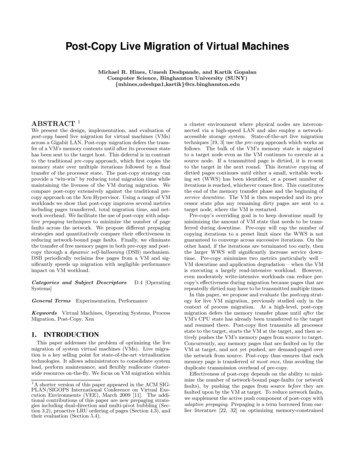
mediate interactions between the two and ensures that only data required by the new service is passedon to enable compatibility.Through the process of refactoring, the teams can inventory the monolithic application and identifycandidates for microservices refactoring while establishing a new functionality with new services.Presentation layerThe next step is to separate the presentation layer from the backend layer. In a traditional n-tierapplication, the application (business) layer tends to be the components that are core to the applicationand have domain logic within them. These coarse-grained APIs interact with the data access layer toretrieve persisted data from within a database. These APIs establish a natural boundary to thepresentation tier and help to decouple the presentation tier into a separate application space.This diagram also introduces to another layer, the API gateway, that sits between the presentation layerand the application logic. The API gateway is a façade layer that provides a consistent and uniforminterface for the presentation layer to interact with, while allowing downstream services to evolveindependently, without affecting the application. The API Gateway may use a technology such as AzureAPI Management and allow the application to interact in a RESTful manner.The presentation tier can be developed in any language or framework that the team has expertise in,such as a single page application or an MVC application. These applications interact with themicroservices via the gateway, using standard HTTP calls.Resulting Architecture Using Strangler Pattern Pactera EDGE. Confidential. All rights reserved.5
At this stage, the team can start peeling away the monolithic application and slowly extract the servicesthat have been established by their bounded contexts into their own set of microservices. Themicroservices can expose a RESTful interface for the application layer to interact with, through the APIgateway, with glue code in place to communicate with the monolith in specific circumstances.As you continue to peel away the monolith, there will come a point when it no longer needs to exist,and the microservices are successfully extracted from the monolith. At this point, the anti-corruptionlayer (glue code) can safely be removed.PoC : Breaking up a MonolithDeploy a monolithic node.js application to a Docker container, then decouple the application intomicroservices without any downtime. The node.js application hosts a simple message board withthreads and messages between users.Assumptions and General Guidelines for the PoCi. In this Section, we will deploy a monolithic node.js application to a Docker container, then decouplethe application into microservices without any downtime. The node.js application hosts a simplemessage board with threads and messages between users.ii. During this walkthrough, we will show you how to run a simple monolithic application in a Dockercontainer, deploy the same application as microservices, then switch traffic to the microserviceswithout any downtime.iii. In this walkthrough, we have emphasized on breaking up the monolith. We are refactoring theapplication to redesign the architecture. Each Service will have its DB deployed as against the casein monolith where the entire application has a single DB.iv. The Security of the Application in the Cloud can be achieved by following the below-mentionedDesign Principles: Implement a strong identity foundation: Implement the principle of least privilege andenforce separation of duties with appropriate authorization for each interaction with your AWSresources. Centralize privilege management and reduce or eliminate reliance on long-termcredentials.Enable traceability: Monitor, alert, and audit the actions and changes to your environment inreal time. Integrate logs and metrics with systems to automatically respond and act.Apply security at all layers: Rather than just focusing on protection of a single outer layer,apply a defense-in-depth approach with other security controls. Apply to all layers (e.g., edgenetwork, VPC, subnet, load balancer, every instance, operating system, and application).Automate security best practices: Automated software-based security mechanisms improveyour ability to scale it securely, rapidly, and cost effectively. Create secure architectures,including the implementation of controls that are defined and managed as code in versioncontrolled templates.Protect data in transit and at rest: Classify your data into sensitivity levels and usemechanisms, such as encryption, tokenization, and access control where appropriate.Keep people away from data: Create mechanisms and tools to reduce or eliminate the needfor direct access or manual processing of data. This reduces the risk of loss or modification andhuman error as well when handling sensitive data.Prepare for security events: Prepare for an incident by having an incident managementprocess that aligns to your organizational requirements. Run incident response simulations anduse tools with automation to increase your speed for detection, investigation, and recovery. Pactera EDGE. Confidential. All rights reserved.6
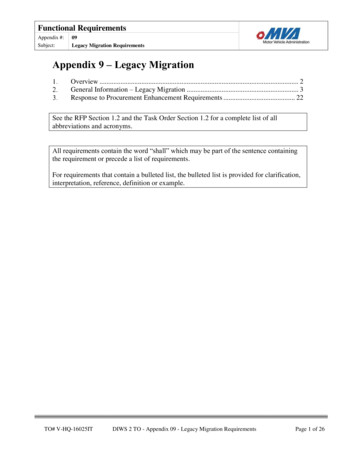
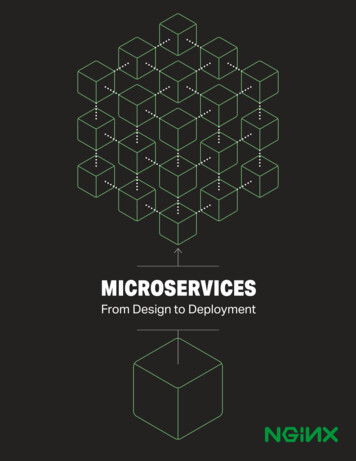
1. Monolithic ArchitectureThe entire node.js application is run in acontainer as a single service and eachcontainer has the same features as all othercontainers. If one application featureexperiences a spike in demand, the entirearchitecture must be scaled.2. Microservices ArchitectureEach feature of the node.js application runs asa separate service within its own container. Theservices can scale and be updatedindependently of the othersFlow for Containerization of the applicationPhase One: Set up the environmentStep 1: Get the Environment UpIn the next few steps, we will be using Docker, Github, Amazon ECS, and Amazon ECR to deploycode into containers. To complete these steps, you will need to ensure that you have the right tools.1. Have an AWS Account: If you don't have an account with AWS, you can sign up here.2. Install Docker: You will be using Docker to build the image files that you will run in your containers.Docker is an open source project and you can download it here for Mac or for Windows.Once Docker is installed, you can check if it is working by running Docker --version in the terminal.You should see something like this: Docker version 17.03.0-ce, build 60ccb22.3. Install the AWS CLI You will use the AWS Command Line Interface (CLI) to push the images to Amazon ElasticContainer Registry. You can learn about the CLI here. Pactera EDGE. Confidential. All rights reserved.7
Once the AWS CLI is installed, you can check if it is working by running aws --version in theterminal. You should see something like this: aws-cli/1.11.63 Python/2.7.10 Darwin/16.5.0botocore/1.5.26.If you already have the AWS CLI installed, run the following command in the terminal to ensureit is updated to the latest version: pip install awscli --upgrade --user4. Have a Text Editor: If you don't have a text editor for coding, you should install one into your localenvironment.Step 2: Download & Open the ProjectDownload Code from GitHub: Navigate to ervices and select 'Clone or Download' to download the GitHub repository to your localenvironment. You can also use GitHub Desktop or Git to clone the repository.Open the Project Files: Start Your Code editor, select 'Add Project Folder', and select the folder whereyou saved the repository 'amazon-ecs-nodejs-microservices'. This will add the entire project into Atomso that you can easily work with it.In your project folder, you should be able to see folders for infrastructure and services. Infrastructureholds the AWS CloudFormation infrastructure configuration code that you will use in the next step. Thefolder services contains the code that forms the node.js application.Take a few minutes to click through the files and familiarize yourself with the different aspects of theapplication, including the database db.json, the server server.js, package.json, and the applicationdockerfile.Step 3: Create the Repository Navigate to the Amazon Elastic Container Registry (Amazon ECR).Select Create Repository.Name your repository. For this step, keep it simple and call this repository as api.Record Repository Information: After you hit next, you should get a message like this: The repository address follows a simple format: ame].You will need this address, including your account ID and the region you are using, in the next steps. Pactera EDGE. Confidential. All rights reserved.8
Step 4: Build and Push the Docker ImageOpen your terminal and set your path to the 2-containerized/services/api section of the GitHub code inthe directory that you have cloned or downloaded into: rvices/api.Authenticate Docker Login with AWS:1. Run aws ecr get-login --no-include-email --region [region]. Example: aws ecr get-login --no-includeemail --region us-west-2. If you have never used the AWS CLI before, you may need to configureyour credentials.2. You're going to get a massive output starting with docker login -u AWS -p . Copy this entire output,paste, and run it in the terminal.3. You should see Login Succeeded.NOTE: If this login does not succeed, it may be because you have a newer version of Docker that hasdepreciated the -e none flag. To correct this, paste the output into your text editor, remove -e none fromthe end of the output, and run the updated output in the terminal. Build the Image: In the terminal, run docker build -t api. NOTE, the ‘.’ is important here. Tag the Image: After the build is complete, tag the image and push it to the repository: docker tagapi:latest Pro tip: The :v1 represents the image build version. Every time you build the image, you shouldincrement this version number. If you were using a script, you could use an automated number, suchas a timestamp to tag the image. This is a best practice that allows you to easily revert to a previouscontainer image built in the future. Push the image to ECR: Run docker push to push your image to ECR: docker push estIf you navigate to your ECR repository, you should see your latest tagged image. Pactera EDGE. Confidential. All rights reserved.9
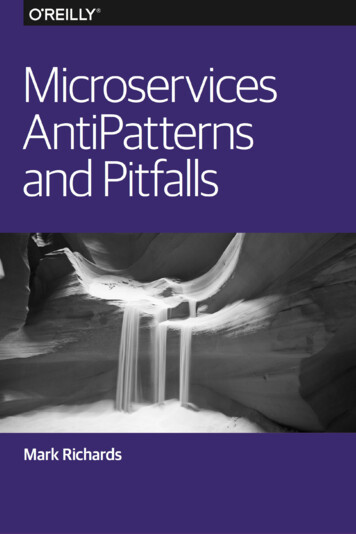
Phase Two - Deploy the MonolithIn this Phase, you will use Amazon Elastic Container Service (Amazon ECS) to instantiate a managedcluster of EC2 compute instances and deploy your image as a container running on the cluster.Architecture OverviewStep 1: Launch ECS Cluster Using CloudFormationFirst, you will create a an Amazon ECS cluster, deployed behind an Application Load Balancer.1. Navigate to the AWS CloudFormation console.2. Select Create Stack.3. Select 'Upload a template to Amazon S3' and choose the ecs.yml file from the GitHub project nfrastructure/ecs.yml Select Next.4. For stack name, enter BreakTheMonolith-Demo. Keep the other parameter values the same:1. Desired Capacity 22. InstanceType t2.micro3. MaxSize 25. Select Next.6. It is not necessary to modify any options on this page. Select Next.7. Check the box at the bottom of the next page and select Create. You will see your stack status inorange ‘CREATE IN PROGRESS’. You can select the refresh button at the top right of the screento check on the progress. This process typically takes under 5 minutes. Pactera EDGE. Confidential. All rights reserved.10
Step 2: Check If the Cluster is Running: Navigate to the Amazon ECS console. Your cluster should appear in the list. Clicking into the cluster, select the 'Tasks' tab, no tasks will be running. Select the 'ECS Instances' tab, you will see the two EC2 Instances the AWS CloudFormationtemplate created.Step 3: Write a Task DefinitionThe task definition tells Amazon ECS how to deploy your application containers across the cluster. Navigate to the 'Task Definitions' menu on the left side of the Amazon ECS console.Select Create new Task Definition.Task Definition Name api.Select Add Container.Specify the following parameters.o If a parameter is not defined, leave it blank or with the default settings: Container name api image [account-id].dkr.ecr.[region].amazonaws.com/api:v1 (this is the URL of yourECR repository image from the previous step). Pactera EDGE. Confidential. All rights reserved.11
o Be sure the tag :v1 matches the value you used in Phase 1 to tag and push the image.Memory Hard limit: 256 Port mappings Host port:0, Container port:3000 CPU units 256Select Add.Select Create.Your Task Definition will now show up in the console.Step 4: Configure ALB: Target GroupThe Application Load Balancer (ALB) lets your service accept incoming traffic. The ALB automaticallyroutes traffic to container instances running on your cluster using them as a target group.Check your VPC Name: If this is not your first time using this AWS account, you may have multipleVPCs. It is important to configure your Target Group with the correct VPC. Navigate to the Load Balancer section of the EC2 Console.You should see a Load Balancer already exists named demo.Select the checkbox to see the Load Balancer details.Note the value for the VPC attribute on the details page.Step 5: Configure the ALB Target Group Navigate to the Target Group section of the EC2 Console.Select Create target group.Configure the Target Group (do not modify defaults if they are not specified here):o Name apio Protocol HTTPo Port 80 Pactera EDGE. Confidential. All rights reserved.12
o VPC select the VPC that matches your Load Balancer from the previous step. Thisis most likely NOT your default VPC.o Advanced health check settings: Healthy threshold 2 Unhealthy threshold 2Timeout 5 Interval 6.Select Create.Configure ALB: ListenerThe listener checks for incoming connection requests to your ALB.Step 6: Add a Listener to the ALB Navigate to the Load Balancer section of the EC2 Console.You should see a Load Balancer already exists named demo.Select the checkbox to see the Load Balancer details.Select the Listeners tab.Select Create Listener: o Protocol HTTPo Port 80o Default target group apiClick Create. Pactera EDGE. Confidential. All rights reserved.13
Step 7: Deploy the Monolith as a ServiceNow, you will deploy the monolith as a service onto the cluster. Navigate to the 'Clusters' menu on the left side of the Amazon ECS console.Select your cluster: BreakTheMonolith-Demo-ECSCluster.Under the services tab, select Create.Configure the service (do not modify any default values): Service name api Number of tasks 1Select Configure ELB:o ELB Type Application Load Balancer.o For IAM role, select BreakTheMonolith-Demo-ECSServiceRole.o Select your Load Balancer ELB name demo.o Select Add to ELB.Add your service to the target group:o Listener port 80:HTTPo Target group name select your group: api.Select Save. Select Create Service.Select View Service. Pactera EDGE. Confidential. All rights reserved.14
Nice work! You now have a running service. It may take a minute for the container to register as healthyand begin receiving traffic.Step 8: Test Your MonolithValidate your deployment by checking if the service is available from the internet and pinging it.To Find your Service URL: Navigate to the Load Balancers section of the EC2 Console.Select your load balancer demo.Copy and paste the value for DNS name into your browser.You should see a message 'Ready to receive requests'.See Each Part of the Service: The node.js application routes traffic to each worker based on the URL.To see a worker, simply add the worker name api/[worker-name] to the end of your DNS Name like this: http://[DNS name]/api/usershttp://[DNS name]/api/threadshttp://[DNS name]/api/postsYou can also add a record number at the end of the URL to drill down to a particular record. Like this:http://[DNS name]/api/posts/1 or http://[DNS name]/api/users/2 Pactera EDGE. Confidential. All rights reserved.15
Phase Three - Break the MonolithIn this Phase, you will break the node.js application into several interconnected services and push eachservice's image into an Amazon ECR repository.Architecture OverviewThe final application architecture uses Amazon Elastic Container Service and the Application LoadBalancer.STEP 1: Provision the ECR RepositoriesIn the previous two steps, you deployed your application as a monolith using a single service and asingle container image repository. To deploy the application as three microservices, you will require toprovision three repositories (one for each service) in Amazon ECR.Our three services are:1. users Pactera EDGE. Confidential. All rights reserved.16
2. threads3. postsCreate the repository: Navigate to the Amazon ECR Console.Select Create RepositoryRepository name:o userso threadso postsRecord the repositories information: cename]Repeat these steps for each microservice.You should now have four repositories in Amazon ECR.Step 2: Build and Push image for each ServiceIn the project folder rvices, you will have folderswith files for each service. Notice how each microservice is essentially a clone of the previous monolithicservice.You can see how each service is now specialized by comparing the file db.json in each service and inthe monolithic api service. Previously, posts, threads, and users were all stored in a single databasefile. Now, each is stored in the database file for its respective service.Open your terminal and set your path to the 3-microservices/services section of the GitHub code. ervicesBuild and Tag Each Image In the terminal, run docker build -t [service-name] ./[service-name] Example: docker build -tposts ./postsAfter the build completes, tag the image so that you can push it to the repository: docker tag[service-name]:latest ce-name]:v1example: docker tag posts:latest :v1 Pactera EDGE. Confidential. All rights reserved.17
Run docker push to push your image to ECR: docker push e-name]:v1If you navigate to your ECR repository, you should see your images tagged with v1.Repeat these steps for each microservice image.NOTE: Be sure to build and tag all three images.Phase Four - Deploy MicroservicesIn this Phase, you will deploy your node.js application as a set of interconnected services behind anApplication Load Balancer (ALB). Then, you will use the ALB to seamlessly shift traffic from themonolith to the microservices.Architecture OverviewThis is the process that you will follow to stand up microservices and safely transit the application'straffic away from the monolith. Pactera EDGE. Confidential. All rights reserved.18
Step1: Write Task Definitions for your Service:You will deploy three new microservices onto the same cluster you have been running from Phase 2.Like in Phase 2, you will write Task Definitions for each service.NOTE: It is possible to add multiple containers to a task definition - so that you could feasibly run all thethree microservices as different containers on a single service. This, however, would still be monolithicas every container would need to scale linearly with the service. Your goal is to have three independentservices and each service requires its own task definition running a container with the image for thatrespective service.You can either use these Task Definitions in the console UI, or speed up the things by writing them asJSON. To write the task definition as a JSON file, select Configure via JSON at the bottom of the newTask Definition screen.The parameters for the task definition are: Name [service-name]Image [service ECR repo URL]:latestcpu 256memory 256Container Port 3000Host Post 0Repeat this process to create a task definition for each service: poststhreadsusersStep2: Configure ALB: Target GroupsLike in Phase 2, you will be configuring target groups for each of your services. Target groups allowtraffic to correctly reach each service.Check you
Microservices architecture brings a host of benefits to the application and the teams working on the application as well but there is certain trade-off with the architecture too. Microservices do pose serious consequences for operations. While planning the migration to