Transcription
P4VS User Guide2020.2March 2021
Copyright 2012-2021 Perforce Software, Inc.All rights reserved.All software and documentation of Perforce Software, Inc. is available from www.perforce.com. You can download and usePerforce programs, but you can not sell or redistribute them. You can download, print, copy, edit, and redistribute thedocumentation, but you can not sell it, or sell any documentation derived from it. You can not modify or attempt to reverse engineerthe programs.This product is subject to U.S. export control laws and regulations including, but not limited to, the U.S. Export AdministrationRegulations, the International Traffic in Arms Regulation requirements, and all applicable end-use, end-user and destinationrestrictions. Licensee shall not permit, directly or indirectly, use of any Perforce technology in or by any U.S. embargoed country orotherwise in violation of any U.S. export control laws and regulations.Perforce programs and documents are available from our Web site as is. No warranty or support is provided. Warranties andsupport, along with higher capacity servers, are sold by Perforce.Perforce assumes no responsibility or liability for any errors or inaccuracies that might appear in this book. By downloading andusing our programs and documents you agree to these terms.Perforce and Inter-File Branching are trademarks of Perforce.All other brands or product names are trademarks or registered trademarks of their respective companies or organizations.Any additional software included within Perforce is listed in "License statements" on page 94.
ContentsHow to use this guide7Syntax conventions7Feedback8Other documentation8What's new in this guide for this releaseGetting started with P4VSAbout P4VS91010Basic Helix Core server Terminology11Basic Tasks11Using Solution Explorer with P4VS12Using P4VS toolbars in Visual Studio12For more information13Installing P4VS and enabling the extension in Visual Studio13Installing P4VS in Visual Studio13Enabling P4VS in Visual Studio13Setting P4VS preferences14Helix Core - Connections14Helix Core - Data Retrieval15Helix Core - Diff/Merge/Reviews17Helix Core - General17Helix Core - Ignoring Files19Helix Core - Logging20Keyboard shortcuts20Connecting to a Helix server21Defining a new Helix server connection21Setting Helix server connection settings using environment variables23Opening a defined Helix server connection23Setting Helix server environment variables using P4CONFIG23Customizing context menus24Managing workspace specifications25Creating workspaces25Changing your workspace27Viewing workspaces273
Stream workspaces27Defining a workspace view27Managing filesPutting a project or solution under Helix server source control29Option 1: Existing project or solution with P4VS as active source control provider30Option 2: New project or solution with P4VS as active source control provider30Option 3: New project or solution without P4VS as active source control provider31Adding files to the depot31Opening a project or solution in the Helix server depot32Retrieving files from the depot32Checking out and editing files33Checking in files and working with changelists34Checking in files34Displaying changelists35Editing changelists36Restricting access to changelists41Moving a file to another changelist41Setting changelist display preferences42Resolving conflicting changes42942Resolving multiple files42Resolving individual files43Reconciling offline work45Deleting files46Excluding Files from Helix server Control46Setting Ignore List preferences47Adding a file to an Ignore List47Removing a file from an Ignore List47Editing Ignore Lists48Comparing files using diff48Changing Helix server file types49Renaming and moving Files49Displaying the revision history of a file or folder51Shelving files51Shelving checked-out files52Unshelving files53
Submitting shelved files53Working with streams54Using the Streams tool window54Editing Ignore Lists55Displaying and searching for streams55Using the Stream Graph56Accessing the Stream Graph from P4VS57Setting Stream Graph display options57Displaying stream status57Working in a stream58Other actions you can perform with the Stream Graph58Merging down and copying up between streams59Merging down59Copying up59Propagating change between unrelated streams60Using other Helix server featuresViewing integration history in the Revision Graph6161Launching Revision Graph61Reading the Revision Graph61Navigating the Revision Graph62Filtering the Revision Graph62Displaying details63Viewing file history with Time-lapse View63Displaying Time-lapse View63Controlling the display63Finding code changes and references with CodeLens65Viewing a project in P4V, the Helix Visual Client66Using jobs (defect tracking)67Creating jobs67Editing jobs67Displaying jobs67Associating changelists with jobs68Filtering Expressions68Using labels69Creating and editing labels69Labeling files695
Displaying and searching for labels69Retrieving files by label70Working with reviews in SwarmWorkflow of a review70Setting up the Swarm integration71Authentication with Swarm72Swarm integration features72Request a review72Update Swarm Review73Open review in Swarm73Review Id and Review State columns74GlossaryLicense statements6707594
How to use this guideThis guide describes the installation, configuration, and operation of P4VS, the Helix Plugin for VisualStudio. With P4VS, developers who work with Microsoft Visual Studio have access to Helix Corefeatures from within the Visual Studio interface. It is possible to check in and check out files, view theversion history, and so on.This section provides information on typographical conventions, feedback options, and additionaldocumentation.Syntax conventionsHelix documentation uses the following syntax conventions to describe command line syntax.NotationMeaningliteralMust be used in the command exactly as shown.italicsA parameter for which you must supply specific information. For example, for aserverid parameter, supply the ID of the server.-a -bBoth a and b are required.{-a b}Either a or b is required. Omit the curly braces when you compose the command.[-a -b]Any combination of the enclosed elements is optional. None is also optional.Omit the brackets when you compose the command.[-a b]Any one of the enclosed elements is optional. None is also optional. Omit thebrackets when you compose the command.Previous argument can be repeated.np4 [g-opts] streamlog [ -l -L -t -m max ] stream1.means 1 or more stream arguments separated by a spacenSee also the use on . in Command alias syntax in the Helix Core P4Command ReferenceTip. has a different meaning for directories. See Wildcards in the Helix Core P4Command Reference.7
FeedbackFeedbackHow can we improve this manual? Email us at manual@perforce.com.Other documentationSee urces/documentation.TipYou can also search for Support articles in the Perforce Knowledgebase.8
What's new in this guide for this releaseWhat's new in this guide for this release(missing or bad snippet)9
Getting started with P4VSThis chapter provides an overview of P4VS, the Helix Plugin for Visual Studio, as well as instructions forinstalling and setting it up.About P4VSBasic Helix Core server TerminologyBasic TasksUsing Solution Explorer with P4VSUsing P4VS toolbars in Visual StudioFor more informationInstalling P4VS and enabling the extension in Visual StudioInstalling P4VS in Visual StudioEnabling P4VS in Visual StudioSetting P4VS preferences10111112121313131314Helix Core - ConnectionsHelix Core - Data RetrievalHelix Core - Diff/Merge/ReviewsHelix Core - GeneralHelix Core - Ignoring FilesHelix Core - LoggingKeyboard shortcuts14151717192020Connecting to a Helix server21Defining a new Helix server connectionSetting Helix server connection settings using environment variablesOpening a defined Helix server connection212323Setting Helix server environment variables using P4CONFIGCustomizing context menusManaging workspace specifications232425Creating workspacesChanging your workspaceViewing workspacesStream workspacesDefining a workspace view2527272727About P4VSP4VS, the Helix Plugin for Visual Studio , enables you to use Helix Core server, also referred to as Helixserver, as your source control from within Visual Studio.10
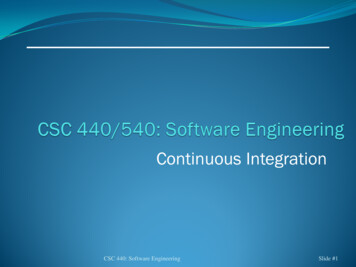
Basic Helix Core server TerminologyBasic Helix Core server TerminologynDepot: The shared repository where file revisions are stored and managed by Helix server.nWorkspace: The area on your computer where you work with your copies of files that are underHelix server control.nHelix Core server: Helix server, the application that manages file revisions.nChangelist: A group of files, with a description explaining how you have changed them (forexample, Fix bug #123). Changelists are assigned numbers by Helix server so you cantrack them. Changelists enable you to group related files and submit them together.The following diagram shows the relationship between workspace and depot:Basic Tasks11nGet revision: Retrieve a copy of a file version from the depot. Helix server also uses the termsync to mean get revision.nCheck out: Enables you to change the file.nMark for add or delete: indicates that the file is added to or deleted from the depot when thechangelist is submitted.nRevert a file: Discard any changes you have made to an open file. If you open a file for edit andmake changes, then change your mind and revert the file, Helix server reloads the last version yougot from the depot and discards your changes.
Using Solution Explorer with P4VSnSubmit a changelist: Update the depot to reflect any changes you have made to files in thechangelist. Submitting is an all-or-nothing operation: if there is a problem submitting one file in achangelist, none of the other files in the changelist are updated.Using Solution Explorer with P4VSSolution Explorer provides access to most P4VS functionality and status information.nWhen you right-click a file in Solution Explorer, all P4VS actions enabled for that file are availablefor selection in the context menu.nBadges on file icons indicate Helix server status:Right-click a file and select Refresh in the context menu to refresh Helix server status information for thefile and any of its children.NoteIf you select Automatically update files status when selection changes in the P4VS Preferences,the file’s Helix server status updates automatically when you click or hover over the file icon, withouthaving to click Refresh.Using P4VS toolbars in Visual StudioP4VS provides the following toolbars that you can use with Visual Studio:12
For more informationnThe Helix Connection toolbar displays your current Helix server service connection(hostname:port, workspace, and user), as well as the pending changelist you are working in. If youare not connected to Helix server, the Connection list shows OFFLINE.nThe Helix Views toolbar provides access to workspaces, file history, jobs, submitted and pendingchangelists, labels, and streams.nThe P4VS toolbar provides the same menu of P4VS options as the Solution Explorer contextmenu.To enable these toolbars, select View Toolbars.To enable these toolbars and customize them to show only a subset of the available options, selectTools Customize.For more informationWatch our P4VS tutorial video: sual-studioFor more information about how to use Helix server, see Solutions Overview: Helix Version ControlSystem.For the P4VS release notes, see /p4vsnotes.txt.Installing P4VS and enabling the extension in Visual StudioTo use P4VS with Microsoft Visual Studio, you must install the plugin and then enable it within VisualStudio.Installing P4VS in Visual Studio1. Make sure Microsoft Visual Studio is closed.2. Download the P4VS Visual Studio Extension Installer file, p4vs.vsix.3. Open the installer file.4. Select the version of Visual Studio that you want the extension to install to.5. Click Install.6. The installer screen displays an Installation Complete message.Enabling P4VS in Visual StudioNoteThis step is not needed when you install a P4VS upgrade.13
Setting P4VS preferences1. Open Visual Studio.2. In Visual Studio, go to Tools Options.3. Select Source Control Plug-in Selection.4. In the Current source control plug-in drop-down list, select P4VS - Helix Plugin for VisualStudio.Setting P4VS preferencesTo set P4VS preferences in Visual Studio, go to Tools Options. You can specify preferences on thefollowing nodes in the Options dialog under Source Control:n"Helix Core - Connections" belown"Helix Core - Data Retrieval" on the next pagen"Helix Core - Diff/Merge/Reviews" on page 17n"Helix Core - General" on page 17n"Helix Core - Ignoring Files" on page 19n"Helix Core - Logging" on page 20In addition, you can:nSpecify keyboard shortcuts for P4VS commands. Go to Tools Options Environment Keyboard.nTurn on CodeLens functionality for P4VS. Go to Tools Options Text Editor AllLanguages CodeLens and select Show Helix Commit Provider.Helix Core - ConnectionsSet the following preferences to determine how you connect to Helix Core server in Visual Studio. Tosave your changes, click OK.When opening a project under source controlnShow the Helix Core server Connection: Prompt for connection settings whenever you open aproject that is under Helix server source control.nConnect to the server using my most recent settings: Without prompting for connectionsettings, reconnect to the Helix server you were connected to during your last session.nConnect to the server using solution-specific settings: Without prompting for connectionsettings, connect to the Helix server you last used for the solution or project that you are opening.nConnect to the server using my Helix Core environment settings: Connect using Windowsenvironment variables for Helix server connections, which you set using the Helix server14
Helix Core - Data RetrievalCommand-Line Client or P4V, the Helix Visual Client. For more information, see the Helix CoreServer User Guide or the P4V help.Opening and closing connectionsnUse IP-specific tickets when logging in: Specifies whether your login ticket is restricted to theIP address from which you are connecting.nAutomatically log off when closing a connection: Specifies whether your ticket is invalidatedwhen you log out.Saved connectionsIf you have saved connections, they remain in the list of 5 most recently used connections. If you nolonger need to use a saved connection, select it in this list and click Remove to delete it from thepreferences.Helix Core - Data RetrievalSet the following preferences to determine how P4VS retrieves data from Helix server:Data retrieval:nCheck server for updates every: Specifies how often P4VS checks Helix server for updated fileinformation. Frequent checks enable P4VS to display current file status but increase the workloadon Helix server.nMaximum number of files displayed per changelist: Specifies the maximum number of filesdisplayed in a changelist, to help minimize the time required to handle and submit very largechangelists. This setting affects only the display of changelists, and does not limit the number offiles that a changelist can contain.nMaximum size of files to preview: Limits the size of image files displayed in the Preview tab, tolimit the amount of image data sent from Helix server to P4VS.nNumber of changelists, jobs, or labels to fetch at a time: Specifies the number ofspecifications read in each batch fetched, to minimize server load and maximize P4VSperformance. To retrieve all entries, specify 0.nAutomatically update file status when selection changes: Select to enable the Helix serverstatus badges in Solution Explorer to update automatically when you click or hover over the fileicon, without having to click Refresh. Deselect to improve performance.Optimize file status retrieval:NoteThe Treat Solution/Projects as directories when selected, Preload file state, and Lazy load file15
Helix Core - Data Retrievalstate options are used to tune the performance of P4VS for your environment. If none of these optionsare selected, P4VS will load the metadata for each file individually. Unless you have a small projectyou should look to use one of these options.nOptimize file state retrieval: Select to apply optimizations on retrieving file state. Subordinateoptimization options include:lTreat Solution/Projects as directories when selected: Select to treat solutions andprojects as directories when P4VS runs Helix server commands.Use this option to improve performance when working with solutions that contain a largenumber of projects or files. Do not use this option if the directories in the solution contain alarge number of other Helix server controlled files that are not included in the solution.This option does not require that all the files and directories referenced by the solution areunder the solution directory.lPreload file state: Select to preload the metadata for all of the files in the Helix server depotin or under the directory containing the solution file.Use this option to improve performance when loading small to medium sized solutions whereall the files that make up the solution are under the solution root. Only use this when there arefew if any files under the solution root that are Helix server controlled that are not part of thesolution.This option tends to work best with solutions and projects created and managed by VisualStudio. Do not use this option if the files for the solution are intermixed in directories withlarge numbers of other Helix server controlled files. This option will provide little improvementin performance if most of the files composing the solution are outside of the solution root.nLazy load file state: Select to only load the Helix server metadata files in the solution as they areoperated on using P4VS.With this option, Helix server metadata for a file is only retreived from the server when you selecta P4VS operation on a file. At that point, the Helix server metadata will be obtained from theserver, the operation performed, and the Helix server metadata updated to reflect the results of theoperation. When this option is selected, the file will by badged in the solution explorer to indicatethat its status is unknown. After a Helix server operation is performed on a file, it will be badged toindicate its current state.Use this option to improve performance loading large to very large sized solutions where you areinterested in only working on a few select files. This is best for solutions and projects whichinclude large amounts of code from libraries or frameworks, large numbers of asset files such asgraphical elements for a game, or large numbers of files that are generated by anotherdevelopment system or plugin. This option is also useful in situations where the connection to theHelix server server is over a slow network or VPN.lFull menu: Select to allow the full P4VS menu to be displayed on files that have not hadtheir metadata loaded.16
Helix Core - Diff/Merge/ReviewsThis option is displayed if the Lazy load file state option is enabled. This allows you toperform an operation on a file before P4VS loads its state. If this option is not selected, youare given the option to refresh the file which will load the metadata of the file from the serverand then enable the appropriate P4VS operations on that file. Please note that if you choosethis option and perform P4VS operations on a file that are not valid based on its current state,you are very likely to get error messages back from those operations.nDo not optimize: Select this to disable all optimizations related to file state retrieval.Helix Core - Diff/Merge/ReviewsTo set the default diff application, select one of the following:nP4Merge: The Helix Core companion diff tool.nOther application: Browse to your preferred diff tool.To specify arguments for third-party diff applications, enter %1 for the name of the first file and %2 for thename of the second file in the Arguments field. Helix server replaces these placeholders with the actualfilenames when calling the diff application.To set the default merge application, select one of the following:nP4Merge: The Helix Core companion merge tool.nOther application: Browse to your preferred merge tool.To specify arguments for third-party merge applications, enter the following replaceable parameters in theArguments field:nBase file: %bnTheir/Source file: %1nYour/Target file: %2nResult file: %rHelix server replaces these placeholders with the actual filenames when calling the merge application.To have Helix Swarm reviews open in an external browser (instead of in a new tab in Microsoft VisualStudio, which is the default):nSelect the Open Swarm reviews in external browser check box.Helix Core - GeneralSet the following display and file behavior preferences:17
Helix Core - GeneralDisplay:nUse OS format for dates: Use the date format that the operating system uses.nFormat dates using Helix standard (yyyy/mm/dd hh:mm:ss): Use the Helix server format.Files and folders:nWarn before reverting files: If selected, P4VS displays a prompt before reverting files.nLock files on checkout: If selected, P4VS locks files every time you check them out. Locksprevent other users from checking in changes while you work on a file.nPrompt for changelist when checking out, adding, or deleting files: If selected, P4VSprompts you to select a changelist when files are about to be checked out, added, or deleted inHelix Core server. If cleared, Helix server performs the action but does not prompt you to select achangelist. Instead, it uses the active changelist, which is either the default or the changelistspecified in the Connection toolbar.nMark for delete in Helix Core server when deleting files: If selected, files that you delete inVisual Studio are marked for delete in Helix Core server.nCheck out writable files on save: If selected, P4VS automatically checks out files that arewritable in the workspace.nAutomatically add new files to Helix Core server: If selected, P4VSmarks new files for add ina pending changelist.This option works together with the Prompt for changelist when checking out, adding, ordeleting files option to determine prompting behavior when you add new files to a project orsolution that is under Helix server control:lllnIf both this option and the Prompt for changelist option are enabled, P4VS prompts you tomark new files for add.If this option is enabled and the Prompt for changelist option is disabled, new files areautomatically added to the default changelist without any prompt.If this option is disabled and the Prompt for changelist option is enabled, no prompts willappear; you must manually mark new files for add.Update related projects when reverting moved files: If selected, P4VS reverts file renames ormoves in Visual Studio when you revert a Helix server rename/move operation.If you do not select this option, Visual Studio continues to show the new file name or locationdespite the fact that Helix server has reverted the file to its original name or location.NoteIf you revert a folder rename/move in P4VS, you must manually revert the name or location inVisual Studio, regardless of your preference selection.nUse Visual Studio to view file versions: If selected, P4VS shows previous revisions of a file18
Helix Core - Ignoring Files(from the File History dialog, for example) in a Visual Studio editor window.You can use this option to view file revisions or shelved files the same way that you would view aneditable file in the Visual Studio IDE.nWhen starting to edit an out of date file: If Always ask to sync the file is selected (default),P4VS prompts you before syncing to prevent you from losing any work. If the check box iscleared, P4VS always syncs the file, without prompting.Project and solution files:nTag project and solution files as controlled by P4VS: If selected, P4VS writes tags to thesolution and project files that are under Helix server control. The default is not to tag project andsolution files; P4VS does not need to tag these files to know that they are under Helix servercontrol.nSet the location of new projects to the current workspace root directory: If selected, P4VSputs new projects in the current workspace root directory. The Location field in the New Projectdialog will be populated by default with the current workspace directory.nWarn if solution is outside workspace root: If selected, P4VS displays a warning messagewhen a solution is not in the client map. If you do not store solutions in source control or you do notwant to be alerted if a solution is created outside the workspace root, you can clear this checkbox.Helix Core - Ignoring FilesTo avoid adding and checking in files that do not belong in the repository, you can exclude individual filesor file types (for example, build or release artifacts) from source control using Ignore Lists. For moreinformation, see "Excluding Files from Helix server Control" on page 46.You can set the following preferences:nEnable Ignore Lists for specifying files to ignore when marking for add: Select to enableP4VS to use Ignore Lists to keep individual files or file types from being added to the Helix serverrepository.If you have already set an Ignore List file as the P4IGNORE environment variable on your localmachine, that file name appears by default in the Name field. If not, enter a file name or accept thestandard default, .p4ignore.txt. The first time you select Edit Ignore List or Add toIgnore List for a file in a folder in Solution Explorer, P4VS adds an Ignore List file with this filename to that folder.NoteYour local P4IGNORE environment variable will be updated with the file name that you enterhere. If other Helix server clients (such as p4 or P4V) on your local machine use Ignore Listfiles, be sure to use the same file name as you use with those clients.19
Helix Core - LoggingnAutomatically add new Ignore Lists to solution or project: Select to have new Ignore Listsappear in the Solution Explorer.If you do not select this option, the Ignore List file will be hidden in Solution Explorer.nPrompt when creating a new Ignore List: Select to have P4VS prompt you when you selectAdd to Ignore List in Solution Explorer to add an Ignore List to a folder that does not yet haveone.If you do not select this option, the system creates the Ignore List without prompting.nAutomatically ignore new Ignore Lists (add Ignore Lists to themselves): Select to haveP4VS automatically add the Ignore List file to itself to prevent the Ignore List from being addedto the Helix server depot.nAutomatically add new Ignore Lists to Helix Core server: Select to have P4VS automaticallyadd new Ignore Lists to the Helix server depot.This option works only when the Automatically ignore new Ignore Lists (add Ignore Lists tothemselves) option is not selected. If that option is not selected, and you do not select theAutomatically add new Ignore Lists to Helix Core option, then you must manually mark theIgnore List file for add to add it to the repository.Helix Core - LoggingSet the following logging preferences. You can view P4VS log messages in the Output window in VisualStudio if you select Helix Core Source Control in the Show output from drop-down list in the Outputwindow.nShow p4 reporting commands: Specifies whether the Output window in Visual Studio displaysall commands issued by P4VS, including commands issued by P4VS to obtain status informationfrom Helix server.nShow p4 command output for file operations: For verbose log messages, enable this option.nEnable logging to file: Logs P4VS activity to the specified file.lName: Specifies the name and location of the log file.lSize: Specifies the maximum size of the log file.Keyboard shortcutsGo to Tools Options Environment Keyboard. You can find P4VS commands by entering P4VSin the Show commands containing field.For more information about creating keyboard shortcuts in Visual Studio, see the Microsoft Visual Studiohelp.20
Connecting to a Helix serverConnecting to a Helix serverConnections enable you to access Helix server to submit and obtain access to files under Helix servercontrol. You use the Open Connection dialog both to define connections and to open them in P4VS.You can:nDefine a new connectionnDefine a connection using environment variablesnOpen a defined connectionDefining a new Helix server connectionTo define a new connection to a Helix server in Visual Studio:1. Open the Open Connection dialog. You can open this dialog the following ways:nAdd a new project in Visual Studio in the New Project dialog. In this dialog, select the Addto source control using P4VS - Helix Plugin for Visual Studio check box; then clickOK.The Open Connection dialog appears unless:lllnYou did not select the check box.You have set the connection settings in Tools Options Source Control HelixCore - Connections to default to an option other than Show the Helix Core serverConnection. In this case, P4VS attempts to connect without showing the OpenConnection dialog.You are already connected. In this case, P4VS does not attempt to connect andmarks the new project for add.Open a solution or project under Helix server source control in Visual Studio.The Open Connection dialog appears unless you’ve set the connection settings in Tools Options Source Control to default to the last Helix server connection or toconnection settings defined in your environment variables.nGo to File Open Connection to a Helix Core server in Visual Studio.2. Enter the server name and port number for this connection using host:port number.If your Helix server is enabled for SSL (Secure Sockets Layer) encryption, use the followingsyntax: ssl:host:port numberImportantIf you attempt to connect to
To use P4VS with Microsoft Visual Studio, you must install the plugin and then enable it within Visual Studio. Installing P4VS in Visual Studio 1. Make sure Microsoft Visual Studio is closed. 2. Download the P4VS Vi