Transcription
Introduction toFor Bio-Linux 8December 2015Website: http://environmentalomics.org/bio-linuxEmail: helpdesk@nebc.nerc.ac.uk
Table of ContentsPART ONE: INTRODUCTION TO THE BIO-LINUX 8 SYSTEM.1Logging in and exploring the Bio-Linux desktop.1Running applications.3Finding files and drives.3Setting things up.4Finding your way on the system.7The Root Folder.7Using the command shell.8Anatomy of a Command.9Listing files in a directory.10Learning about Linux commands.11Basic Linux tips for filenames.12Getting the prompt back when running graphical applications from the terminal.12Linux shorthand and shortcuts.13More Basic Linux Commands.13Changing directories.14Tab completion.15Command history.17Making a directory.17Office software.18Using text editors.19Nano.19Gedit.19Reading text files.20An important note on line endings – CR and LF.21Copying files.22Linking to files.23Removing files and directories.24Redirecting output to files.25Piping output between applications.26Diff, Grep and Sort.27Diff.27Grep.27Environment Variables.29Changing permissions on files and directories.30Some other useful information.31Copying and pasting text.31The simple way to stop a process.31Putting a command to one side.31Logging out of a session.31Clearing your terminal of text.31Accessing a running program or working with others interactively.32Accessing your machine – including a full graphical desktop - remotely.32PART TWO: INTRODUCTION TO BIOINFORMATICS ON BIO-LINUX.33Documentation and Help for Bioinformatics Software on Bio-Linux.33Bio-Linux Bioinformatics Documentation.33Help Functions within the Programs.34
Example data for this tutorial.34Interface choices.35General points about working with bioinformatics programs.36Sequence formats.36File naming conventions in bioinformatics.37Naming files and the danger of over-writing previous results.39A common problem: what is a text file and what is not.39GZipped files in bioinformatics.40EXAMPLES OF RUNNING BIOINFORMATICS PROGRAMS ON BIO-LINUX.41Analysing sequences with QIIME.41Preparation.42Assign Samples to Multiplex Reads.42Processing sequences into OTUs.43Data to information.44Heatmap.45Taxonomy Summary Charts.45Diversity.45Alpha.45Beta.45Inter-Sample Distance.46Jackknifing & UPGMA.46Analysing sequences with MOTHUR.47Preparation.47Assign Samples to Multiplex Reads and Quality Filtering.48Generating Alignment & Distance Matrix.48Classify Sequences.49Renaming Files.49Clustering Sequences.49Generating OTU Table and Normalisation.49Classifying OTU.50Converting the shared file to BIOM-format.50Data to information.50Heatmap.50Venn Diagram.50Finding and running useful scripts.51Aligning sequences using MUSCLE.51BLAST.53A few examples of ways to run BLAST, on Bio-Linux or otherwise.53What this course covers.53Why use BLAST on the command line?.53General considerations for database searching.54A very, very brief introduction to BLAST .54How a BLAST database looks on the file system.55A simple blastp search.55Formatting BLAST output.56Handling multiple sequences.57BLAST searching using fasta files containing more than one sequence.57Processing multiple files using a foreach loop.57Working with lots of BLAST results.61EMBOSS Programs.62Ways to run EMBOSS programs:.62A comparison of the Jemboss and command line interfaces for EMBOSS programs.63Working with EMBOSS programs.63Using the EMBOSS command line.65A very basic sequence assembly.69Quality Checking.69Split Barcodes.69
Clean Up.70Assembly With Velvet.71Assembly With Abyss.71Assessing The Assemblies.72Adding Some Annotation.72Artemis.73Ways to run Artemis:.73Appendix A – BLAST references and documentation.75Web pages.75References.75Appendix B – Creating local BLAST databases.76Obtaining local BLAST databases.76Building BLAST indices from local sequence files.77Appendix C - Cheat sheet of basic Linux commands.79Copyright and redistribution:This document is the work of many authors over many years. Unless otherwise stated the material is Copyright NERC.You may redistribute the complete document and its associated files without restriction in any format.If you re-use substantial portions of this text in derivative works you must acknowledge the authors (CC-BY). We wouldalso appreciate you letting us know if you re-use our stuff.If you use Bio-Linux for your science, please cite us! See the website for further info.
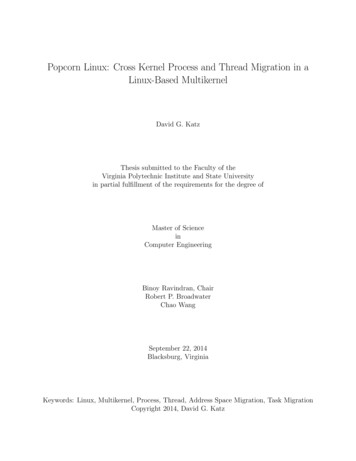
Part One: Introduction to the Bio-Linux 8 SystemLogging in and exploring the Bio-Linux desktopYou can log into your Bio-Linux machine locally or over the network, on a fully installed system or a VirtualMachine or on a system running Live from a USB memory stick or a DVD.These course notes are written from the perspective of someone running the Live version of the system – thatis, having booted a PC directly from a USB memory stick and selected "Try Bio-Linux". The maindifferences for people working on an installed system will be the name of the account you are logged intoand what privileges that particular user account has. For example, the user of the Live system always has fulladministrative privileges. So don't worry if you find small differences between what is described here andwhat you see on your system.Please refer to our on-line document about various ways you can set up a Bio-Linux tallationIf you are booting the machine from a DVD or a USB memory stick, when prompted, selectOption 1: Try Bio-LinuxAfter the system has started up, you will see the Bio-Linux desktop (Figure 1).Figure 1: A view of the Bio-Linux 8 desktop1
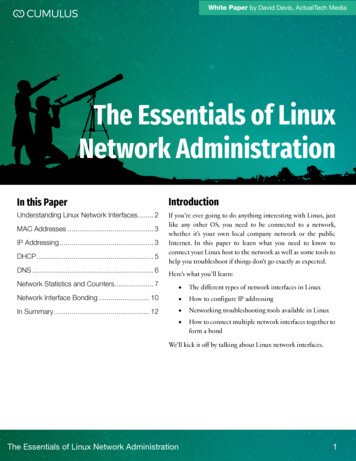
There are three icons on the desktop Install Bio-Linux 8 Bio-Linux Documentation Opens a menu of links as follows: On the Live System only – click this icon to start the Bio-Linux installer NEBC HomepageOpens the NEBC home page in a web browser User GuideOpens the Bio-Linux Userguide – a basic introduction to system admin Introductory Tutorial Opens the folder of Introductory Bio-Linux tutorials and data files Bioinformatics Docs Shows the NEBC Bio-Linux Bioinformatics Documentation SystemSample DataProvides access to much sample data to help you in trying out newsoftwareOn the left of the screen you will see the Dash, which is used to launch and organize applications. Thedash is populated by a column of large button icons. The Dash Button at the top with the Ubuntu logobrings up the main Dash panel to find files and applications (see below). The other icons are, bydefault, from the top:1.Open your home folder8. Shell Terminal2.Launch Firefox web browser9. Ubuntu Software Centre (find and install3.Launch Evolution mail reader4.LibreOffice Writer word processor10. System Settings and User Preferences5.LibreOffice Calc spreadsheet11. Virtual Desktop Switcher6.LibreOffice Impress presentation editor12. Disks and USB removable mediaapps)13. Rubbish Bin (deleted files area)On the top of the screen you will see the menu and panel bar (Figure 2).Figure 2: The menu and panel bar, found at the top of the screen.If you open an application window, the name of the active application will appear in the left portion of thisbar. If you move the mouse over it, a context menu for the active window will appear (like on Apple Mac).The right portion of the bar has a panel of icons to control some system settings.From left to right, the things you see in the panel area above are:1. Network monitor and setup (the icon shownindicates WiFi is active – you may see others)2. Keyboard selector (defaults to UK keyboard)3. Battery monitor (on laptops only)24. Audio volume control5. Wall clock (click it for a calendar)6. System menu (includes access to systemsettings and options to lock screen, switchuser, shut down, etc.)
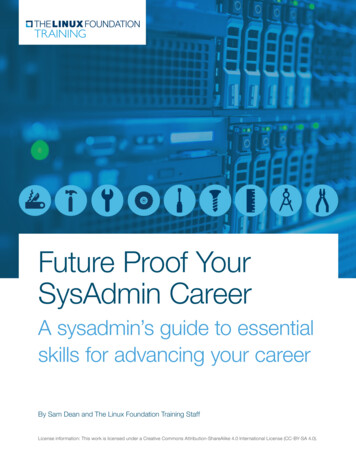
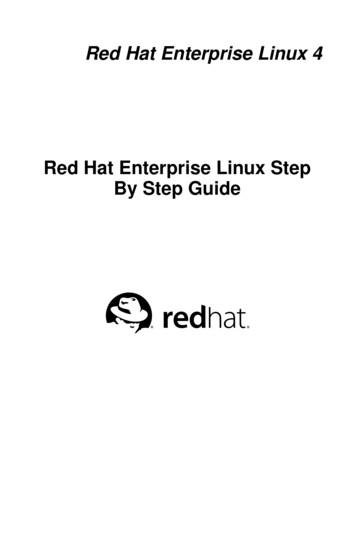
Running applicationsClicking the Dash Button at the top left of the screen opens a panel where you can search for applicationsand files on the system. This includes bioinformatics tools and any other applications you have installed.Start typing either the application name or a keyword, or select the DNA icon at the bottom (circled in theimage) to see a list of bioinformatics tools and resources.Figure 3: Searching for applications in the DashThe applications found in the menu are by no means all the means all those found on the system. Mostbioinformatics applications need to be run from the terminal as detailed at length in this tutorial.Finding files and drivesThe file cabinet icon near the top of the Dash takes you directly to your Home folder.Figure 4: Your home folder3
Your personal Desktop, and folders in your Home area called Documents, Pictures, Videos, etc. are listed.You can use these or else create your own folders as you wish.The file browser provides convenient shortcuts to these directories in the left pane, even if you are viewinganother folder in the main panel.Devices recognized by your system such as the disk drives, CD/DVD devices, USB sticks, etc. are listed atthe bottom of the left pane. Removable media can be ejected by clicking the icon next to the device name.Networks resources can be accessed through the Browse Network icon. This includes Windows networkshares using the CIFS protocol and files on other Bio-Linux machines if you can access them via the SFTPprotocol. Browsing regular FTP servers is also supported.Note: The Dash also has a file and media finder, as seen on the previous page, selected by clicking theUbuntu button at the top left to bring up the Dash console and then selecting one of the little white iconsfrom along the bottom of the window.Setting things upThe System settings iconallows you to customiseand administer your system (Figure 6) in various ways.The Personal area is used for customising a variety ofattributes relating to your personal preferences.The Hardware and System areas allow you to do things suchas configuring hardware drivers, changing firewall settings,administering users and groups, and managing the packages onyour system.Other features - Virtual Desktops etc.The icon that looks like this:Figure 5: The System Settings Windowallows you to switch“virtual desktops”. Unlike Windows, Linux by default gives you access to multiple desktop areas. Thisallows you to have windows open for different things in different virtual desktops. For example, if you wereworking on writing an article, you could have programs relevant to that work open and visible via one ofthese desktops. Meanwhile, you could have programs related to sequence analysis open on another desktop,and so on. This is a great tool for keeping things organised during your working day. Clicking the icon willzoom out to show an overview of all desktops. You can also switch quickly by holding down Ctrl Alt andtapping the arrow keys on the keyboard.The Deleted Items Folder icon(also commonly referred to as a Rubbish Bin or Trashcan) is thebottom icon the Dash. This is where files deleted in the file browser usually end up. This gives you a chanceto salvage them if you deleted them by mistake. Deleting files on the system is covered in more detail in theRemoving Files and Directories section of this tutorial.4
Exercise 1-1a) Exploring the desktopTake some time to explore the desktop. Look at the options under each of the icons covered in the previoussection, and try the various subsections in the Dash console. Try clicking the icons on the desktop. Also tryusing the right and middle mouse buttons when the mouse pointer is over the icons in the Dash and explorethe menus presented to you.Try going to a different virtual desktop and starting up some windows/applications there. Try movingwindows off one desktop area and onto another.b) Obtaining the example files for this tutorialThe sample files referred to in this tutorial can be found on the system as a compressed package file. You'llneed to copy and unpack them before proceeding.Copying the compressed file from the tutorials folder on the systemDouble-click the Bio-Linux Documentation icon on the desktopOpen the Introductory TutorialDrag the bioinf files.tar.gz file to the left and drop it over the word Home to copy it to your homefolder. Note that a copy of this file can also be found online if you need it for some o-Linux/bioinf files.tar.gzc) Extracting the files from the compressed tarballThe file you just downloaded is referred to as a tar file or tarball. Tar is a utility similar to Winzip; itmakes package of files. The extra .gz extension shows that the gzip method has been used to compress thetar file.Here are two equivalent options for how to unpack these files, one on the command line and one graphical.Both should produce the same result.Option 1 – extracting via the command line Open a new terminal by clicking the icon in the dash --- Type the following at the command prompt and press the enter key :tar -xa -f bioinf files.tar.gzThis command uncompresses and unpacks the contents of the tar file into your current working directory,which in this case is your home folder. You should then see a new prompt, just like this:5
(exercise 1-1 continued)If you see an error, try typing the command again, making sure it is exactly as shown above includingspaces, hyphens, underscores, etc. If the error says "No such file or directory " then check you really didcopy the file in step (b) above. You can confirm the extraction worked by looking in the file browser orusing the ls command.Option 2 – extracting via a graphical interfaceBut don't use this version – we're trying to learn about the command line here!! Open your Home Folder by clicking the file cabinet icon in the Dash.Click the right mouse button over the bioinf files.tar.gz file and select Extract Here.d) Re-visiting the command abovePress the up arrow key while in the terminal. The previous command should re-appear for you to edit.You can move the cursor left and right using the keyboard but don't try to move it with the mouse – thatwon't work.Edit the command by adding an extra 'v' righ after '-xz' so that the full command reads:tar -xav -f bioinf files.tar.gzHit the enter key to run it. You don't need to scroll the cursor back the end before you do this. What isthe result this time?The letters after the hyphens are parameters of the tar command: x mea
image) to see a list of bioinformatics tools and resources. Figure 3: Searching for applications in the Dash The applications found in the menu are by no means all the means all those found on the system. Most bioinformatics applications need to be run from the terminal as deta