Transcription
0DEPARTMENT OF MICROBIOLOGYST ALOYSIUS COLLEGE (AUTONOMOUS), MANGALURULABORATORYMANUALFIRST SEMESTER
1CONTENTSPAGESL.NO EXPERIMENTNOINSTRUCTIONS TO THE MICROBIOLOGY LABORATORY AND GOOD1 LABORATORY PRACTICES.22 STUDY OF GLASSWARE USED IN MICROBIOLOGICAL WORK4STUDY OF MICROBIOLOGY LABORATORY EQUIPMENT3 /INSTRUMENTS74 MICROSCOPY175 PREPARATION OF BACTERIAL SMEARS246 SIMPLE STAINING277 GRAM STAIN29CAPSULE STAINING – WET INDIA INK METHOD AND DRY INDIA INK8 METHOD349 ENDOSPORE STAINING METHOD- SCHAEFFER FULTON METHOD36DEMONSTRATION OF BACTERIAL MOTILITY BY HANGING DROP10 METHOD39PREPARATION OF CULTURE MEDIA: NUTRIENT BROTH AND11 NUTRIENT AGAR41SERIAL DILUTION TECHNIQUE. VIABLE COUNT BY STANDARD PLATE12 COUNT METHOD4613 ISOLATION BY STREAK PLATE METHOD4914 STUDY OF COLONY MORPHOLOGY (CULTURAL CHARACTERISTICS).50
21. INSTRUCTIONS TO THE MICROBIOLOGY LABORATORY AND GOOD LABORATORY PRACTICES.1. Wash your hands with disinfectant soap when you arrive at the lab and again before you leave.2. Absolutely no food, drinks, chewing gum, or smoking is allowed in the laboratory.3.Do not put anything in your mouth such as pencils, pens, labels, or fingers.4.Do not store food in areas where microorganisms are stored.5. Purchase a lab coat and safety glasses, bring them to class, and use them. Alternatively, a long sleevedshirt that buttons or snaps closed is acceptable protective clothing.6. Avoid loose fitting items of clothing. Wear appropriate shoes (sandals are not allowed) in thelaboratory.7. Keep your workspace free of all unnecessary materials.8. Disinfect work areas before and after use with 70% ethanol or fresh 10% bleach. Laboratory equipmentand work surfaces should be decontaminated with an appropriate disinfectant on a routine basis, andespecially after spills, splashes, or other contamination.9. Label everything clearly. 8. Replace caps on reagents, solution bottles, and bacterial cultures.10. Do not open Petri dishes in the lab unless absolutely necessary.11. Inoculating loops and needles should be flame sterilized in a Bunsen burner before you lay them down.12. Turn off Bunsen burners when not in use.13.Long hair must be restrained if Bunsen burners are in use.14. Treat all microorganisms as potential pathogens.Use appropriate care and do not take cultures out of the laboratory.
315. Wear disposable gloves when working with potentially infectious microbes or samples (e.g., sewage).If you are working with a sample that may contain a pathogen, then be extremely careful to use goodbacteriological technique.16. Sterilize equipment and materials.17. Never pipette by mouth. Use a pipetting aid or adjustable volume pipettors.18. Do not lick labels. Use only self-stick labels for the identification of experimental cultures.19. Consider everything a biohazard. Do not pour anything down the sink. Autoclave liquids and brothcultures to sterilize them before discarding.20. Dispose of all solid waste material in a biohazard bag and autoclave it before discarding in the regulartrash.21. Familiarize yourself with the location of safety equipment in the .22. Dispose of broken glass in the broken glass container.23.Dispose of razor blades, syringe needles, and sharp metal objects in the “sharps” container.24. Report spills and accidents immediately to your instructor. Clean small spills with care .25. Report all injuries or accidents immediately to the instructor, no matter how small they seem.&&&&&&&&&&&&
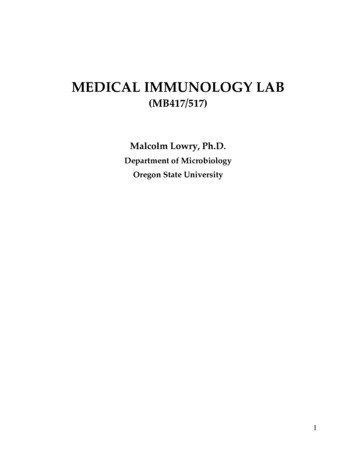
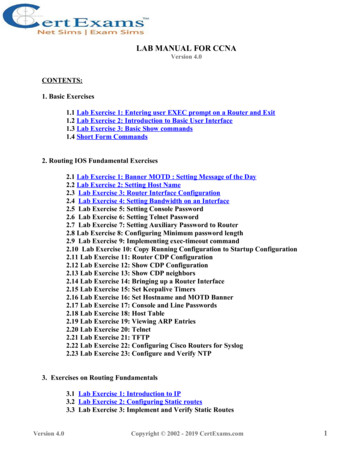
42. STUDY OF GLASSWARE USED IN MICROBIOLOGICAL WORK1)CULTURE TUBES AND PETRI DISHESGlass test tubes and glass or plastic Petri dishes are used tocultivate microorganisms. A suitable nutrient medium in the formof broth or agar may be added to the tubes, while only a solidmedium is used in Petri dishes. A sterile environment ismaintained in culture tubes by various types of closures.Historically, the first type, a cotton plug, was developed bySchröeder and von Dusch in the nineteenth century. Today mostlaboratories use sleevelike caps (Morton closures) made of metal,such as stainless steel, or heat-resistant plastics. The advantage ofthese closures over the cotton plug is that they are labor-savingand, most of all, slip on and off the test tubes easily.2) Petri dishes provide a larger surface area for growth andcultivation. They consist of a bottom dish portion that contains the medium and a larger top portion thatserves as a loose cover.For routine purposes, dishes approximately 15 cm in diameter are used.The sterile agar medium is dispensed to previously sterilized dishes frommolten agar deep tubes containing 15 to 20 ml of medium, or from amolten sterile medium prepared in bulk and contained in 250-, 500-, and1000-ml flasks, depending on the volume of medium required. Whencooled to 40 C, the medium will solidify. Remember that after inoculation, Petri dishes are incubated in aninverted position (top down) to prevent condensation formed on the cover during solidification fromdropping down onto the surface of the hardened agar.
53) Pipettes: A pipette is another instrument used for aseptic transfers. Pipettes are similar in function tostraws; that is, they draw up liquids. They are made of glass or plastic drawn out to a tip at one end andwith a mouthpiece forming the other end. They are calibrated to deliver different volumes depending onrequirements. Pipettes may be sterilized in bulk inside canisters, or they may be wrapped individually inbrown paper and sterilized in an autoclave or dry-heat oven.4). Slides: A microscope slide is a thin flat piece of glass, typically 75 by 26 mm (3 by 1 inches) and about1 mm thick, used to hold objects for examination under a microscope.Cavity Slide: These have a depression in the slide. These slides are useful as moistchambers for observing hanging drops.
65) Cover slips: These are a thin flat piece of transparent material,usually square or rectangular about 20mm in wide a nd fraction of mm thick that is placed over objects for viewing with microscope.6) Measuring cylinders,7) Conical Flask,8) Volumetric Flask, 9) Beaker,10) Durham tubes .11)Bentglass rod( Spreader), 12) Glass rod.Transfer Instruments: Microorganisms must be transferred from one vessel toanother or from stock cultures to various media for maintenance and study. Such atransfer is called subculturing and must be carried out under aseptic conditions toprevent possible contamination.Wire loops and needles are made from inert metals such as Nichrome or platinumand are inserted into metal shafts that serve as handles. They are extremely durable
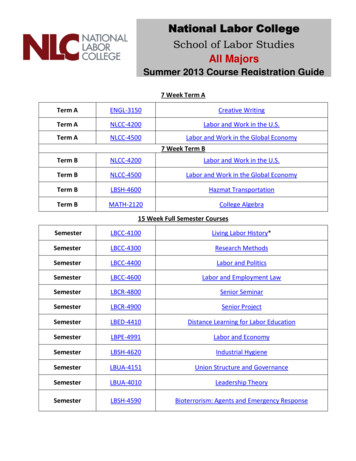
7instruments and are easily sterilized by incineration in the blue(hottest) portion of the Bunsen burnerflame&&&&&&&&&&&&&&&&&3. STUDY OF MICROBIOLOGY LABORATORY EQUIPMENT /INSTRUMENTSAutoclave: Autoclave:Autoclave is the nucleus of a microbiology laboratory. It is used not only to sterilize liquid substances suchas prepared media and saline (diluents) solutions, but also to sterilize glassware’s, when required.It has the same working principleas a domestic pressure cooker.The maximum temperature thatcan be obtained by boiling waterin an open container is 100 C(boiling point of water). Thistemperature is sufficient to killonly the non-spore formers, but itis difficult to kill the sporeformingbacteriaatthistemperature, as they escape byforming heat resistant spores. Ittakes very long time to kill thespores at this temperature.On the other hand, when water isboiled in a closed container, due to increased pressure inside it, the boiling point elevates and steamtemperature much beyond 100 C can be obtained. This high temperature is required to kill all the bacteria
8including the heat resistant spore-formers. Steam temperature increases with increase in steam pressureIn operating a standard vertical autoclave, sufficient water is poured into it. If water is too less, the bottomof the autoclave gets dried during heating and further heating damages it. The materials to be sterilizedare covered with craft paper and arranged on an aluminium or wooden frame kept on the bottom of theautoclave, otherwise if the materials remain half-submerged or floating, they tumble during boiling andwater may enter. The autoclave is closed perfectly airtight only keeping the steam release valve open.Then, it is heated over flame or by the in-built heating element. Air inside the autoclave should be allowedto escape completely through this valve. When water vapour is seen to escape through the valve, it isclosed.Temperature and pressure inside goes on increasing. The pressure increase is observed on the pressuredial. Usually sterilization is done at 121 C (a pressure of 15 pounds per square inch i.e. 15 psi) for 15minutes. The required time is considered from the point, when the required temperature-pressure isattained.Once required temperature-pressure is attained, it ismaintained by controlling the heating source. After thespecified time (15 minutes), heating is discontinued and steamrelease valve slightly opened. If fully opened immediately, dueto sudden fall in pressure, liquids may spill out from thecontainers.Gradually, the steam release is opened more and more, so asto allow all steam to escape. The autoclave is opened only after the pressure drops back to normalatmospheric pressure (0 psi). The autoclave should never be opened, when there is still pressure inside.The hot sterilized materials are removed by holding them with a piece of clean cloth or asbestos- coatedhand gloves.In case of a steam-jacketed horizontal autoclave, a boiler produces the steam . It is released at a designatedpressure, into the outer chamber (jacket). Air is allowed to escape and then its steam release valve isclosed.
9Hot air oven:It is used for sterilization of glassware’s, such as test tubes, pipettes and petri dishes. Such drysterilizationisdone only forglassware’s.Liquidsubstances, suchaspreparedmediaandsaline solutionscannotbesterilizedinoven,astheylose water dueto evaporation.The glassware’sare sterilized at180 Cfor3hours. An ovenhasa
10thermostat-control, using which the required constant temperature can be obtained by trial and error.The thermostat dial reading is approximate and the exact temperature is read by introducing athermometer into the oven or on a built-in L-shaped thermometer.In a modern oven, there is a digital temperature display and automatic temperature controller to set thedesired temperature easily. Time is set by a digital timer. After loading the glassware’s, the door is closedand oven switched on.The required temperature is set. After the oven attains the set temperature, the required time ofsterilization is set on the timer. The oven switches off automatically after the set time. The oven is opened,only after its temperature comes down near to room temperature. Otherwise, if the door is opened, whilethe inside of the oven is still very hot, cold air may rush in and crack the glassware’s.Microbiological Incubator:Profuse growth of microbes is obtained in the laboratory by growing them at suitable temperatures. bleculturemediumandthenincubating it atthe temperatureoptimum for ainsconstanttemperaturea
11specifically suitable for the growth of a specific microbe. As most of the microbes pathogenic to man growprofusely at body temperature of normal human being (i.e. 37 C), the usual temperature of incubation is37 C.The incubator has a thermostat, which maintains a constant temperature, set according to requirement.The temperature reading on the thermostat is approximate. Accurate temperature can be seen on thethermometer fixed on the incubator. Exact temperature, as per requirement, is set by rotating thethermostat knob by trial and error and noting the temperature on the thermometer.Most of the modern incubators are programmable, which do not need trial and error temperature setting.Here, the operator sets the desired temperature and the required period of time.The incubator automatically maintains it accordingly. Moisture is supplied by placing a beaker of water inthe incubator during the growth period. A moist environment retards the dehydration of the media andthereby, avoids spurious experimental results.Laminar Flow Chamber:It is a chamber used for aseptic transfer of sterilized materials, as well as for inoculation of microbes. Dustparticles floating in the air harbour microbes. These microbe-laden dust particles may enter into thesterilized media and contaminate them, when they are opened for short periods of time during inoculationof microbe or transfer from one container to another.To overcome this, when inoculation is done in open air, the air of the small inoculating area is sterilized bythe flame of a bunsen burner. The heated air becomes light and moves upwards, thereby preventing thedust particles from falling on the media during the short opening process.To further reduce the chance of contamination by the microbe-laden air, a laminar flow chamber is used. Itis a glass-fitted cuboidal chamber. An air blower blows air from the surrounding and passes it through aHEPA filter (High Efficiency Particulate Air filter), so as to make it dust free (microbe-free).
12This microbe-free air passes through the chamber in a laminar manner and comes out from the chamberthrough the open front door. This laminar flow of microbe-free air from the chamber to outside throughthe open door prevents the outside air from entering into the chamber.Thus, the chamber does not get contaminated with the microbes present in the outside air, though thedoor is kept opened during inoculation or transfer of media. An UV lamp fitted inside the chambersterilizes the chamber before operation.It has a stainless steel platform with provision for gas pipe connection for a bunsen burner. Before use, theplatform is cleaned and disinfected with lysol, the bunsen burner is connected and then the glass door isclosed.
13The UV light is switched on for 10 minutes to sterilise the environment inside the chamber and thenswitched off. The glass door should never be opened when the UV light is on, because UV light hasdetrimental effect on skin and vision. The blower is switched on and then the glass door is opened.Now, the bunsen burner is lighted and media transfer or inoculation is carried out in the chamberaseptically. If extremely hazardous microbes are to be handled, a laminar flow chamber with glovesprojecting into the chamber from the front glass door is used, as inoculation has to be done keeping thefront door closed.Quebec Colony Counter:In enumeration of bacteria in samples, it is assumed that a single bacterium gives rise to a single visiblecolony, when grown on a plate of solidified nutrientmedium. Thus, by counting the number of colonies,the number of bacteria in a sample can be estimated.Sometimes, colonies are very small and too muchcrowded making it difficult to count. Countingbecomes easy, when a mechanical hand counter, calledQuebec colony counter, is used. It divides the plateinto several square divisions and the colonies are magnified 1.5 times by a magnifying glass, which makescounting easy.McIntosh and Fildes’ anaerobic JarMcIntosh and Fildes’ anaerobic jar is an instrument used in Microbiology laboratory, for the generation ofanaerobic condition (anaerobiosis) to culture obligates anaerobes such asClostridium spp. Anaerobiosisobtained by McIntosh and Fildes’ anaerobic jar is one of the excellent and most widely used method foranaerobiosis but it requires costly special apparatus and vacuum pump. Availability of gas supply isanother major drawback of this system. Currently, it is being replaced by more convenient .McIntosh and Fildes’ jar consists of a 8*5 inch (20*12.5 cm) jar of stout glass or metal with a tight fitting
14metal lid.The lid can be clamped airtightwith a screw and is fitted with two tubes with taps, one for introduction of gas inside (inlet) and theother as outlet for vacuum valve. The lid also containstwo terminals that can be connected to an electricsupply. A capsule containing alumina pellets coated with palladium (palladinished alumina) is suspendedunder the lid by stout wires which are connected with the terminals to heat the catalyst for its activity.Nowadays, catalyst active at room temperature is also available.Principle:McIntosh and Fildes’ anaerobic jar works on the principle of evacuation and replacement, where the airinside the chamber is evacuated and replaced with mixture of gases (consisting of 5%CO2, 10%H2 and85%N2).It is practically impossible to evacuate all the air so some amount of oxygen will still be left behind. Theresidual oxygen left behind is converted to water using Spongy palladium or platinum catalyst. Thecatalyst acts as a catalyzing agent causing slow combination of hydrogen and oxygen to formwater. Reduced methylene blue is generally used as indicator (mixture of NaOH, methylene blue, andglucose). It becomes colorless anaerobically but regains blue color on exposure to oxygen.Procedure1. Keep the inoculated culture plates inside the jar along with an indicator.2. Screw tight the lid
153. Close the inlet tube and connect outlet tube to a vacuum pump ( at least three quarters of the air of thejar can be removed).4. Note the pressure on a vacuum gauze and when the pressure is reduced to 100 mm Hg (i.e., 600 mmbelow atmospheric), tightly close the outlet tap.5. Connect the inlet tap is to a hydrogen supply and then open it. Hydrogen is passed through a smallwash bottle.6. Bring the reduced pressure up to 760 mm Hg (i.e., atmospheric) by monitoring on the vacuum gauze as0.7. Switch on the electric terminals for heating the palladinised crystal (When room temperature catalyst isused heating is not required). The catalyst helps the combination of hydrogen and residual oxygen to form water. This process isallowed to continue for 20 minutes.Incubate the McIntosh and Fildes’ jar in an incubator at 37 C for 48 hours.Monitoring efficacy of anaerobiosis:Reduced methylene blue indicator is used to check the efficacy of anaerobiasis. A tube containing reducedmethylene blue solution had to kept inside the jar along with the culture plates. Methylene blue iscolorless in reduced conditions and turns blue when oxidized.pH Meter:A pH meter is an instrument for determining the pH of liquid media, liquid samples and buffers. It has aglass pH electrode. When not in use, it should be kept half immersed in water contained in a small beakerand preferably be covered by a bell jar to avoid dust accumulation in the water and loss of water throughevaporation.Before use, the meter is calibrated using two standard buffers of known pH. Usually buffers of pH 4.0, 7.0and 9.2 are available commercially. The instrument is switched on and left for 30 minutes to warm up. Thetemperature calibration knob is rotated to the temperature of the solutions whose pH is to the measured.Then, the electrode is dipped into the buffer (pH 7.0). If the reading is not 7.00, the pH calibration knob isrotated till the reading is 7.00. Then, the electrode is dipped in another buffer (pH 4.0 or 9.2).
16If the reading is same as the pH of the buffer used, the instrument is working properly. Otherwise, theelectrode is activated by dipping in 0.1 N HC1 for 24 hours. After calibration, the pH of samples isdetermined by dipping the electrode into them and noting the reading.Every time, before dipping into any solution, the electrode should be rinsed with distilled water. Thesamples should not contain any suspended sticky materials, which may form a coating on the tip of theelectrode and reduce its sensitivity.The old model pH meters have double electrodes(one of them acting as reference electrode), whilenew models have single combined electrode.Moreover, to overcome the problem of erature correction are available.Here, another ‘temperature electrode’ is also put intothe solution along with the pH electrode, whichmeasures the temperature of the solution andautomatically corrects the influence of temperaturevariations.Sophisticated pH meters have single gel electrode. Such electrodes have very little chance of breakage, asthey are almost completely enclosed in a hard plastic casing except at the tip. The tip has both pH andtemperature sensors.Moreover, they are easy to maintain, as they do not require constant dipping in distilled water, becausethe electrode tip is closed with a plastic cap containing saturated solution of potassium chloride, when notin use. However, in preparation of microbiological media, pH is determined by narrow-range pH papersand is adjusted to the required pH by adding acids or alkalis as required.&&&&&&&&&&&&&&&
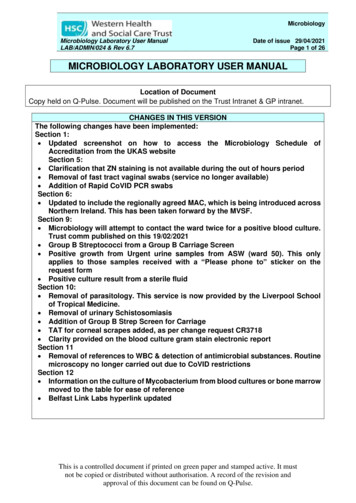
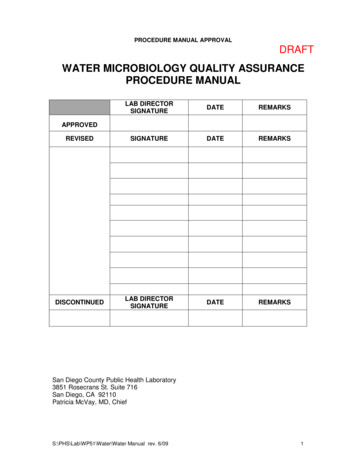
174. MICROSCOPYMicrobiology is a science that studies living organisms that are too small to be seen with the naked eye.Needless to say, such a study must involve the use of a good compound microscope. Although there aremany types and variations, they all fundamentally consist of a two-lens system, a variable but controllablelight source, and mechanical adjustable parts for determining focal length between the lenses andspecimen.Components of the Microscope
18Stage A fixed platform with an opening in the center allows the passage of light from an illuminatingsource below to the lens system above the stage. This platform provides a surface for the placement of aslide with its specimen over the central opening. In addition to the fixed stage, most microscopes have amechanical stage that can be moved vertically or horizontally by means of adjustment controls. Lesssophisticated microscopes have clips on the fixed stage, and the slide must be positioned manually overthe central opening.Illumination The light source is positioned in the base of the instrument. Some microscopes are equippedwith a built-in light source to provide direct illumination. Others are provided with a reversible mirrorthat has one side flat and the other concave. An external light source, such as a lamp, is placed in front ofthe mirror to direct the light upward into the lens system. The flat side of the mirror is used for artificiallight, and the concave side for sunlight.
19Abbé Condenser This component is found directly under the stage and contains two sets of lenses thatcollect and concentrate light as it passes upward from the light source into the lens systems. Thecondenser is equipped with an iris diaphragm, a shutter controlled by a lever that is used to regulate theamount of light entering the lens system.Body Tube Above the stage and attached to the arm of the microscope is the body tube. This structurehouses the lens system that magnifies the specimen. The upper end of the tube contains the ocular oreyepiece lens. The lower portion consists of a movable nosepiece containing the objective lenses.Rotation of the nosepiece positions objectives above the stage opening. The body tube may be raised orlowered with the aid of coarse-adjustment and fine-adjustment knobs that are located above or belowthe stage, depending on the type and make of the instrument.Magnification Enlargement, or magnification, of a specimen is the function of a two-lens system; theocular lens is found in the eyepiece, and the objective lens is situated in a revolving nosepiece. Theselenses are separatedby the body tube. The objective lens is nearer the specimen and magnifies it, producing the real imagethat is projected up into the focal plane and then magnified by the ocular lens to produce the final image.The most commonly used microscopes are equipped with a revolving nosepiece containing four objectivelenses, each possessing a different degree of magnification. When these are combined with themagnification of the ocular lens, the total or overall linear magnification of the specimen is obtained. Thisis shown in Table 5.1.Resolving Power or Resolution Although magnification is important, you must be aware that unlimitedenlargement is not possible by merely increasing the magnifying power of the lenses or by usingadditional lenses, because lenses are limited by a property called resolving power. By definition,resolving power is how far apart two adjacent objects must be before a given lens shows them as discrete
20entities. When a lens cannot discriminate, that is, when the two objects appear as one, it has lostresolution. Increased magnification will not rectify the loss and will, in fact, blur the object. The resolvingpower of a lens is dependent on the wavelength of light used and the numerical aperture, which is acharacteristic of each lens and imprinted on each objective. The numerical aperture is defined as afunction of the diameter of the objective lens in relation to its focal length. It is doubled by use of thesubstage condenser, which illuminates the object with rays of light that pass through the specimenobliquely as well as directly. Thus, resolving power is expressed mathematically as follows:resolving power wavelength of light2 X numerical apertureBased on this formula, the shorter the wavelength, the greater the resolving power of the lens. Thus, forthe same numerical aperture, short wavelengths of the electromagnetic spectrum are better suited forhigher resolution than are longer wavelengths. However, as with magnification, resolving power also haslimits. You might rationalize that merely decreasing the wavelength will automatically increase theresolving power of a lens. Such is not the case, because the visible portion of the electromagnetic spectrumis very narrow and borders on the very short wavelengths found in the ultraviolet portion of thespectrum. The relationship between wavelength and numerical aperture is valid only for increasedresolving power when light rays are parallel. Therefore, the resolving power is also dependent on anotherfactor, the refractive index. This is the bending power of light passing through airfrom the glass slide to the objective lens. The refractive index of air is lower than that of glass; as light rayspass from the glass slide into the air, they are bent or refracted so that they do not pass into the objectivelens. This would cause a loss of light, which would reduce the numerical aperture and diminish theresolving power of the objective lens. Loss of refracted light can be compensated for by interposingmineral oil, which has the same refractive index as glass, between the slide and the objective lens. In thisway, decreased light refraction occurs and more light rays enter directly into the objective lens, producinga vivid image with high resolution (Figure 5.2).Illumination Effective illumination is required for efficient magnification and resolving power. Since theintensity of daylight is an uncontrolled variable, artificial light from a tungsten lamp is the most commonlyused light source in microscopy.
21The light is passed through the condenser locatedbeneath the stage. The condenser contains two lensesthat are necessary to produce a maximum numericalaperture. The height of the condenser can be adjustedwith the condenser knob. Always keep thecondenser close to the stage, especially when usingthe oil-immersion objective. Between the light sourceand the condenser is the iris diaphragm, which can beopened and closed by means of a lever, ser. Excessive illumination may actuallyobscure the specimen because of lack of contrast. Theamount of light entering the microscope differs witheach objective lens used. A rule of thumb is that as themagnification of the lens increases, the distancebetween the objective lens and slide, called workingdistance, decreases, whereas the numerical aperture ofthe objective lens increases (Figure 5.3).
22Use and Care of the MicroscopeYou will be responsible for the proper care and useof microscopes. Since microscopes are expensive, youmust observe the following regulations and procedures.The instruments are housed in special cabinets and must be moved by users to their laboratory benches.The correct and only acceptable way to do this is to grip the microscope arm firmly with the right handand the base with the left hand, and lift the instrument from the cabinet shelf. Carry it close to the bodyand gently place it on the laboratory bench. This will prevent collision with furniture or coworkers andwill protect the instrument
23against damage. Once the microscope is placed on the laboratory bench, observe the following rules:1. Remove all unnecessary materials (such as books, papers, purses, and hats) from the laboratory bench.2. Uncoil the microscope’s electric cord and plug it into an electrical outlet.3. Clean all lens systems; the smallest bit of dust, oil, lint, or eyelash will decrease the efficiency of themicroscope. The ocular, scanning, low-power, and high-power lenses may be cleaned by wiping severaltimes with acceptablelens tissue. Never use paper toweling or cloth on a lens surface. If the oil-immersion lens is gummy ortacky, a piece of lens paper moistened with xylol is used to wipe it clean. The xylol is immediately removedwith a tissuemoistened with 95% alcohol, and the lens is wiped dry with lens paper. Note: This xylol cleansingprocedure should be performed only by the instructor and only if necessary; consistent use of xylol may loosenthe lens.The following routine procedures must be followed to ensure correct and efficient use of the microscope.1. Place the microscope slide with the specimen within the stage clips on the fixed stage. Movethe slide to center the specimen over the opening in the stage directly over the light source.2. Raise the microscope stage up as far as it will go. Rotate the scanning lens or low-power lens intoposition. Lower the body tube with the coarse-adjustment knob to its lowest position.Note: Never lower the body tube while looking t
1. INSTRUCTIONS TO THE MICROBIOLOGY LABORATORY AND GOOD LABORATORY PRACTICES. 1. Wash your hands with disinfectant soap when you arrive at the lab and again before you leave. 2. Absolutely no food, drinks, chewing gum, or smoking is allowed in the laboratory. 3.Do not put anything