Transcription
Ghai’sTextbook ofPRACTICAL PHYSIOLOGYPrelims Ghai.indd 111-07-2018 11:26:28
Ghai’sTextbook ofPRACTICAL PHYSIOLOGYNinth EditionRevised & Edited byVP Varshney MBBS MDDirector-Professor and HeadDepartment of PhysiologyMaulana Azad Medical CollegeNew Delhi, IndiaMona Bedi MBBS MDDirector-ProfessorDepartment of PhysiologyMaulana Azad Medical CollegeNew Delhi, IndiaJAYPEE BROTHERS MEDICAL PUBLISHERSThe Health Sciences PublisherNew Delhi London PanamaPrelims Ghai.indd 311-07-2018 11:26:28
Preface to the Ninth EditionGhai’s Textbook of Practical Physiology, 9th edition, has been prepared for the benefit of the medical students on the basis ofour long teaching experience in physiology. Even though theoretical knowledge is important for the students, it becomesmore important when used in practice, hence the importance of a detailed textbook of practical physiology.In this book, we have attempted to familiarize the students with the clinical and experimental approach to humanphysiology. Care has been taken to modify the practicals according to the Medical Council of India (MCI) guidelines. Welllabeled diagrams and flowcharts have been incorporated to improve understanding.A basic format has been adhered to in each practical. Each experiment starts with STUDENT OBJECTIVES, which arebasically learning objectives for the students. This is what the student is expected to learn at the end of each practical.This is followed by a brief INTRODUCTION of the practical. After explaining the PRINCIPLE, the APPARATUS required forthe experiment is described. A detailed step by step PROCEDURE is then elaborated. The working instructions are simpleso the average student can easily follow them. Next come the OBSERVATIONS and RESULTS. The PRECAUTIONS, whichhelps to minimize the error in the practicals are listed after the RESULTS. As all experiments have a physiological andclinical importance, a separate heading has been ascribed for PHYSIOCLINICAL SIGNIFICANCE in each experiment. Eachchapter ends with QUESTIONS along with their answers to help the student to prepare for their examination viva. ObjectiveStructured Practical Examination (OSPE) is a reliable, valid and important method of assessing practical skills. These havebeen added at the end of each practical to acquaint the student with the mode of practical assessment.We sincerely hope that this endeavor of ours, helps the students to comprehend the scientific basis of practicals inphysiology and prepare for their examinations in a systematic manner.We would always welcome suggestions and ideas from our students and friends for the betterment of this book infuture. After all “The secret in education lies in respecting the students’’.VP VarshneyMona BediPrelims Ghai.indd 511-07-2018 11:26:28
ContentsSection 1: Hematology . 2:1.13:1.14:1.15:1.16:1.17:1.18:The Compound Microscope 1Experiments on Blood 10Hemocytometry 17The Red Cell Count 24The Total Leukocyte Count 30Estimation of Hemoglobin 37Examination of a Peripheral Blood Smear and Determination of Differential Leukocyte CountDetermination of Erythrocyte Sedimentation Rate and Packed Cell Volume 58Determination of Red Blood Cell Indices 65Blood Grouping (Blood Typing)—ABO and Rh System 68Determination of Bleeding Time and Clotting Time 79Platelet Count 89Determination of Arneth Count (Cooke-Arneth Count) 93Absolute Eosinophil Count 96Reticulocyte Count 98Determination of Osmotic Fragility of Red Blood Cells 100Determination of Specific Gravity of Blood 104Determination of Viscosity of Blood 10846Section 2: Human Experiments . 109Unit I: Respiratory System2.1:2.2:2.3:2.4:Stethography: Recording of Normal and Modified Movements of RespirationPulmonary Function Tests 116Determination of Vital Capacity and Effect of Posture on Vital Capacity 127Cardiopulmonary Resuscitation 131110Unit II: Cardiovascular System2.5:2.6:2.7:2.8:2.9:2.10:Examination of the Arterial Pulse 137Recording of Systemic Arterial Blood Pressure 140Effect of Posture on Blood Pressure and Heart Rate 153Effect of Muscular Exercise on Blood Pressure and Heart RateElectrocardiography 158Additional Chapters CVS 165155Unit III: Special Prelims Ghai.indd 13Perimetry (Charting the Field of Vision) 169Mechanical Stimulation of the Eye 173Physiological Blind Spot 174Near Point and Near Response 174Sanson Images 175Demonstration of Stereoscopic Vision 175Dominance of the Eye 175Subjective Visual Sensations 17611-07-2018 11:26:28
xivTextbook of Practical l Acuity 176Color Vision 179Tuning fork Tests of Hearing 180Localization of Sounds 185Masking of Sounds 185Sensation of Taste 185Sensation of Smell 187Unit IV: Nervous System2.26:2.27:2.28:2.29:Electroencephalography 188Electroneurodiagnostic Tests 191Study of Human Fatigue 200Autonomic Function Tests 204Unit V: Reproductive System2.30:2.31:2.32:Semen Analysis 210Pregnancy Diagnostic Tests 212Birth Control Methods 214Section 3: Clinical Examination. 2173.1:3.2:3.3:3.4:3.5:History Taking and General Physical Examination 217Clinical Examination of the Respiratory System 221Clinical Examination of the Cardiovascular System 227Clinical Examination of the Gastrointestinal Tract and AbdomenClinical Examination of the Nervous System 237233Section 4: Experimental Physiology . 271Unit I: Amphibian 0:4.11:4.12:4.13:4.14:4.15:4.16:4.17:Introduction to Amphibian Experiments 272Study of Apparatus 273Dissection of Gastrocnemius Nerve Muscle Preparation 281Simple Muscle Twitch (Effect of a Single Stimulus) 283Effect of Temperature on Muscle Contraction 288Velocity of Nerve Impulse 289Effect of Two Successive Stimuli (of Same Strength) 291Recording the Effect of Increasing Strength of Stimulus on Skeletal Muscle Contraction 293Genesis of Tetanus 295Genesis of Fatigue 298Effect of Load on Skeletal Muscle Contraction (Freeload and Afterload) 299Recording of a Normal Cardiogram of Frog’s Heart and Effect of Temperature on it 301Properties of Cardiac Muscle 304Effect of Stimulation of Vagosympathetic Trunk and White Crescentic Line; Vagal Escape; Effect of Nicotine andAtropine on Frog’s Heart 307Effect of Adrenalin, Acetylcholine and Atropine on Frog’s Heart 310Perfusion of Isolated Heart of Frog 311Study of Reflexes in Spinal and Decerebrate Frogs 313Unit II: Mammalian Experiments4.18:Prelims Ghai.indd 14Experiments on Anesthetized Dog 31411-07-2018 11:26:28
xvContentsSection 5: Charts and Important Questions. 3175.1:5.2:5.3:5.4:5.5:5.6:5.7:5.8:Jugular Venous Pulse Tracing 317Cardiac Cycle 319Oxygen Dissociation Curve 320Strength-duration Curve 322Action Potential in a Large Myelinated Nerve FiberAction Potentials in Cardiac Muscle Fibers 325Dye Dilution Curve 327Oral Glucose Tolerance Test (OGTT) 328323Section 6: Calculations. 333Section 7: Sample Problem Solving. 3377.1:7.2:7.3:Sample Problem Solving in Hematology 337Sample Problem Solving in Clinical Practicals 338Sample Problem Solving in Experimental (Amphibian) Practicals 339Appendix341Index347Prelims Ghai.indd 1511-07-2018 11:26:29
Section 1: :1.11:1.12:1.13:1.14:1.15:1.16:1.17:1.18:The Compound MicroscopeExperiments on BloodHemocytometryThe Red Cell CountThe Total Leukocyte CountEstimation of HemoglobinExamination of a Peripheral Blood Smear and Determination of DifferentialLeukocyte CountDetermination of Erythrocyte Sedimentation Rate and Packed Cell VolumeDetermination of Red Blood Cell IndicesBlood Grouping (Blood Typing)—ABO and Rh SystemDetermination of Bleeding Time and Clotting TimePlatelet CountDetermination of Arneth Count (Cooke-Arneth Count)Absolute Eosinophil CountReticulocyte CountDetermination of Osmotic Fragility of Red Blood CellsDetermination of Specific Gravity of BloodDetermination of Viscosity of BloodCome here! Hurry! There are little animals in this rain water. They swim! They play around! They are a thousand timessmaller than any creature we can see with our eyes alone. Look! See what I have discovered.1.1: THE COMPOUND MICROSCOPEStudent ObjectivesAfter completing this experiment, the student should be able to:1. Name the different parts of the microscope and explain thefunctions of each.2. Explain the physical basis of microscopy and define the termsmagnification, resolution, and numerical aperture.3. Describe the mechanism of image formation and the type ofimage seen.4. Explain how to use low power (LP), high power (HP), oilimmersion (OI) objective to obtain different magnifications.5. Describe the procedure (protocol) that must be followed everytime while using a microscope.Sec 01.indd 16. Name the precautions that must be observed during and afterusing the microscope.7. Explain the basic working of other types of microscopes.INTRODUCTIONAntonie van Leeuwenhoek (1632–1723) was a Dutchtradesman and scientist, best known for his work on thedevelopment and improvement of the microscope andalso for his subsequent contribution toward the study ofmicrobiology.04-07-2018 14:52:51
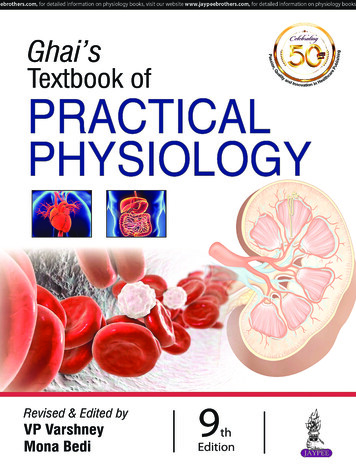
2Textbook of Practical PhysiologyThe microscope is one of the most commonly usedinstruments in the medical colleges and in clinicallaboratories. Students of physiology use it in the studyof morphology of blood cells and in counting theirnumbers. They will use it in histology, histopathology, andmicrobiology and later in various clinical disciplines.Monocular microscope: The compound microscope is socalled because, in contrast to a single magnifying convexlens, it has two such lenses—the objective and the eyepiece.It magnifies the image of an object that is not visible tothe naked eye to an extent where it can be seen clearly.Monocular microscope has only one eyepiece (Fig. 1A).Binocular microscope: It is a compound bright-fieldmicroscope but having two eyepieces instead of one so thatboth eyes are used simultaneously. This prevents eyestrain(Fig. 1B).Before using a microscope, the students must familiarizethemselves with its different parts and how to use it and takeits care. It will be discussed under the following heads: Parts of the microscope The support system The focusing system The optical (magnifying) system The illumination system. Physical basis of microscopy Visual acuity Resolving power Magnification Calculation of total magnification Numerical aperture Image formation Working distance. Protocol (Procedure) for the use of microscope Focusing under low power (100x) Focusing under high power (450x)Focusing under oil immersion (1000x)“Racking” the microscope. Common difficulties faced by students Precautions and routine care Other types of microscopes. PARTS OF THE MICROSCOPEThe Support SystemThe support system acts as a framework to which variousfunctional units are attached (Fig. 2): Base: It is a heavy metallic, U-shaped or horseshoeshaped base or foot, which supports the microscope onthe worktable to provide maximum stability. Pillars: Two upright pillars project up from the base andare attached to the C-shaped handle. The hinge jointallows the microscope to be tilted at a suitable angle forcomfortable viewing.Note: The microscope is never tilted when counting cells in achamber or when examining a blood film under oil immersion. Itcan be tilted for viewing histology slides. Handle (the arm or limb): The curved handle, whichprojects up from the hinge joint supports the focusingand magnifying systems. Body tube: Fitted at the upper end of the handle, eithervertically or at an angle, the body tube is the part throughwhich light passes to the eyepiece, thus conducting1ABFigs. 1A and B: (A) Monocular microscope; (B) Binocular microscope.Sec 01.indd 2Fig. 2: Compound microscope. 1. Base, 2. Pillars, 3. Handle, 4. Bodytube, 5. Coarse adjustment screw, 6. Fine adjustment screw, 7. Fixedstage, 8. Mechanical stage, 9. Fixed and revolving nose pieces,10. Objective lenses, 11. Mirror, 12. Condenser, 13. Eyepiece.04-07-2018 14:52:51
6Textbook of Practical PhysiologyFig. 4: Diagram to explain the numerical aperture. The angle alphais shown.The NA is also an index of light gathering power of alens, i.e. the amount of light entering the objective. TheNA can be decreased by decreasing the amount of lightpassing through the lens. Thus, as shown below, theillumination has to increase as the objectives are changedfrom LP to HP to OI. The magnifying power of each lensand its NA rather than its focal length, are etched on eachobjective lens.Low power objective (10x; NA 0.25; focal length 16mm)High power objective (45x; NA 0.65; focal length 4mm)Oil immersion objective (100x; NA 1.30; focal length 2 mm).Image Formation in the CompoundMicroscopeIt is the objective that starts the process of magnification. Itforms a real, inverted, and enlarged image (primary image:A’-B’) (Fig. 5) in the upper part of the body tube (A realimage is that which can be received on screen). The fieldlens of the eyepiece collects the divergent rays of light of theprimary image and passes these through the eye lens, whichtherefore the image seen by the eye is—virtual, inverted, andmagnified, and appears to be further magnified the image.The light rays reaching the observer’s eye are divergentand about 25 cm in front of the eye. Figure 5 shows the raydiagram of a compound microscope.Working DistanceThe working distance is the distance between the objectiveand the slide under study. This distance decreases withincreasing magnification. It is 8–13 mm in LP, 1–3 mm in HP,Sec 01.indd 6Fig. 5: The ray diagram of a compound microscope. AB object;A’ B’ real, inverted, magnified image; A” B” virtual, inverted,magnified image; O objective lens; E Eyepiece; Fo Focus ofobjective; Fe Focus of eyepieceFig. 6: Diagram to show the working distances of low power (LP),high power (HP) and oil immersion (OI) lenses.and 0.5–1.5 mm in OI lenses, respectively. Figure 6 showsthe approximate working distances for each lens.Note that the OI lens has to be immersed in a drop of oil.PROTOCOL/PROCEDURES FOLLOWED WHILEUSING THE MICROSCOPEPrincipleA focused beam of light passes through the material understudy into the microscope. Parts of the specimen that areoptically dense and having a high refractive index or arecolored with a stain (dye), cast a potential shadow which ismagnified in two main stages as it passes into the observer’seye.ProcedureThe student must avoid the bad habit of using objectivelenses in a haphazard manner, starting with any lens at04-07-2018 14:52:52
12Textbook of Practical PhysiologyFor a sample of serum: No anticoagulant is used. The bloodis allowed to clot in the container and serum is collected asdescribed later. Obviously, capillary blood does not requirea container or anticoagulant.Collection of Blood SamplesCollection of Capillary Blood (Skin-prick Method)A single bold prick is given on finger under asepticconditions (Fig. 7). Never squeeze the pricked finger asthis will expel tissue fluid along with blood to come out ofthe puncture site. The dilution of blood will, thus, nullifythe results. Hence for clinical work, venous blood is alwayspreferred. Skin-prick may be used on the bedside of apatient, or in an emergency when it is not convenient totake a venous sample.Note: The thumb and little finger are never pricked becausethe underlying palmar fasciae (venous bursae) from these digitsare continuous with those of the forearms. Any accidental injury tothese fasciae may cause the infection to spread into the forearm.Thus finger prick is given on the distal digit on the palmar surface ofthe 3rd/4th finger. Remember that one deep puncture, which will give you freeflowing blood, is less painful than 3 or 4 superficial pricks.Apparatus Blood Lancet/Pricking needle: Disposable, sterile,one-time use, blood lancets (flat, thin metal pieceswith 3–4 mm deep penetrating sharp points) arecommercially available and should be preferred.Ordinary, narrow-bore injection needles are uselesssince they only make shallow cuts rather than deepFig. 7: Finger prick method.Sec 01.indd 12punctures. However, wide-bore (22 gauge) needles maybe used in an emergency or if blood lancets are notavailable.Cutting needle with three-sided cutting point (usedby surgeons) can serve the purpose well.Pricking gun: A spring-loaded pricking gun that has adisposable, three-sided sharp point, and a loading andreleasing mechanism, is ideal because the depth of thepuncture can be preselected. Sterile gauze/cotton, moist with 70% alcohol/methylatedspirit. Glass slides, pipettes, etc. according to requirements.Note: The students should bring their own lancets. These may bereused two to three times, if required, after passing their pointsthrough a flame. Spirit does not kill the hepatitis virus which can bekilled on heating. However, too much heating, however, is likely toblunt the pricking points.ProceduresAll aseptic precautions must be taken. The person givingthe prick should wash his/her hands with soap and water,and wear gloves if possible.Note: Keep all the equipment ready before getting a prick. If thefinger to be pricked appears cold and bloodless, especially in winter,immerse it in warm water for 2–3 minutes. Clean and vigorously rub the ball of the finger with thespirit swab, followed by a final cleaning with dry gauze.(Scrubbing increases local blood flow). Allow the alcohol to dry by evaporation for the followingreasons: Sterilization with alcohol/spirit is effective only afterit has dried by evaporation. The thin film of alcohol can cause the blood drop tospread sideways along with alcohol so that it will notform a satisfactory round drop. The alcohol may cause hemolysis of blood. Steadying the finger to be pricked in your left hand,apply a gentle pressure on the sides of the ball ofthe finger with your thumb and forefinger to raise athick, broad ridge of skin (Do not touch the prickingarea). Hold the lancet between the thumb and fingers ofyour right hand, and keeping it directed along the axisof the finger, but slightly “off” center so as to miss thetip of the phalanx (i.e. not too far down or too far nearthe top of the nail bed), prick the skin with a sharp andquick vertical stab to a depth of 3–4 mm and releasethe pressure. The blood should start to flow slowly,spontaneously and freely (without any squeezing)—ifa good prick has been given.04-07-2018 14:52:53
18Textbook of Practical PhysiologyCounting Chamber: Improved NeubauerChamberThe counting chamber was introduced by Crammer in 1805.Its modification by Thoma, and later by Neubauer remainedin use for a long time. Improved Neubauer chamber is incurrent use.The counting chamber (Figures 9A and B) is a single,solid, and heavy glass slide. Extending across its middlethird are three parallel platforms (pillars, or flanges)separated from each other by shallow trenches (moats,gutters, or troughs). The central platform or “floorpiece”(sometimes also called the plateau) is wider, and exactly 0.1mm (one-tenth of a mm) lower than the two lateral pillars.The floorpiece is divided into two equal parts by a shorttransverse trench in its middle as shown in Figures 9A andB. Thus, there is an H-shaped trench or trough enclosingthe two floorpieces. The two lateral platforms can supporta coverslip which, when in position, will span the trenchesand provide a capillary space 0.1 mm deep between theundersurface of the coverslip and the upper surface of thefloorpieces. Identically ruled areas, called “counting grids”,consisting of squares of different sizes, are etched on eachfloorpiece. The two counting grids allow RBC and WBCcounts to be made simultaneously if needed, or duplicatesamples can be run.Note: Hemocytometers with silver-coated floorpieces show thegrids beautifully, which makes them easier to use by the students.Thoma’s ChamberIn this counting chamber, not used now, the centraldepressed platform is circular. The grid is only 1 mm 2,consisting of 25 groups of 16 smallest squares each.The dimensions of the smallest squares are the same, i.e.1/20 mm 1/20 mm. The 1 mm squares at the corners areabsent.Old Neubauer ChamberThere are nine 1 mm squares. The four corner groups of16 squares each are for WBC counting, while the central1 mm 2 area has 16 groups of 16 squares each for RBCcounting (rather than 25 groups of 16 smallest squares asin improved Neubauer chamber). The medium squares areseparated by triple lines.The Counting GridThe ruled area on each floorpiece, the counting grid, hasthe following dimensions: Each counting grid (Fig. 10) measures 9 mm2 (3 mm 3 mm).It is divided into nine large squares, each 1 mm2 (1 mm 1 mm). Of these nine squares, the four large corner squares arelightly etched, and each is divided by single lines into16 medium-sized squares each of which has a side of1/4 mm, and an area of 1/16 mm2 (1/4 mm 1/4 mm).These four large corner squares are employed forcounting leukocytes and are, therefore, called WBCsquares (Fig. 10).ABFigs. 9A and B: Hemocytometer, or counting chamber with improved Neubauer’s ruling. (A) Surface view, with the coverslip in position.The locations of the counting grids on the two platforms (floorpieces) are indicated. The arrow indicates the place where the tip of thepipette should be placed for charging the chamber; and (B) Side view with the coverslip in position. The space between the undersideof the coverslip and the surface of the platform is 0.100 mm in depth. The depth and the area of the smallest square are etched on thesurface of the chamber.Sec 01.indd 1804-07-2018 14:52:54
20Textbook of Practical Physiologymillimeter, but we are not concerned with these but only therelative volumes or parts in relation to each other. It can beseen that the capillary bore in WBC pipette is wider than thatin RBC pipette, and therefore, will hold more blood thoughthe volume of the stem in both cases is 1.0 (one).Differences between Red Blood Cell Pipette andWhite Blood Cell PipetteThe differences between RBC pipette and WBC pipette aredescribed in Table 3.Note: Though the dilution obtained with the RBC pipette is 10 timesthat obtained with WBC pipette, its bulb is not 10 times bigger. Thereason is the much finer bore in the red cell pipette.Filling the Pipette (Fig. 12) Place a drop of anticoagulated blood on a glass slide orget a fingerprick under aseptic conditions. Holding the mouthpiece of the pipette between yourlips and keeping the pipette (with its graduations facingyou) at an angle of about 40 to the horizontal, placeTable 3: Differences between RBC pipette and WBC pipette.RBC pipetteWBC pipetteCalibrations are 0.5 and 1.0 belowthe bulb, and 101 above the bulbCalibrations are 0.5 and 1.0below the bulb, and 11 aboveitThe capillary bore is narrow, thus it The capillary bore is wider,is a slow-speed pipettehence it is a fast-speed pipetteBulb is larger and has a red beadBulb is smaller and has a whitebeadThe volume of the bulb is 100 times The volume of the bulb is 10the volume contained in stemtimes the volume of the stem(RBC: red blood cell; WBC: white blood cell)Fig. 12: Filling the pipette.Sec 01.indd 20its tip within the edge of the drop. Gently suck on themouthpiece and draw blood until it is just above themark 0.5 (capillary action cannot fill the pipette at thisangle). The blood drop should be of adequate size (say 3–4mm in diameter). If it is too small or if the tip is liftedout of the drop, air will enter the pipette along withblood. If the tip presses against the skin, the bore atthe tip will get blocked and no blood will enter thestem even if you suck hard at the mouthpiece. Alternately, the pipette (after removing the rubbertube) may be filled with blood (without sucking/by lowering its bulb end below the horizontal) andallowing the blood to flow down the stem by gravity. Remove the pipette from the blood drop and clean itsouter surface with a cotton swab by wiping it towardthe tip. Do not touch the bore at the tip otherwise someblood will be pulled out. Keeping the pipette horizontal all the time, bring theblood in the stem to the exact mark 0.5 by wiping the tipon your palm (or on a paper) a couple of times till theblood recedes to the exact mark.Note: Do not use filter paper for this purpose as it will absorb a largeamount of blood, and neither should you try to blow out the extrablood. Holding the pipette nearly vertical, immerse its tip inthe diluting fluid taken in a watch glass, and suck thediluent to the mark 11 (WBC) or 101 (RBC). As the fluidis sucked up, the blood is swept before it into the bulbof 10 volumes (WBC) or 100 volumes (RBC pipette). The sucking up of diluting fluid should not bedone very quickly because blood being viscous, if asufficient time is not allowed, a thick film of bloodwill remain sticking to the inside of the capillarybore, thus introducing a significant error. The dilution of blood should not be delayedotherwise it is likely to clot in the stem. Once the diluent has been taken to the appropriatemark, keep the pipette horizontal so that the fluiddoes not run out by gravity. Do not place the pipette on the table, or delay themixing because it becomes impossible to dislodgethe cells from the walls of the bulb once they settledown. Mixing the blood with the diluting fluid: Once thediluting fluid has been sucked up, remove the rubbertube. Holding the short stem above the bulb betweenyour thumb and first two fingers, and pressing the tip ofthe pipette against the palm of the other hand, rotate itto and fro for 3–4 minutes so that the blood and diluentget thoroughly mixed.04-07-2018 14:52:54
21Section 1: Hematology Red blood cell pipette: Since the volume of the bulbFig. 13: Charging a chamber.Alternately, remove the rubber tube, close the pipetteends with thumb and forefinger of your right hand, andshake it vigorously with a figure of eight motion.Do not shake the pipette with an endwise motion asthis will force the cells out of the bulb into the stem. Charging the chamber: Once the blood and the diluenthave been mixed well, “charge” the chamber (Fig. 13).Charging the chamber requires patience, practice,and understanding of how to correctly judge the sizeof the drop, the angle at which the pipette should beheld on the floorpiece, and the time needed for filling(charging) the chamber. This is called the “speed of thepipette”. Obviously, it varies with the size of the capillarybore in the stem of the pipette. High-speed pipette: Since the bore of the WBCpipette is wider, a drop will form more quickly atits tip, and it will be larger, as compared to the RBCpipette. This requires that this pipette should be heldmore horizontally say, at an angle of 10–20 and fora shorter time. Slow-speed pipette: The bore of the RBC pipettebeing narrow, it will take a longer time for a suitabledrop to form. It should, therefore, be held at a steeperangle—say, 60–70 .It is for this reason that the students should first practicecharging a chamber with the RBC pipette and then with theWBC pipette.Calculation of Dilution Obtained (Dilution Factor)When blood is sucked up to the mark 0.5 (half part orvolume) and is followed by the diluting fluid, the bloodenters the bulb first and is followed by the diluent to themark 101 (RBC pipette), or mark 11 (WBC pipette). The stemin both pipettes contains only the diluent. Thus, the dilutionof the blood occurs in the bulb only.Sec 01.indd 21is 100 (101 – 1.0 100), it means that 100 volumes(or parts) of diluted blood contain 0.5 (half ) part ofblood and 99.5 (100 – 0.5 99.5) parts or volumes ofdiluents. White blood cell pipette: In this case, the volume of thebulb is 10 (11 – 1 10). When blood is taken to the mark0.5 (half part or volume) followed by diluent to the mark11, the volume of the diluted blood is now 10, whichcontains 0.5 part of blood and 9.5 parts or volumes ofthe diluting fluid. This gives a dilution of 0.5 in 10 (halfin ten), or 1 in 20 (one in 20), the dilution factor being20 (the blood will be diluted 20 times). Similarly, if bloodis taken to the mark 1.0 followed by diluted to mark11, the dilution now would be 1 in 10.For Red Blood Cell CountingThe red cells are counted in four corner groups and onecentral group of medium squares, each of which has 16smallest squares, i.e. in a total of 80 smallest squares.Area of smallest square 1/20 mm 1/20 mm 1/400mm2.Since the depth of the chamber is 1/10 mm, the volumeof the smallest square 1/400 1/10 1/4,000 mm3.For White Blood Cell (Total Leukocyte) CountingThis count is done in the four corner groups of large squares,each of which has 16 medium squares.Area of one medium 1/4 mm 1/4 mm square 1/16 mm2.Volume of this square 1/16 mm2 1/10 mm 1/160 mm3.Focusing the Counting GridExamine the grid on each floorpiece, without the coverslip,under low and high magnifications. Rack the condenser upand down, closing/adjusting the diaphragm at the sametime. Find out the
2 Textbook of Practical Physiology The microscope is one of the most commonly used instruments in the medical colleges and in clinical laboratories. Students of physiology use it in the study of morphology of blood cells and in counting their n