Transcription
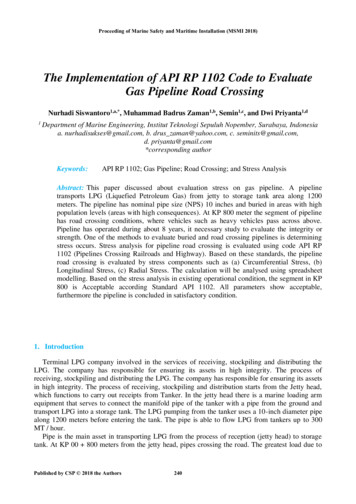
How to Build a Hoop House:Expand your growing season with this inexpensive DIY designHoop houses are simple, inexpensive, portable, solar heatedgarden structures that turn a little bit of hands-on effort andsimple materials into a lot more growing season. That’s whyhoop houses make so much sense. Although hoop houses are smaller,less expensive and simpler than greenhouses, a successful layout stillrequires planning and care. Building a hoop house that ages gracefullyalso demands construction details that aren’t immediately obvious.This is where the tried and true design features you’ll learn about herecan help.not just the obvious advantages of protection from frost. Decreasedwind pressure on seedlings, more humid growing conditions and higherinternal concentrations of CO2 during the main part of the seasonare reasons why hoop houses deliver better food and more of it. Fornorthern gardeners hoop houses also bring the reality of spring plantingand nurturing closer to the time when your post-winter enthusiasmnaturally kicks in. The warmth and serenity of a hoop house offers apleasant space to work, sit and recharge yourself, too. Hoop housesprotection when used with roll up sides and shade cloth.
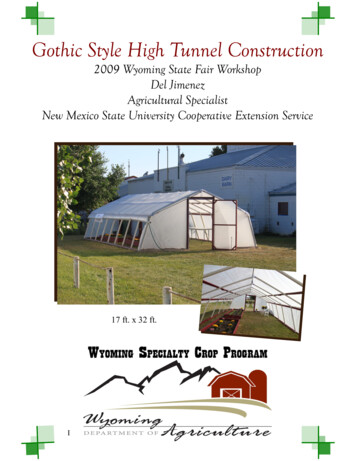
1/4” x 5”carriageboltPURLIN/HOOP DETAILHOOP PIPE CONNECTIONDETAILpurlinspurlinground frame side boardscut each 12’ground frame board to10’, then use the 2’ offcutsfor splicing jointsground pipeshoop pipeshoop pipegroundpipegroundframeboard1/4” x 5”carriageboltsGROUND PIPE/GROUND FRAME DETAILEND WALL/HOOP PIPE DETAILAre you looking for a small space for nurturing seedlings? Do youenvision a hoop house tall enough you can walk into? Do you plan tomake roll up sides to control excess heat? All of these features can beincorporated into the build-it-yourself design here.cover or other buildings. Also, since excess heat within the hoop houseduring summer will be an issue even in northern regions, orient yourhoop house so the ends are aligned with prevailing winds for maximumventilation. A location with deep, stone-free soil makes anchoring thestructure much easier.Location and OrientationFlat, level, well-drained conditions are required for any hoop house, butshelter is also worth considering. Even moderate winds exert a lot offorce on a hoop house, so choose a location that gains shelter from treeBuilding Your Own Hoop HousePVC pipes arched over a wooden ground frame, then covered inpolyethylene plastic. This is the DIY hoop house recipe in a nutshell,and it works for structures up to about 18 feet wide. You can also
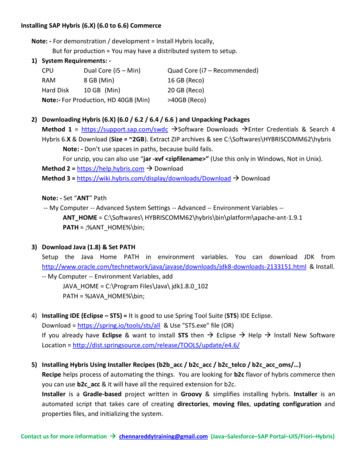
Above: A simple, home-made hoop house in an urban setting. PVC pipes andpoly plastic let the growing season start early.Left: Large and long-lived growth of plants like these tomatoes becomespossible in a hoop house. Freedom from wind damage is another reasonplants thrive with this kind of protection.make hoop houses smaller, too. See “Hoop House Pipe Guidelines” forrecommended pipe diameters and hoop pipe lengths. We used 1 1/2-inchdiameter, schedule 40 PVC pipe for the hoops, and 2-inch diameter PVCfor the ground pipes on this design. Study all the instructions and plansuntil you fully understand construction steps before buying materials.Step#1:Build the Ground FrameRegardless of the size of your hoop house, begin by creating a four-sidedground frame from rot-resistant lumber. 2x6s placed on their edge workwell for houses from 14- to 18-feet wide. Use 2x4s for the ground frameon smaller hoop houses.If the sides of the frame you need are longer than the lumber you’vegot, use 24-inch battens to splice joints. Hot-dipped galvanized #10 x3-inch wood screws work best here, with #10 4-inch screws used tosecure corner joints. Set your frame in place, then measure and equalizediagonal measurements taken from corner to corner. As long as oppositesides of the frame are equal in length, corners will be exactly 90º whendiagonal measurements are the same. Drive temporary wooden stakesinto the earth on the outside corners of the ground frame to prevent itfrom moving out of square.Step#2:Drive Ground PipesGround pipes are vertical lengths of 36-inch-long PVC poundedvertically into the ground with a sledge hammer. Drive one groundpipe at each corner of the wooden frame, and another every three feetalong the long sides, all tight to the inside face of the ground framemembers. Each pair of ground pipes supports one hoop pipe. As youwork, have someone hold a piece of scrap wood on top of the stakes asyou’re pounding them in, to avoid breaking the PVC. Drive the pipes soStep#3:Raise the Hoop PipesThe length of hoop pipes required to create the ideal arch depends onthe width of hoop house you’re making. One 10-foot and one 20-footlength of PVC pipe is required for each hoop on this 18-foot-wideon one of each pair of pipes that’ll come together for each hoop. Thislength required to span the width of structure. Although you couldprobably get by joining these pipes with friction only, use PVC cement
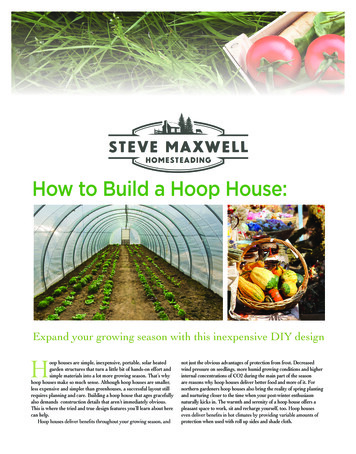
Hoop House Pipe Guidelines12 feet wide x 6 feet tallHoop Pipe Length: 19 feetThis hoop house is tall enough to walk through. Structures likethis extend the growing season, but they also make it moreintense. Heat-loving crops thrive in regions where theynormally wouldn’t.14 feet wide x 7 feet tallHoop Pipe Length: 23 feetas you assemble the joints with the pipes unbent, just to make sure theystay together.The amount of arch in a hoop house can safely vary, depending onhow much headroom you want. If your hoop house width is narrowerthan the design here, you’ll need to shorten the hoop pipes accordingly.See “Hoop House Pipe Guidelines” for suggested diameters and lengthsfor different hoop house widths.Lay your hoop pipes in position across the ground frame, next to the18 feet wide x 8 feet tallHoop Pipe Length: 27 feetinto position. First slip the end of one hoop pipe into its ground pipe,Install all hoop pipes like this, then use a drill to bore 1/4” diameter holesfor lock bolts through the wooden ground frame, the hoop pipe and theground pipe for a lock bolt. Do this work while ensuring that the hooppipe is pushed all the way down, and only on one end of each hoop fornow. Install and tighten 1/4” dia. x 4” carriage bolt in each of the holes,then climb a step ladder and take a sighting along the tops of all hoops.The peaks should all be more-or-less the same height, though someadjustment will be required. Have a couple of helpers push and pull theunbolted bottom ends of the hoop pipes, then drill and bolt them whenthe peaks are aligned.Step#4:Install PurlinsThe hoops may be up, but they’re not strong yet because they’re onlyThe wider your hoop house, the bigger and stronger your pipes needto be. Follow these guidelines if you’re modifying the width of hoophouse from the design shown here. Hoop house length doesn’t requirechanges in hoop size or pipe diameter.Structure Width10 to 12 ftHoop Pipe Dia.Hoop Pipe LengthGround Pipe Dia.3/4”19 feet1”12 to 14 ft1”23 feet1 1/2”14 to 18 ft1 1/2”27 feet2”Note: These pipe sizes assume a hoop spacing of 36”. In areas of high snow load andwind, decrease hoop pipe spacing to 24”.
?Do you long for more heatand growing power for your garden?A hoop house is like moving a partof your land hundreds of miles south, allfor a small investment in materials andtime. It’s proof positive that a little bit ofway when it comes to food self reliance.supported at their bottom ends. This is where purlins come in. They’rehorizontal pipes that bolt to the hoops, adding strength. You’ll needat least one purling installed along the ridge of the structure, with twomore partway down each side in regions that get high winds or lots ofsnow. Place the purlin pipes on the inside of the hoops, secured with thesmooth heads of 1/4” dia. x 4” carriage bolts facing upwards. If you’dlike the option of rolling up the lower sides of your hoop house duringwarm weather, add wooden 1x2 hip boards two or three feet up from theground, for anchoring the main pieces of hoop house plastic. The roll upsides hang from these wooden strips, available to be raised or lowered asneeded to control internal temperatures.Step#5:Adding and Anchoring the PlasticIt makes sense to use the best grade of greenhouse plastic you can foryour hoop house, even if it’s small. Hardware store plastic looks good,but it’ll degrade in the sunlight and tear in a year or two. The besthoop house option is 6 mil thick, UV-protected greenhouse plastic. It’llthermal performance while it does. Choose a calm day to unroll all theplastic you need to cover your hoop house, leaving at least 12 inches ofextra plastic along the ground edges, and 24” on the ends. Wrap thistie the balls in place with the end of ropes. Throw the other ends of theRather not use PVC?Galvanized steel pipe made for chain link fence installationsmakes excellent hoop house supports, and several pipebending tools are made especially for this work. Althoughsteel pipe is more challenging to work with than PVC andmore expensive, it does deliver a stronger structure whereextreme wind and snow loads may occur.
Three Details that Makea Big DifferenceSomething called “wiggle wire” is thebest option for anchoring plastic alongthe edges of your hoop house. It workswith an aluminum track that fastens tothe ends and edges of your hoop house, tomake securing plastic fast and absolutelyreliable.You’ll enjoy longer plastic life andmuch more effective hoop house actionPull two layers of plastic over your frameand secure them with a little slack. Small,installed to continually blow air into thegap between the layers, keeping them tautwhile also boosting internal hoop houseHoop House FloorDepending on how you use your hoopis the reason why. If you’ll be usingpots, the soil is quite likely to turn into atrampled, dusty and muddy mess as youwalk in an out for watering, weeding andtransplanting. Any kind of pathways youcreate should be made of light, organicmaterial that doesn’t permanently affectthe soil. Clean straw is an excellentpathway option, but it’s not availableeverywhere. If you live in a forestedarea, sawdust is a perfect choice for aextending plastic life.If you live in a windy area, consider adding duckbill anchors (left) to secure theground frame. Pound one just outside each corner, with another one of two along eachlong edge. Lever the cable of the anchor up to set the duckbill horizontal, then use ropeto tie the ground frame down.hoop house pathways.Protect Your Polyropes over the peak of the hoop house, then get helpers to carefully pull the plastic up andinside the hoop house, to relieve sideways strain on the framework by lifting the plastic byhand as it goes up.With the plastic draped over the frame, pull it as needed for alignment (fold marks on theplastic usually offer visual guidelines), then get ready to secure it. You could wrap excess plasticup with 1x2 strips of wood, then anchor these strips to the hip boards or ground frame, butthere’s a better option. See “Three Details that Make a Big Difference” on page TK for details.Step#6:Build End Wallsthe PVC structure. Although you can use wooden battens to secure the plastic along the edgesof the end wall frames, the same kind of wiggle wire channels and spring strips that secure themain edges of the plastic work much better.Chemical interaction between PVC andpolyethylene hoop house skin can causepremature deterioration of the poly. That’s onereason it makes sense to apply protective tapealong all edges of the frame that touches theskin before poly installation. This tape alsomakes bolt heads less likely to cause physicaldamage to the skin.
PARTS LISTPartMaterialSizeQuantityGround frame sidesrot-resistant lumber2x6x12’6Ground frame endsrot-resistant lumber2x6x12’2Long hoop pipesschedule 40 PVC1 1/2” dia. x 20’11Short hoop pipesschedule 40 PVC1 1/2” dia. x 10’11Ground pipesschedule 40 PVC2” dia. x 36”22Ground pipe boltscorrosion-resistant metal1/4” dia. x 5”-long88Short purlinsschedule 40 PVC1 1/2” x 20’3Long purlinsschedule 40 PVC1 1/2” x 10’3Top plasticgreenhouse grade6mil x 32’ wide x 35’ long1End wall framingconstruction-grade lumber2x4 as neededEnd wall plasticgreenhouse grade6mil x 32” wide x 10’ longHere’s a short list of suppliers for hoop house kits and hardwareHarnois Greenhouses1044 rue PrincipaleSt-Thomas, QC CanadaJOK 3L0Phone: 888-427-6647www.harnois.comThis is primarily a commercial supplier ofgreenhouses, but they also sell greenhousesas small as 20’ x 20’.Hoop House Greenhouse KitsP.O. Box 2430Mashpee, MA 02649Phone: 1-800-760-5192www.hoophouse.comReady-to-assemble steel hoop kitsPlastic, tape, blower fansLostcreek Greenhouse Systems245 C.R. 2651Mineola, TX 75773Phone: 903-497-1158www.hoopbenders.netSteel hoop bending tools PlasticGrowers Supply1440 Field of Dreams WayDyersville, IA 52040www.growerssupply.comHoop house kits Plastic, tapeSteve Maxwell liveson a 90 acre ruralisland homestead hebegan building in 1985after growing up in thecity. Visit Steve onlineat SteveMaxwell.ca
This is the DIY hoop house recipe in a nutshell, and it works for structures up to about 18 feet wide. You can also . Study all the instructions and plans until you fully understand construction steps before buying materials. Step#1: .