Transcription
A Few Simple Kite Plans(Part of the “From Kites to Space” Unit)Compiled by Rebecca Kinley Fraker
From Kites to SpaceKITE PLANSForeword:If you were a member of any of myclasses, as soon as I mentioned “kites”you would begin to giggle. Because mystudents claim that when Mrs. Frakersays the word “kite” all the wind in thestate dies down, and everythingbecomes very still. Sometimes theysuggest that I should go into the pathof an approaching hurricane, announcea kite-building class, and stop thosehurricane winds.Nevertheless, I have continued my love of kites. Faced with no wind, I have collected andmodified different kite plans until many of my kites will fly in practically no breeze at all.Faced with little money, I found plans that use copier paper, bamboo skewers, and plasticbags. Faced with rainy weather and no open areas, I experimented until I found thepaper bag kite which will fly in the classroom or hall with a minimum of arm movement.Please note: There are far more beautiful kites to make and many other categories ofkites. I hope this unit will inspire you to do further research into sport and fighter kites.There are also new sports involving kites such as kite boarding, skiing with kites, andparasailing.I can say with confidence, BUILD THESE KITES AND THEY WILL FLY !!!Rebecca K. FrakerAtlantic Union Conference Teacher Bulletinwww.teacherbulletin.org2
From Kites to SpaceKITE PLANSTable of ContentsBumblebee Kite.4Bag Kite (A Modified Box) .6Picnic Plate Kite .8Simple Sled Kite . 10A Template for the Sled Kite. 14Simple Delta Kite. 15Advanced Delta Kite. 17Percentage Plan for a Delta Kite. 21Percentage Chart. 22Kite Internet Resources. 23Kite Video Clips . 24Atlantic Union Conference Teacher Bulletinwww.teacherbulletin.org3
From Kites to SpaceKITE PLANSBumblebee KiteThe Bumblebee is a very simple, inexpensive kite that can be made with copier paper. Itwill fly if you run with it. It needs only a little breeze to go up.*There is a moviemaker clip available for this kite.Materials needed:Hole puncherScotch tapeStaplerCopier paper (any color)Ruler with inchesKite stringPencils or craft sticksOptional: markers or crayonsStep One:Fold the paper in half.Step Two:Measure and mark an A at 2 ½”and a B at 3 ½” along the fold.Step Three:Pull the corner of the open corner closestto the A on one side down to the A andstaple it. Now do the other side.Atlantic Union Conference Teacher Bulletinwww.teacherbulletin.org4
From Kites to SpaceKITE PLANSStep Four:Reinforce the B line with scotch tape.Then punch a hole through the B line. Donot put it too close to the fold.Step Five:Take about 15 feet of lightweight kitestring or fishing line. Tie it onto a pieceof cardboard and then wrap it around.Then put the remaining end through thehole and tie it with a double knot.Step Six:Swing it around your head a few seconds.It should float. Then, it’s outside forsome fun! Experiment by putting alightweight ribbon tail at the end.Atlantic Union Conference Teacher Bulletinwww.teacherbulletin.org5
From Kites to SpaceKITE PLANSBag (Modified Box Kite)Box kites normally take precision work and spars. This low-tech version uses a paper bagof any size, and will fly with just hand motions. Even three year olds can make this kite!*There is a moviemaker clip available for this kite.Materials Needed:Paper lunch bag (with a box bottom)ScissorsScotch tapeStaplerKite stringHole puncherRibbon or streamers.Step 1:Take a paper bag. The illustrations showa MacDonald’s bag. You can use brownpaper lunch bags or find colorful ones in apaper store.Open the bag.Cut off the bottom.At this point, if you wish to decorate thebag you may do so. If you wait untillater, it will be harder to do.Step 2:On the cut end (the former bottom), foldabout a one inch cuff. The exact size isnot critical. The paper bag may alreadyhave crease lines and those can be used.The cuff should be on the outside of thebag.Atlantic Union Conference Teacher Bulletinwww.teacherbulletin.org6
From Kites to SpaceKITE PLANSStep 3:In the middle of a long side of the cuff,put a short piece of scotch tape to serveas reinforcement for the hole for thestring.Step 4:Now punch a hole through the cuff andthe tape.Step 5:Tie the kite string through the hole. Youdo not need a long kite string for thiskite. 10 to 15 feet will do.Step 6:Use ribbon or streamers to make a tailthat is about 3 feet long. Don’t make ittoo heavy. The tail should be stapled ortaped to the end OPPOSITE the sidewith the hole, although it will not mattermuch.Step 7:Go fly a kite!Atlantic Union Conference Teacher Bulletinwww.teacherbulletin.org7
From Kites to SpaceKITE PLANSPicnic Plate Kite*There is a moviemaker clip available for this kite.Materials Needed:Styrofoam or sturdy picnic plateLightweight stringPlastic strips about 18” long orSurveyor’s flagging tape.Scotch, duct, or masking tapeStep 1:Turn the plate upside down.To the best of your ability, draw a linedown the center of the plate.Step 2:Poke a hole along the line about 3 ½inches from the top.Step 3:Push one end of the line through the hole.The end should go through the back ofthe plate (where you drew the line) andcome through to the eating side of theplate.Step 4:Make sure the string is through at leasttwo inches, and scotch tape it to theeating side of the plate.Atlantic Union Conference Teacher Bulletinwww.teacherbulletin.org8
From Kites to SpaceKITE PLANSStep 5:Tape a long tail to the bottom of theplate on either side. This can be madefrom strips of plastic bag.Step 6: OptionalDecorate with sharpies or crayons.Step 6:Move away from the potato salad andgo fly a kite!Atlantic Union Conference Teacher Bulletinwww.teacherbulletin.org9
From Kites to SpaceKITE PLANSSimple Sled Kite*There is a moviemaker clip available for this kite.The Sled Kite is relatively unknown outside of the world of ardent kite flyers. Peoplewho fly kites all the time know the Sled Kite as a very simple kite to build. It is veryforgiving of mistakes in construction and is a wonderfully easy kite to fly.Why would anyone call a kite a 'Sled'? Well, when the kite was invented by WilliamAllison of Dayton, Ohio in 1950, he patented it as a 'polymorphic' kite, meaning it couldtake on many different shapes according to the wind. Frank Scott modified Allison'sdesign and wanted to call it a 'Flexible Flyer'. But that name was already being used by acompany making the Flexible Flyer Snow Sleds. So Scott called his kite a 'Sled Kite'.They have been called Sled Kites ever since. There are almost as many different types ofSled Kites as there are people who have made them.The Sled Kite can be made from almost anything: trash bags, plastic store bags,Tyvek , newspaper, even wrapping paper-anything relatively light and strong. The nicething about Tyvek is that it can be sewn, glued or taped, and it accepts a wide varietyof inks and crayons for decoration. The kite is also easily 'scalable'. It can be made quitelarge, or quite small.PLEASE LOOK OVER ALL INSTRUCTIONS AND PICTURES BEFORE BEGINNING.Materials List:Spar making material (bamboo skewers or cardboard strips)Tape (packing, scotch, masking, or duct)ScissorsHole punchRulerTemplate paperKite material: plastic bags, Tyvek, or newspaperStringAtlantic Union Conference Teacher Bulletinwww.teacherbulletin.org10
From Kites to SpaceKITE PLANSStep 1: Decide the size of the kiteDecide what height you would like to haveyour kite. This sample kite uses sparsmade from bamboo skewers. Strips ofcardboard cut from cereal boxes will alsowork well.Step 2: Preparing a template.The template will be two squares acrossand three squares down.The skewers measure 12 inches, so to getthe size of the square blocks, divide 12by 3. This means the template blocksshould be 4 inches by 4 inches.If you wish to make a kite that is 21inches high, divide 21 by 3 for 7 inchblocks.And if you are really brave, use anynumber and get into fractions orcentimeters.Step 3: Prepare your template paperFor this kite, you will need a piece ofpaper for a template that is 12 incheshigh and eight inches wide. (Constructionpaper works well, as it is slightly largerthan copier paper.)For this kite, divide the paper into 4 inchsquare blocks. There should be twoacross and three down. Draw the cuttinglines as shown.Now cut out the template.Atlantic Union Conference Teacher Bulletinwww.teacherbulletin.org11
From Kites to SpaceKITE PLANSStep 4: Use the template to cut outthe kite.Take the kite material. Make sure thepiece is twice the size of your template.Fold the kite material in half.Place the long side of the template onthe fold. This can be lightly taped inplace.Cut around the outsides of the template.Do NOT cut the fold apart!Step 5: Open up the sail.Tape the spars (in this case, skewers)from point to point. Clear packing tapeworks well, but younger children oftenhave trouble with it. They could puttheir spars in place with scotch tape, andthen have an adult put packing tape overit. If you don’t mind the looks, maskingtape or duct tape also works well.Step 6: Holes for the string.Reinforce each of the points of the kite.On each of the two points of the wings,punch a hole.Step 7: The tails.Make 30 inch tails from plastic strips andtape at the bottom ends of each of thespars. The tails may be in bunches and bemade from the left-over plastic.Atlantic Union Conference Teacher Bulletinwww.teacherbulletin.org12
From Kites to SpaceKITE PLANSStep 8: Adding the bridle.Take a piece of kite string that is 36inches long. This will be the bridle. Putthe ends through the holes on the wingsand tie tightly.Step 9: Balancing the kite and bridle.Now, hold the kite by the string and letdangle. Match the kite halves. Nextmake a loop in the bridle. Double-knot itso that it doesn’t slip.Step 10: FinishingFasten your kite string to the loop andGO FLY your kite.Atlantic Union Conference Teacher Bulletinwww.teacherbulletin.org13
From Kites to SpaceKITE PLANSA Template for the Sled KiteThis template can be enlarged or shrunk with a copier.Put the left side on the fold. Cut along the slanted black lines.Atlantic Union Conference Teacher Bulletinwww.teacherbulletin.org14
From Kites to SpaceKITE PLANSSimple Delta Kite*NO video availableMaterials needed:Hole puncherScotch tapeStaplerCopier paper (any color)One bamboo skewerRuler with inchesKite stringPlastic bag cut in one inch strips orOther tail materialPencils or craft sticksOptional: markers or crayonsStep 1: Fold a sheet of colored copierpaper in half.Step 2: Fold again along a diagonal lineworking from the fold in Fig.2. Thisdiagonal line can be determined by making amark at the top 1/2 inch from the fold anda mark at the bottom 3 in. from the foldand drawing a line between these marks.Atlantic Union Conference Teacher Bulletinwww.teacherbulletin.org15
From Kites to SpaceKITE PLANSStep 3: Fold back one side forming akite shape. Place tape firmly along thecenter fold where the pieces meet (NOTthe original fold line.)Step 4: Place bamboo skewer or plasticstraw across the “wings” and tape it downfirmly.Step 5: Flip kite over onto its back andfold the front flap back and forth until itstands straight up.(Otherwise it acts like arudder and the kite spins around in circles.)Step 6: Cut off 6 to 10 feet of plasticribbon and tape it to the bottom of thekite as shown.Step 7: Punch a hole in the flap , about 1/3down from the top point. This hole can bereinforced with an additional piece of tape.Step 8: Tie one end of the string to thehole and wind the other end onto a stringwinder.Atlantic Union Conference Teacher Bulletinwww.teacherbulletin.org16
From Kites to SpaceKITE PLANSAdvanced Delta Kite* A moviemaker clip is available for this kite.Materials Needed:Three 1/8” wooden dowel rods. The length will depend on the size of your kite.ScissorsWide tape (masking or duct)Material for sailGlue (glue sticks for light-weight material, white glue for heavier)String & reel**Tail material optionalStep 1: Material and Size SelectionAs with any kite construction, any materialcan be used, but Delta kites tend to dobetter with heavier material. The oneshown in the illustrations has been madefrom a roll of vinyl wallpaper. Freezerpaper also works well.Step 2: Figuring the ProportionsUse the chart to figure the measurementsof your kite. Fold your material with theright side out. Then transfer thosemeasurements to the folded material.First, look carefully at the template andcharts on the next few pages. Deltas arebuilt with proportions to any size that youwant.Step 3: Cut out the piecesMove the scraps out of your way.Atlantic Union Conference Teacher Bulletinwww.teacherbulletin.org17
From Kites to SpaceStep 4: Put the keels togetherCrease the keels and then glue or tapethem together with the wrong sidestogether.Step 5: Turn over the kiteOn the back or wrong side of the kite, puta strip of masking or duct tape down thecenter. Flip the kite back over andreinforce the edges of the keel with tape.KITE PLANS***AT THIS POINT, if youwish to make the kite double thickness,place the extra piece of material rightside down on a table. Cover the wrongside of your kite (the back side of thekite without the keel) with glue. Nowcarefully put it on the piece of material.The wrong sides should be together.Smooth it out. Allow it to dry, and thencut out around it.Step 6: Reinforce the bottom with tapeThe bottom, or trailing edge, is thelongest part of the triangle-shaped kite.Step 7: Put on the spine1/8” dowel rods work very well for thespine and spars. Measure the length ofthe spine, and cut three pieces thatlength. You will need a fourth spar a littleshorter than these three. Then tape oneof them down the center of the WRONGside of the sail, the side that DOES NOThave the keel on it. Make sure it issecurely fastened at the top and bottom.Atlantic Union Conference Teacher Bulletinwww.teacherbulletin.org18
From Kites to SpaceStep 8: Fasten the side sparsAgain, these will be taped on the WRONGside of the sail, the side that DOES NOThave the keel. Place them starting at thetrailing edge and going up. They will NOTreach the nose of the kite. Fasten thesetop and bottom but don’t tape them thewhole way down. You may want to makepockets from tape.Step 9: This is tricky! Measure down theleading edge from the tip of the kiteabout 1/3 of the way. Now take thefourth spar and put it from one edge tothe other across the spine. You should cutoff the cross spar about a fourth-inch ora centimeter longer than the width of thekite at that point.KITE PLANSStep 10: Fastening the crossspar. Lay the cross spar in place acrossthe kite. Slide it so that one end is flushand butts the side spar, and the othersticks out. Now tape the flush side withduct or masking tape or make a pocket.Pull the other side in flush with the otherside spar. This will make the kite bowslightly. If it is too long, you may have totrim it. If it is too short, remove it andslide it more toward the tip of the kite.Fasten it with duct or masking tape tomake a pocket.The bow in the kite is giving an optical illusion.The crosspiece is actually only about a third ofthe way down from the nose of the kite.Atlantic Union Conference Teacher Bulletinwww.teacherbulletin.org19
From Kites to SpaceKITE PLANSStep 11: Put the hole in the keel at thepoint of the triangle.GO FLY A KITE !!!(A Delta with a tail)Step 12: Painting or decoratingThis can be an earlier step, before the sparsare put on. DO REMEMBER, it is the sidewith the keel on it (the side without the spars)that will show against the sky. These picturesshow a class painting their kites.Atlantic Union Conference Teacher Bulletinwww.teacherbulletin.org20
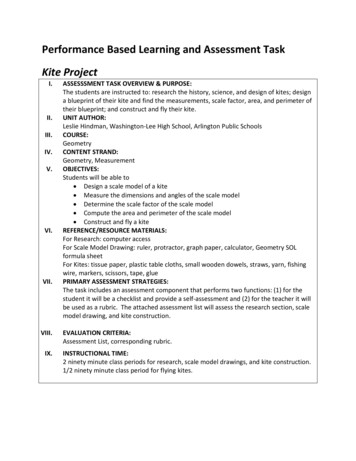
From Kites to SpaceKITE PLANSPERCENTAGE PLAN FOR DELTA KITE66%FOLDSAVE THIS PIECE FORBACKINGSAIL PIECES100%76%CUT ON RED DOTTED LINES10%FOLD LINEKEEL PIECESDISCARDTHESEPIECES27%Atlantic Union Conference Teacher Bulletin24%DISCARD THESEPIECES73%www.teacherbulletin.org21
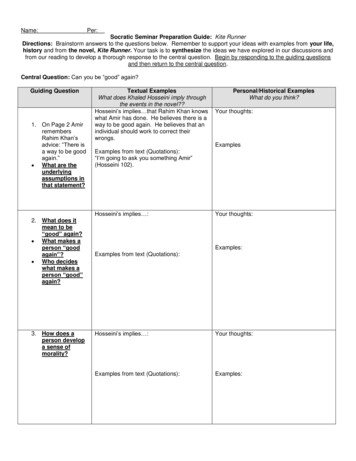
From Kites to SpaceKITE PLANSPERCENTAGE CHARTDelta kites look beautiful against the sky. With the pattern,they can be made any size your material allows. The trick isto get the proportions correct. Start with the 100%measurement to make it easy. Or if you really know yourproportions, choose a height for your kite and put it in the66% box. If h 66%, what is the measurement of 100% ?The kite measurements can be figured using centimeters orinches. To get your measurements use the following chart.Remember that the material gets folded in half.100% 66% h 152% w 76%Example(use inchesor cm.)30Also thefinishedheight ofyour kiteFinished widthof your kite20462327%24% 10%Dimensions ofthe sailmaterialneeded:132% by100%8740 by 303If you wish to make a double-thickness kite sail using the above measurements, you willneed another piece of material that is 20 by 50.Notice on the pattern that the material is a rectangle. That means there are four rightangles. That means you can find the lengths of other sides by using trigonometricfunctions. You can even find the other angles.You can also use the Pythagorean Theorem, a2 b2 c2 to find the length of the othersides.acbAtlantic Union Conference Teacher Bulletinwww.teacherbulletin.org22
From Kites to SpaceKITE PLANSKite Internet ResourcesThere are literally thousands of kite sites on the web. Here are just a few that arelarge and easy sites to navigate.American Kitefliers Association http://www.aka.kite.org/This is the largest association of kiters in the world. Its purpose is toeducate the public in the art, history, technology, and practice ofbuilding and flying kites - to advance the joys and values of kiting in allnations. They are men, women, adults and children, from all walks oflife. Their interests run from kite building to multi-line kitecompetition, from miniature kites, to aerial photography and more. The AKA is anonprofit organization dedicated to educating the public in the art, history, technology,and practice of building and flying kites.ON the site of American Kitefliers Association http://www.aka.kite.org/ , choose theTable of Contents Tab at the top left of the page. Choose “Publications” then “Manuals”.You will find wonderful pdf files that include instructions on kite flying, kite building, andsafety. There is also a great pdf on Kites in the Classroom.The Virtual Kite Zoo http://www.blueskylark.org/zoo/This has a lot of information, and also includes links to many otherpages. Included are links to knot-tying instructions. There aresimple kite plans included, as well as terminology.How to Make and Fly Kiteshttp://www.howtomakeandflykites.com/This is a more advanced kite site. There are some very interestingkite plans here.Canadian Science Projects http://www.hilaroad.com/camp/projects.htmlUnder “Engineering” you will find a kite project. But all the rest of the projects aregreat, too. There are videos included with these.'No Sticks' sled from a Kinko's Bag: http://members.cox.net/gengvall/k sled.htmlDave Ellis' great Sled Kite Page: http://kckiteclub.org/DaveEllis/sledkite.htmBasic Sled: http://www.ex.ac.uk/ jastaple/kites/projects/sled/sled.htmlAtlantic Union Conference Teacher Bulletinwww.teacherbulletin.org23
From Kites to SpaceKITE PLANSKite Video ClipsHow To Make A Each of the kites in this file has a short accompanying moviemaker file. Look for them onthe Teacher Bulletin site, www.teacherbulletin.orgPrism Kites Videos http://prismkites.com/videos.htmlPrism Kites sells kites. But they also have these fabulous kite videos that take only a fewseconds to download. They make a nice introduction to a kite making class.A Wind of Change Videoshttp://www.awindofchange.com/photo.htmlThis is also a commercial site. It includes some great videos of people water boardingwhile being towed by kites.MetaCafe: The Most Fun Kite for Under 5http://www.metacafe.com/watch/792355/most fun kite for under 5/MetaCafe has quite a few short videos on kites. This one shows a person making andsailing a kite in fast-forward.Atlantic Union Conference Teacher Bulletinwww.teacherbulletin.org24
Kite material: plastic bags, Tyvek, or newspaper String . From Kites to Space KITE PLANS Atlantic Union Conference Teacher Bulletin www.teacherbulletin.org 11 Step 1: Decide the size of the kite Decide what height you would like to have your kite. This sample