Transcription
WEIGHTLIFTING TRAINING GUIDECopyright 2015 CrossFit, Inc. All Rights Reserved. CrossFit is a registered trademark of CrossFit, Inc.All content herein is Copyright CrossFit, Inc. No content, in part or in whole, may be reproduced without prior written consent from CrossFit, Inc.V6.20150522.KW
Weightlifting Training Guide TABLE OF CONTENTSCOURSE OVERVIEW. . . . . . . . . . . . . . . . . . . . . . . . . . . . . . . . . . . . . . . . . . . . . . . . . . . . . . . . . . 3DETAILED COURSE CURRICULUM. . . . . . . . . . . . . . . . . . . . . . . . . . . . . . . . . . . . . . . 16CONTACT INFORMATION . . . . . . . . . . . . . . . . . . . . . . . . . . . . . . . . . . . . . . . . . . . . . . . . . 33ADDENDUM . . . . . . . . . . . . . . . . . . . . . . . . . . . . . . . . . . . . . . . . . . . . . . . . . . . . . . . . . . . . . . . . 352 of 43Copyright 2015 CrossFit, Inc. All Rights Reserved.V6.20150522.KW
Weightlifting Training Guide COURSE OVERVIEW3 of 43Copyright 2015 CrossFit, Inc. All Rights Reserved.V6.20150522.KW
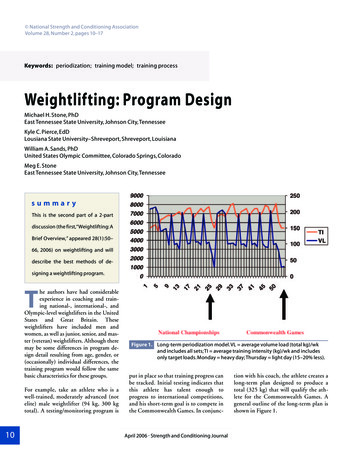
Weightlifting Training Guide COURSE OVERVIEWGOAL OF THE COURSE:To teach the snatch and clean and jerk safely, efficiently and effectively.DAY 1: SNATCHFundamentals of teaching the snatch:§§ STANCE§§ GRIP§§ POSITIONFigure 1.The snatch is jumping the barbell through a range of motion and receiving it in an overhead squat.If you can jump, you can snatch.Remember this weekend, it all comes back to the jump. The jump creates speed throughthe middle, and it all starts with the feet (stance).4 of 43Copyright 2015 CrossFit, Inc. All Rights Reserved.V6.20150522.KW
Weightlifting Training Guide COURSE OVERVIEW1.STANCEStance is critical! 90% of all missed lifts are missed because of footwork.STANCE:Figure 2.Figure 3.JUMPING (PULL/PRESS/JERK) POSITION (FIGURE 2):Feet are under hips (stance you would assume prior to a vertical jump). Everyone will behip width initially; adjustments can be made on an individual basis.LANDING (RECEIVE/SQUAT) POSITION (FIGURE 3):Feet are shoulder width apart, toes turned out slightly while cork-screwing the knees(weight is on the heels. Torso is upright (no hinge at the hip) and back is slightly arched.Turn knees out and track in the same direction as the toes.Stance drills:1. Walk feet from jumping to landing position.2. Jump feet from jumping to landing position.3. Jump feet to landing position while increasing the depth of the squat (2”, 4”, 6”,full squat).COACHING POINTS:§§ Feet move for speed and stability!§§ In each drill, torso should be upright (no hinge at the hip) and weight is distributedon the back half of your feet.§§ No donkey kicks. Jump hard, not high.§§ You must be consistent with getting your feet where they need to be and hittingthe proper positions every time.5 of 43Copyright 2015 CrossFit, Inc. All Rights Reserved.V6.20150522.KW
Weightlifting Training Guide COURSE OVERVIEW2.GRIPHOOK GRIP: FINGERS AROUND THE THUMB (FIGURE 4):1. Always use the hook grip!2. It is not a death grip on the barbell (that will slow down the barbell and lead toarm pulling).3. Width: barbell should be 8” – 12” (20–30cm) above the head.Figure 4.3.POSITION: BARBELL POSITION OVERHEAD AND ACTIVESHOULDERSMETHODS FOR DETERMINING CORRECT OVERHEAD POSITION:1. Eyeball methodGreat method for large groups: athletes put barbell overhead; coach looks to seethe barbell is 8”–12” above the athlete’s head. Move hands out to lower barbell;move hands in to raise barbell.2. Hip crease methodHave athletes stand with PVC pipe at their hip and hands in a snatch grip.Athletes should raise one leg, and the PVC pipe should rest in their hip creasewithout rising up. If the barbell rises, the hands are too narrow to start. If thebarbell misses the hip crease all together, hands are too wide to start. Place thebarbell overhead, and coach looks to see the barbell is 8”– 12” above the head.3. Scarecrow methodThis method works best for small groups or individual basis. Have athlete turnback to coach and stand with elbows high and outside (elbows raised aboveshoulders, forearms and hands pointed down to the ground). Coach standsbehind the athlete, holding a PVC pipe across the athlete’s back, and places hishands on the PVC pipe in the same spot where the athlete’s hands are hanging.The athlete then turns around and places his hands outside of the coach’s hands.The athlete then lifts the barbell overhead, and coach checks to see that thebarbell is 8”–12” above the head.6 of 43Copyright 2015 CrossFit, Inc. All Rights Reserved.V6.20150522.KW
Weightlifting Training Guide COURSE OVERVIEWCOACHING POINTS:§§ Barbell should be centered over the body. From a side view, you should be able todraw a plumb line from the end of the barbell down through the shoulders, hips,knees, and ankles (the barbell is not too far forward or too far back).§§ Shoulders are “active”. Cue: “SHOW ME YOUR ARMPITS!” (shoulders are externallyrotated and armpits are facing forward, not down – Figures 5–7). Watch this videofrom Kelly Starrett on “ACTIVE SHOULDERS”.§§ For beginners, err on the side of hands being too narrow to avoid wrist pain.§§ Wrists should be neutral overhead (not cocked backward or too far forward),palms turned slightly up.§§ Can flip thumbs out at the top.Figure 6.Figure 5.Figure 7.7 of 43Copyright 2015 CrossFit, Inc. All Rights Reserved.V6.20150522.KW
Weightlifting Training Guide COURSE OVERVIEW4.POSITION:COACHING POINT:With each position, it is important to emphasize why we do each movement and expectfocused, deliberate practice (perfect practice makes perfect!).BURGENER WARM-UP:1. Down and “Finish”: speed through the middle2. Elbows High and Outside: keep the barbell close3. Muscle Snatch: strong turnover4. Snatch Lands at 2”, 4”, 6”: footwork5. Snatch Drops: footwork, speed, strength in bottom of snatchCOACHING POINT:Look for vertical hip drive, not horizontal hip drive, so that the barbell will stay back in theleast line of resistance (Russian/Polish method). The path of the barbell will be back intothe hips with a light brush of the hips.Correcting issues with the Burgener Warm-upSKILL TRANSFER EXERCISES:1. Snatch Push Press: overhead strength2. Overhead Squat: core strength3. Heaving Snatch Balance: speed of arms4. Snatch Balance without a dip*: foot/arm speed5. Snatch Balance with a dip: foot/arm speed*Commonly referred to as “Drop Snatch” (see note on page 22). Watch Milko Tokolaperform snatch drop snatch:Look for speed through the middle and junkyard dog attitude!(NOTE: If you have an athlete with mobility issues in the bottom position of the squat(i.e. cannot keep torso erect in the bottom position), consider a split snatch. See specificcoaching cues/instructions on page 23).8 of 43Copyright 2015 CrossFit, Inc. All Rights Reserved.V6.20150522.KW
Weightlifting Training Guide COURSE OVERVIEWCOACHING POINT:It is important to understand that as the barbell travels up, you press your body downunder the barbell. Much like a teeter-totter (Figures 8–11)—when one side comes up, theother side presses down to the ground.Figure 8.Figure 9.Figure 10.Figure 11.In Figure 9, look at his hair: his hair is flying up, which means he is pulling his body downunder the barbell.Watch this video of the 2009 World Championships: it shows the change in direction fromelevating the barbell up to pulling down underneath the barbell.5.POSITION: HIGH HANG SNATCHThere are three positions we will snatch from: high hang, launch and floor.EVERYONE CAN SNATCH FORM THE HIGH HANG!§§ High hang is nothing more than “Down and Finish” and receiving the barbell in anoverhead squat.§§ High hang is a great position to learn from, and should problems occur, it is a greatplace to go back to and snatch from.§§ Do high hang snatch and receive in a 2” squat, hold and ride down; recover. Do9 of 43Copyright 2015 CrossFit, Inc. All Rights Reserved.V6.20150522.KW
Weightlifting Training Guide COURSE OVERVIEWa high hang snatch and receive in a 4” squat (hold and ride down); recover andrepeat, landing in a 6” squat (hold and ride down). Make sure feet hit landingposition!6.POSITION: LAUNCHLAUNCH – 1” ABOVE THE KNEE (FIGURES 12–13)The launch position is the jump sequence from 1” above the knee to the high hang. Thelaunch position is crucial as it is the point where the hamstrings are stretched to allowfor explosion! The key is to stay back. If one stays back while pulling off the ground andstretches the hamstrings, the barbell will automatically hit the high hang and finish!Reference: click on “sportivny” and go to the article: Key Muscles for Weightlifting.Natalie at Mike’s Gym (Figures 12–13)Figure 12.Figure 13.Breakdown of the launch position.It is important to understand the barbell will attempt to pull the lifter forward. The lifterhas to stay back and counterbalance the weight of the barbell. The lifter must learn tostay over the barbell and be patient by using the legs (not the back) to reach the launchposition, and only then stand with the legs to engage the hamstrings and finish!10 of 43Copyright 2015 CrossFit, Inc. All Rights Reserved.V6.20150522.KW
Weightlifting Training Guide COURSE OVERVIEW7.POSITION: FLOOR/STARTING POSITIONFLOOR/STARTING POSITION (ADDRESSING THE BARBELL; FIGURE 14):1. Shoulders are over or slightly in front of the barbell2. Head is neutral3. Back is slightly arched and tight4. Hips are slightly higher than the knees5. The distribution of weight is over the center of the foot or slightly forwardCOACHING POINTS:§§ It is important to hammer in the details here! You cannot start in a weak positionand end in a strong position. In order to finish strong, you must start strong.§§ When lifting the barbell from the ground, the weight is initially in the center of thefoot. As the barbell is raised, the path of the barbell is back into the hips and theweight is transferred to the heels.§§ Back angle does not change from the ground to the launch position (hips andback rise together).§§ With beginner lifters, always use a static start position.WORK EACH POSITION (EMPHASIS ON EACH POSITION IS FINISH!)1. Liftoff2. Liftoff to Launch to Finish3. Liftoff to Launch to SnatchBack is straight orslightly arched.Head neutral orslightly tilted up.Hips are slightlyhigher than knees.Shoulders are over orslightly in front of bar.The distribution of weight isover the center of the foot.Figure 14.E N D DAY 111 of 43Copyright 2015 CrossFit, Inc. All Rights Reserved.V6.20150522.KW
Weightlifting Training Guide COURSE OVERVIEWDAY 2: CLEAN AND JERKGOAL OF THE COURSE:To teach the snatch and clean and jerk safely, efficiently and effectively.BURGENER WARM-UP:1. Down and “Finish”: speed through the middle2. Elbows High and Outside: keep the barbell close3. Muscle Snatch: quick turnover4. Snatch Lands at 2”, 4”, 6”: footwork5. Snatch Drops: footwork, speed, strength in bottom of snatchSKILL TRANSFER EXERCISES:1. Snatch Push Press: overhead strength2. Overhead Squat: core strength3. Heaving Snatch Balance: speed of arms4. Snatch Balance without a dip*: foot/arm speed5. Snatch Balance with a dip: foot/arm speed*Commonly referred to as “Drop Snatch” (see note on page 22).Figure 15.12 of 43Copyright 2015 CrossFit, Inc. All Rights Reserved.V6.20150522.KW
Weightlifting Training Guide COURSE OVERVIEW1.THE CLEANTeaching the clean is simple because everything you learned for the snatch applies to theclean. Stance, grip, and position of the clean are very similar to the snatch.FRONT SQUAT: The front squat rack position is the same receiving position as in a clean.1. Front Squats without hands on barbell (Figure 16) Arms extended straight out,barbell rests on front rack position.Figure 16.2. Front Squats with hands on barbellTo grip the barbell, place thumbs at edge of knurling and move hands abouta thumb and half away from the edge of knurling. Elbows lead up out of thebottom of the squat.3. Pause Front SquatsHold lifter in bottom of squat, count 1001, 1002, and then drive up with elbows.4. 1 and 1/4 Front SquatsComplete one full front squat, come up out of the hole a quarter of a squat,go back down in the hole, and drive up all the way to the top. A person withinflamed knees would not be a candidate for 1 and ¼ squats. Also, note 1 and ¼front squat max should be what one can clean.5. In the hole Front SquatsStarts in the bottom of the squat. Set rack to hold the barbell at the height of thebottom of the squat in order for the lifter to get under it. Lifter gets under barbelland drives up from bottom of squat. The third rep is an eccentric rep: 10 secondtempo down to the hole, drive up.13 of 43Copyright 2015 CrossFit, Inc. All Rights Reserved.V6.20150522.KW
Weightlifting Training Guide COURSE OVERVIEWFrom here, athletes drill high hang clean and launch clean, working on theadjustment from front squat to press/jerk. With the barbell on the front rack,rotate elbows down, but remain forward of the barbell, to create a shelf (Figure18). From here, drive the barbell up for a press or jerk.Figure 17.Positions are the same for front squat to press, front squat to push press, frontsquat to push jerk and front squat to jerk.CLEAN:Stance: Jumping positionGrip: Hands are a thumb knuckle from edge of knurlingPositions: High Hang – Launch – Floor14 of 43Copyright 2015 CrossFit, Inc. All Rights Reserved.V6.20150522.KW
Weightlifting Training Guide COURSE OVERVIEW2.THE JERKSKILL TRANSFER EXERCISES – JERK:1. Push Press behind the neck (start from behind neck to teach straight line dip anddrive keeping face out of the way).2. Push Jerk behind the neck3. Push Press4. Push Jerk5. Jerk behind the neck6. JerkPROGRESSION FOR TEACHING THE JERK:(For specific instructions on how to mark the feet for the Jerk, go to page 30.)1. Sta
Drill: 1. Down Finish 2. Down Finish Overhead Squat (High hang snatch), (Position 1 of 3-position snatch) Do high hang snatch and receive at 2” (hold then ride down to full squat for all reps) for a few