Transcription
B A S I C G U I D E T O D E N TA LINSTRUMENTSCarmen SchellerC.D.A., R.D.N., Dip. Ad. Ed., PG Cert ODEDental Nurse TutorDublin Dental School and HospitalRepublic of Ireland
2006 by Blackwell Publishing LtdBlackwell Munksgaard, a Blackwell Publishing CompanyEditorial Offices:Blackwell Publishing Ltd, 9600 Garsington Road, Oxford OX4 2DQ, UKTel: 44 (0)1865 776868Blackwell Publishing Professional, 2121 State Avenue, Ames, Iowa 50014-8300, USATel: 1 515 292 0140Blackwell Publishing Asia, 550 Swanston Street, Carlton, Victoria 3053, AustraliaTel: 61 (0)3 8359 1011The right of the Author to be identified as the Author of this Work has been asserted inaccordance with the Copyright, Designs and Patents Act 1988.All rights reserved. No part of this publication may be reproduced, stored in a retrieval system,or transmitted, in any form or by any means, electronic, mechanical, photocopying, recordingor otherwise, except as permitted by the UK Copyright, Designs and Patents Act 1988,without the prior permission of the publisher.The author has no financial interests and no formal links with any of the companies whoseproducts are referred to in this book.First published 2006 by Blackwell MunksgaardISBN-10: 1-4051-3379-1ISBN-13: 978-1-4051-3379-1Library of Congress Cataloging-in-Publication DataScheller, Carmen.Basic guide to dental instruments / Carmen Scheller.p. ; cm.Includes index.ISBN-13: 978-1-4051-3379-1 (pbk. : alk. paper)ISBN-10: 1-4051-3379-1 (pbk. : alk. paper)1. Dental instruments and apparatus – Handbooks, manuals, etc. I. Title.[DNLM: 1. Dental Instruments – Handbooks. WU 49 S322b 2006]RK681.S33 2006617.6′0028 – dc222005029604A catalogue record for this title is available from the British LibrarySet in 9 on 11.5pt Sabonby SNP Best-set Typesetter Ltd., Hong KongPrinted and bound in Singaporeby COS Printers Pte LtdThe publisher’s policy is to use permanent paper from mills that operate a sustainable forestrypolicy, and which has been manufactured from pulp processed using acid-free and elementarychlorine-free practices. Furthermore, the publisher ensures that the text paper and cover boardused have met acceptable environmental accreditation standards.For further information on Blackwell Publishing, visit our website:www.blackwellmunksgaard.com
CONTENTSDedicationAcknowledgementsHow to Use This BookivvviSection 1:Infection Control in the Dental Surgery1Section 2:Dental Radiography15Section 3:Basic Instruments31Section 4:Instruments and Sundries Used in Moisture Control39Section 5:Local Anaesthesia47Section 6:Instruments Used for Rubber Dam Placement57Section 7:Handpieces, Burs and Rotary Attachments65Section 8:Instruments Used in Basic Restorative Procedures83Section 9:Matrix Bands and Matrix Retainers111Section 10:Instruments Used in Endodontic Treatment125Section 11:Elevators143Section 12:Extraction Forceps149Section 13:Surgical Instruments161Section 14:Measuring Devices189Section 15:Impression Trays195Section 16:Orthodontic Instruments201Section 17:Instruments Used in Periodontal Procedures235Section 18:Instruments Used in Removable and Fixed Prosthodontics251AppendixIndex269271
To my family, Mom, Dad and Clayton, for giving me the strength to follow mydreams, and to Padraig for being a big part of that dream.
ACKNOWLEDGEMENTSI would like to thank the many people who helped with the development of this instrument guide: Margaret Crosswaite, Tina Gorman, Helen Phipps, Joan Brennan, JoyMarkey and Ann Bradley for the constant guidance, encouragement and advice; Dr.Michael O’Sullivan, Dr. Frank Quinn, Dr. Therese Garvey, Dr. Johanna Glennon andDr. Maria Jennings for their advice, encouragement and editing of relevant chapters;Catherine Waldron and Anne O’Byrne for their assistance; Dr. Barry Harrington, whohelped me at the early stages of this project; Professor David Coleman, who suppliedthe photography equipment needed to take some of the photos; the staff at the CentralSterile Services Department (Dublin Dental School and Hospital) who were alwayshelpful in finding the ‘best’ instruments for photography purposes; and Dr. FrankQuinn who supplied some excellent clinical photographs.Thank you to the following companies and people who supplied photographs:American Eagle Instruments Inc.DENTSPLY Ash InstrumentsDynaflexGarrison Dental SolutionsHenry Schein IrelandHu-FriedyJ. Morita Europe GMBHKerrKodakLaerdal Medical LtdLearning and Teaching ScotlandLM – Instruments OyL&R ManufacturingDr. Anthony MaganziniMiltexOrmco EuropeOwandy Dental ImagingPremier Dental Products CompanyDr. Frank QuinnRoydent Dental ProductsSDISeptodontSirona Dental SystemsSybron EndoTotal CareUltrasonicsW&H (UK) LTDYoung Dental
HOW TO USE THIS BOOKAs the dental profession evolves, there is an increasing demand for supplementary material that can keep up with advancing trends. ‘Hands on’ practical experience is essential for anyone in the dental profession, and this needs to be supplemented with writteninformation to reinforce our practical experiences.This illustrated manual has been prepared for students working and studying in thedental profession. It may be used as a study aid or kept in the dental surgery as a reference guide. This manual is intended to complement other methods of learning, i.e.textbooks, lecture notes etc., and is not meant to be a comprehensive resource. The100 items used in the National Examining Board for Dental Nurses in the UnitedKingdom are included in this book, and the current (at time of publishing) ‘spotter’items list is included in the Appendix.Because many dental instruments look similar, and can be confusing to a student,the ‘false friends’ sub-sections identify instruments that may resemble the particularinstrument. This manual is not intended to be a complete representation of all dentalinstruments, but it does include examples from each dental discipline. As many dentalinstruments are multi-functional and are referred to by more than one name, wherepossible, these are given beside the name of the instrument. Complete set-ups havebeen included at the end of most sections for various procedures. The dental professional may have to modify these lists, depending on operator preference.Each section is dedicated to a specific discipline or division of dentistry. Some instruments feature in many sections, and these have been included in the set-up subsections of the relevant sections. Infection control is a fundamental requirement inthe dental surgery, and as such the first section is dedicated to this area. This sectionaims to introduce the principles of health and safety, which must always be at the forefront of a dental professional’s mind. Contact the legislative bodies for appropriateregulations and legislation relevant to your workplace.The instruments in this guide are not to scale, and during photography some coloursmay have been altered.
SECTION 1INFECTION CONTROL INT H E D E N TA L S U R G E R YIt is the responsibility of the dental team to ensure that the appropriate and correct procedures are carried out in relation to infection control to protect the patients, the publicand themselves.
Basic Guide to Dental InstrumentsINFECTION CONTROL INTHE DENTAL SURGERY2(a)(b)Figure 1.1(c)
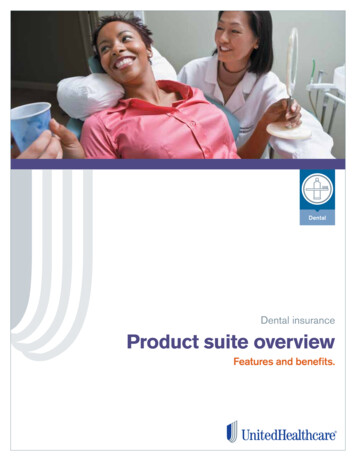
Infection Control in the Dental Surgery3FIGURE 1.1 a, b, cName(a) Mask (b) Safety glasses (c) Face shieldsFunction, precautions and directions for use To protect the dental team from micro-organisms, debris, splatter and chemicals A mask is worn to protect the mucous membranes of the nose and mouth. It filtersout small particlesⴰ Should always be changed between each patient or before if it is visibly soiledⴰ Should be worn during patient care, sterilisation, disinfection, cleaning proceduresand during laboratory work Safety glasses and/or face shields are worn to protect the mucous membranes of theeyesⴰ Should be disinfected between patientsⴰ A face shield can be used instead of safety glasses, but a mask must still be wornⴰ Should be large enough to cover the eye area completely and provide protectionfrom the top and side. With some safety glasses additional top and side shieldshave to be added to be used for this purposeⴰ Safety glasses are available to fit over prescription eye wearⴰ Must be shatterproofVarietiesDifferent types of masks and glasses availableINFECTION CONTROL INTHE DENTAL SURGERYPROTECTIVE WEAR
Basic Guide to Dental InstrumentsINFECTION CONTROL INTHE DENTAL SURGERY4Figure 1.2(b)(a)Figure 1.3
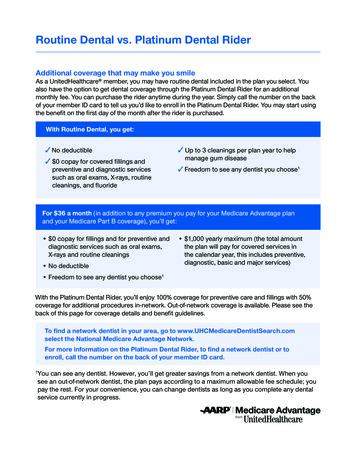
Infection Control in the Dental Surgery5NameProtective glovesFunction and directions for use To protect the dental team from direct contact with micro-organisms, debris,splatter and chemicals Worn during patient care when coming in contact with contaminated objectsand chemicals, and when working intra-orally Always change between patients Do not wash gloves Replace damaged and ripped gloves immediately Always wash and dry hands thoroughly prior to donning gloves It is important to make sure gloves fit properlyVarieties Made from many different materials, i.e. latex, vinyl, nitrile. Available packaged as sterile surgical gloves Rubber utility gloves/heavy duty gloves are used during sterilisation proceduresWORK SURFACESFIGURE 1.3 a, bNameNon-permeable barriersFunction and features Used to cover surfaces to prevent contamination Must be impermeable Single use; to be disposed of in the contaminated wasteVarietiesMany different types and sizes availableINFECTION CONTROL INTHE DENTAL SURGERYFIGURE 1.2
Basic Guide to Dental InstrumentsINFECTION CONTROL INTHE DENTAL SURGERY6Figure 1.4(a)(b)Figure 1.5
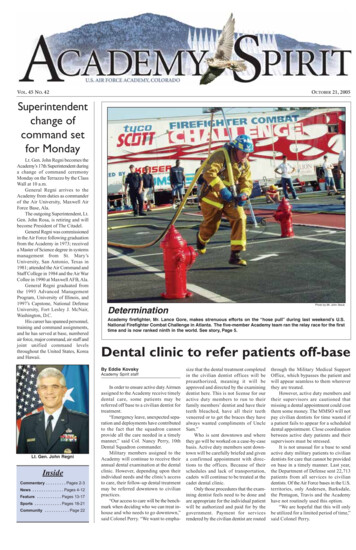
Infection Control in the Dental Surgery7INFECTION CONTROL INTHE DENTAL SURGERYITEMS USED FOR IDENTIFICATION AND ORGANISATIONDURING STERILISATIONFIGURE 1.4NameColoured identification ringsFunction and feature Used to organise and identify instruments AutoclavableVarieties Many different types and sizes available Coloured autoclavable tape can also be usedFIGURE 1.5 a, b, cNameInstrument cassettesFunction(s) Used to organise and identify instruments during sterilisation and disinfection Can double as an instrument tray during proceduresVarietiesMany different types and sizes available; including plastic and metal types(c)Figure 1.5 (Continued)
Basic Guide to Dental InstrumentsINFECTION CONTROL INTHE DENTAL SURGERY8Figure 1.6(b)(a)Figure 1.7Figure 1.8
Infection Control in the Dental Surgery9NameAutoclave tapeFunction and features Used to secure instrument wrap or pouches prior to sterilisation Will change colour once exposed to a certain temperature, but this does not indicate whether sterilisation has occurred Can be written on to indicate the contents of the packageVarietiesMany different types and sizes availableFIGURE 1.7 a, bNameSterilisation pouchFunctions and features Used to wrap instruments prior to sterilisation Aids in organisation of instruments One side may be transparent to allow for viewing of the pouch contents (Figure 1.7 a, b) Coloured markings indicate that a certain temperature has been reached during thesterilisation cycle Instruments will remain sterile in pouch until it is punctured or openedVarietiesMany different types and sizes availableSTERILISATION EQUIPMENTFIGURE 1.8NameAutoclaveFunction and directions for use Uses steam under high pressure to achieve sterilisation Follow manufacturer’s directions for use Consult local legislation and guidelines in regards to appropriate sterilisationproceduresVarietiesMany different types and sizes availableINFECTION CONTROL INTHE DENTAL SURGERYFIGURE 1.6
Basic Guide to Dental InstrumentsINFECTION CONTROL INTHE DENTAL SURGERY10Figure 1.9(a)(b)Figure 1.10
Infection Control in the Dental Surgery11FIGURE 1.9NameBottle brushesFunctions, features and precautions Manual cleaning is never recommended except when ultrasonic cleaning is noteffective in removing debris Used along with a soapy cleaner to remove debris prior to sterilisation Allows cleaning inside suction tubes Long handle allows a greater distance between the operator and the contaminatedobject Should always be used submersed in water to reduce splatter Always wear heavy duty utility gloves while using bottle brushesVarietiesMany different types and sizes availableFIGURE 1.10 a, bNameBur brushesFunction and precautions Manual cleaning is only recommended when ultrasonic cleaning is not effective inremoving debris Used along with cleaner to remove debris prior to sterilisation Allows for the cleaning of burs with small, hard-to-clean flutes Always wear rubber utility gloves/heavy duty gloves while using bur brushesVarietiesMany different types and sizes availableINFECTION CONTROL INTHE DENTAL SURGERYMANUAL CLEANING AIDS
INFECTION CONTROL INTHE DENTAL SURGERY12Figure 1.11Figure 1.12Basic Guide to Dental Instruments
Infection Control in the Dental Surgery13NameUltrasonic cleanerFunction(s) and directions for use Used along with a soapy cleaner Uses sound waves to reduce bioburden and debris from instruments prior tosterilisation Follow manufacturer’s instructions for solution types and length of time needed forcleaningVarietiesMany different types and sizes availableFIGURE 1.12NameAssistinaFunction(s) and directions for use Uses air to run cleaning fluid solution and oil through handpieces Used to expel debris from handpieces Plastic cover over handpiece attachment is used to reduce aerosol Follow manufacturer’s instructions for useVarietiesMany different types availableINFECTION CONTROL INTHE DENTAL SURGERYFIGURE 1.11
SECTION 2D E N TA L R A D I O G R A P H YRadiographs are important tools in the diagnosing of dental disease. There are manytypes of radiographs available, all of which are used for different purposes. There aretwo main types of dental radiographic films: intra-oral and extra-oral.
DENTAL RADIOGRAPHY16Basic Guide to Dental InstrumentsFigure 2.1Front view of radiograph packetsOcclusal filmpacketFigure 2.2Periapical filmpackets
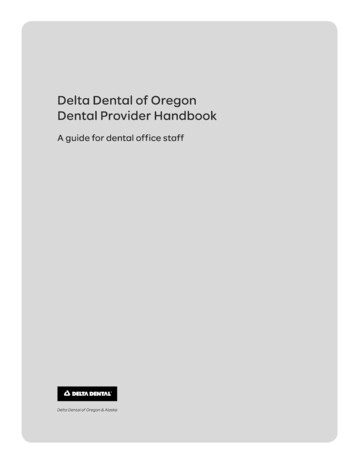
Dental Radiography17INTRA-ORAL RADIOGRAPHS A detailed radiograph film, which is exposed while in the patient’s mouth Used in conjunction with a film holder for accurate placement Some films may be covered in a clear plastic sleeve for infection control purposes(see Figure 2.2) Every film has a bump to assist in film orientation The bump always faces towards the X-ray tube Inside the film packet:ⴰ Black paper on either side of film to protect film from light (see Figure 2.1)ⴰ On the back of the film there is a thin sheet of lead foil to absorb stray/scatter radiationFIGURE 2.3NameOcclusal radiographTypeIntra-oral radiographFunctions Provides an image of the maxillary or mandibular arch Used to check eruption of teeth, to locate foreign objects, jaw fractures and supernumerary teeth, and to detect hard and soft tissue abnormalitiesFigure 2.3DENTAL RADIOGRAPHYFIGURES 2.1; 2.2
DENTAL RADIOGRAPHY18Figure 2.4Figure 2.5Basic Guide to Dental Instruments
Dental Radiography19NamePeri-apical radiographTypeIntra-oral radiographFunctions Provides an image of the entire tooth (crown to root and supporting structures) A detailed image of two to four teeth may be obtained on one radiograph Used to show apical infections, retained roots, morphology of roots, length of rootcanal, post-trauma, apical cysts, and evaluation of implants, lesions and periodontal statusVarieties Different sizes of films are available depending on the patient’s mouth size and tolerance level The same size of radiographic film can be used for bite-wing radiographsFIGURE 2.5NameBite-wing radiographTypeIntra-oral radiographFunctions Provides an image of the crowns of the premolars and molars on either the right orthe left side Used to detect interproximal caries, recurrent caries and to check bone levelsVarieties The same size of radiographic film can be used for peri-apical radiographs Can have vertical and horizontal bite-wing radiographsDENTAL RADIOGRAPHYFIGURE 2.4
DENTAL RADIOGRAPHY20Basic Guide to Dental InstrumentsCassette for an extra-oral filmFigure 2.6Figure 2.7Figure 2.8
Dental Radiography21EXTRA-ORAL RADIOGRAPHS Are exposed outside the patient’s mouth Panoramic radiograph film is placed within the cassette, then on the panoramicX-ray machine Will show a full view of the maxillary and mandibular dental arches, but with lessdetail than an intra-oral radiograph The film is protected from light in the cassette, which is held between two intensifying screens (see Figure 2.6) This type of film needs a special machine for exposureFIGURE 2.7NamePanoramic radiograph/OPG (Orthopantomograph)TypeExtra-oral radiographFunctions Provides an image of all the teeth in both the maxillary and mandibular arches andsupporting structures Used to view the periodontium, bone levels, pathology, temporomandibular joints,sinuses, impacted teeth, position of dental nerves, eruption patterns, orientation ofthird molars, retained roots, fractures, cysts and restorationsFIGURE 2.8NameCephalometric radiographTypeExtra-oral radiographFunctions Provides an image of the skull – mostly used in orthodontic assessments and oralsurgery Allows the operator to take measurements of the skull Used to monitor treatment progression and to detect fracturesDENTAL RADIOGRAPHYFIGURE 2.6
22Basic Guide to Dental InstrumentsDENTAL RADIOGRAPHYEndodonticradiographXCP holderPosteriorperi-apicalXCP holderFigure 2.9Figure 2.10Posteriorperi-apicalXCP holderAnteriorperi-apicalXCP holderBite-wingXCP holder
Dental Radiography23RADIOGRAPHIC ACCESSORIES AND EQUIPMENTNameExtension cone paralleling (XCP) film holdersFunctions To aid in film placement for intra-oral radiographs The holders shown in Figure 2.9 are for use with digital radiography; the holdersfor ordinary radiographic films are similar These XCP film holders are used with the paralleling technique A film holder helps to take the most accurate radiograph possible, reducing radiation exposure through retakesNote: It is the duty of the dental team to minimise the amount of radiation exposureto the patientVarieties Different film holders are available depending on the type of radiograph indicatedand operator preference (e.g. styrofoam bite block, digital radiograph holders, SnapA-Ray instrument) Check legislation and local rules in your area to identify which film holders areacceptableFIGURE 2.10NameX-ray viewerFunction and labelling of films Used with a light source to view patient radiographs All radiographs must be placed in film mounts and labelled with the patient’s name,date, operator’s name and chart number (if applicable)VarietiesMany varieties of X-ray viewers and film mounts are available from differentmanufacturersDENTAL RADIOGRAPHYFIGURE 2.9
DENTAL RADIOGRAPHY24Basic Guide to Dental Instruments(a)(b)Figure 2.11(b)(a)Figure 2.12
Dental Radiography25NameDigital radiography aids (a) Sensor in an XCP film holder (b) Barrier wrapped aroundsensor and XCP film holderFunctions A way to produce a filmless radiographic image A sensor is used instead of a film As sensors cannot be sterilised, a non-permeable barrier must be placed over thesensor and XCP film holder (see Figure 2.11b and Section 1)The digital radiographical image is viewed on a computer screen and stored in thecomputer. It is easily retrieved.VarietiesThere are many manufacturers of digital radiography equipmentFIGURE 2.12 a, bName(a) Intra-oral X-ray machine (b) Extra-oral X-ray machineFunctions Intra-oral X-ray machines are used for exposing occlusal, peri-apical and bite-wingradiographs Extra-oral X-ray machines are used for exposing panoramic/OPG radiographs andcephalometric radiographsVarietiesMachines from different manufacturers may vary in designDENTAL RADIOGRAPHYFIGURE 2.11 a, b
Basic Guide to Dental InstrumentsDENTAL RADIOGRAPHY26Figure 2.13Film holder and X-ray tube placed in position to expose ananterior peri-apical radiographX-ray unit tube headXCP film holderThyroid collarLead apronFigure 2.14
Dental Radiography27NameAutomatic processorFunction and precautions Film processing includes the steps taken to make a latent (non-visible) image visible The automatic processor shields the radiograph from light, which can cause artefacts and adversely affect processing while the rollers carry the film through thesolutions and the dryer Developer and fixer chemicals are contained within the automatic processor andshould be handled wearing protective equipment Follow the manufacturer’s instructions for use of the processor Dispose of chemicals according to your local health and safety guidelinesVarieties Radiographs are transported through the processor usually by rollers or conveyors Radiographs can be processed by the manual method!The following items relate to health and safety in radiography. Checklocal legislation and guidelines in your area, as these differ betweencountries.FIGURE 2.14NameLead apron and thyroid collarFunction and precautions A lead apron and thyroid collar must be used to protect the patient from radiationduring X-ray procedures The lead apron is used with a thyroid collar that must cover the radio-sensitivetissues (from the thyroid downwards and including the lap area) The lead apron must be hung up, not folded because folding the apron will causethe lead inside to crack, causing radiation to pass throughVarietiesDifferent styles available from various manufacturersDENTAL RADIOGRAPHYFIGURE 2.13
DENTAL RADIOGRAPHY28Figure 2.15Basic Guide to Dental Instruments
Dental Radiography29NameDosimeter/radiation monitoring badgeFunction and directions for use Used to measure level of radiation received by an individual Monitored by local radiological board Aids in quality assurance process by monitoring safety of X-ray units Badge needs to be worn around the hip area and sent back to the radiological boardto read dosage levels Each individual should be allocated their own dosimeter/radiation monitoringbadge, as each individual needs to know their own dosage levelDENTAL RADIOGRAPHYFIGURE 2.15
SECTION 3BASIC INSTRUMENTSThere are a few basic instruments that are universal to almost every procedure indentistry.
32Basic Guide to Dental InstrumentsHand InstrumentsBASIC Figure 3.2Figure 3.1
Basic Instruments33GENERAL FEATURES OF DENTAL INSTRUMENTSWorking end(s) of instr uments Are the functional parts of the instrument Can have a variety of functions including: cutting, packing, carving, placing andcondensing Are adapted to the function of the particular instrument May be bevelled (i.e. the working end is cut at an angle) An instrument can be single-ended (one working end) or double-ended (two workingends)Shank of an instr ument The part between the working end and the handle Can be straight or angled The function of the instrument determines the angle and flexibility of the shankHandle of an instr ument Is the part of the instrument that the operator grasps Provides stability and leverage Design is related to the function of the instrument Examples:ⴰ The handle of an upper extraction forceps may be curved to facilitate a palm graspfor the operatorⴰ The handle of a rubber dam clamp forceps is rounded to fit in the palm of theoperator’s handⴰ A serrated handle allows a better gripⴰ A large handle allows a palm graspTHE BASIC DENTAL INSTRUMENTSFIGURE 3.2NameMouth mirror and handleFunctions To provide indirect vision To reflect light For retraction and protection of oral tissues For magnification (the number of the mirror represents size of mirror head)Varieties Single-sided or double-sided Can be disposable Plain or magnifyingBASIC INSTRUMENTSFIGURE 3.1
34BASIC INSTRUMENTS(a)(b)Figure 3.3Figure 3.4Basic Guide to Dental Instruments
Basic Instruments35FIGURE 3.3 a, bFunctions Detection of:ⴰ defective pits and fissuresⴰ calculusⴰ deficient margins of restorations, crowns and bridgesⴰ caries Examination (pointed tip allows good tactile sensitivity)Varieties Can be single-ended or double-ended Many different styles available Working ends may vary (straight, curved)False friendsPeriodontal probe, endodontic probe (DG16 probe), lateral condenserFIGURE 3.4NamePeriodontal probeFunction and features Measure the depth of periodontal pockets Tip is calibrated in millimetres Blunt end reduces the possibility of tissue traumaVarieties Single-ended or double-ended Can be straight, curved or at right angles Plastic types availableFalse friendsSickle/contra-angled probe/sickle probe, endodontic probe/DG16 probe and endodontic spreaderBASIC INSTRUMENTSName(a) Sickle/contra-angled probe (b) Nabers probe
36BASIC INSTRUMENTSFigure 3.5(a)(b)Figure 3.6Figure 3.7Basic Guide to Dental Instruments
Basic Instruments37FIGURE 3.5Function and feature Detection of caries on mesial and distal surfaces The angled working ends facilitate adaptation to interproximal surfacesFalse friendFurcation probeFIGURE 3.6 a, bName(a) College tweezers (b) Locking college tweezersFunctions Placing small objects in the mouth and retrieving small objects from the mouth Locking type ‘lock’ to prevent dropping materialsVarieties Locking and non-locking types Working ends can be straight, curved, serrated or smoothFalse friendsTissue dissecting forceps, toothed dissecting forcepsFIGURE 3.7NameMetal rulerFunctionMeasurement of length, e.g. endodontic K filesVarieties Can be calibrated in different units of measure Plastic type availableBASIC INSTRUMENTSNameBriault probe
38Basic Guide to Dental InstrumentsBASIC INSTRUMENTSSet-upExamination Mouth mirror and handle Sickle/contra-angled probe College tweezersOptional: Briault probe, metal ruler and periodontal probe
SECTION 4INSTRUMENTS ANDSUNDRIES USED INMOISTURE CONTROLProperties of dental materials can be altered by moisture. The dental team can use specific instruments and sundries to aid in moisture control.
INSTRUMENTS AND SUNDRIES USEDIN MOISTURE CONTROL40Basic Guide to Dental Instruments(a)(b)Figure 4.1Figure 4.2
Instruments and Sundries Used in Moisture Control41NameDisposable saliva ejector/Low volume suctionFunction and features Low volume evacuation of the mouth Are more tolerated by the patient Plastic types are disposable and flexible – to suit clinical needVarieties Metal or plastic Plastic ones come in a variety of colors and shapes and can be adapted for particular usesFIGURE 4.2NameHigh volume suction tipFunctions High volume evacuation of the mouth Retraction and protection of tissues Reduction of aerosols created by handpiecesVarieties Metal (autoclavable), plastic (autoclavable or disposable – check manufacturer’sinstructions) Various lengths, shapes and sizesINSTRUMENTS AND SUNDRIES USEDIN MOISTURE CONTROLFIGURE 4.1 a, b
INSTRUMENTS AND SUNDRIES USEDIN MOISTURE CONTROL42(a)Basic Guide to Dental Instruments(b)(c)Figure 4.3(a)(b)Figure 4.4(b)(a)Figure 4.5
Instruments and Sundries Used in Moisture Control43NameGarmer cotton wool roll holdersFunctions Moisture control Hold cotton rolls against the buccal and lingual surfaces (mandibular teeth) Retract cheek and tongueVarietiesSeparate holders for left and right sidesFIGURE 4.4 a, bNameDisposable dry aid/dry guardFunctions and directions for use Moisture control Absorb excess saliva Place close to the opening of the parotid salivary ductVarietiesMade from a variety of materials, e.g. cardboard or an absorbant material enclosedin a plastic coverFIGURE 4.5 a, bName(a) Disposable cotton wool rolls (b) Cotton pelletsFunctions Moisture control – absorb saliva, blood or excess dental materials Can be used to deliver materials to and from the mouthVarietiesVarious sizes availableINSTRUMENTS AND SUNDRIES USEDIN MOISTURE CONTROLFIGURE 4.3 a, b, c
INSTRUMENTS AND SUNDRIES USEDIN MOISTURE CONTROL44Figure 4.6Basic Guide to Dental Instruments
Instruments and Sundries Used in Moisture Control45NameMetal air/water syringe or referred to as 3-in-1 syringeFunctions and par ts Provides spray of air, water, or a combination of both Retraction Has a handle, controls and a tip (tip can be metal or plastic)Varieties Different angled tips available for ease of access Can have plastic disposable tips for infection control purposesINSTRUMENTS AND SUNDRIES USEDIN MOISTURE CONTROLFIGURE 4.6
46Basic Guide to Dental InstrumentsINSTRUMENTS AND SUNDRIES USEDIN MOISTURE CONTROLSet-upFissure sealants Mouth mirror and handle (p. 33) Sickle/contra-angled probe (p. 35) College tweezers (p. 37) Disposable saliva ejector Garmer cotton wool roll holders (mandibular sealants) High volume suction/low volume suction Prophy handpiece (p. 71) Bristle brush (p. 81) and rubber cup (p. 80) Flour of pumice to clean the tooth surface prior to sealant (do not use prophy pasteas fluoride interferes with sealing procedure) Acid etch, sealant material Applicator brush (p. 87) Glass dappen dish (p. 91) Curing light (p. 105)
SECTION 5LOCAL ANAESTHESIALocal anaesthetics provide temporary loss of sensation to a particular area of the mouth,so that the patient will not feel pain.
LOCAL ANAESTHESIA48Basic Guide to Dental InstrumentsFingerbarPistonrodBarrel of syringeThreadedtipFigure 5.1Protective needle cap(a)(b)Cartridge endNeedle hubInjection endFigure 5.2
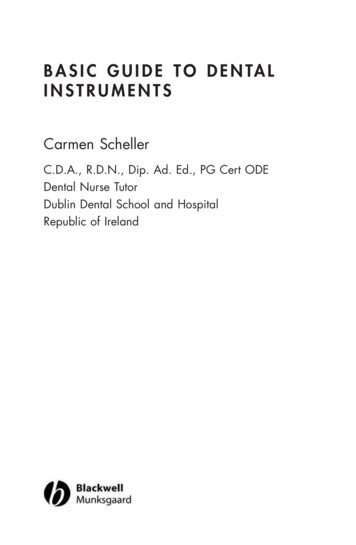
Local Anaesthesia49SYRINGES, NEEDLES AND CARTRIDGESFIGURE 5.1Function and features Used to administer local anaesthetic with a disposable anaesthetic cartridge and adisposable needle The finger bar of the syringe controls the piston rod, which depresses the rubberstopper of the anaesthetic cartridge during aspiration When the piston rod is depressed, the local anaesthetic solution is forced out throughthe disposable needle, which is screwed onto the threaded tip The barrel of the syringe is open on both sides t
Each section is dedicated to a specific discipline or division of dentistry. Some ins-truments feature in many sections, and these have been included in the set-up sub-sections of the relevant sections. Infection control is a fundamental requirement in the dental surgery, and as such