Transcription
For SPARES, ADVICEor REPAIRSPlease call us onMIRA EXCEL0800 001 4040(UK Only)SHOWER CONTROLInstallation and User GuideThese instructions are to be left with the user1
CONTENTSIntroduction. 3Patents and Design Registration. 3Important Safety Information. 4Pack Contents Checklist. 5Dimensions. 7Specifications. 8Installation Requirements. 9Installation. 11General. 11Excel. 121. Back inlet supplies (rising or falling concealed pipework). 122. Exposed supplies (rising or falling surface pipework). 15Excel B. 203. Solid and dry-lined walls. 204. Stud Partitions and Shower Enclosures (Front Face). 245. Laminated Panels and Shower Enclosures (Rear Face). 25Reversed Inlet Connections. 26Control Assembly. 28Mira Beat Fixed Showerhead and Arm. 291. Important Safety Information. 292. Specifications. 293. General. 294. Installation. 30Commissioning. 311. Maximum temperature setting. 312. Maximum Temperature Settings for Reversed Inlet Connections. 333. Temperature override button - disable. 34Operation. 35Fault Diagnosis. 36Maintenance. 401. Cleaning. 402. Cartridge assembly - renewal. 403. Cartridge assembly 'O' seals/inlet strainers - renewal. 40Spare Parts. 41Accessories. 45Customer Service. 482
INTRODUCTIONThank you for purchasing a quality Mira product. To enjoy the full potential of yournew product, please take time to read this guide thoroughly, having done so, keepit handy for future reference.The Mira Excel is a Thermostatic Mixer with independent selection of spray forceand temperature. The Thermostatic Mixer incorporates a wax capsule temperaturesensing unit. This provides an almost immediate response to changes in pressuresor temperature of the incoming water supplies to maintain the selected temperature.An adjustable maximum temperature stop is provided which limits the temperature tothe desired level. An override button allows the user to exceed the preset maximumtemperature. The flow control utilizes ceramic plate technology operating directly onthe hot and cold inlets to provide precise control and isolation of the incoming watersupplies. Inlet filters are fitted to protect the thermostatic control mechanism.The Mira Excel (Exposed Version) has adjustable inlets to fit pipework centresbetween 150 mm and 155 mm.Mira Excel: An exposed shower control for connection to wall mounted or rear entrypipework.Mira Excel B: A built-in shower control for connection to concealed pipework.Patents and Design RegistrationDesign Registration:3 003 921, 3 003 922Patents:GBFranceGermany2 291 6930 694 721(E)695 13 455.8GuaranteeFor domestic installations, Mira Showers guarantee the Mira Excel against anydefect in materials or workmanship for a period of 5 years from the date of purchase(shower fittings for one year).For non-domestic installations, Mira Showers guarantee the Mira Excel againstany defect in materials or workmanship for a period of one year from the date ofpurchase.For terms and conditions refer to the back cover of this guide.If you experience any difficulty with the installation or operation of your newThermostatic Mixer, please refer to ‘Fault Diagnosis’, before contacting Kohler MiraLtd. Our telephone and fax numbers can be found on the back cover of this guide.3
Recommended UsageApplicationValve OnlyValve with FittingsDomestic Light Commercial Heavy Commercial Healthcare Note: Heavy duty shower fittings are available separately for use in Healthcareand Heavy Commercial applications, for details contact Customer Services.IMPORTANT SAFETY INFORMATIONThis Mira Excel is precision engineered and should give continued safe and controlledperformance, provided:1. It is installed, commissioned, operated and maintained in accordance withmanufacturers recommendations.2. Periodic attention is given, when necessary, to maintain the product in goodfunctional order.Caution!1. Read all of these instructions.2. Retain this guide for later use.3. Pass on this guide in the event of change of ownership of the installationsite.4. Follow all warnings, cautions and instructions contained in this guide.5. Anyone who may have difficulty understanding or operating the controls of anyshower should be attended whilst showering. Particular consideration shouldbe given to the young, the elderly, the infirm or anyone inexperienced in thecorrect operation of the controls.6. When this product has reached the end of its serviceable life, it should bedisposed of in a safe manner, in accordance with current local authorityrecycling, or waste disposal policy.4
PACK CONTENTS CHECKLIST Tick the appropriate boxes to familiarize yourself with the part names and to confirm that the parts are included.Excel Thermostatic Mixer1 x Mira Excel 1 x O-Key 2 x Compression Nuts 2 x No. 8 x 3/4" Screws 2 x Olives 2 x Pipe Concealing Plates Documentation1 x Installation and User Guide1 x Customer Support Brochure1 x Installation Template 52 x Wall Plugs
Excel B Thermostatic Mixer1 x Excel B (with building-in shroud)1 x ConcealingPlate Assembly 1 x Shroud 1 x Knob Assembly 2 x No.8 x 1 1/4" Screws 4 x M5 x 50 mm Screws (2 fitted) 2 x M4 x 30 mm Screws 2 x Wall Plugs Documentation1 x Installation and User Guide1 x Customer Support Brochure1 x Installation Template3 x Compression Nuts 3 x olives 6
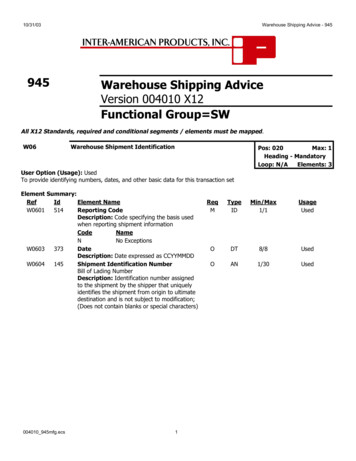
DIMENSIONSExcel20813410038150 - 155Excel B2215515561 - 78151208All dimensions in mm.7
SPECIFICATIONS1. Pressure Ranges1.1. Minimum maintained pressure: 0.1 Bar (1.0 metre head) when used with Mirashower fittings.1.2. Maximum maintained pressure: 5.0 Bar.1.3. Maximum static pressure: 10 Bar.Note: Nominally equal inlet supply pressures are recommended for optimumperformance.2. Temperature Control2.1. Close temperature control is provided between 35 C and 45 C.Note: The temperature control specification, outlined below, is achieved withthe blend set between 35 C and 45 C, with supply temperatures of 15 C coldand 65 C hot, AND, nominally equal inlet supply pressures.2.2. The blended temperature is maintained within 2 C with a 10 C change in thehot or cold supply.2.3. The wax capsule sensor effects a shut down to seepage in approximately2 seconds if the cold supply fails. Shut down to seepage is only achieved if thehot supply is 12 C above the blend temperature.3. Standards and Approvals3.1. Designed to comply with BS EN 1111 and 1287 for thermostatic mixing valves,and to be used within systems designed to BS6700.3.2. BS 6700 recommends that the temperature of stored water should never exceed65 C. A stored water temperature of 60 C is considered sufficient to meet allnormal requirements and will minimise the deposition of scale in hard waterareas.8
INSTALLATION REQUIREMENTSKey to SymbolsFloat ValveTwin Impeller PumpIsolating ValveSingle Impeller PumpThermostatic MixerTempering ValveOverflow IndicatorMini Expansion VesselPressure Reducing ValveThe Mira Excel is compatible with the following systems:Gravity fed systemThe Thermostatic Mixer MUST be fed froma cold water cistern and hot water cylinderproviding nominally equal pressure.Gas heated systemThe Thermostatic Mixer MUST be installedwith a gas water heater or combinationboiler of a fully modulating design.9
Unvented mains pressure systemThe Thermostatic Mixer can be installedwith a unvented, stored hot watercylinder.Mains pressurised instantaneous hotwater system (thermal store)The Thermostatic Mixer can be installedwith systems of this type with balancedpressures.Pumped systemThe Thermostatic Mixer can be installedwith an inlet pump (twin impeller). The pumpmust be installed on the floor next to the hotwater cylinder.90 30 -60 Air Separation10
INSTALLATIONGeneralInstallation must be carried out in accordance with these instructions, and must beconducted by designated, qualified and competent personnel.The installation must comply with the “Water Supply Regulations 1999 (Water Fittings)”or any particular regulations and practices, specified by the local water company orwater undertakers.Note: Make sure that all site requirements correspond to the information given insection: ‘Specifications’.1. The Mixer must not be installed in an area where it may freeze.2. For stud partitions alternative fixings may be required.3. Isolating valves must be installed close to the Mixer for ease of maintenance.4. Pipework must be rigidly supported and avoid any strain on the connections.5. Pipework dead-legs should be kept to a minimum.6. Supply pipework layout should be arranged to minimise the effect of other outletusage upon the dynamic pressures at the Mixer inlets.7. Inlet and outlet threaded joint connections should be made with PTFE tape orliquid sealant. Do not use oil-based, non-setting joint compounds.8. To eliminate pipe debris it is essential that supply pipes are thoroughly flushedthrough before final connection.9. Decide on a suitable position for theMixer. The position of the Mixer andthe Shower Fittings must providea minimum gap of 25 mm betweenHose Retaining Ringthe spill-over level of the showertray/bath and the handset. This is toprevent back-siphonage. For furtherinformation on the installation of yourShower Fittings, refer to the FittingsInstallation and User Guide.Note: Only use Shower Fittingsrecommended by the manufacturer25 mmor supplier.Spill OverLevel11
Excel1. Back inlet supplies (rising or falling concealed pipework)Spirit Level1.1 Use the installation template to markthe positions of the holes for thebackplate and the pipe centres.Installation Template1.2 For solid walls drill the backplateholes with a 6 mm diameter drilland insert the wall plugs (supplied).For other types of wall structurealternative fixing may be required.Wall PlugBackplate1.3 Use the two No. 8 x 1 3/4" fixingscrews (supplied) to fix the backplateto the wall. Make sure that the twoangled fixing holes are at the bottomof the backplate.Fixing Screw1.4 Use a spirit level and pencil tomark the route of the hot and coldwater supply pipes at 150-155 mmcentres.Note: The Excel is supplied withinlet connections hot left, cold rightand bottom outlet as standard.For installations with reversed hotand cold supplies complete theinstallation and refer to section:Reversed Inlet Connections.12I&MRepro\Orion\New Excel\P384180
1.5 Remove the plaster and brick/blockto the required depth to conceal thepipework.Note: Depth must be sufficientto prevent pipe concealing platesfouling on the plumbing elbows.1.6 Install the supply pipes. The pipesmust project 18 mm from the finishedsurface of the wall at 150-155 mmcentres.Note: Use the installation template toensure pipes are in the right position.18 mm fromfinished wallsurfaceØ 32 mm150-155 mmCentres1.7 Finish the surface of the wallas required. The recesses fromwhich the pipes emerge must alsoaccommodate the 32 mm diameterx 10 mm deep flanges on the pipeconcealing plates.1.8 Fit the pipe concealing plates overthe hot and cold supply pipes.1.9 Thoroughly flush the hot and coldwater supply pipes. The suppliesmust be clean and free from debrisbefore connecting the showercontrol. Failure to do so may resultin product malfunction.Concealing Plates1.10 Slide the compression nuts andolives over the supply pipes.OliveCompressionNutBackplate13
1.11 Locate the Excel shower control on tothe backplate and supply pipes andhold it in position.Note: Align the adjustable inlets toaid location onto the pipework.1.12 Use a suitable screwdriver to tightenthe two screws in the backplate. Thescrews will hold the shower control inposition.1.13 Use a suitable spanner to tightenthe compression nuts (anticlockwiserotation when viewed from front).Protect the chromium plated surfaceswith a cloth.Do not overtighten.1.14 Turn on the water supplies and checkfor any leaks.Shower fittings1.15 Install the shower fittings. Refer tothe Installation and User Guide forthe shower fittings.14Screws
2. Exposed supplies (rising or falling surface pipework)Installation TemplateRising Supplies2.1 Use the installation template to markthe positions of the holes for thebackplate and the pipe centres.2.2 For solid walls drill the backplateholes with a 6 mm diameter drilland insert the wall plugs (supplied).For other types of wall structurealternative fixing may be required.Wall PlugBackplate2.3 Fix the backplate to the wall with thetwo fixing screws (supplied). Makesure that the angled fixing holes areat the bottom of the backplate.2.4 Use the O-Key or a suitablescrewdriver to remove the blankingplugs from the rising supply inlets.Fixing ScrewInlet NippleBoltsInlet NipplesI&MRepro\Orion\New Excel\P3841802.5 Use the O-Key to remove the inletnipple bolts from the rear supplyinlets.WasherO-Key2.6 Remove the inlet nipples.Blanking Plugs15
2.7 Align and fit the inlet nipples, completewith 'O' seals, into the rising supplyinlets.2.8 Fit and tighten the inlet nipple boltswith the O-Key.Note: The nipple will still floatwhen the bolt has been tightened.2.9 Screw the blanking plugs, completewith washers into the rear supply inletnipple holes. Tighten the blankingplugs using the O-Key or suitablescrewdriver.2.10 Locate the Excel shower control onto the backplate.2.11 Use a suitable screwdriver to tightenthe two screws in the backplate. Thescrews will hold the shower controlin position. Do not overtighten thescrews.16Blanking PlugsWashers'O' SealInlet NipplesO-KeyInlet NippleBolts
2.12 Install the hot and cold supplypipes approximately 35 mm fromthe finished wall at 150‑155 mmcentres.Use the installation template tomake sure the pipes are in the rightposition.Note: The Excel is supplied withinlet connections hot left, cold rightand bottom outlet as standard.For installations with reversed hotand cold supplies complete theinstallation and refer to section:Reversed Inlet Connections.Note: Thoroughly flush the hotand cold water supply pipes. Thesupplies must be clean and free fromdebris before connecting the showercontrol. Failure to do so may result inproduct malfunction.2.13 Slide the compression nuts andolives over the supply pipes.2.14 Insert the hot and cold supply pipesfully into the inlet nipples and slidethe olives and compression nuts intoplace.Note: Align the adjustable inlets toaid location onto the pipework.2.15 Use a suitable spanner to tightenthe compression nuts. Protect thechromium plated surfaces with acloth.2.16 Turn on the water supplies and checkfor any leaks.17OliveCompression NutInstallationTemplate
Falling Supplies2.17 Follow the installation instructions2.1 to 2.9 inclusive.2.18 Use the O-Key to remove the outletnipple.Outlet CapOutlet BlankingPlug2.19 Carefully lever the outlet cap fromthe outlet blanking plug in the showercontrol body.2.20 Use the O-Key to remove the outletblanking plug.Outlet Nipple2.21 Screw the outlet nipple, completewith 'O' seal into the hole previouslyblanked. Tighten the outlet nipplewith the O-Key.2.22 Screw the outlet blanking plug,complete with 'O' seal, into the outlethole between the two inlet nipples.Tighten the outlet blanking plug withthe O-Key.2.23 Fit the outlet cap correctly. Thematching contours of the outlet capand shower control body must bealigned.2.24 Locate the Excel shower control onto the backplate.18Tapered End
2.25 Use a suitable screwdriver to tightenthe two screws in the backplate. Thescrews will hold the shower control inposition.Backplate2.26 Install the hot and cold supplypipes approximately 35 mm fromthe finished wall at 150‑155 mmcentres.Use the installation template toensure the pipes are in the rightposition.2.27 Follow the installation instructions2.10. to 2.14. inclusive.2.28 Refer to section: Reversed InletConnections and follow theinstallation instructions 1.2. to 1.10.inclusive. This will put the cartridgeassembly, the indicator trim andthe temperature knob in the correctorientation for hot left and cold rightinlet supplies.Note: For falling supplies where thehot and cold inlet pipes have beenreversed, only the indicator trim andthe temperature knob need to beremoved and reinstalled the correctway up. Refer to section: ReversedInlet Connections.2.29 Turn on the water supplies and checkfor any leaks.Shower fittings2.30 Install the shower fittings. Refer tothe Installation and User Guide forthe shower fittings.19Compression NutInstallationTemplateOlive
Excel B3. Solid and dry-lined wallsRead the section: Installation Requirements first.The built-in shower control is supplied with a support bracket that can be used toinstall the shower control into a solid or dry-lined wall structure.A foam seal is fitted to the concealing plate assembly to seal the bracket to the wallsurface (i.e. tiles). This will provide a sufficient seal for most installations to preventingress of water into the wall cavity.3.2 Determine the route for the outletpipework. When connecting to thebiv shower fittings it is recommendedthat the outlet be positioned aboveand to one side of the shower control.This is to prevent the flexible hosefrom obstructing the temperature andflow knobs of the shower control. Forfurther information on the installationof the shower fittings refer to theInstallation and User Guide.3.3 If installing the shower into a solidwall, mark an opening sufficient toaccommodate the shower controlapproximately 245 mm x 145 mm onthe surface of the wall.Alternatively, if installing theshower into a dry-lined wall, usethe installation template and markaround the outside edge.Outlet Pipe BIRBIV OutletBIV OutletHot InletCold InletShower Control145 mm3.1 Determine the route for the incominghot and cold supply pipework.Note: For some installations thevalve may want to be completelysealed within the wall and a cavityseal is available as an accessory.245 mmSpirit LevelInstallationTemplateBend tabs outwards and placethe spirit level on tabs to level the template20I&MRepro/Drawings/Orion/New Excel/Template leveling
3.4 Mark the route of the supply andoutlet pipes.3.5 Remove the plaster and brick/blockfor the shower control to a depthbetween 64 and 81 mm from thefinished surface of the wall. Theshower body requires a clearancedepth of 58 mm, with a finished wallsurface thickness between 6 and23 mm.Note: The maximum and minimumdepth levels are indicated on theouter sections of the building-inshroud.3.6 Remove the plaster and brick/blockfor the supply and outlet pipes.3.7 Mark the support bracket fixing holepositions. The support bracketsshould be positioned so that thevalve can be fitted level and thecompression fittings can be easilytightened.3.8 Drill a 6.0 mm diameter hole at eachof the marked positions and insert thewall plugs (supplied).Note: For stud partition installationsalternative fixings may be required.Alternatively the shower body can besecured to the rear face of the wallcavity or to a timber noggin.3.9 Align the holes in the support bracketswith the holes in the wall and securethe unit with the two fixing screws(supplied).3.10 Remove all three sections of thebuilding-in shroud. Align the hot andcold supply and top outlet pipes withthe valve but do not connect to thevalve.216 mm Minimum DepthFinished wallsurfaceSupportBracketFinished wall surface23 mmMaximum depth58 mmSupportBracketFixing HolesFixingScrews
3.11 Remove the support bracket andvalve unit from the wall and thoroughlyflush the hot and cold water supplypipes.Note: The supplies must be clean andfree from debris before connectingthe shower control. Failure to do somay result in product malfunction.Note: The Excel B is supplied withinlet connections hot left, cold rightand top outlet as standard. Forinstallations with reversed hot andcold refer to section: Reversed inletconnections.Compression Nut3.12 Loosely attach the compression nutsand olives.3.13 Fit the support bracket and valveunit in to the wall with the two fixingscrews.3.14 Insert the hot and cold supplyand top outlet pipes through thecompression nuts and olives. Ensurethat each pipe is pushed fully intothe valve.Note: For falling inlet supplies theoutlet pipe may have to be set deeperinto the wall.3.15 Hold each pipe in position and usea suitable spanner to tighten thecompression nuts.3.16 Turn on the water supplies andcheck for any leaks on both theinlet and the outlet connections.22CompressionNutOlive Threads
3.17 Refit the three building-in shroudsections that you removed earlier.Secure the shroud in position withthe screws.3.18 Plaster and tile as necessary up tothe sides of the building-in shroud.Make sure that the finished tiled wallsurface is within the FINISH arrow onthe building-in shroud.3.19 When the plaster/tiles have set,remove the screws and pull the entirebuilding-in shroud away.Note: Retain the screws for lateruse.Separate thesetwo parts3.20 Remove the backplate from theconcealing plate. Remove theprotective film from foam seal and fitin position with the four fixing screws(supplied).Do not overtighten the screws.Note: If the finish is particularlyuneven (i.e. due to grout lines), applya small amount of silicone sealant toensure a seal.3.21 Fit the shroud and concealing plateover the backplate.Firmly push the concealing plate untilit clips into position.3.22 Fit the control assembly, refer tosection: Control Assembly.ConcealingPlateShower fittings3.23 Install the shower fittings. Refer to theshower fittings Installation and UserGuide.Shroud23
4. Stud Partitions and Shower Enclosures (Front Face)The built-in shower control is supplied with a support bracket that can be used toinstall the shower control into the front face of a stud partition wall structure or showerenclosures. The front face installation of the support bracket is only practical wherean applied surface finish e.g. plaster or tiles can conceal flanges of the bracket.A foam seal is fitted to the concealing plate assembly to seal the bracket to the wallsurface (i.e. tiles). This will provide a sufficient seal for most installations to preventingress of water into the wall cavity.4.1 Refer to section: Installation, 3. Solidand dry-lined walls and follow steps3.1. and 3.2.Spirit LevelBend tabsoutwards andplace spirit levelon tabs to levelthe template4.2 Use the installation template(supplied) to mark the size of thehole required on the panel. Bend thetabs outwards and use a spirit levelto ensure that the hole is markedsymmetrically.Mark around the outside edge of thetemplate.InstallationTemplate4.3 Carefully cut the hole in the panel.Note: The support bracket requiresa clearance depth of 58 mm, witha panel/wall thickness of between4 and 18 mm.The raised portion on the building-inshroud can be used as a depth gauge.Panel/wall thicknesses in excess of18 mm can be accommodated, but aclearance will be required around theinlet and outlet connections to allowinsertion of pipe and tightening of thecompression nuts.4.4 To complete the installation, refer tosection: Installation, 3. Solid anddry-lined walls and follow steps 3.4to 3.23.24Mark around thetemplate with apencil6 mm Minimum Depth4 - 18 mmFinishedwall surfaceFinishedwall surface23 mmMaximum depth58 mm Clearance
5. Laminated Panels and Shower Enclosures (Rear Face)The built-in shower control is supplied with a support bracket that can be usedto install the shower control onto the rear face of a laminated panel or preformedshower cubicle.A foam seal is fitted to the concealing plate assembly to seal the bracket to the wallsurface (i.e. tiles). This will provide a sufficient seal for most installations to preventingress of water into the wall cavity.Note: This installation is only possiblewith a finished wall thickness between6 and 21 mm.Spirit LevelBend tabsoutwards andplace spirit levelon tabs to levelthe template5.1. Refer to section: Installation,3. Solid and dry-lined walls andfollow instructions 3.1. and 3.2.5.2. Use the installation template(supplied) to mark the size of thehole required on the panel.Bend the tabs outwards and use aspirit level to ensure that the hole ismarked symmetrically.Mark through the inner slots of thetemplate.InstallationTemplate5.3. Carefully cut the hole in the panel.Note: The support bracket requiresa clearance depth of 58 mm, witha finished wall thickness between6 and 21 mm.Mark through the slot in thetemplate with a pencil6 mm Minimum Depth58 mmClearance5.4. Fit the valve in position and mark theposition of the holes for the supportbrackets.5.5. Drill a 5.0 mm diameter hole at eachof the marked positions.21 mmMaximum depth25
5.6. Remove the outer sections of thebuilding-in shroud and fix the supportbracket and valve in position using thetwo M4 x 30 mm screws (supplied).5.7. Align the hot and cold supply and topoutlet pipes with the valve but do notsecure the pipes.5.8. To complete the installation, refer toSection: Installation, 3. Solid anddry-lined walls and follow steps 3.11to 3.23.Note: The shower body has two fixingholes in the back face for securingto the rear face of the wall cavity ortimber noggin.M4 x 30 mm ScrewsTwo holes in the backface to secure to awooden noggin. This willhelp to secure the valvebehind a partition wall.REVERSED INLET CONNECTIONSThe Excel is supplied with inlet connections hot left, cold right and bottom outlet.The Excel B is supplied with inlet connections hot left, cold right and top outletas standard. If the hot and cold water supply pipes have been reversed duringinstallation the following procedure must be performed.1.1 Isolate the hot and cold water supplies to the shower control.1.2 Turn the flow knob fully anticlockwise to drain any water.1.3 Carefully pull off the temperature knob, indicator trim and flow lever. Removethe shroud.Note: The red and blue pillars identify the correct hot and cold inlets for thecartridge.26
1.4 Remove the four cartridge retaining screws.1.5 Pull out the cartridge. Do not remove the metal plate from the cartridgeassembly. Any residual water will drain from the body.Caution! Take care not to damage the two inlet seals or the large cartridgeseal.1.6 Rotate the cartridge through half a turn (180 ) and insert it back into the showercontrol body. The blue pillar should now be on the left side of the showercontrol. When re-inserting the cartridge, make sure that the large cartridgeseal is first located in the shower control body.1.7 Fit the four screws that retain the cartridge.1.8 Refit the shroud.1.9 Refit the controls. Refer to section: Control Assembly.1.10 Restore the hot and cold water supplies and check for any leaks.Make sure that the largecartridge seal is firstlocated in the showercontrol bodyCartridgeCartridge RetainingScrewInlet SealShroudControl Assembly27
CONTROL ASSEMBLYThe procedure below details the steps required to fit the control assembly and isapplicable to both the exposed and built-in models.1.2.RedMake sure that the temperature hub isturned to the position illustrated andthat the flow stop is at the bottom.Note: If the red and blue pillarsare reversed (due to reversed inletconnections) the flow stop will bepositioned at the top.BlueTemperatureHubFlow StopMake sure that the flow control levercarrier is turned fully clockwise to theoff position.Flow Lever3.4.5.Fit the flow lever in the positionshown. Make sure that the stop ringis fitted to the flow lever as shown onthe inset diagram.Note: If the red and blue pillarsare reversed (due to reversed inletconnections) remove the stop ring,rotate 180 and refit. Check thefree movement of the flow lever,DO NOT FORCE (Refer to thesection Operation for details)Stop RingFit the indicator trim making sure thatthe arrows line up with the hub andthe
fouling on the plumbing elbows. 1.6 Install the supply pipes. The pipes must project 18 mm from the finished surface of the wall at 150-155 mm centres. Note: Use the installation template to ensure pipes are in the right position. 1.7 Finish the surface of the wall as req