Transcription
BURMA BORDER PROGRAMLABORATORY MANUALFOR LABORATORYTECHNICIAN TRAINING2002Mae Hong Son – Mae- SodThailand
Page iLaboratory n 1 Health and diseaseLesson 2 Job descriptionLesson 3 Safety in the LaboratoryLesson 4 The MicroscopeLesson 5 The CellLesson 6 Blood CellsLesson 7 Malaria7.1 Malaria cycle7.2 Malaria Smear7.3 Fixing and staining7.4 Principle of smearing, fixing and staining7.5 How to recognize a good stain7.6 Examination of blood film for malaria parasites7.7 Routine examination of blood film for malaria parasites7.8 Malaria parasite density7.9 Malaria recordPictures of Plasmodium parasitesLesson 8 FilariasisLesson 9 Determining of haemoglobin and haematocrit9.1 Determining of haemoglobin level9.2 Determining of haematocritLesson 10 Tuberculosis10.1 Safety precautions10.2 Sputum collection10.3 Sputum smearing10.4 AFB stain of sputum smear10.5 TB slide examination10.6 TB recordLesson 11 Paragonimiasis11.1 Sputum preparation11.2 Microscopic examinationLesson 12 Hepatitis BLesson 13 Blood transfusionLesson 14 Laboratory recordingLesson 15 Laboratory quality control15.1 Laboratory quality control service by SMRULesson 16 Inventory / 65676970717273747582868687Appendix 1 Learning materialsAppendix 2 Reagents and equipmentAppendix 3 Laboratory equipment suppliers in ThailandReferences91929495
Page iiLaboratory ManualACKNOWLEDGEMENTThis manual would not be finished if there were no contribution and support fromall NGOs’ laboratory program representatives along the Thai–Myanmar Border.These are IRC, MHD, MSF, SMRU, AMI and ARC who support their staff in thiscooperative work.Katherine Jonhson, R.T. – Supervisor of Laboratories, MSF – ThailandProux Stephane, Laboratory in charge, Shoklo Malaria Research Unit.Banjong Suttiprapa, Laboratory Coordinator, ARC – ThailandKyi Twe, Laboratory Supervisor, MHD – ThailandPattinee Suanprasert, Laboratory Technician, IRC – ThailandWe are also very grateful to the Royal Perth hospital web site:http://www.rph.wa.gov.au for providing valuable Plasmodium pictures and weencourage students to visit this excellent web site.Any comments or questions concerning this manual should be addressed to:Proux StephaneS.M.R.UPO. Box 46 Mae-Sot 63110TAK Province. THAILANDTel: (66) 055 545 021Fax: (66) 055 545 020E-Mail: NT COVER PICTURES:Upper left: Plasmodium falciparum gametocyte on a Giemsa stained thinblood film.Upper right: Paragonimus westermani egg in sputum. Wet preparation,X40 objective.Down left: Anophele female mosquito feeding.Down right: Plasmodium falciparum sporozoites in a smear ofmosquito's salivary gland, Giemsa stain.
Page iiiLaboratory ManualPrefaceThis laboratory manual is a selected review of the main laboratory techniques used forthe training of laboratory technicians working in the camp’s laboratory along theThai – Myanmar border. All the tests presented in the manual correspond to thedisease most commonly found along the border. The techniques presented in themanual are those most appropriate to use in the camp laboratories and are feasible tostandardize in all camps along the border. Most of all equipment and supplies can bepurchased and maintained in Thailand. This manual is intended to prepare displacedpersons from Myanmar to organize and maintain laboratories as well as trainadditional laboratory technicians on their own.
Page 1Laboratory Manual1. HEALTH AND DISEASEWHAT IS A HEALTHY PERSON?Somebody, who feels well, has no pain, eats well, and sleeps well. A healthy childgrows well. A healthy adult has normal activity.WHAT IS A DISEASE?Anything that disturbs the normal function of the body. A person who has adisease will feel various symptoms; for example: headache, abdominal pain,chills.These symptoms are only caused by the disease. They are not the diseases.CAUSE OF DISEASE:1) A Disease can be caused by a lack or an excess of something, for example offood.Lack of food for child: no growth, œdema, weakness Lack of essential vitamins: eye problems (vitamin A), skindisease (vitamin B) .Drinking too much alcohol: liver problems2) A disease can also be caused by infectious agents. Infectious agents areparasites, bacteria, viruses or other small living things that you cannot seewith your eyes that enter our body from the outside and cause diseases.Some examples of parasites are worms and the parasite thatcauses malariaSome examples of bacteria that causes diseases are thebacteria that cause tuberculosis and the bacteria that causewounds to get infected (cause pus in wound).Some viruses cause diseases like the common cold andmeasles.3) A disease can also be caused by abnormality inside the body such as diabetes,cancer WHAT IS THE ROLE OF A DOCTOR OR A MEDIC?The doctor or the medic will examine the patient to find clinical signs of thedisease. For example; big liver, hard belly, noise in the lungs, fast pulse .For some disease, examining only the clinical signs and symptoms is enough for amedic to treat the patient. Sometimes it is not enough, so they need the help of alaboratory for other examinations before giving treatment.
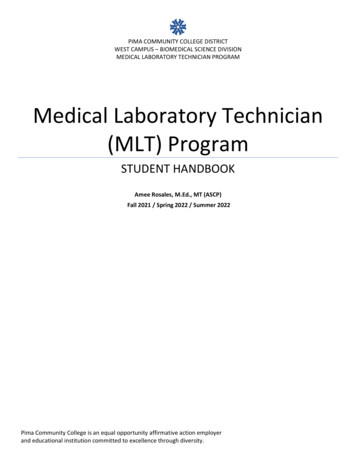
Page 2Laboratory ManualWHAT IS THE ROLE OF THE LABORATORY?The laboratory will find the infectious agents that cannot be seen only by eyes,because they are very small in size. To find them, the laboratory uses amicroscope.The laboratories can also check for some bodily substances, especially in bloodand urine. For example: some kind of sugar in the blood or protein in urine.While doctors and medics examine the whole body, laboratory techniciansexamine only samples from the body such as blood, urine, sputum and stool.These samples are also called specimens.PATIENTDOCTORSymptomExample: (fever)Clinical Signs(Big liver) Healthy TreatmentLABORATORYInfectious Agents(Malaria) Result
Page 3Laboratory Manual2. JOB DESCRIPTIONA. LABORATORY TECHNICIANS1. Collect the specimen:- Sputum / Blood2. Prepare the specimen:- Thin and thick blood smears- Dry and wet sputum smear3. Make the staining4. Examine: for- Malaria parasites- TB Bacteria- Lung parasite (Paragonimus)- Microfilaria parasite- Haemoglobin or haematocrit measurement- Blood grouping- HIV- Hepatitis B5. Record each specimen with the result in the register book.6. Return the result to the medic or nurse. The laboratory technician is responsiblefor the result that he / she gives. In emergency cases, he / she must give the resultdirectly to the medic as quickly as possible.7. Keep the laboratory cleanooooClean the room. Tables, chairs, shelves, floor and boxesClean the laboratory EquipmentClean the old slidesProperly dispose of all waste8. Maintain the microscope properly; dry the desiccant (silica gel) for reusing.9. Regularly check the stock of reagents, equipment, and items and fill out theinventory (stock) and the order form that you will give to the in – charge.10. Do the statistics at the end of the month and fill in the laboratory statistic form.11. Collect the slides for quality control every month and send to the lab supervisor.QUALITIES OF THE LAB TECHNICIANSConscientious, Honest, Neat and ReliableLab technicians should be aware that the patient’s life depends on the resultshe / she gives
Page 4Laboratory ManualB. LABORATORY SUPEVISORSThe supervisors should be able to:1. Perform all the laboratory activities described in the laboratoryworkers job description.2. Communicate:2.1 Between the laboratory and the other departments (OPD, IPD.):o Discuss the result of all IPD patients with the medics.o With the medic, organise a meeting if there is a problem tosolve.o Teach the nurses and medics for the proper collection ofspecimen especially thin and thick blood smear in case the labtechnicians cannot do it by their own. Bad smears can lead towrong results, so lab technician supervisor should show themedics and nurses how to make a good smear and explain thatthe quality of the result depends on it. However, bloodcollection should be done by the lab technician as much aspossible.2.2 Among the laboratory staff:o Organise meeting with the staff if there is a problem.o Organise the staff duties.2.3 With the NGO laboratory technician in – charge:o Discuss the problems met during the month.o Give new ideas to improve the work.o Complete and send the statistic forms, quality control form,quality control slides, and laboratory order form on time.o Discuss about the monitoring record.3. Monitor the laboratory activities:3.1 Check the collection of the specimens:o Blood.o Sputum.3.2 Evaluate all the techniques done in the laboratory:o Thin and thick smears.o Giemsa staining.o TB smears.o TB staining.o Paragonimus smears.o Haemoglobin or haematocrit measurement.o Blood grouping.o HIV tests.o Hepatitis B tests.
Page 5Laboratory Manual3.3 Control the registration of the results in each book and on forms:o Malaria book.o TB book.o Haemoglobin or haematocrit book.o Blood transfusion book.o Lab request forms.o Statistics forms.o Quality control forms.3.4 Confirm the results from the lab technicians if they are not sure.3.5 Control the laboratory inventory and ordering systemo Recheck the inventory form done by the lab techniciano Realisation of the laboratory order3.6 Do quality control of malaria and TB slides3.7 Fill out general monitoring record.3.8 Supervise the cleaning and maintenance of the lab items and thelaboratory room
Page 6Laboratory Manual3. SAFETY IN THE LABORATORYThe main accidents associated with medical laboratory work are:INFECTIONSCUTBURNSHARMFUL EFFECTS OF TOXIC CHEMICALSWASTESINFECTIONSLaboratory specimens are often infectious:Sputum of TB patients contains bacteria that may infect the lab technicians.Urine of patients with urinary tract infection (UTI) contains bacteria. If the labtechnician touches this urine, then touches his / her mouth or his / her eyes,he / she may get an infection.Stool may contain parasites such as roundworm eggs. If swallowed, they willgive roundworm infection.To avoid this, you must:Put a mask on before smearing a sputum specimen.Put gloves on before you work with any specimens or when cleaningequipment.Always wash your hands after handling specimens.Be very careful with needles, blood lancets and dispose of them properly.Using these safety methods is called UNIVERSAL PRECAUTIONS. If youfollow this you will protect yourself from the diseases that can infect and kill you.Anytime that you handle any specimens for laboratory tests, you must treat themas if they were infectious. Do not treat only the specimens that you think areinfectious. You must assume that every patient has an infection. This way you willprotect yourself from the possibility of getting an infection.CUTSLab work requires some glassware: slides, beakers, cylinders, pipettes, bottles.You must be careful with cracked glassware, especially when you wash slides.
Laboratory ManualPage 7BURNSDifferent kinds of alcohol are used in the laboratory. All of them areflammable.Acid alcohol, used in TB test, contains acid that causes burns on skin andclothes.HARMFUL EFFECTS OF TOXIC CHEMICALSAll the chemicals used in the laboratory are toxic if swallowed.Mouth pipetting should be avoided. Never mouth pipetting for acid.Avoid skin contact with xylene, and do not breath it.WASTESBefore washing used slides (especially unstained slides) or specimen containers,throw the wasted specimen into the latrine. Then soak these slides and containers withdisinfectant (solution used for destroying the infectious agents), such as chlorine andhypochlorite.Old slides and used blood lancets must be collected in closed bottles or boxes (or oldinfusion bottles) and thrown into the latrines or wasted wells.NEVER LEAVE USED SLIDES or BLOOD LANCETS LYING ON THE FLOOR
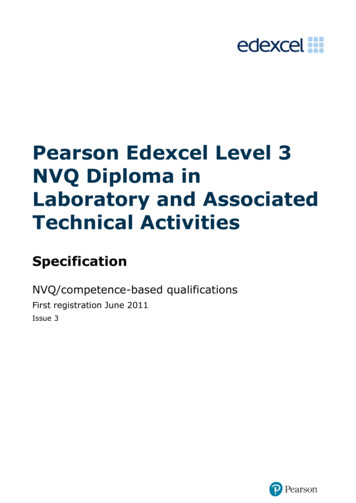
Page 8Laboratory Manual4. THE MICROSCOPEMicroscope is used to see something so small that you cannot see it with your eyes. Amicroscope can magnify the object up to 1000 times its real size.The parts of the microscope can be classified into 4 systems:A)B)C)D)THE SUPPORT SYSTEMTHE MAGNIFICATION SYTEMTHE ILLUMINATION SYSTEM or THE LIGHT SYSTEMTHE ADJUSTMENT SYSTEMABACD
Page 9Laboratory ManualA)THE SUPPORT SYSTEMConsists of:1.2.3.4.5.3The footThe bodyThe objective holderThe stage to place the slide or the objectThe mechanical stage, which holds and controls the movement of theobject slide2451
Page 10Laboratory ManualB)THE MAGNIFICATION SYSTEMConsists of a system of lenses:1.The eyepieces:They multiply the size of the object by 10.2.The objectives:X 10 objective multiplies the size of the object 10 times.X 40 objective multiplies the size of the object 40 times.X 100 objective multiplies the size of the object 100 timesWith x 100 objective, we use immersion oil on the slide.Example: If the x 40 objective and the x 10 eyepiece are used, the total magnificationwill be 40 times (objective) multiplied by 10 times (eyepieces): 40x10 400.It means that the image will be magnified 400 times from real eyesight image.
Page 11Laboratory ManualC)THE ILLUMINATION SYSTEM or THE LIGHT SYSTEMConsists of:1.The mirror that sends the light to the object.2.The condenser that focuses the light.3.The diaphragm, which is fixed within the condenser.It reduces or increases the light before passing through thecondenser.CondenserMirrorDIAPHRAGMCLOSE(Obj X10)HALF-OPEN(Obj X40)OPEN(Obj X100)
Page 12Laboratory ManualD)THE ADJUSTMENT SYSTEMConsists of:4.The coarse adjustment screwThis is the largest screw. It is used to adjust approximately5.The fine adjustment screwThis moves the objective more slowly. It is used to adjustperfectly.6.The condenser screw (some models do not have this)This is used to raise the condenser for greater light or to lowerit to reduce the light:Using x 10 objective: condenser downUsing x 40 objective: condenser half wayUsing x 100 objective: condenser up7.The iris diaphragm leverThis is a small lever inside the condenser. It is moved to closeor open the diaphragm to reduce or increase the intensity oflight8.The screw of the mechanical stageOne screw moves the slide to the right or left.One screw moves the slide forward or backward.Blue filter to beused withelectric light only
Laboratory ManualPage 13ROUTINE MAINTENANCE OF THE MICROSCOPEThe microscope needs daily attention to keep it in good working orderto ensure reliable laboratory result1- Remove the oil from x100 objective with lens paper or soft tissue paper.2- Clean the eyepieces with lens paper or soft tissue paper.3- Clean the condenser, the mirror and support stage with a soft cloth.4- Cover the microscope with a clean plastic or cloth cover in order to protectit from dust.5- Put it in a sealed microscope box with an opened box of blue desiccant toprotect from fungus developing on the microscope especially on the lenssurfaceNote:Desiccant must be renewed regularly by heating it. Its color will turn from pink toblue and ready to be used again.
Page 14Laboratory Manual5. THE CELLThe cell is the basic unit of all living things. A cell is an important part of all animals orplants. It usually works together with other cells to form various organisms(it performs like a leaf, which is one component of an entire roof). Some organisms areformed of only one cell but others, like the human body or plants, have billions of cells.Most of the organisms that cause diseases are one-cell living things, which are toosmall to be seen with the eye.Examples of these living things are yeast, malaria protozoa and bacteria.Aside from these living things, there are free-living things, which are so small that wecannot see them even with an ordinary microscope. They are called Virus and they arenot complete cells.ONLY SOME OF EACH KIND OF THESE ORGANISMS CAN CAUSE DISEASE IN HUMANSAlthough cells vary in shape, size, and function, they are similar in their main structure.Commonly a cell consists of 2 major parts:1. Nucleus2. Cytoplasm1. NUCLEUS is the inner part of the cell. Inside the nucleus, there is a very smallmaterial called Chromatin that acts like the brain of the cell2. CYTOPLASM is the fluid that surrounds the nucleus and is enclosed by a Cellmembrane or/and Cell wall. Inside the cytoplasm, there are variouscomponents, which help the cell to perform its activities.Fig 5. 1: Structure of a cell.
Page15Laboratory Manual6. BLOOD CELLSBlood is a red liquid solution, which contains several different kinds of cells. Thesecells are:1) Red Blood Cells2) White Blood Cells3) Platelets1) THE RED BLOOD CELLS (RBC)The RBC carries oxygen (good air) from lungs to all body tissue cells.Size:7 m (micrometer or micron. 1000 m 1 mm)It is seen about 7 mm by the x100 objective.Shape: Round as a biconcave disc, occasionally slightly irregular.Mature RBC is the only kind of cell in our body that has no nucleus.Coloring by Giemsa stain:Periphery is pink-grey colorCenter is pale pink-grey color or almost colorless.Fig 6. 1: Normal RBC as seen on a thin smear.
Page16Laboratory Manual2) THE WHITE BLOOD CELLS (WBC)The WBC defends the body against infection. They act as the soldiers of our body.There are 5 main types of WBC, which differ in size, shape of the nucleus, color ofcytoplasm and granules in the cytoplasm (granules look like spots).We will study only 4 kinds of WBC:2.1) NeutrophilSize: 12 – 15 mIt is seen about 12 – 15 mm by x100 objective.Shape: RoundColoring by Giemsa stain:Cytoplasm:Nucleus:Granules:PinkishSeveral (2 to 5) lobes, linked by strands of chromatin.The chromatin forms a deep purple mass.Mauve and very small, blue, numerous but separate.For patients suffering from severe malaria the cytoplasm may contain brownish –black masses. This is malaria pigment (see figure 7. 20).Fig 6. 2: Neutrophil
Page17Laboratory Manual2.2) EosinophilSize: 12 – 15 mShape: RoundColoring by Giemsa stainNucleus:Granules:Usually 2 lobes in a deep purple mass.Large, round, orange, numerous and closely packed.Sometimes the cell appears damaged, with scattered granules.LymphocyteEosinophilFig 6. 3: Eosinophil2.3) LymphocyteSize: 7 – 10 m (They are smaller than the other kinds of WBCs)Shape: RoundColoring by Giemsa stainNucleus:Cytoplasm:One compact and large nucleus occupying most of the cell.Chromatin is dark purple and dense.Very little visible, pale blue without granules.LymphocyteFig 6. 4: LymphocyteNeutrophil
Page18Laboratory Manual2.4) MonocyteSize: 15 – 25 m (They are the largest kinds of WBCs)Shape: IrregularColoring by Giemsa stainNucleus:Granules:Cytoplasm:Variable, often kidney – shaped.Chromatin arranged in strands, pale mauve.fine, dust – like, blue.blue – gray, sometimes vacuoles are present inside.For patients suffering from severe malaria the cytoplasm may contain brownish –black masses. This is malaria pigment.Fig 6. 5: Monocyte3) THE PLATELETS (Plt.)They are fragments of cells, which have an important function in the clotting of blood.Without platelets, bleeding from any scratches or cut wounds will not be stopped.Size: 1 – 4 m (It is seen about 1 – 4 mm by the x100)Shape: various shapes (triangular, star – shape, oval, etc )Coloring by Giemsa stain: pinkPlateletsFig 6. 6 Platelets
Page 19Laboratory Manual7. MALARIAMalaria is a disease caused by a parasite, Plasmodium, which infects red blood cells.Malaria is spread by mosquitoes. Mosquitoes suck up the malaria parasite from the blood of aninfected person and transfer parasites to another person when biting them.There are 4 kinds of Plasmodium:Plasmodium falciparum causes the severe malaria, which can cause coma and lead to death.Plasmodium vivax, Plasmodium malariae and Plasmodium ovale give mild malaria cases.Along Thai – Myanmar border area, Plasmodium falciparum and Plasmodium vivax are oftenfound and Plasmodium malariae is seldom found whereas Plasmodium ovale is rarely found.Symptoms and clinical signs:A patient with malaria will complain of fever, chills, headache, and joint pain. During the clinicalexam, the medic or doctor sometimes finds anaemia and big spleen(especially among children). In cases of severe malaria, the patient may also be unconscious.Diagnosis:Microscopic examination of blood will show parasites inside the red blood cells. The name of thelaboratory exam is MS or M/S (malaria smear).-Plasmodium falciparum or PF are small and ring shaped. They are often found in greatnumber in 4 or cases, more than 4 % of RBCs are infected.Plasmodium vivax or PV and Plasmodium ovale or PO are bigger than PF, but usually are lessnumerous and less harmful.Plasmodium malariae or PM are also bigger than PF, found in very small quantities in theblood and they develop very slowly.Treatment:-In this area, usually patients infected with PV, PO or PM are treated with Chloroquine.For patients with PF, the treatment might be done by Quinine, Mefloquine, Artesunate andtheir combinations with other medicines (refer to the updated S.M.R.U malaria handout).Prevention:Malaria is spread by a mosquito. This mosquito is called Anopheles and it usually bites fromsunset until dawn. To prevent malaria, it is necessary to avoid being bitten by the Anophelesmosquito. This can be done by:-Covering up between sunset and dawn.Taking a bath before sunset or after dawn then use repellent.Sleeping under a mosquito bed net.Killing mosquitoes, reducing mosquito-breeding places.To prevent severe malaria from developing, have your blood checked for every fever.
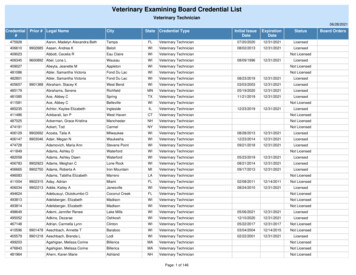
Page 20Laboratory Manual7.1 MALARIA LIFE CYCLEFig 7. 1
Page 21Laboratory ManualFemale anopheles mosquito needs to eat blood when it is pregnant. The anopheles infected withPlasmodium bites a person to suck his blood and at the same time, it releases SPOROZOITES inthe blood of this person. SPOROZOITES are the infective form of Plasmodium (see Fig.7. 1)Pre – Erythrocytic Cycle in Liver cells (Cycle in liver before RBC cycle):1. After sporozoites were released to the blood stream, they reach the liver and enter the livercells then develop. Each parasite grows and divides up to 30.000 new parasites, remaining ineach liver cell, called hepatic schizont. Then liver cells burst, and release a great number ofnew parasites, called MEROZOITES into the blood stream.For Plasmodium vivax and Plasmodium ovale, some parasites remain in liver cells, assleeping forms (hypnozoites). In the liver cells, these sleeping forms cannot be destroyed bychloroquine. They can wake up and produce new merozoites into blood stream again causinga new malaria episode, not caused by a new infection. This is called relapse, which may occurfrom time to time after initial infection, during 2 – 3 years.Erythrocytic Cycle (Cycle in Red blood Cell):2. After each merozoite was released into blood stream, it enters a RBC and develops. Themerozoites that cannot enter a RBC within 5 minutes are destroyed. Once inside the RBC,merozoite becomes TROPHOZOITE (PVT Plasmodium Vivax Trophozoite).3. The trophozoite grows and divides itself. It becomes a SCHIZONT: each schizont cancontain up to 32 new parasites depending on the type of Plasmodium, which are also calledmerozoites. Then the infected RBCs burst and release the new merozoites in the blood. Thisprovokes the peak of fever.DESTRUCTION OF RBCsDEAD RBCs ELIMINATED BY SPLEENcausecauseANAEMIABIG SPLEENDevelopment of the parasite in the RBCs takes 42 – 48 hours for PV and 36 – 48 hours for PF.Delay between infected mosquito bite and the first peak of fever is called "incubation period"and it takes about 2 weeks (12 – 17 days for PV and 9 –14 days for PF).4. Each new merozoite will infect one new RBC and make a new cycle, causing the fever to goUP and DOWN. Chloroquine destroys schizonts, so it stops the cycle in the blood (but not inthe liver: see 1. above).5. After some cycles in the RBCs, instead of developing into schizonts, some merozoitesdevelop in a different way. They become sexual reproductive form called GAMETOCYTES.There are male gametocytes and female gametocytes. Their presence in the blood of aninfected person does not cause any disease and if a mosquito does not take them up, they die.Infective form in the mosquito:6. When the anopheles mosquito bites and sucks an infected person’s blood, in the mosquito’sstomach, all the trophozoites and schizonts die. Only gametocytes can survive. Fertilisationoccurs between male and female Gametocytes and produces a ZYGOTE (egg). The zygoteenters the stomach wall of the mosquito, and develops there. Each egg gives birth to a greatnumber of new sporozoites, which is the infective form of malaria. Sporozoites then collectin the salivary glands of the mosquito.
Page 22Laboratory ManualLife cycle of each type of Plasmodium malaria are different in the number of merozoites contained inmature schizonts, the incubation period, the length of time of the parasite cycle in the RBCs and thepresentation of relapse.CharacteristicsP. FalciparumP. VivaxP. MalariaeP. OvaleNo. of merozoites inEach mature liverSchizontUp to 30,00010,00015,00015,000No. of merozoites ineach mature RBCschizont8 – 32Rarely seen inPeripheral bloodUp to 2410 - 128 - 10A cycle duration ofparasite in RBC36 – 48 hr.42 – 48 hrs72 hrs48 - 50 hrsIncubation period9 – 14 daysExceptionally upTo 1 year12 – 17 days18 – 40 days16 – 18 days8 – 10 weeks, or30 – 40 weeks, orUp to 8 yearsUp to 53 yearsNo relapseNo certainreportEnter every stageOf RBCsParticularly enterYoung RBCsUsually invadeOlder RBCsUsually infectYounger RBCsTime of relapseafter initialinfectionEntering ofmerozoites to RBCs³RESISTANCEThe appropriate treatment of malaria in each area depends on the susceptibility of malaria parasite tothe anti malarial drugs. Presumptive treatment, wrong lab diagnosis, and the incorrect use of thesedrugs (e.g. self treatment) contribute to the parasites resistance, which means that the parasite cansurvive and/or multiply despite taking medicine.The first anti malarial drugs were discovered about 3000 years ago, but since 1950 resistanceappeared among P. falciparum against chloroquine and this parasite continues a great facility tobecome resistant to many other malaria drugs. The falciparum parasites on the Thai – Myanmarborder are the most multidrug resistant in the world.The follow up of patient is very important in order to monitor the efficacy of the drugs.
Page 23Laboratory Manual7.2 MALARIA SMEARIt is a laboratory exam that finds out if a patient has malaria. The examination is done with blood,because malaria parasites infect Red Blood Cells.Method1)On a tray, prepare:Clean slidesCottonSavlon or rubbing alcoholGlovesBlood lancetsLittle dustbin for dirty cottonGlass container for used blood lancetsPencil2)Clean one of the slides, holding it by the edges:!! Never touch the slide surface !!3)Put on the gloves.4)Clean the third or the fourth finger of the patient with cotton soaked in rubbing alcohol orsavlon (see figure 7. 2)Fig 7. 2In baby under 6 months or very small children, it might be difficult and also dangerous toget the blood from the finger as the lancet may pierce finger bone and cause possibleinfections. You may try to take blood from the side of the heel (as shown by blue arrows infigure 7. 3) or from the side of big toe instead (as shown by red arrow in figure 7. 3)Fig 7. 3
Page 24Laboratory Manual5)Open the blood lancet paper, from the side opposite to the sharp end.6)Remove the lancet from the paper and prick the finger or the site firmly and rapidly(see figure 7. 4).!! Place the used lancet in the glass container or dispose of it properly !!PRICK THE SIDEOF FINGERFig 7. 47)8)With a DRY piece of cotton or gauze, wipe away the first drop of blood.Pressing the finger firmly, apply 3 drops of blood (size h) at one end of the slide for thicksmear and about 1 cm away, apply 1 drop (this size n) on the slide for thin smear. Whenapplying the blood on the slide, avoid the finger to touch the slide. (See figure 7. 5).Fig 7. 5! The quantity of blood is very important for the thick smear (See figure 7. 5)!Not enough blood may lead to a WRONG NEGATIVE RESULT.A smear with too much blood cannot be stained properly and CANNOT BE EXAMINED9)Use a second slide (called spreader) to spread the big blood drop for thin smear. Do it with aslow and regular movement to make a good blood film.- Put the spreader on the first slide and draw it backward- Let the blood run across the edge of the spreader. The spreader must have a smooth & cleanededge otherwise it is not possible to obtain a good thin smear.- Firmly push the second slide, keeping it at an angle of 45 degrees, with a slow and regularmovement until it is off the first slide (see figure 7. 6).
Page 25Laboratory ManualSpreader with clean & smooth edgesORFig 7. 610) If the smear is good prepare the thick film:Quickly join the 3 small drops of blood and mix them circularly not less than 10 times byusing the corner of the spreader (see figure 7.7). Then use an alcohol soaked cotton towipe the blood off the spreader.Fig 7. 711) Let the slide dry on a plane surface.- Label the slide with the patient’s number and date: use a PENCIL.Fig 7. 8
Page 26Laboratory Manual7.3 FIXING AND STAININGA. FIXING1) Materials needed:Absolute methanolSlide-rack2) Method:After the blood smear completely dries:Fix only the thin smear by dipping it QUICKLY in methanol 3 – 5 seconds.Be careful because the vapour of methanol may fix the thick smear.Let the slide dry on the slide-rack completely before staining.B. STAINING1) Materials needed:Pure GIEMSA stainClean filtered water with pH at or near 7.2Wash-bottleGraduated cylinder (100 ml)Graduated pipette (10ml)Slide-rackStaining tray*You may need to filter the pure Giemsa stain before using it (depend on the quality of stain). Thisshould be prepared by shaking the original bottle of pure Giemsa stain first then filter the stain usinga filter paper into another dry clean bottle and tighten the lid (Giemsa contains methanol)*
Record each specimen with the result in the register book. 6. Return the result to the medic or nurse. The laboratory technician is responsible for the result that he / she gives. In emergency cases, he / she must give the result directly to the medic as quickly as possible. 7. Keep the laboratory clean o Clean the room.