Transcription
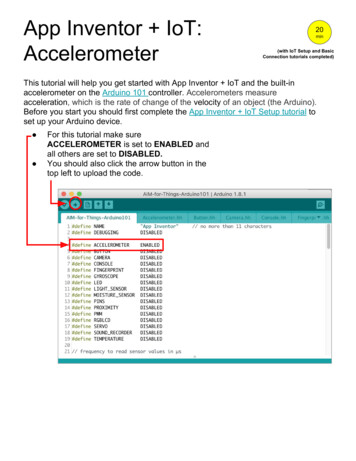
App Inventor IoT:Accelerometer20min(with IoT Setup and BasicConnection tutorials completed)This tutorial will help you get started with App Inventor IoT and the built-inaccelerometer on the Arduino 101 controller. Accelerometers measureacceleration, which is the rate of change of the velocity of an object (the Arduino).Before you start you should first complete the App Inventor IoT Setup tutorial toset up your Arduino device. For this tutorial make sureACCELEROMETER is set to ENABLED andall others are set to DISABLED.You should also click the arrow button in thetop left to upload the code.
Next, you should complete the App Inventor IoT Basic Connection tutorial tomake a basic connection to the Arduino device. If you prefer, you can downloadthe completed .aia file here.The remaining steps all build off of the the starter code for Basic Connectiontutorial and .aia: Drag a Label from the User Interface Palette and drop it betweenLabelStatus and ListBLE Rename the Label "LabelData". Change its text to “Data: “. In the Palette window, click on Extension at the bottom, and then select"Import extension" and click on "URL." Copy this URL and paste it ppinventor.iot.arduino101.aix Add the Arduino101Accelerometer extension to your app by dragging itonto the Viewer.
Next, we need to let App Inventor know which BLE device is reading theaccelerometer data. Click on Ardunio101Accelerometer1 in the Components pane.In the Properties pane, click on BluetoothDevice and select BluetoothLE1.
Now switch to the Blocks Editor viewFirst, we want to request data updates when the accelerometer sensor values onthe Arduino change. from Arduino101Accelerometer1 in the Blocks pane, addcall pdates tothe existing when BluetoothLE1.Connected block from the BasicConnection tutorial.Next, we need to store the data we receive from the accelerometer. From theVariables drawer in the Blocks pane, drag an initialize global name to block andname it "Accel X". From the Math drawer add a number block and set it to "0".We'll use this to keep track of the X-Axis value. Do this again, and rename the second variable "Accel Y". Repeat a third time, and rename the third variable "Accel Z".
Let's make a new procedure to display the current readings in the LabelData whenwe get new data. You can create a procedure by dragging out a purple procedureblock from the Procedures drawer in the Blocks pane. Let's rename itupdateDataLabel. from LabelData in the Blocks pane, add set LabelData.Text to. from the Text drawer connect a join block. From the Text drawer, connect a text block and type"Reading: " . From the Text drawer, connect a text block and type "X ".(note the extra space after the X) We need 4 more slots in our join block. Hover over the gear on the join block In the popup, attach four of the string blocks the the twoalready there. From the Variables drawer, connect a get global Accel X block. From the Text drawer, connect a text block and type " Y ".(note the spaces before and after the Y) From the Variables drawer, connect a get global Accel Y block. From the Text drawer, connect a text block and type " Z ".(note the spaces before and after the z) From the Variables drawer, connect a get global Accel Z block.
Finally, we need to call the procedure when this data is received. From the Arduino101Accelerometer1 drawer in the Blocks pane, dragwhen Ardunio101Accelerometer1.AccelerometerDataReceived from the Variables drawer, add set global Accel X to Hover over the orange "Accelerometer X" in.AccelerometerDataReceived to see the get Accelerometer X block.Drag the get Accelerometer X block from this window and snap toset global Accel X. Do the same thing for Accel Y. Do the same thing for Accel Z. from the Procedures drawer, add call updateDataLabel.Your app should now be working! Connect your Android device using the MITAI2 Companion (if you haven't already). Test it out by moving the Arduino aroundin the air. If it is working, you should see the data labels change.
accelerometer on the Arduino 101 controller. Accelerometers measure acceleration, which is the rate of change of the velocity of an object (the Arduino). Before you start you should first complete the App Inventor IoT Setup tutorial to set up your Arduino device. (with I