Transcription
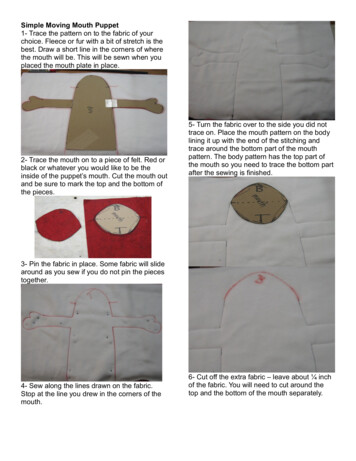
Simple Moving Mouth Puppet1- Trace the pattern on to the fabric of yourchoice. Fleece or fur with a bit of stretch is thebest. Draw a short line in the corners of wherethe mouth will be. This will be sewn when youplaced the mouth plate in place.2- Trace the mouth on to a piece of felt. Red orblack or whatever you would like to be theinside of the puppet’s mouth. Cut the mouth outand be sure to mark the top and the bottom ofthe pieces.5- Turn the fabric over to the side you did nottrace on. Place the mouth pattern on the bodylining it up with the end of the stitching andtrace around the bottom part of the mouthpattern. The body pattern has the top part ofthe mouth so you need to trace the bottom partafter the sewing is finished.3- Pin the fabric in place. Some fabric will slidearound as you sew if you do not pin the piecestogether.4- Sew along the lines drawn on the fabric.Stop at the line you drew in the corners of themouth.6- Cut off the extra fabric – leave about ¼ inchof the fabric. You will need to cut around thetop and the bottom of the mouth separately.
7- Open up the two flaps of the mouth andplace the felt mouth into place. Pin the cornersof the mouth first. Then the middle of the topand the middle of the bottom. Pin the entiremouth into place, you may need to ease thebody fabric around so it fits in place nicely.8- Sew the mouth into place. Start the sewingin one corner and slowly go around to the othercorner. Lift the presser foot and flip the mouthunder so you can sew the opposite side of themouth. This is the trickiest part of the sewing.Go slowly and carefully.
12- Peel the back off and place it over theplastic pieces. This gives the inside of themouth a nice covering.9- Trace the mouth plate pattern on to a plasticlid and cut out the parts.10- Using hot glue, attach the plastic pieces tothe top and bottom of the mouth.11- Trace around the pattern for the felt coveron to adhesive backed felt. Label the top andbottom so you know how it should be placed.13- Turn the puppet inside out. Start with thearms. Using a chopstick makes the processeasier.
14- After both arms have been turned insideout, turn the rest of the puppet. Now you areready to add some stuffing.17- Another way to stuff the head is to use afoam ball that had been cut in half and trimmedlike in the pictures.15- Use poly fill stuffing to stuff the arms andhands. Leave a small gap where the elbow ofthe puppet would be so the arm can bend ifyou choose to add rods for arm control. Addstuffing for the top of the arm too.18- Use a butter knife or an electric knife to cutthe foam ball in half.16- To stuff the head you can use either aninexpensive sponge with the corners cut toallow for it to follow along the mouth line.
19- Trim just a bit off one end and then usingyour finger, hollow out a bit of space to allowfor finger room.20- Slip the foam into the head and fuss with ituntil it fills out the top of the head nicely.21- Now you are ready to add facial featuresand hair and perhaps clothing. Use yourimagination. A tongue can be made by cuttinga heart shaped piece of foam or felt to be gluedinto the mouth.
Simple Moving Mouth Puppet 1- Trace the pattern on to the fabric of your choice. Fleece or fur with a bit of stretch is the best. Draw a short line in the corners of where the mouth will be. This will be sewn when you placed the mouth plate in place. 2- Trace the mouth on to a piece o