Transcription
Ministry of Science and Education of Russian FederationFederal state institution of higher professional educationUlyanovsk State UniversityInsitute of Medicine, Ecology and Physical cultureE.Sh. Yenikeyev, N.V. TerekhinaLABORATORY MANUAL OF BIOCHEMISTRYFOR FOREIGN MEDICAL STUDENTSPart 1Ulyanovsk - 2015
УДК 577.1 (075.8)ББК 28.072я73Recommended for publishing by the Methodical Committee and Academic Councilof Ulyanovsk State UniversityWritten and compiled by:E.Sh. Yenikeyev, Cand.Biol.Sci, Associate ProfessorN.V. Terekhina, Cand.Biol.Sci.Reviewers:T.P. Gening, Doct.Biol.Sci, ProfessorD.A. Kseico, Cand.Biol.Sci, Associate ProfessorYenikeyev, E.Sh.Laboratory Manual of Biochemistry for foreign medical students/ E.Sh. Yenikeyev, N.V. Terekhina. – Part 1. – Ulyanovsk : UlyanovskState University, 2015. – 42 р.This manual is designed according to syllabus of biochemistry for studentsof Medical faculty (specialities: general medicine, pediatrics and pharmacology).It will be a guide to action for students during their practical work.УДК 577.1 (075.8)ББК 28.072я73 Yenikeyev E.Sh., Terekhina N.V., 2015 Ulyanovsk State University, 20152
TABLE OF CONTENTSPAGEPreface4Rules for working in a biochemical laboratory5Laboratory equipment10Laboratory technics14The format of laboratory report20Experimental part20References413
PREFACEBiological chemistry is a fundamental medical discipline.The knowledge of biochemistry is necessary for any medical student for understandingof methabolic processes of human in normal and decease state, interpret and usebiochemical data in prognostics and cure. Practical work is an important part of thediscipline. This side of learning give an opportunity for medical student to see the basisof clinical laboratory activity. Students will become familiar with commonly usedlabware and instrumentation of a biochemical laboratory, learn the requirements andrules for work. Laboratory reports will be required for all experiments.4
RULES FOR WORKING IN A BIOCHEMICAL LABORATORY1. Notify your instructor at once in case of any accident or personal injuryto you or your neighbor, even if apparently minor.2. Wear safety goggles, if necessary.3. Locate safety equipment. During the first laboratory period familiarizeyourself with the location and operation of the safety features of thelaboratory, including: Fire extinguishers Fire blanket Laboratory first aid kits4. Know the ways to put out a fire.a) If it is open fire, such as a large chemical spill on a lab bench, thecorrect extinguisher should be used as follows:Pull the pin.Point the extinguisher (of dry) or hose (if CO2) at the base of thefire.Squeeze the handle while moving the extinguisher back andforth.NOTE: Be careful not to spread the fire by getting the nozzle of theextinguisher too close-- the material being emitted is underpressure.b) If it is a small, contained fire, such as in a flask or beaker, cover thecontainer with a piece of ceramic, cutting off the supply of oxygen tothe fire and thus putting it out.5. Be careful when using glassware. Cuts and burns are the mostcommon injuries that occur in chemistry laboratories.5
6. Wash chemicals from skin.a) If you receive a chemical burn from a caustic material, i.e. acid orbase, immediately wash the burned area with large quantities ofwater. Ask another student to summon the lab instructor.b) Wash your hands and face quickly and thoroughly whenever theycome into contact with a chemical.c) Always wash your hands, before leaving the lab since toxic chemicalsmay be transferred to the mouth at a later time.7. Be careful with flames. A lighted gas burner can be amajor fire hazard. a) General Precautions:1) The burner should be burning only for the period of time in which itis actually utilized.2) Before lighting your burner carefully position it on the desk awayfrom flammable materials, overhanging reagent shelves, flammablereagents such as acetone, toluene, and alcohol on neighboring desks.3) Be careful not to extend your arm over a burner whilereaching for something. b) Personal Precautions:1) Keep long hair tied back so that it cannot fall forward into a flame.2) Keep beards away from flames.8. Never point a test tube toward a laboratory neighbor or yourself when:a) Heating a test tube over a burner.b) Carrying out a reaction in a test tube.9.Wear suitable clothing. Wear clothing that will protect you againstspilled chemicals or flaming liquids. Hard-soled, covered footwear mustbe worn in the laboratory at all times--no sandals allowed.10. Assume that a particular reagent is hazardous unless you know for sure itis not.a) Never taste a chemical unless specifically directed to do so.b) If you are instructed to smell a chemical, point the vessel away fromyour face and carefully fan the vapors toward your face with your handand sniff gently.6
11. Never fill a pipette by using your mouth.12. Dilute concentrated acids and bases by pouring the reagent into water(room temperature or lower) while stirring constantly. Never pourwater into concentrated acids; the heat of solution will cause the water toboil and the acid to splatter.13. Use the fume hoods. Any experiment involving the use of or production ofpoisonous or irritating gases must be performed in a hood.14. Read the label. Read the label carefully, read it twice, before takinganything from a bottle. Many chemicals have similar names, such assodium sulfate and sodium sulfite. Using the wrong reagent can spoil anexperiment or can cause a serious accident.15. Eating, drinking, and smoking are strictly prohibited in the laboratory atall times because of the possibility of chemicals getting into the mouth orlungs through contamination. The chief hazard with smoking is fire.16. Avoid rubbing your eyes unless you know your hands are clean.17. Do not put hot objects on the desktops. Place hot objects on a wire gauze orceramic pad.18. Never throw lighted matches into a sink. They may ignite a discardedflammable liquid.19. Perform only authorized experiments. Unless authorized to do so by theinstructor, a student will be subject to immediate and permanent expulsionfrom the lab if:a) Attempting to conduct unauthorized experiments.b) Attempting variations of the experiment in the lab manualPerforming unauthorized experiments are dangerous. Students lack theexperience to recognize whether or not the chemicals and techniques aresafe.7
20. Keep your workspace orderly.a) Place tall items, such as graduated cylinders, toward the back of theworkbench so they will not be overturned by reaching over them.b) Clean up all chemical spills, scraps of paper, and glasswareimmediately.c) Keep drawers closed while working and the aisles free of anyobstructions, including chairs. d) Never place coats, books, and otherbelongings on the laboratory bench where they willinterfere with the experiment and are likely to be damaged.21. Clean up your workspace at the end of each laboratory period.a) Wash and wipe off your desktop.b) Be sure gas and water are turned off.22. Avoid using excessive amounts of reagent.a) Never use more than called for in the experiment.b) Do not return any excess chemical to the reagent bottle.c) If you are uncertain how to dispose of an excess of a specificchemical, consult your instructor.23. Discard waste chemicals as follows:a) Non – flammable water – soluble liquids – in Liquid Wastebottleb) Chemical solids, contaminated paper, contaminated brokenglassware – in Solid Waste bottlec) Paper products – in Trash cand) Organic solvents (exepting acids) – in Organic Waste bottlee) Glass tubing waste or broken glass – in Broken Glass Wooden Box24. Always add a reagent slowly--never "dump" in. Two reasons:a) Some reactions give off a lot of heat, and unless adding slowly, canbecome too vigorous and out of control.8
b) If you make a mistake and choose the wrong chemical, addingslowly decreases the possibility of causing a serious accident.25. Treat chemical spills as follows:a) Alert your lab neighbors and your instructor.b) Clean up the spill as directed by your lab instructor.26. Never fill a vessel more than about 70% capacity if you plan to heat it,unless specifically told to do so.27. Never work in the lab without the instructor present. This includes settingup equipment.28. Maintain a wholesome, businesslike attitude in the lab. Horseplay andother acts of carelessness are prohibited.29. Be aware of your lab neighbors' activities; you may be a victim of theirmistakes. If you observe improper techniques or unsafe practices:a) Advise your neighbor.b) Advise your instructor if necessary.30. Observe all specific precautions and modifications mentioned in eachexperiment.31. Do not remove any chemicals from the lab.32. For reasons of safety, you may not be allowed to attend lab if you are late.9
LABORATORY EQUIPMENTLaboratory equipment refers to the various tools and equipment used byscientists working in a laboratory. They are generally used either perform anexperiment or to take measurements and gather data. Larger or moresophisticated equipment is generally called a scientific instrument. Laboratoryequipment include tools such as Bunsen burners, and microscopes as well asspecialty equipment such as operant conditioning chambers, spectrophotometersand calorimeters. Another important type of laboratory equipment is laboratoryglassware such as the beaker or reagent bottle.Laboratory glassware refers to a variety of equipment, traditionally made ofglass, used for scientific experiments and other work in science, especially inchemistry, biochemistry and biology laboratories. Some of the equipment is nowmade of plastic for cost, ruggedness, and convenience reasons, but glass is stillused for some applications because it is relatively inert. Some kinds ofglassware and laboratory equipment shown below.IllustrationName10FunctionTest Tube-Used to prepare,store, sample andmix chemicalmaterials of allkinds.WireGauzeScreen-Used to support acontainer (such as abeaker or flask)during heating;helps to distributeheat evenly
IllustrationNameTest TubeRack-Used to store testtubes, either dry orcontaining somechemicals and keepthem in an uprightpositionGraduatedCylinder-Used to accuratelymeasure thevolume of a liquidchemical for use ina reaction; volumeis measured inmilliliters (mL)AlcoholBurner-A portable burnerused to heatsubstances byusing ethyl alcoholas fuelTest TubeTongs-Used for handlingtest tubes easilyand securely(test tubeholder)11Function
IllustrationNameScoopula(scapula)12Function-Used for handlingsmall quantities of apowdered materialwith minimumspillageRing Stand-Used to holdglassware in placeduring anexperiment; oftenuses a buret clamp orring clamp to holdglassware while it isbeing heatedBuret Clamp-Attaches to a ringstand and is used tosupport another pieceof lab equipmentsuch as a buret, testtube, or flaskRing-Used to supportglassware that isbeing heated;attached to a ringstand to providesupport.
IllustrationNameFunctionFunnel-Used for pouringliquids intocontainers that havesmall openings toprevent spillageBeaker-Usually used as acontainer for mixingor holding chemicals;it comes in manyshapes and sizes andis not used forprecise measurementof liquidsErlenmeyerFlask-A glass containerused to give onlyapproximatemeasurements ofvolume; it is usuallyused as a mixingvessel or a containerfor heatingThermometer -Used to measure thetemperature of asubstance13
LABORATORY TECHNIQUESWorking in the chemistry laboratory, you will be handling potentially dangeroussubstances and performing unfamiliar tasks. This section provides you with a guideto the safe laboratory techniques needed in this course. While performingexperiments throughout the year, refer back to this section any time you are unsureof proper laboratory techniques. Always read the label on a reagent bottle before using its contents. Always wear safety goggles when handling chemicals. Never touch chemicals with your hands. Never return unused chemicals to their original containers. To avoid waste, donot take excessive amounts of reagents.Pouring liquids1. Use the back of your fingers to remove the stopper from a reagent bottle. Holdthe stopper between your fingers until the transfer of liquid is complete. Do notplace the stopper on your workbench.2. Grasp the container from which you are pouring with the palm of your handcovering the label.3a. When you are transferring a liquid to a test tube or measuring cylinder, thecontainer should be held at eye level. Pour the liquid slowly, until the correctvolume has been transferred.3b. When you are pouring a liquid from a reagent bottle into a beaker, the reagentshould be poured slowly down a glass stirring rod. When you are transferring aliquid from one beaker to another, you can hold the stirring rod and beaker in onehand.Filtering a MixtureSometimes it is necessary to separate a solid from a liquid. The most commonmethod of separating such a mixture is filtration.1. Fold a filter paper circle in half and then quarters. Open the folded paper to forma cone, with one thickness of paper on one side and three thicknesses on the other.2. Put the paper cone in a filter funnel. Place the funnel in an iron ring clamped to aring stand. Moisten the filter paper with a small volume of distilled water, and14
gently press the paper against the sides of the funnel to achieve a good fit. (If thecorrect size of filter paper has been used, the top edge of the cone will be justbelow the rim of the filter funnel.)3. Place a beaker beneath the funnel to collect the filtrate. The tip of the funnelshould touch the inside surface of the beaker and extend about one inch below therim. Guide flow of liquid with a glass rod Mixture being filtered Filtrate Solidcollects on filter paper Stem touches side of beaker.4. Decant the liquid from the solid by pouring it down a glass stirring rod into thefunnel. Be careful to keep the liquid below the top edge of the cone of filter paperat all times; the liquid must not overflow. Finally, use a jet of distilled water from awash bottle to wash the solid into the filter.5. When the filtration is complete, wash the solid residue on the filter paper withdistilled water to remove traces of solvent. Dry the solid.6. If the filtrate contains a dissolved salt, it may be recovered by evaporation ifdesired.Using a Gas BurnerLaboratory gas burners produce various kinds of flames when different mixtures ofgas and air are burned. The two most common models are the Bunsen burner andthe Tirrell burner. Both have adjustable air vents;the Tirrell burner has a gas control valve in its base.1. Examine your laboratory burner. Determine which model you have.2. Connect the burner to the gas supply with rubber tubing.3. Close the air vents. If your model is a Tirrell burner, also close the gas controlvalve at the base of the burner.4. Hold a lighted match at the top of the burner tube and turn on the gas supply. Dothis by opening the main gas supply valve located on top of the nozzle to whichyou attached the rubber tubing. (If your model is a Tirrell burner, first open themain gas supply valve, then open the gas control valve at the base approximatelyonehalf- turn.) You should get a yellow, or luminous, flame. When a Tirrell burneris used, the main gas supply valve should be opened fully and the gas flowregulated by the gas control valve. Gas supply to a Bunsen burner is controlled bythe main gas valve.5. Open the air vents slowly, to admit more air into the flame, to produce a lightblue (nonluminous) cone-shaped flame. If the flame “blows out” after lighting, the15
gas supply should be reduced.6. Adjust the air vents and gas supply to produce the desired size of flame. Formost laboratory work, the blue inner cone of the flame should be about 1 inch highand free of yellow color. If you want a smaller flame, close the air vent slightly andreduce the gas supply. You will learn how to control the burner flame by trial anderror.7. Turn the burner off at the main gas supply valve when done. CAUTION:Confine long hair and loose clothing when using a gas burner. Do not reach over aburner. Ensure that flammables are not being used when a burner is lit. Never leavea lit burner unattended. Know the location of fire extinguishers, the fire blanket,and safety shower.Heating LiquidsHeating a Liquid in a Test TubeThe correct procedure for heating liquids in the laboratory is important tolaboratory safety.1. Adjust your gas burner to produce a gentle blue flame.2. Fill a test tube one-third full with the liquid to be heated.3. Grasp the test tube with a test-tube holder, near the upper end of the tube.4. Hold the test tube in a slanting position in the flame, and gently heat the tube ashort distance below the surface of the liquid.5. Shake the tube gently as it is being heated, until the liquid boils or reaches thedesired temperature.CAUTION: Never point the open end of a test tube you are heating either towardyourself or anyone working nearby. Never heat the bottom of the test tube.Heating a Liquid in a BeakerMany laboratory experiments require the use of a hot water or boiling water bath.This procedure describes how to assemble a water bath.1. Fasten an iron ring securely to a ring stand so that it is 2–4 cm above the top of agas burner placed on the ring stand base.2. Place a 250-mL beaker one-half-filled with water on a wire gauze resting on theiron ring.3. Light your gas burner and adjust it to produce a hot flame.4. Place the burner beneath the wire gauze. For a slower rate of heating, reduce theintensity of the burner flame.CAUTION: Never heat plastic beakers or graduated glassware in a burner flame.Never let a boiling water bath boil dry; add water to it as necessary.16
Inserting Glass TubingIn many experimental procedures, you are required to insert a thermometer or alength of glass tubing into a hole in a rubber stopper. It is essential that you knowthe correct way to do this. Otherwise, serious injury may result.1. Lubricate the end of the glass tubing with a few drops of water, washing-upliquid, glycerol, or vegetable oil.2. Hold the glass tubing close to where it enters the hole in the rubber stopper.Protect your hands with work gloves or pieces of cloth.3. Ease the tubing into the hole with a gentle twisting motion. Push the tubingthrough the hole as far as is required. Do not use force!4. Wipe excess lubricating material from the tubing before continuing with theexperiment.5. If the glass tubing is to be removed from the stopper, it should be doneimmediately after the experiment is completed.CAUTION: The end of the glass tubing should be fire-polished or smoothed withemery cloth before being inserted into a rubber stopper. Do not try to bend theglass tubing—it will break. Ensure that the palm of the hand holding the rubberstopper is not in line with the emerging glass tube.Measuring MassIn many experiments you are required to determine the mass of a chemical used orproduced in a reaction. An object’s mass is determined by measuring it on abalance. When you determine the mass of an object, you are comparing its masswith a known mass. In the SI, the base unit of mass is the kilogram. Check the balance before you start. The balance pan should be empty and clean,and all masses (or dials) should be set on zero. The balance must be level. Checkthe bubble level on the base. See yourteacher if you need assistance with checking your balance. Objects to be placed directly on the balance pan must be clean, dry, and at roomtemperature. Solid chemicals and liquids must never be put directly on the balancepan. Liquid samples should be placed in beakers or sealed containers. Solidchemicals can be conveniently placed in beakers, disposable plastic weighingboats, or on 10-cm squares made of glossy paper. The balance is a precision instrument that must be handled with care. To avoid17
damaging it, always be sure that the balance is in an arrested position when objectsare placed on or removed from the pan. Always turn all dials slowly. Never move or jar either a balance or the balance table. If you spill a chemical on or near the balance, clean it up immediately. If indoubt, inform your teacher. A camel-hair brush is usually provided to wipe minutetraces of solid from the balance pan before you use it. Never attempt to measure an object with a mass greater than the maximumcapacity of the balance. When you are done, return all the masses to zero, and make sure the balance panis clean.Do not attempt to use a balance until your teacher has demonstrated the propertechnique.Measuring VolumeVolume measurements are important in many experimental procedures. Sometimesvolume measurements must be accurate; other times they can be approximate.Most volume measures in the laboratory are made using equipment calibrated inmilliliters. Although some beakers have graduation marks, these marks aredesigned only for quick, rough estimates of volume. Accurate volumes must bemeasured with pipets, burets, or volumetric flasks.Using a Graduated CylinderHalf-fill a 100-mL graduated cylinder with water, and set the cylinder on yourlaboratory bench. Examine the surface of the water. Notice how the surface curvesupward where the water contacts the cylinder walls. Thiscurved surface is called a meniscus.A volume measurement is always read at the bottom of the meniscus, with youreye at the same level as the liquid surface. To make the meniscus more visible, youcan place your finger or a dark piece of paper behind and just below the meniscuswhile making the reading.Graduated cylinders are available in many capacities. The 100-mL cylinder ismarked in 1-mL divisions, and volumes can be estimated to the nearest 0.1 mL.The last digit in these measurements is therefore significantbut uncertain.Using a PipetA pipet is used to accurately measure and deliver volumes of liquids. Two typesare in common use: volumetric pipets and graduated, or measuring, pipets. The use18
of a volumetric pipet will be described. A volumetric pipet has a single calibrationmark and delivers the volume printed on the bulb of the pipet at the temperaturespecified. (A graduated pipet has calibrations along the length of the pipet.)Volumes can be measured more accurately with a volumetric pipet than with agraduated pipet.1. Place the tip of the pipet below the surface of the liquid to be dispensed.2. Compress a pipet bulb and press the hole in the bulb against the upper end of thepipet. CAUTION: Never fill a pipet by applying suction with your mouth. Neverpush the pipet bulb over the end of the pipet.3. Slowly release pressure on the bulb so that liquid is drawn into the pipet to alevel about 2 cm above the calibration mark.4. Remove the bulb and simultaneously place your index finger over the end of thepipet. If you are right-handed, you should hold the pipet in your right hand and thepipet bulb in your left.5. Keep your index finger pressed firmly against the end. Withdraw the pipet fromthe liquid, and carefully wipe the outside of the stem with a paper towel.6. Slowly reduce the pressure on your finger to allow the excess liquid to drain intoa waste receiver, until the bottom of the meniscus is at the calibration mark.7. Now, deliver the remaining liquid in the pipet into the designated receiver.When releasing liquid from a volumetric pipet, let it drain completely. Wait 20seconds, then touch the pipet tip to the side of the flask or surface of the liquid.This action will remove some, but not all, of the liquid in the tip. The pipet deliversthe stated volume when this procedure is followed. A small amount of liquidremains in the tip. Do not blow this out into your receiver.19
THE FORMAT OF A LABORATORY REPORTTITLE. This should give both the substance or system studied and the method ofphysical measurement made, or of property determined.OBJECT OR PURPOSE. One sentence; may not be necessary if it just duplicatesthe title.PRINCIPLE OF METHOD. Briefly discuss the theory underlying the laboratoryand briefly give the principle of the method, and use this as opportunity to writedown any equations you will use in results and calculations.PROCEDURE. You may refer to the lab. manual for this, but you should anymodifications to the procedure and indicate possible improvements and sources oferrors or other general problems. Draw diagrams of apparatus setup if required.RESULTS AND CALCULATIONS. Tabulating usually saves a lot of time andspace. Embed both the graphs and tables in the text. Be sure to make the graphsreadable. For repeated calculations, give one example and one only, in full.CONCLUSIONS. Your major findings in a few lines.20
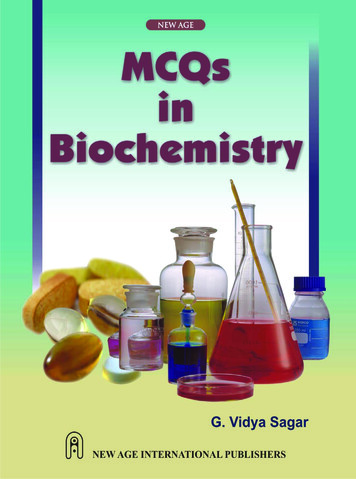
EXPERIMENTAL PARTExperiment 1.Quantitative assay of proteins by the biuret methodPrinciple: The biuret method is based on the ability of protein solutions to changetheir color on red - violet due to the interaction with a solution of copper sulfate inalkaline media. The intensity of coloring is proportional to the proteinconcentration in solution.Material: blood serum.Reagents: 0.9% solution of NaCl, biuret reagent (0.15 g CuSO4 5H2O,and 0.6 g NaKC4H4O6 4H2O (sodium potassium tartrate, or Rochelle salt), wasdissolved in 50 ml of H2O under vigorous stirring, 30 ml 10% solution of NaOH,and 0.1 g of KI was added; mixture must be dissolved in 100 ml of water).Instruments and equipment: PEC, micropipettes, tubes, glass rods, 10 mmcuvettes.Procedure:1. Put 0.1 ml of serum in the 1st tube and add 5 ml of biuret reagent.2. Put 0.1 ml of 0.9 % solution of NaCl in the 2nd tube and add 5 ml of biuretreagent.3. Stir both test tubes very gently in order to avoid foaming of liquid.4. Incubate for 30 min at room temperature to let the colors develop.5. Place colored solutions in different cuvettes (thickness of layer is 1 cm) andanalyze on a photoelectric colorimeter with a green filter (wave length is540 nm). Use a cuvette with mix of biuret reagent and 0.9 % solution ofNaCl as a test.Determine a protein concentration (g/l) using the calibration curve (Fig.1)Fig. 1. Calibration curve (A – extinction, C – protein concentration (g/l))21
Note: the total protein in normal serum varies from 65 to 85 g/l.Write down the results and draw to a conclusion.Experiment 2.Color reactions for amino acids and proteins.Properties of proteinsPrinciple: Color reactions on proteins are qualitative reactions caused by presenceof specific chemical groups. Some of these reactions are widely used inbiochemical practice to study the structure and amino acid composition of proteinsand their quantitative determination.Material: 1% solutions of egg white and gelatin.Reagents: 10% and 30% solutions of NaOH, 1% solution of CuSO4 5H2O,1% solution of ninhydrin, 95% solution of acetone, 5% solution of(CH3COO)2Рb, HNO3 (conc.), 1% solution of C6H7NO3S, 5% solution of HCl,0.5% solution of NaNO2, 10% solution of Na2CO3.Instruments and equipment: test tubes, pipettes, funnels, glass rods, paper filters,glasses 100 and 500 ml, cylinders, alcohol lamps, holders.Procedure: Part A. Preparation of standard protein solutionEgg protein is a 10% aqueous solution of several proteins and in contrast to theyolk does not contain large amounts of other organic compounds (lipids andcarbohydrates). Almost 70% of egg protein is egg albumin, which is easilyseparated from the globulin fraction by 10-fold dilution of the egg white withdistilled water. In this case, the globulin proteins precipitate fraction and easilyseparated from the solution by filtration or centrifugation. Egg albumin remains insolution.1. To separate the protein from the yolk gently, make holes in the shell on bothends and the protein will flow out into a beaker (500 ml). Put 250 ml of distilledwater in the same beaker and mix thoroughly by means of a glass rod.2. Transfer the solution into a measuring cylinder and add distilled water until thetotal volume riches 300 ml. Left the solution for 30 minutes at room temperature toform a floc of globulins.3. Drain 15 ml of the resulting suspension through a filter. The filtrate containingovalbumin will be used for further work.22
Part B. Color reaction on proteins1. The ninhydrin test (on the amino group in α-position).Principle: Proteins, polypeptides and free α-amino acids, when heated, reactwith ninhydrin with the formation of the condensation product, painted in purplecolor:Pour 5 drops of 1% solution of egg albumen in test tube 1. Put 5 drops of 1%solution of gelatin in test tube 2. Pour 0.5 ml of 1% solution of ninhydrin in 95%solution of acetone in each tube and heat each tube carefully to boiling. There willa purple-blue color in test tube 1. Write down the results and conclusion.2. Foll reaction (cysteine, cystine).Principle: When boiling the protein with alkali from cysteine (cystine) easily splitoff sulfur as hydrogen sulfide. It forms sodium sulfide in the alkaline medium:СН 2 -SНСН 2 ОН СН-NH2 2 NaOH CООНcysteine СН-NH 2 Na 2 S 2 Н 2 О COOHserineLead acetate reacts with alkali forming sodium plumbate:(СН 3 СОО) 2 Рb 2 NaOH Pb(ONa) 2 2 CH 3 COOHSodium sulfide by reaction with sodium plumbite gives a black precipitateof lead sulfide:Na 2 S Pb(ONa) 2 2 Н 2 О PbS 4 NaOH23
Pour 5 drops of 1% solution of egg albumen in test tube 1. Put 5 drops of 1%solution of gelatin in test tube 2. Add 5 drops of 30% NaOH and 1 drop of 5%lead acetate solution to each tube. Boil each test tube carefully and observeformation of black precipitate in test tube 1. Write down the results andconclusion.3. Xanthoproteic reaction (on the aromatic amino acids).Principle: When heated with concentrated nitric acid, the protein provides yellowcolor. The reaction is caused by the presence of cyclic amino acids in proteins(phenylalanine, tryptophan and tyrosine) and is based on the formation of theirnitro derivatives of amino acids which have a yellow color:In alkaline mediu
Laboratory Manual of Biochemistry for foreign medical students / E.Sh. Yenikeyev, N.V. Terekhina. Part 1. Ulyanovsk : Ulyanovsk State University, 2015. 42 р. This manual is designed according to syllabus of biochemistry for students of Medical faculty (spec