Transcription
Fortinet FortiGate Virtual Appliance for Microsoft AzureQuick Start Guide
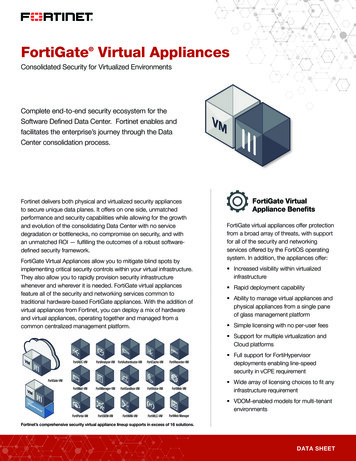
FORTINET FORTIGATE VIRTUAL APPLIANCE FOR MICROSOFT AZURE QUICK START GUIDEFORTINET FORTIGATE VIRTUAL APPLIANCE FOR MICROSOFT AZURE QUICK START GUIDEThe following section will take you through a step-by-step process in order to deploy Fortinet FortiGate on Azure.What Is the FortiGate Enterprise Firewall for Azure?The Fortinet FortiGate Enterprise Firewall offers enterprise-class firewall and network protection for your cloud-based applications and infrastructure across a broadspectrum of potential security threats. Empowered by advanced IPC technology, FortiGate helps to protect against known threats and newly emerging threatsthrough anomaly-based detection that identifies attack behavior profiles rather than specific past exploits. FortiGate delivers complete content and network protection,antivirus, application control, web filtering, and VPN along with advanced features such as an extreme threat database, vulnerability management, and flow-basedinspection work, all with the scalability and functionality of Azure.2
FORTINET FORTIGATE VIRTUAL APPLIANCE FOR MICROSOFT AZURE QUICK START GUIDEWhy FortiGate on Azure?Built-in Azure firewalls provide a good baseline level of firewall tools, including a web application firewall; however, when your Azure VNETs are interacting with theopen Internet, it is essential to augment these baseline firewall features. FortiGate’s advanced threat detection technology helps to identify threats before they arewidely known and recognized. The easy-to-use and streamlined FortiGate user interface allows quicker setup with more granular control than many standard webapplication firewalls. Configuring multiple high-availability options is relatively straightforward. FortiGate provides next-generation firewall functionality, securing thevirtual infrastructure while also providing VPN and Internet gateway protection.The Fortinet FortiGate-VM firewall technology for Azure delivers complete content and network protection by combining stateful inspection with a comprehensivesuite of powerful security features. Application control, antivirus, IPS, web filtering, and VPN along with advanced features such as an extreme threat database,vulnerability management, and flow-based inspection work in concert to identify and mitigate the latest complex security threats. The security-hardened FortiOSoperating system is purpose-built for inspection and identification of malware.The FortiGate Virtual Appliance offers protection from a broad array of threats, with support for all of the security and networking services offered by the FortiOSoperating system. IPS technology protects against current and emerging network-level threats. In addition to signature-based threat detection, IPS performsanomaly-based detection, which alerts users to any traffic that matches attack behavior profiles.How to Deploy the Fortigate Next-Generation Firewall in Microsoft Azure Using the Azure Portal and ARMThe FortiGate Next-Generation Firewall for Microsoft Azure is deployed as a virtual machine in Microsoft’s Azure cloud (IaaS). You will see in the following sectionshow to deploy and configure the FortiGate in the Azure Marketplace. FortiGate Next-Generation Firewall (BYOL)—This is currently the only licensing model that is supported. Fortinet also offers a 60-day evaluation license.3
FORTINET FORTIGATE VIRTUAL APPLIANCE FOR MICROSOFT AZURE QUICK START GUIDEBEFORE YOU GET STARTEDBefore you can begin to deploy the FortiGate Next-Generation Firewall, you will need to make sure the following conditions have been met in order to successfullycomplete the installation: Create a Microsoft Azure account Obtain a license (choose one of the following):1. Purchase a FortiGate Next-Generation Firewall license for Microsoft Azure http://www.windowsazure.com/en-us/account/2. Register to receive an evaluation license from Fortinet 4
FORTINET FORTIGATE VIRTUAL APPLIANCE FOR MICROSOFT AZURE QUICK START GUIDEStep-by-Step Instructions to Get the FortiGateUp and Running on AzureThe following section will take you through a step-by-step process inorder to deploy a Single Instance FortiGate on Azure.1. Log In to the Azure Portal You can access the Azure portal using the following URL:https://portal.azure.com/ You will be redirected to: https://login.microsoftonline.com/(abbreviated URL due to its length)The current Azure portal is the portal through which you willstart creating and managing Azure services, such as theFortigate NGFW Firewall Virtual Appliance. The Azure portalincludes a dashboard that you can configure to work with andmonitor the resources in your environment. The Azure portallets you administer all of your Azure platform resources in asingle location. The current Azure portal uses ARM, althoughsome classic model functionality is exposed through the newportal. The legacy or classic portal still is available for use, butthe new portal has been released for general availability and isthe portal you should use.5
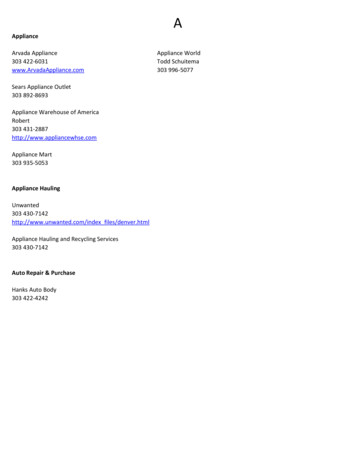
FORTINET FORTIGATE VIRTUAL APPLIANCE FOR MICROSOFT AZURE QUICK START GUIDE2. Enter User Credentials and Sign InEnter your user credentials: Username: Your Username (2) Password: Your Password (3) Click “Sign in.” (4)3. Successful Login to AzureOnce you have successfully logged in to the Azure portal, you willobserve the Microsoft Azure Dashboard.Note the following login details in the top right-hand corner of theMicrosoft Azure Dashboard. If you click here, you will see options to: Sign out Change your password View your permissions View your bill6
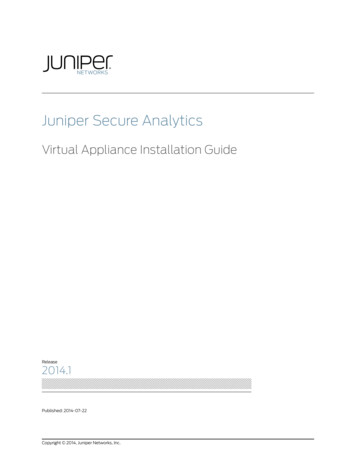
FORTINET FORTIGATE VIRTUAL APPLIANCE FOR MICROSOFT AZURE QUICK START GUIDE4. Creating the NEW FortiGate in the Azure MarketplaceIn the Microsoft Azure portal, follow these steps: In the upper left-hand corner (5), click New. In the New column, enter Fortinet in the “search themarketplace” and enter Return (6).NOTE: There are alternative ways of achieving the above; this isjust one of the examples.7
FORTINET FORTIGATE VIRTUAL APPLIANCE FOR MICROSOFT AZURE QUICK START GUIDE5. Fortinet Virtual Appliances Available in the Azure MarketplaceYou will now see something similar to this, which depicts thereturn of the “Fortinet” search results.6. Select the FortiGate NGFW Single VM from the AzureMarketplaceSelect FortiGate NGFW Single VM (7).8
FORTINET FORTIGATE VIRTUAL APPLIANCE FOR MICROSOFT AZURE QUICK START GUIDE7. Select the FortiGate NGFW Deployment ModelOnce you have selected the FortiGate NGFW Single VM, you willautomatically be taken to the Resource Manager Panel, whereyou can create a deployment model.In the Select a deployment model, select the default ResourceManager (8).Then click Create (9).NOTE: Though there is no option from the dropdown menu toselect a different deployment model, this is where you wouldselect the Classic deployment model option.So what exactly are the Azure deployment models?Azure provides two deployment models, the Classic model andthe Azure Resource Manager (ARM) model. The foundationof each model is an application-programming interface (API),which is the Resource Manager API for ARM and the ServiceManagement API for the classic model. Although developerscan write software to interact with these APIs directly throughthe REST API, it is more common to interact with these APIsindirectly using the Azure portal, the Azure PowerShell onWindows, or the Azure Command-Line Interface (CLI) on aWindows, OS X, or Linux computer.In contrast to common belief, these two models are compatiblewith each other, but ARM simplifies the deployment andmanagement of resources by managing them as a singleresource group. Most newer resources support ARM, andeventually all resources will. However, how you create, configure,and manage Azure resources is different in these two models.9
FORTINET FORTIGATE VIRTUAL APPLIANCE FOR MICROSOFT AZURE QUICK START GUIDE8. Configuring the FortiGate NGFW Basic SettingsIn the Configure basic settings panel (10), enter: FortiGate VM Name—Enter the name of the FortiGate VirtualAppliance. (Only alphanumeric characters are permitted, andthe value must be between 1 and 15 characters.) FortiGate Administrative Username—Enter theadministrator username for the FortiGate Virtual Appliance.(The administrator username for the FortiGate VirtualAppliance cannot be “admin.”) If you do enter “admin,” youwill get an error message stating that the specified usernameis NOT allowed. In addition to this, the username can NOTcontain special characters. FortiGate Password—Enter the administrator accountpassword for the FortiGate Virtual Appliance. (The administratoraccount password MUST be between 6 and 72 characters,and MUST contain characters from at least three of thefollowing groups: uppercase characters, lowercase characters,numbers, and special characters.) Confirm password—Re-enter the administrator accountpassword for the FortiGate Virtual Appliance. Subscription—The only available subscription for theFortiGate Virtual Appliance in Azure is the Pay-As-You-Gosubscription model, so just leave this as “default”. Resource group—Enter the Resource group name, andnote that only alphanumeric characters, periods, underscores,hyphens, and parentheses may be used. In addition to this,a Resource group name can NOT end with a “.” (With AzureResource Manager, everything you provision on Azure is aresource. You can put multiple resources into a resourcegroup. Managing resource groups and creating and updatingresource groups are the most common operations usingAzure Resource Manager.)10
FORTINET FORTIGATE VIRTUAL APPLIANCE FOR MICROSOFT AZURE QUICK START GUIDE Location—Select a location from the drop-down menu. Thelocation refers to allowing you to administer all of your Azureplatform resources in a single location.Once you have confirmed that all the above settings are correct,click “OK.” (11)NOTE: If any of the values are incorrectly defined, you will see a“Red !”; otherwise, you will see a “Green ü.”11
FORTINET FORTIGATE VIRTUAL APPLIANCE FOR MICROSOFT AZURE QUICK START GUIDE9. Configuring the FortiGate NGFW Network and Storage SettingsIn the Configure Network and Storage Options panel, we willlook at each configuration option individually. Let us first startwith what is presented by default when you select the Networkand Storage Settings.As you can see, this is what is presented to you without anyconfiguration changes that have yet to take place.Select the Virtual network settings (12).12
FORTINET FORTIGATE VIRTUAL APPLIANCE FOR MICROSOFT AZURE QUICK START GUIDE10. Configuring the FortiGate NGFW Network and Storage Settings(Virtual Network)The first question that comes to mind about a virtual network(VNET) is why do we need a VNET? Well, the answer is a simpleone and the basic principle here is that we need a VNET in orderto be able to build a private network in the Azure cloud.An Azure Virtual Network, which is also known or referred to as aVNET, is something that you only create in Microsoft Azure. TheAzure Virtual Network enables virtual machines and the otherresources that are part of the Azure Virtual Network to communicatewith each other privately. It is the Azure Virtual Network thatprovides this communication function. If we did not have an AzureVirtual Network, or if a virtual machine was outside the AzureVirtual Network, then communication with other virtual machineswould not be possible.After you have selected the Virtual network settings, you willobserve that you can either create a new virtual network orselect an existing one. If you select an existing virtual network, itwill need to have at least two subnets in order for the FortiGateNGFW to route between them. In a typical deployment, the“outside” subnet just connects the FortiGate outside interface tothe Azure Public Load Balancer and therefore does not need tobe very large.Here you are just going to accept the default Virtual networkname of FortigateProtectedVNet and the Address space of10.1.0.0/16. Click OK (13).NOTE: No changes have been made here.13
FORTINET FORTIGATE VIRTUAL APPLIANCE FOR MICROSOFT AZURE QUICK START GUIDE11. Configuring the FortiGate NGFW Network and Storage Settings(Subnets)Virtual networks in Azure are logically isolated from one another.In a VNET, you configure the IP address ranges, subnets, routetables, gateways, and security settings in a similar manner inyour own data center. Virtual machines within the same VNETcan by default communicate with one another. Connectivity fromoutside the virtual network, such as from within Azure or fromthe Internet, to a virtual machine requires a private or a public IPaddress.After you have selected the Subnets settings, you can also observethat you already have the following subnets defined: Outside Subnet name: PublicFacingSubnet Outside Subnet address prefix: 10.1.0.0/24 Internal Subnet name: FortigateInternalSubnet Internal Subnet address prefix: 10.1.1.0/24The Outside and Inside address fields are prepopulated withthe first useable address in the subnet (Azure uses the first fouraddresses in each subnet). However, if deploying to an existingsubnet, this address may already be in use.So how does the IP addressing work? When a virtual machineis deployed into a VNET, its internal IP address is assignedfrom the subnet you specify and is dependent on the order inwhich it was provisioned, unless a static IP has been specified.For example, the FortigateInternalSubnet subnet created usesthe address prefix of 10.1.1.0/24. The first four IP addressesof each subnet are reserved. With this knowledge in hand, it iseasy to deduce that the first IP address available in this subnetwill be 10.1.1.5. Unless otherwise specified, a virtual machinewill be assigned the next available IP address from the subnet towhich it was assigned at provisioning time.14
FORTINET FORTIGATE VIRTUAL APPLIANCE FOR MICROSOFT AZURE QUICK START GUIDESelect the Configure subnets settings (14).Here you are just going to accept the default Subnetsconfiguration and click OK (15).NOTE: No changes have been made here.15
FORTINET FORTIGATE VIRTUAL APPLIANCE FOR MICROSOFT AZURE QUICK START GUIDE12. Configuring the FortiGate NGFW Network and Storage Settings(Virtual Machine Size)In the Azure Marketplace, the FortiGate virtual machines comein a variety of sizes, beginning with the D2 series with two coresup through the D4 series virtual machines with up to eight cores.Each virtual machine size within each series has different limitsfor the amount of memory, number of NICs, maximum numberof data disks, size of cache, maximum IOPS and bandwidth, andmaximum network bandwidth.Select the Virtual machine size settings (16).Select the View all setting (17).After you select the View all setting, you will be presented with allthe available FortiGate virtual machine sizes, which include: A4 Standard D2 Standard D3 Standard D4 Standard D2 V2 Standard D3 V2 Standard D4 V2 StandardSo what are “A4 Standard” and “D4 Standard?” Number ofvNICs? What would be the use case for selecting the particular“virtual machine size?” Where can you find more guidance,so when you are selecting and setting this up you are moreinformed.16
FORTINET FORTIGATE VIRTUAL APPLIANCE FOR MICROSOFT AZURE QUICK START GUIDEThe “A4 Standard” and “D4 Standard,” etc., are what are referredto as instance sizes. The instances are differentiated primarilyon CPU and memory, although they also have different levels ofsupport for multiple vNICs. For more information, please click onthe following n/articles/virtual-machines-windows-sizes/But wait! When you select a “virtual machine size,” why do you notsee the number of vNICs? From the “choose a size” panel, youhave no idea and would have to guess. The answer is that Azurehas never prioritized multiple vNICs. So, the Azure Marketplacetemplates have a bias against them, and it’s extremely difficult tocreate a variable number of vNICs. So, all templates in the AzureMarketplace are static at two vNICs.If you require more than two vNICs, you will need to deploy acustom template at this point. Please contact the Azure team(azuretech@fortinet.com) for assistance.17
FORTINET FORTIGATE VIRTUAL APPLIANCE FOR MICROSOFT AZURE QUICK START GUIDE12a. Configuring the FortiGate NGFW Network and StorageSettings (Virtual Machine Size)In this example you are going to select and use the D2 V2Standard instance size.Select the D2 V2 Standard instance size (18).Then click Select (19).18
FORTINET FORTIGATE VIRTUAL APPLIANCE FOR MICROSOFT AZURE QUICK START GUIDE13. Configuring the FortiGate NGFW Network and StorageSettings (Storage Account)Without going into the details of the different types of storageavailable in Azure, it is important to note (there are few exceptions)that all storage types are created from an Azure StorageAccount. The Azure Storage Account in turn determines certaincharacteristics for the storage, such as whether the storage islocally redundant or geo-redundant, and whether the storage isbased on standard HDDs or SSDs.You can either create a new storage account or select an existingone for the FortiGate Virtual Appliance, but all resources shouldbe in the same location (in this example: West Europe).Select the Storage Account settings (20).Enter a Storage Account Name (21). (This account name cancontain lowercase characters and numbers, and must bebetween 3 and 24 characters.)Select the Performance (22). (In this instance only standard isavailable.)Select the Replication option you wish to use (23). There are twooptions available: Locally redundant storage (LRS) Geo-redundant storage (GRS)Locally redundant storage (LRS) is where all data in the AzureStorage Account replicates synchronously to three differentstorage nodes within the primary region that was chosen whencreating the Azure Storage Account.Geo-redundant storage (GRS) is where every entity is replicatedinto two data centers.19
FORTINET FORTIGATE VIRTUAL APPLIANCE FOR MICROSOFT AZURE QUICK START GUIDEThe data in the Azure Storage Account is always replicated inorder to ensure durability and high availability. Be aware thatsome settings cannot be changed after the storage account hasbeen created.Select OK (24).20
FORTINET FORTIGATE VIRTUAL APPLIANCE FOR MICROSOFT AZURE QUICK START GUIDE14. FortiGate NGFW Network and Storage Settings (Completed)After successfully completing the FortiGate NGFW Network andStorage Settings, you should see something similar to the above.Select OK (25).21
FORTINET FORTIGATE VIRTUAL APPLIANCE FOR MICROSOFT AZURE QUICK START GUIDE15. Configuring the FortiGate NGFW IP Address AssignmentsSettings (Public IP)Select the FortiGate IP Address Assignments Settings (Public IP)panel (26).Select the Public IP address name (new) publicip-fortigatesettings (27).NOTE: Don’t worry about Domain name label and Public IPAddress Type, as this will be covered next.22
FORTINET FORTIGATE VIRTUAL APPLIANCE FOR MICROSOFT AZURE QUICK START GUIDE15a. Configuring the FortiGate NGFW IP Address AssignmentsSettings (Public IP Address Name)This is where you can set the Public IP Address Name and theAssignment to either Dynamic or Static.You will leave these as default.Select OK (28).NOTE: No changes have been made here.23
FORTINET FORTIGATE VIRTUAL APPLIANCE FOR MICROSOFT AZURE QUICK START GUIDE15b. Configuring the FortiGate NGFW IP Address AssignmentsSettings (Domain Name)Next, you need to enter a valid DNS Domain Name Label(which is a DNS prefix). This will be used for the Public IPAddress. Enter a Domain name label (29). Select either a Static or Dynamic Public IP Address Type (30).In the Public IP Address Type, a “Static” Public IP Addresswill be reserved across reboots and shutdown states, while a“Dynamic” address will be
The FortiGate Virtual Appliance offers protection from a broad array of threats, with support for all of the security and networking services offered by the FortiOS operating system. IPS technology protects against cur