Transcription
PLATINUM DIGITAL HDNetwork Video RecorderINSTRUCTION MANUAL1
Important InformationFCC VerificationThis equipment has been tested and found to comply with the limits forClass B digital device, pursuant to part 15 of the FCC Rules. These limitsare designed to provide reasonable protection against harmful interference in a residential installation. This equipment generates, uses andcan radiate radio frequency energy and, if not installed and used in accordance with the instructions, may cause harmful interference to radioor television reception, which can be determined by turning the equipment off and on, the user is encouraged to try to correct the interferenceby one or more of the following measures: Reorient or relocate the receiving antenna Increase the separation between the equipment and the receiver Connect the equipment into an outlet on a circuit different from thatto which the receiver is connected Consult the dealer or an experienced radio/TV technician for helpThese devices comply with part 15 of the FCC Rules. Operation is subject to the following two conditions: These devices may not cause harmful interference These devices must accept any interference received, including interference that may cause undesired operationImportant Notice - All jurisdictions have specific laws and regulationsrelating to the use of cameras. Before using any camera for any purpose, it is the buyer’s responsibility to be aware of all applicable lawsand regulations that prohibit or limit the use of cameras and to complywith the applicable laws and regulations.FCC Regulation (for USA): Prohibition against eavesdroppingExcept for the operations of law enforcement officers conducted underlawful authority, no person shall use, either directly or indirectly, a device operated pursuant to the provisions of this Part for the purposeof overhearing or recording the private conversations of others unlesssuch use is authorized by all of the parties engaging in the conversation.Warning - Changes or modifications made to this device not approvedexpressly by the party responsible for compliance could void the user’sauthority to operate the equipment.Important Safety Instructions Make sure product is fixed correctly and stable if fastened in place Do not operate if wires and terminals are exposed Do not cover vents on the side of the device and allow adequate spacefor ventilation Only use the power adapter supplied with the NVRPassword InformationThis NVR does not have a default password. A password is created during the Setup Wizard. If password protection has been enabled and youhave forgotten your password, you can enter a super password. Click“Forgot Password” then input the NVR’s MAC address without the colons, for example, EC71DBE32877 - see page 42 for more information.The NVR’s Mac address can also be obtained using SwannView Link forWindows. Please download it from our website.About this ManualThis instruction manual is written for the NVR-7300 and was accurate atthe time it was completed. However, because of our on-going efforts toconstantly improve our products, additional features and functions mayhave been added since that time. We encourage you to visit our websiteto check for the latest updates and product announcements.2
ContentsImportant Information 2Recording: Schedule 27Contents 3Chapter 5 - Playback & Backup 28Chapter 1 - Live View 4Search: Playback 29Live View 4 & 8 Channel 5The Playback Interface 30Live View 16 Channel 6Search: Event 32Chapter 2 - Menu 7Search: Backup 33Menu Layout 8Chapter 6 - System Configuration 34Chapter 3 - Camera Configuration 9System: General 35IP Channel 10System: User 36Display: Camera 11System: Maintenance 37Creating a Privacy Mask 13Alarm: Exception 38Camera Parameter 14Device: HDD 39Recording: Encode 16Display: Output 40Alarm: Motion 17Network: General 41Motion Detection 18Network: Advanced 42Motion Detection Schedule 19Chapter 7 - System Status 43Motion Detection Tips 20Search: Log Search 44Alarm: Video Loss 21Network: Status 45Video Loss Schedule 22Device: S.M.A.R.T 46Controlling an Optical Zoom & Auto-focus Camera23System: System Information 47Chapter 4 - Recording Configuration 24Warranty Information 48Recording: Encode 25Helpdesk & Technical Support 49Recording: Option 263
Live ViewLive View is the default displaymode for the NVR. Each camera connected will be displayedon-screen. You can check thestatus or operation of your NVRand cameras using the iconsand Menu Bar on the Live Viewscreen. Right-click the mouseto access the Menu Bar.09/12/2014 10:30:15 Tue09/12/2014 10:30:15 TueCamera109/12/2014 10:30:15 TueCamera209/12/2014 10:30:15 Tue09/12/2014 10:30:15 TueCamera24
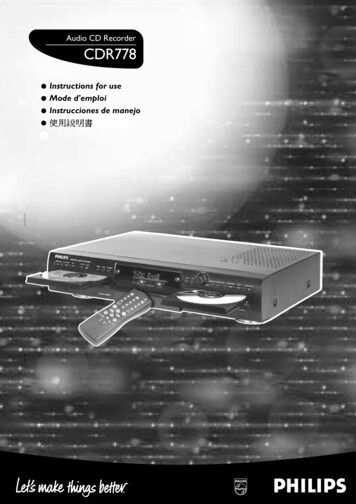
Live View: 4 & 8 Channel09/12/2014 10:30:15 TueDouble-click a livevideo channel toview full screen.09/12/2014 10:30:15 TueStatus IconsCamera1Camera209/12/2014 10:30:15 TueCamera Toolbar09/12/2014 10:30:15 TueClick & drag a livevideo channel toreposition it.Menu Bar11. Opens the Menu.2. Click to view a single camera.3. Click to view four cameras.4. Click to view eight cameras.234567895. Click to view nine cameras.8. Click to manually record the se6. Click to view the next screen in lected camera.single or four camera view.9. Click to access the Setup Wizard.7. Click to enable PIP mode.5
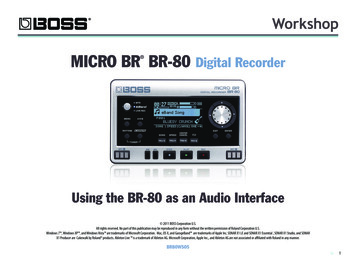
Live View: 16 Channel09/12/2014 10:30:15 TueDouble-click a livevideo channel toview full screen.09/12/2014 10:30:15 TueStatus IconsCamera1Camera209/12/2014 10:30:15 TueCamera Toolbar09/12/2014 10:30:15 TueClick & drag a livevideo channel toreposition it.Menu Bar1234567891. Opens the Menu.5. Click to view nine cameras.2. Click to view a single camera.6. Click to view sixteen cameras.3. Click to view four cameras.4. Click to view eight cameras.108. Click to enable PIP mode.9. Click to manually record the se7. Click to view the next screen in lected camera.single or four camera view.10. Click to access the Setup Wizard.6
MenuThe Menu is where you controlthe various actions and optionsthat are available on the NVR.You can also access previously recorded video for playbackand to export to a USB storagedevice such as a flash drive.To maintain system integrity, afirmware upgrade can be performed when available and access to the Shutdown menu torestart or safely turn off theNVR.7
Menu LayoutClicking each category will reveal anumber of tabs or sub-categoriesthat can be changed from their default value.The various actions and optionsthat are available, are categorisedon the left-hand side of the Menu.To exit or access theprevious menu, rightclick the mouse.To shutdown, reboot or lockthe NVR, click the “Shutdown”button. To ensure the integrity of your data and recordings,always select “Shutdown” whenpowering off the NVR.Some options may have additionalmenus that can be accessed.8
Camera ConfigurationThe majority of the camera configuration options available arein the “Display”, “Recording”and “Alarm” menus that areaccessible from the Menu. Youcan change the resolution andbitrate settings as well as theimage settings for brightness,contrast and more. The NVRhas several controls for MotionDetection, Video Loss and theability to create one or moreprivacy masks.9
IP ChannelThe IP channel function displays a list of cameras that are either connected directly to the NVR, or connected directly to your network. Thename, IP address, channel number, status, user name and passwordof each camera is displayed. It’s not necessary to change the camera’suser name and password.Auto Add: This option is enabled by default. The NVR will automaticallydetect and display cameras connected directly to the NVR, or connecteddirectly to your network.Scan: Click this button to update the list of cameras detected. Don’t forget to click “Apply” to save settings. Click “Cancel” to exit.10
Display: CameraThe configuration options available allowyou to name each camera relevant to where ithas been installed aswell as the ability toadjust image settingssuch as brightnessand contrast. You alsohave complete controlof the camera’s displaycapabilities.Camera No.: Select a camera that you would like to configure. Hoveringthe mouse over the selection box will display the IP address and MACaddress of the camera selected. A green icon indicates that a camera isconnected to that particular channel. A red icon indicates that a camerais not connected to that particular channel.Camera Name: Select a name for the camera you’ve selected. It can beup to 16 characters in length.Display Camera Name: Leave this enabled if you would like to displaythe camera name on the Live View screen, otherwise click to disable.Record Date: It’s recommended to leave this enabled as the date will berecorded directly onto your videos and creates an inseparable record ofexactly when the footage was captured.OSD Display Position: Allows you to change the position of the cameraname on the Live View screen. Click the “Set” button to change. Use themouse to reposition the camera name. Right-click the mouse then click“Save” to exit.Image Settings: This gives you access to the image adjustment tools.Click the “Set” button to change then click “OK” when finished.Brightness: This changes how light the image appears to be.Contrast: This increases the difference between the blackest black andthe whitest white in the image.Saturation: This alters how much colour is displayed in the image. Thehigher the saturation, the more bright and vivid colours will appear.Hue: This changes the colour mix of the image.11
Display: Camera (cont.)Sharpen: Increase or decrease the overall sharpness of the image. Increasing the sharpness will also increase the level of video noise that isvisible.Mask: Click the checkbox to enable then click “Area Settings” to createone or more privacy masks - see page 13 for more information.Camera Parameter: See page 14 for more information. Click the “Default” button to revert back to default settings. Use the “Copy to” button to apply all settings to the other cameras. Don’t forget to click “Apply” to save settings. Right-click the mouse to exit the Menu.12
Creating a Privacy MaskA privacy mask can beused if you want to obscure part of your image for privacy. You canalso use this option tominimize false triggers for Motion Detection. You can create upto four areas per camera to mask. Any areaobscured by a privacymask won’t be shownlive or recorded.09/12/2014 10:30:15 TueCamera11. Using the mouse, click and drag to select the area that you want toenable for a mask (as shown above). Up to four masks can be enabled.2. To delete a mask, move the arrow within the mask, right-click themouse to access the sub-menu (as shown above) then click “DeleteArea”. Click “Delete All” to delete all masks. Click “Save” to save yourmask or click “Cancel” to exit. Click the “Default” button to revert back to default settings. Use the “Copy to” button to apply all settings to the other cameras. Don’t forget to click “Apply” to save settings. Right-click the mouse to exit the Menu.13
Camera Parameter09/12/2014 10:30:15 TueCamera2Camera Parameter: This function gives you complete control on everyaspect of the camera’s display capabilities. Click the “Set” button tochange.Exposure Mode: This function determines how light or dark an imagewill appear on-screen. If there is very little light, the image will be underexposed. If there is too much light, the image will be overexposed -Anti-flicker: This function is used to reduce flicker caused by fluorescent lighting. If the video is flickering or you are mounting the cameraoutdoors, select the relevant option, otherwise leave it off -Auto: The exposure level is handled automatically.OFF: Anti-flicker is turned off.Anti-smearing: This function allows objects to be seen against a verybright background.Outdoor: Select this if the camera will be mounted outdoors. It’s designed to adjust the image for sunlight conditions.50HZ: The UK and Australia utilise 50Hz for their mains frequency.60HZ: The USA, Canada and some Latin American countries utilise 60Hzfor their mains frequency.Low Noise: This function is used for night video. By increasing the gainrange, you can decrease the video noise to gain a brighter image.Manual: This function allows you to manually adjust the shutter speed.Slowing down the shutter speed allows more light into the camera producing a brighter image. The potential downside is that you get moremotion blur.14
Camera Parameter (cont.)09/12/2014 10:30:15 TueCamera2Contextual: This function changes the way the camera processes whitebalance to correct image colours -CDS: This allows the image to be set by the camera’s light sensor.Auto: The white balance is handled automatically.OFF: The backlight is turned off.Day: Select this for day-time monitoring.Night: Select this for night-time monitoring.Manual: This function will increase or decrease the red and blue gain.Day/Night: This function changes the camera’s colour mode during different times of the day AGC: This function allows an increase in sensitivity, enabling operationin lower light conditions.Colour: Select this for day-time monitoring.Black&White: Select this for night-time monitoring.Backlight: Compensate for differences between dark and light objects BLC: This improves exposure of an object that is in front of a light source.WDR: This will brighten dark areas and darken bright areas.Mirroring: Click the checkbox to change the orientation of the image.Rotation: Click the checkbox to turn the image upside down.3D-Noise Filter: This function will reduce the overall noise content. Click the “Default” button to revert back to default settings. Don’t forget to click “Apply” to save settings. Click “Cancel” to exit.15
Recording: EncodeThe Encode functionallows you to changethe resolution and bitrate for each cameraconnected. By defaultthe Main Stream resolution is 2048 x 1536which fits in with thecapabilities of the provided cameras. TheSub stream resolutionis CIF (352 x 288).Camera No.: Select a camera that you would like to configure.you’re having issues streaming to your mobile device or computer.Encoding Parameters: Select which parameter that you would like toconfigure, Main Stream or Sub stream. By default, the SwannView Linkapp and Windows software utilises the Sub stream parameter to displayan image from the NVR to your mobile device or computer.Max. BitRate(Kbps): The default bitrate is 5120Kbps for Main Streamand 64Kbps for Sub stream. Change the bitrate if you’re having issuesstreaming to your mobile device or computer.Record Audio: See page 23 for more information. Use the “Copy to” button to apply all settings to the other cameras.Resolution: The default resolution is 2048 x 1536 (4:3) for Main Stream.Other resolutions available are 2304 x 1296 (16:9), 1080P (1920 x 1080)and 720P (1280 x 720). For Sub stream, the default resolution is CIF (352x 288) but can be changed to 640 x 360. Click the “Default” button to revert back to default settings. Don’t forget to click “Apply” to save settings. Right-click the mouse to exit the Menu.Frame Rate(fps): For Main Stream, the default frame rate is 25fps. ForSub stream, the default frame rate is 4fps. Change the frame rate if16
Alarm: MotionWhether you’re waitingfor an expected event,hoping you don’t spotan unwelcome visitor,or just curious aboutwhat happens whenyou’re not around, Motion Detection can beconfigured to alert youand record video onlywhen it detects motion. Motion Detectionis enabled by default.Channel: Select a camera that you would like to configure.Enable: Motion Detection is enabled by default.Motion Detection: Click the “Set” button to change the default MotionDetection area - see page 18 for more information.Schedule: Click the “Set” button to change the default Motion Detectionalarm schedule - see page 19 for more information.Action: Click the “Set” button to enable an audio warning, to send anemail and to trigger other cameras when motion is detected. Click the “Default” button to revert back to default settings. Use the “Copy to” button to apply all settings to the other cameras. Don’t forget to click “Apply” to save settings. Right-click the mouse to exit the Menu.17
Motion Detection09/12/2014 10:30:15 TueCamera1Using the “Sensitivity” function, you canchange the motion sensitivity level for eachtime period available. The level is controlledby a slider, allowing you to set a value between 0 and 50. The lower the number, themore sensitive the Motion Detection will be.Motion Detection is an essential part of your security system. It’s themain method that detects when someone is in your home when theyshouldn’t be. When motion has been detected by one or more cameras,a signal is sent to your NVR, alerting you to a potential threat in yourhome. It does this in several ways such as activating an audio warningusing its internal buzzer, sending an email and sending an alert to yourmobile device or computer. You can also configure your NVR so it triggers the other cameras to start recording.1. Right-click the mouse to access the sub-menu then click “Delete All”.2. Click and drag to select the area that you want to create a zone for.Multiple zones can be created. The same action also applies if you wantto delete a zone that has been created.Motion Detection is the default recording mode for the NVR. The entireview of the camera is enabled to detect motion however you can selectcertain areas if you wish. In the above example, a Motion Detection zonehas been setup for the windows and dining room entrance. Movementoutside of these zones will not be detected. Click the “Default” button to revert back to default settings.3. You can adjust the sensitivity level (see above) if required.4. Right-click the mouse to access the sub-menu then click “Save” tosave any changes that you have made. To revert back to default settingsclick “Add to All” or click “Cancel” to exit. Use the “Copy to” button to apply all settings to the other cameras. Don’t forget to click “Apply” to save settings. Right-click the mouse to exit the Menu.18
Motion Detection ScheduleBy default, a Motion Detection alarm schedulehas been enabled foreach connected camera. You can howeverchange the scheduleaccording to what fitsin with your needs. Theschedule is presentedas a 24 hour 7 days aweek grid and is colourcoded to represent theevent type.In the above example, a schedule has been created for 06:00 a.m. to06:00 p.m. Sunday to Saturday. Using the mouse, click on a particularsquare or section to change. Click the “Default” button to revert back to default settings. Don’t forget to click “Apply” to save settings. Click “Cancel” to exit. Right-click the mouse to exit the Menu.19
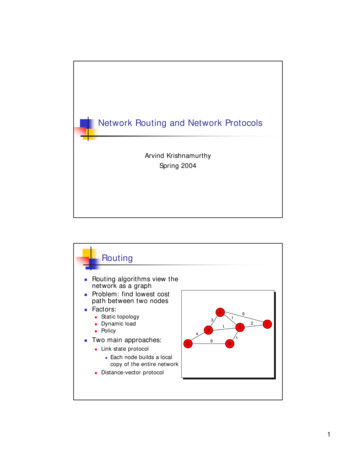
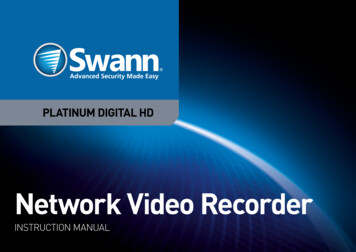
Motion Detection TipsPlacement of the camerasBedroomBackdoor1. Keep cameras 10 - 15 feet (3 - 4 metres) away from heating vents, where the sunlight shines in, andradiators. If a camera detects a swift change in motion, even that of a cloud passing quickly over directsunlight shining into your living room, Motion Detection could be activated.2. Place cameras in areas where people have to walk through, like the stairwell, main hallway or entrydoor. That way, an intruder will activate Motion Detection regardless of where they are headed. Intrudersusually go right for the master bedroom, so put a camera near that room or other rooms where you havevaluables, like the study.3. Walk through your house and assess where intruders are most likely to enter, and what path they wouldtake. Most burglars enter the home through a front or back door, so it’s advisable to place the camerasnear those areas.Hallways4. When installing camer
ing the Setup Wizard. If password protection has been enabled and you have forgotten your password, you can enter a super password. Click “Forgot Password” then input the NVR’s MAC address without the co-lons, for example, EC71DBE32877 - see page 42 for more information. The NVR’s Mac address can a