Transcription
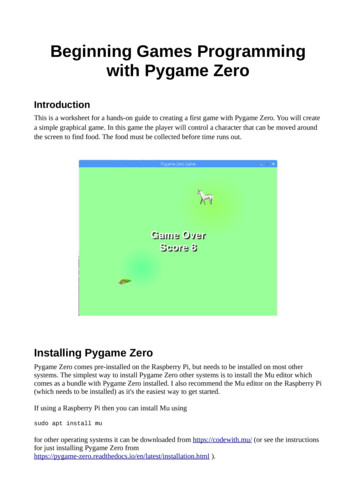
Beginning Games Programmingwith Pygame ZeroIntroductionThis is a worksheet for a hands-on guide to creating a first game with Pygame Zero. You will createa simple graphical game. In this game the player will control a character that can be moved aroundthe screen to find food. The food must be collected before time runs out.Installing Pygame ZeroPygame Zero comes pre-installed on the Raspberry Pi, but needs to be installed on most othersystems. The simplest way to install Pygame Zero other systems is to install the Mu editor whichcomes as a bundle with Pygame Zero installed. I also recommend the Mu editor on the Raspberry Pi(which needs to be installed) as it's the easiest way to get started.If using a Raspberry Pi then you can install Mu usingsudo apt install mufor other operating systems it can be downloaded from https://codewith.mu/ (or see the instructionsfor just installing Pygame Zero nstallation.html ).
You can then run Mu from the programming category in the application menu, or by typingmu-editor from the command line.If you can't or don't want to use Mu you can use any other editor on your system (eg. Leafpad orNotepad), but you will then need to run the program from the command-line using pgzrun.Getting Started with MuWhen you first start Mu then it will ask what mode you wish to run in. Unsurprisingly you shouldselect Pygame Zero. If you need to change the mode in future you can change t the mode using the“Mode” button menu (top left).To get started and test that everything is setup correctly create a first program file with thefollowing two lines:WIDTH 800HEIGHT 600Save it as findfood.pyTo test from Mu click on the Play button. You will need to save the file which by default is stored inthe mu code directory.If you want to run the program from outside of Mu then change to the appropriate directory andenterpgzrun findfood.pyWhen run you the program should create a new windows with a black background.
You can close the program by clicking on the x in the top right, or by pressing Stop from the Mumenubar.You've now created your first Pygame Zero file.Adding a Background ImageYou are now going to need some image files to include in the game. I have collected some imagesthat are suitable for the game, but feel free to choose something different or create your own if youprefer.You can get the required files d-gamefiles.tgzunzip them to your home directory using:cd tar -xvzf findfood-gamefiles.tgzAll the code files should be stored in the mu code directory and in the case of the images into a subdirectory images.This can be achieved through the file explorer or the following from the command linecp /finding-food/images/* /mu code/images/
Before starting the sprites you can replace the black background with a background image. This canbe achieved by adding the following line into your code (after the current WIDTH and HEIGHTentries.BACKGROUND IMG “grass-field”def draw():screen.blit(BACKGROUND IMG, (0,0))Click on the Play button and you should now see the same screen from before, but it will now havea green background.This works by definding BACKGROUND IMG which is a variable that holds the name of theimage. The image is entered as the filename without any path information or the .png suffix. Onrecent versions of Pygame Zero then you can use the full filename if you prefer, but to maintaincompatibility with older versions of Pygame Zero the files must be in the images folder and notinclude the suffix. This is the same for any images.The linedef draw():is defining the draw function. This is a Python function that Pygame Zero calls approximately 60times per second. It should be used to tell Pygame Zero what should be displayed on the screen.In this case the function calls screen.blit which displays a bitmap image at the appropriate position(in this case 0,0 starting at the top left of the screen).Creating a SpriteA sprite is an image used in a computer game that is often created from a bitmap image. In this casethere will be two sprites, one for the player (an animal character) and the other for the food (bag ofanimal food).You will need several images for the sprites for the player character, so that you can show it facingdifferent directions and to make it appear to move. The minimum needed would ba an image withthe character facing each of the following directions: front, right, left and rear. To make themovement a little more realistic additional images can be used with the legs moving between theimages. If you are artistic then you can create your own images, but in this case I have selectedsome images under a creative-commons license. The example shown is a Unicorn, but it could bereplaced with any appropriate animal, such as the horse images included in the download (or with adifferent character completely such as a car or boat).
The unicorn / horse images are from https://opengameart.org/content/lpc-horses-rework based on anearlier design from: https://opengameart.org/node/69398. The images are provided as a sprite sheetwhich contains all the sprites in one file. In some games the images can be used directly from thesprite sheet, but in Pygame Zero we need these as separate images. I have extracted each of theimages into individual files named based on their direction and numbered 1 to 3. I have alsoduplicated the second image for each of these to give a total of 4 images per direction.Later you will use a bag of food, which is something I edited based on original image from OpenClipart https://openclipart.org/detail/2413/dog-food.For more creative commons licensed images use the search engine at:https://search.creativecommons.org/To add the first image update the code as shown:WIDTH 800HEIGHT 600BACKGROUND IMG "grass-field"player Actor ("unicorn-right-1")player.pos 150,100def draw():screen.blit(BACKGROUND IMG,(0,0))player.draw()The code that is shown in grey is existing code and the new lines are in black / coloured text.In Pygame Zero a sprite is known as an actor. You can think of it as an actor on a stage (which issimilar terminology that Scratch uses), although in Pygame Zero terminology it is an Actor on thescreen. The actor takes an image as it’s argument, following the same rules as mentioned previouslywhen adding the background image (no path information or suffix).The player.pos value is an attribute of the Actor, which determines the position of the actor on thescreen. Setting this to a specific x and y position will position the actor on the screen. The firstvalue is the x co-ordinate increasing from left to right and the second is the y co-ordinate from topto bottom.The image below shows the co-ordinate system with the unicorn positioned at 150, 100.
Moving the SpriteNext you can have the sprite move around the screen. To have it move across the screen you justneed to change the player.pos value which takes the x and y position. Or to change only onedirection at at time you can use player.x or player.y as appropriate.We could do this in the draw function used previously, but there is a separate function called theupdate function that is intended for these kind of updates.First add a global variable called delay timer. This should be placed before the start of the drawfunction.# a counter to delay between changesdelay timer 0Then add the following code at the end of the file after the draw functiondef update():global delay timerif (delay timer 10):delay timer 0if (player.x 750):player.x 20else:delay timer 1returnLike the draw function the update function is run approximately 60 times per second. That would betoo quick for the character so the function has a delay factor which means that it only updates theposition of the Actor every 10 time times the update function is run. This is achieved by onlychanging the sprites position when the timer reaches 10. It then increases the x position until the xposition reaches 750.Although the image now moves across the screen it does not look particularly realistic.This is the reason that there are multiple images. If the image is changed to one showing the legsmoving each time the image is moved then the Actor moves then the player can appear to walk.This is similar to early “moving images” created using a zoetrope.
The complete code with updated images is shown belowWIDTH 800HEIGHT 600BACKGROUND IMG "grass-field"IMG PREFIX "unicorn"player Actor (IMG PREFIX "-right-1")player.pos 150,100# a counter to delay between changesdelay timer 0# which of the 4 images to display (value from 1 to 4)image number 1def draw():screen.blit(BACKGROUND IMG,(0,0))player.draw()def update():global delay timer, image numberif (delay timer 10):delay timer 0if (player.x 750):player.x 20image number 1if (image number 4):image number 1image name "{}-{}-{}".format(IMG PREFIX,"right",image number)player.image image nameelse:delay timer 1returnThe image definition has been changed from a basic string to a prefix, direction and number. Thiswill allow the image to be updated based on the direction and between the 4 different images forthat direction.The initial image is created using the following line:player Actor (IMG PREFIX "-right-1")This uses the simple ' ' concatenation which joins sub-strings into a single string. The image prefixvariable is used which will allow you to change the selected image if you wanted to use a differentcharacter. For example if you change the earlier definition of IMG PREFIX to use “horse” then itwill change the unicorn to a horse.The next time the image is changed it is done using the following line, which uses the Python stringformatter.image name "{}-{}-{}".format(IMG PREFIX,"right",image number)The string formatting uses special codes within a string to indicate where the values will beinserted. Each of the curly braces ‘{}’ are replaced by the appropriate argument to the formatcomment. The first pair of brackets is replaced with the value of IMG PREFIX (“unicorn”), thesecond by the string indicating the direction (“right”) the third by the value of image numbershowing the image to be displayed (1 to 4). Which will give the same string as used previously.
This string is then used to set the player.image value which will replace the current image. TheActor is displayed using the draw function as before and but it is changed in the update function.The draw() vs the update() functionIt is worth restating the purpose of the two different functions.# Draw function – updates the screen, include draw of any actors.def draw():# Update function – use to handle updates to the players and check the status of the keyboard.def update():These functions are both called 60 times per second.Note that the timing of the movement is only approximate. Although the update function should run60 times every second the actual timing will depend upon a number of factors including whether thesystem has sufficient resources available to meet that requirement. For more details ooks.html#updateControlling the MovementTo detect key presses on the keyboard there is a keyboard built-in. For each key there is an attributewhich is normally False and then changes to True when that key is pressed.The following code can be used to determine if one of the arrow keys are pressed.if (keyboard.up):direction "up"if (keyboard.down):direction "down"if (keyboard.left) :direction "left"if (keyboard.right) :direction "right"After adding the code to move the direction, the update function should look like the following:def update():global delay timer, image number# Only move whilst key is pressedif (delay timer 10):delay timer 0direction "none"if (keyboard.up):if (player.y 40):player.y - 20direction "rear"if (keyboard.down):if (player.y 560):player.y 20
direction "front"if (keyboard.left) :if (player.x 40):player.x - 20direction "left"if (keyboard.right) :if (player.x 760):player.x 20direction "right"if (direction ! 'none'):image number 1if (image number 4):image number 1image name "{}-{}-{}".format(IMG PREFIX,direction,image number)player.image image nameelse:delay timer 1returnAdding the food spriteThere is another image in the images directory called food.png. This will be the food that has to becollected.It is created as a new Actor and it's location determined using a random x and y co-ordinate.To create a random location it uses the random module which should first be imported and then usesthe randint method which returns a random integer between the values given. The edge of thescreen is avoided to prevent the food being partly on and partly off the screen.import randomWIDTH 800HEIGHT 600BACKGROUND IMG "grass-field"IMG PREFIX "unicorn"player Actor (IMG PREFIX "-right-1")player.pos 150,100food Actor ("food")food.pos (random.randint (50, 750), random.randint (50, 550))# a counter to delay between changesdelay timer 0# which of the 3 images to display (value from 1 to 3)image number 1score 0def draw():screen.blit(BACKGROUND IMG,(0,0))food.draw()player.draw()
def update():global delay timer, image number, score# Only move whilst key is pressedif (delay timer 10):delay timer 0direction "none"if (keyboard.up):if (player.y 40):player.y - 20direction "rear"if (keyboard.down):if (player.y 560):player.y 20direction "front"if (keyboard.left) :if (player.x 40):player.x - 20direction "left"if (keyboard.right) :if (player.x 760):player.x 20direction "right"if (direction ! 'none'):image number 1if (image number 4):image number 1image name "{}-{}-{}".format(IMG PREFIX,direction,image number)player.image image nameif (player.colliderect(food)):score 1food.pos (random.randint (50, 750), random.randint (50, 550))else:delay timer 1returnThe colliderect method is used to detect when the player actor reaches the food actor. It detectswhen the rectangle containing the player actor overlaps with the rectangle containing the food actor.This is called a collision.When a collision is detected then the score is incremented and the food is moved to a new randomlocation.TimerA game is not going to be much fun unless it poses a challenge. The challenge of this game will beof trying to get the food before the time runs out. The timer will start quite long with the timerdecreasing each time the food is eaten, so as to get harder each time some food is eaten.A new variable is created called game timer. This will hold a count-down value since the last timethe player ate some food. The initial count down will be set with the value from game timer start.This is set at 10 seconds. The timer decrement value is the amount that the timer will decrementfrom the start time each time that a point is scored.
game timer 10game timer start 10timer decrement 0.2The value of the game timer is then decremented by 0.017 seconds each update loop (which is thelength of time that should pass between each time the function is called).To make the game more challenging as each point is scored then the game timer is set a little lowereach time. This is done by the following formula.game timer game timer start - (score * timer decrement)Remember that the timer is only approximate as there is no guarantee that the update function willrun at 60 times per second.Display textThe final thing is to tell the player what score they achieved when the game is over.The method to display the text is screen.draw.text. This needs to be within the draw function ratherthan update.display text “Game Over\nScore “ str(score)screen.draw.text(display text, fontsize 60, center (100,50), shadow (1,1),color (255,255,255), scolor "#202020")The arguments are mostly self explanatory. The color value is the colour of the text and scolor theshadow. The color is set using RGB values representing the amount of Red,Green,Blue respectivelyand the scolor using a string based on the hexadecimal value (similar to how colours are defined inHTML / CSS). I have deliberately used both to show that you can use either, but you can usewhichever colour format you prefer.Complete codeThe code for the complete game is shown below:import randomWIDTH 800HEIGHT 600BACKGROUND IMG "grass-field"IMG PREFIX "unicorn"player Actor (IMG PREFIX "-right-1")player.pos 150,100food Actor ("food")food.pos (random.randint (50, 750), random.randint (50, 550))# a counter to delay between changesdelay timer 0# The game timer to restrict how long the player has to collect food
game timer 10game timer start 10timer decrement 0.2# which of the 3 images to display (value from 1 to 3)image number 1score 0def draw():screen.blit(BACKGROUND IMG,(0,0))if (game timer 0):display text "Game Over\nScore " str(score)screen.draw.text(display text, fontsize 60, center (400,300),shadow (1,1), color (255,255,255), scolor "#202020")food.draw()player.draw()def update():global delay timer, image number, score, game timerif (game timer 0):returnelse:game timer - 0.017# Only move whilst key is pressedif (delay timer 10):delay timer 0direction "none"if (keyboard.up):if (player.y 40):player.y - 20direction "rear"if (keyboard.down):if (player.y 560):player.y 20direction "front"if (keyboard.left) :if (player.x 40):player.x - 20direction "left"if (keyboard.right) :if (player.x 760):player.x 20direction "right"if (direction ! 'none'):image number 1if (image number 4):image number 1image name "{}-{}-{}".format(IMG PREFIX,direction,image number)player.image image nameif (player.colliderect(food)):score 1food.pos (random.randint (50, 750), random.randint (50, 550))game timer game timer start - (score * timer decrement)else:delay timer 1return
Future ImprovementsYou now have the starting point of a game, but it's only the start of the process of creating a game.Here is a list of possible suggestions to improve the game, with hints on how they can be ahieved: Show the score on the screen as each point is scored. Use screen.draw.text() to display score at the top of the screen.Add a countdown timer to the screen. Display the game timer on the screen. Note that the value may need to be adjusted sothat the game ends as soon as the display of the game timer reaches 0.Add obstacles that need to be avoided. Create new actors with the obstacles and test for collisions with the obstacles.Allow the player to play again after the end of the game. Wrap the entire game into a while loop with an option to play again after the player hasfinished the game.Add tracking of a high score to provide additional challenge. To allow the high score to persist in new games it should be saved.These suggestions and others have already been implemented in a similar game known as CompassGame which is available from he Compass Game is a different game, but shares much of the same initial code. It has howeverchanged considerably converting much of the code to object orientated code and adding newfeatures.Another option is to change the game by changing the sprites and perhaps the gameplay. Thepreviously mentioned Compass Game is similar in that regard. Instead of trying to reach food inCompass Game the player has to go in the direction specified. It is possible to change the characterto a completely different creature, vehicle or even a space craft.Updates and Other ProjectsFor a related project see the Space Asteroids game from the 2018 Raspberry Pi Birthday. This gameuses Pygame Zero and GPIO Zero dsFor future updates on this and other projects follow PenguinTutor on Twitter, Facebook or YouTube.
Pygame Zero comes pre-installed on the Raspberry Pi, but needs to be installed on most other systems. The simplest way to install Pygame Zero other systems is to install the Mu editor which . The player.pos value is an attribute of the