Transcription
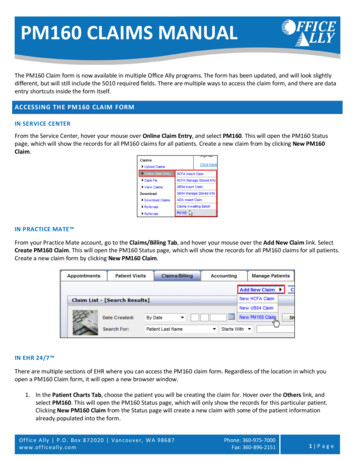
PM160 CLAIMS MANUALThe PM160 Claim form is now available in multiple Office Ally programs. The form has been updated, and will look slightlydifferent, but will still include the 5010 required fields. There are multiple ways to access the claim form, and there are dataentry shortcuts inside the form itself.ACCESSING THE PM160 CLAIM FORMIN SERVICE CENTERFrom the Service Center, hover your mouse over Online Claim Entry, and select PM160. This will open the PM160 Statuspage, which will show the records for all PM160 claims for all patients. Create a new claim from by clicking New PM160Claim.IN PRACTICE MATE From your Practice Mate account, go to the Claims/Billing Tab, and hover your mouse over the Add New Claim link. SelectCreate PM160 Claim. This will open the PM160 Status page, which will show the records for all PM160 claims for all patients.Create a new claim form by clicking New PM160 Claim.IN EHR 24/7 There are multiple sections of EHR where you can access the PM160 claim form. Regardless of the location in which youopen a PM160 Claim form, it will open a new browser window.1. In the Patient Charts Tab, choose the patient you will be creating the claim for. Hover over the Others link, andselect PM160. This will open the PM160 Status page, which will only show the records for this particular patient.Clicking New PM160 Claim from the Status page will create a new claim with some of the patient informationalready populated into the form.Of f ic e Ally P.O . Bo x 8 7 2 0 20 V an cou ve r, W A 98687w w w .of f ic e ally. co mPhone: 360-975-7000Fax: 360-896-21511 P a g e
2. In the Patient Charts Tab, choose the patient you will be creating the claim for. Hover over the Progress Notes link,and select Progress Notes/Encounters. Their Patient Chart-Progress Notes page will display, listing any progressnotes/encounters created for this patient. Click on the View icon for the progress note/encounter you wish to createa claim for. Above the progress note display, hover your mouse over the Create link, and select Create PM160 Claim.This will open the PM160 Claim form, which will have some of the patient information already populated.3. In the Document Center Tab, check the box for any encounter you want to create a claim for. Hover your mouseover the Select Actions link, and select Create PM160 Claim. This will open a PM160 claim form, which will havesome of the patient information already populated.Of f ic e Ally P.O . Bo x 8 7 2 0 20 V an cou ve r, W A 98687w w w .of f ic e ally. co mPhone: 360-975-7000Fax: 360-896-2151Fax: 360-896-22 P a g e
4. In the Document Center Tab, hover your mouse over the Select Actions link, and select View PM160 Status. This willopen the PM160 Status page that will show the records for all PM160 claims for all patients. Create a new claim fromthe PM160 Status page by clicking New PM160 Claim.Of f ic e Ally P.O . Bo x 8 7 2 0 20 V an cou ve r, W A 98687w w w .of f ic e ally. co mPhone: 360-975-7000Fax: 360-896-2151Fax: 360-896-23 P a g e
PM160 STATUS PAGEWhen you access the PM160 form, you will see the PM160 Status page. The first time you see this page for the new PM160claim forms, the Saved Claims and Submitted Claims sections will be empty.**For users that were using the older PM160 form tool, you have not lost your old claims. Click on the View Prior Claimslink below the Submitted Claims section. Any claims you had saved or submitted in the old form will be listed.Old PM160 Form Tool:Of f ic e Ally P.O . Bo x 8 7 2 0 20 V an cou ve r, W A 98687w w w .of f ic e ally. co mPhone: 360-975-7000Fax: 360-896-2151Fax: 360-896-24 P a g e
On the new PM160 Status page, the top portion of the page will allow you to search through the Saved and Submittedclaims. Enter your search criteria, and click Search. Your results will appear under the search section, still divided into Savedand Submitted Claims.**EHR Users: If you access PM160 via the Patient Chart, it will only display claims related to that patient.SAVED CLAIMS-In the left column under the Saved Claims section, you can select multiple claims with the check boxes, and clickDelete Selected to remove multiple claims at one time.The Edit link will open the claim to change, add, and/or delete information, and either save or submit the claim.The View link will allow you to open or save a PDF file of the claim form.Of f ic e Ally P.O . Bo x 8 7 2 0 20 V an cou ve r, W A 98687w w w .of f ic e ally. co mPhone: 360-975-7000Fax: 360-896-2151Fax: 360-896-25 P a g e
SUBMITTED CLAIMS-The View link will allow you to open or save a PDF file of the submitted claim form.***For users that were using the older PM160 form tool, clicking on the View Prior Claims link will display anyclaims you had saved or submitted in the old form.CREATING A NEW PM160 CLAIMIf you access the PM160 claim form through the Progress Notes in the Patient Charts Tab or by selecting Create PM160Claim from the Select Actions link in the Document Center Tab in EHR, you will be taken directly to the claim form. If youaccess the PM160 Claim form any other way, you will see the PM160 Status page. To begin a claim, click New PM160 Claim.There are data entry shortcuts in multiple sections of the form, which will save information for any subsequent claims. Thiswill allow you to search for and auto-populate information for later claims, saving time on data entry.PATIENTTo enter information, you will need to click New next to the Patient section. This will open a pop-up box labeled NewPatient. Practice Mate/EHR users: you can click Browse to search through your patient list, which will populate some of thepatient information. You may also type the patient’s information directly into the New Patient window. Click Save & Updatewhen finished. The information will then be populated into the PM160 form in the Patient section, and saved for futureclaim entries.The next time you create a claim for this patient, click Select, search and select the patient, and the information will againpopulate into the claim form.Of f ic e Ally P.O . Bo x 8 7 2 0 20 V an cou ve r, W A 98687w w w .of f ic e ally. co mPhone: 360-975-7000Fax: 360-896-2151Fax: 360-896-26 P a g e
If you need to change any information after you have saved & updated the section, click the Edit button and make yourcorrections. Click Save & Update when finished.BILLING PROVIDER/ SERVICE LOCATION NAME & ADDRESSClick New next to the Billing Provider section. This will open a pop-up box labeled New Provider. Click Browse to searchthrough your provider list, which will populate some of the provider information. You may also type provider informationdirectly into the New Provider window.In the Service Facility section, there is a Browse button as well. Search through your Facility List to populate some of theservice facility information. You may also type facility information directly into the New Provider window.Click Save & Update when finished. The information will then be populated into the PM160 form in the Billing Provider andService Location Name & Address sections, and saved for future claim entries.The next time you create a claim and want to enter this provider and facility information, click Select, search and select thedesired information, and it will again populate into the claim form.If you need to change any information after you have saved & updated the section, click the Edit button and make yourcorrections. Click Save & Update when finished.Note: The Provider NPI needs to match the NPI on file with the payer. In the Federal Tax ID field, do not include any hyphensin your entry.Of f ic e Ally P.O . Bo x 8 7 2 0 20 V an cou ve r, W A 98687w w w .of f ic e ally. co mPhone: 360-975-7000Fax: 360-896-2151Fax: 360-896-27 P a g e
REFERRED TOClick New in the Referred To section. Type the information into the fields, and click Save. The information will then bepopulated into the PM160 form in the Referred To section, and saved for future claim entries. The next time you create aclaim with this same Referred Provider, click Select, search and select the desired information, and it will populate into theclaim form.If you want to delete the entry in the Referred To section, click Remove. If you need to change any information after youhave saved & updated the section, click the Edit button and make your corrections. Click Save & Update within the EditReferred Provider window when finished.ADDITIONAL FEATURESAt the top and bottom of the claim page, there are additional buttons to assist in your claims submission process.Return to Claim Status Page- This will close the current claim without saving it, and direct you back to the PM160 Statuspage. You will see a warning appear, stating if you close the page your work will not be saved. Choose whether you want toclose the page with the yes or no options.View PDF- This will open the claim with your PDF reader, allowing you to see the traditional form format, and save or printthe claim.Clear Form- This will delete any information you have entered into the claim form, letting you start over if needed.Save Claim- This will save the claim form, and any information which has been entered, to the Saved Claims section of thePM160 Status page. You may save an incomplete claim to go back to later without having to start over.Submit Claim- This will send the claim to the insurance payer when you have finished entering the information for the claim.Once the claim is submitted, it will be listed in the Submitted Claims section of the PM160 Status page, and will no longer beable to be edited.Of f ic e Ally P.O . Bo x 8 7 2 0 20 V an cou ve r, W A 98687w w w .of f ic e ally. co mPhone: 360-975-7000Fax: 360-896-2151Fax: 360-896-28 P a g e
If you try to submit a claim that has missing or incorrect information, you will see the flagged fields become highlighted, anda list of the problems will display in the bottom left corner of the claim. (The figure below has been condensed to showrelevant information.)COMMON ERR ORSMISSING INFORMATIONIf you try to Save & Update from a window with required information missing, the fields will highlight, and your action will bedelayed until the needed information is supplied.Of f ic e Ally P.O . Bo x 8 7 2 0 20 V an cou ve r, W A 98687w w w .of f ic e ally. co mPhone: 360-975-7000Fax: 360-896-2151Fax: 360-896-29 P a g e
If you try to submit a claim that has missing information, you will see the required fields become highlighted, and a list of theproblems will display in the bottom left corner of the claim. (The figure below has been condensed to show relevantinformation.)INCORRECT INFORMATIONIf there is incorrect information on the claim form, the claim will fail, and appear in your Saved Claims section with a Statusof Failed. To correct the errors, click the Edit link for the failed claim, and click the pop up in the top left corner to see theexplanation of what information is incorrect.Of f ic e Ally P.O . Bo x 8 7 2 0 20 V an cou ve r, W A 98687w w w .of f ic e ally. co mPhone: 360-975-7000Fax: 360-896-2151Fax: 360-896-210 P a g e
IMMUNIZATION FEESCHDP claims processing system does not recognize or process fee amounts over 99.99. Office Ally’s new PM160 claim formwill not allow you to enter an amount greater than this. The field will become highlighted, and details will display under theMissing Information section at the bottom of the form. (The figure below has been condensed to show relevantinformation.)If you need to be reimbursed for any of the 4 exceptions to the 99.99 fee amount, you will find the additional codes in thedrop down lists. Select the vaccine with Purchased in the description first, and enter 99.99 in the Fee field. Select the vaccinewith Purchased (Add. Fee) in the description for the next line, and enter the remainder of the fee amount. This willdocument the whole fee amount to be reimbursed and fit the CHDP’s format.Of f ic e Ally P.O . Bo x 8 7 2 0 20 V an cou ve r, W A 98687w w w .of f ic e ally. co mPhone: 360-975-7000Fax: 360-896-2151Fax: 360-896-211 P a g e
TRANSITION TO NEW P M160 CLAIM FORM FORMAT (FOR USERS THAT USED OLD PM160 FORM)Any saved or failed claims that appear in your Saved Claims section will still be available to you to view and/or edit, but willbe found in a different location of the PM160 Status page. To find these old forms, scroll down to the Submitted Claimssection, and click View Prior Claims.You will be taken to the old PM160 page format, with your previously created and saved claims. Any saved or failed claimswill appear in the Claims Created section at the top. You will be able to View, Edit, or Delete claims in this section. All theseclaims will be in the old format style. Any previously submitted claims will be listed under the Claims Submitted section. Youwill be able to View these claims. When you are finished with this page, click the Back to New PM160 Status Page button inthe top right corner to return to the new claim format.If you have further questions, or need assistance, contact Training Support at (360) 975-7000 opt. 2.Of f ic e Ally P.O . Bo x 8 7 2 0 20 V an cou ve r, W A 98687w w w .of f ic e ally. co mPhone: 360-975-7000Fax: 360-896-2151Fax: 360-896-212 P a g e
Office Ally P.O. Box 872020 Vancouver, WA 98687 Phone: 360-975-7000 www.off iceally.com Fax: 360-896-2151 1 Page . The PM160 Claim form is now available in multiple Office Ally programs. The form has been updated, and will look slightlyFile Size: 1MB