Transcription
ADEMCO 4110XMSECURITY SYSTEMUser GuideN5100V5 4/99 Rev. C
IMPORTANT!PROPER INTRUSION PROTECTIONFor proper intrusion coverage, sensors should be located at every possible point of entry to a home orcommercial premises. This would include any skylights that may be present, and the upper windows in amulti-level building.In addition, we recommend that radio backup be used in a security system so that alarm signals can stillbe sent to the Central Monitoring Station in the event that the telephone lines are out of order (alarmsignals are normally sent over the phone lines).EARLY WARNING FIRE DETECTIONEarly warning fire detection is important in a home. Smoke and heat detectors have played a key role inreducing fire deaths in the United States. With regard to the number and placement of smoke/heatdetectors, we subscribe to the recommendations contained in the National Fire Protection Association'sNational Fire Alarm Code (NFPA 72). These recommendations can be found in the “National FireProtection Association Recommendations” section of this manual.SYSTEM COMPATIBILITY NOTICEYour Honeywell security system is designed for use with devices manufactured or approved by Honeywellfor use with your security system. Your Honeywell security system is not designed for use with any devicethat may be attached to your security system's keypad or other communicating bus if Honeywell has notapproved such device for use with your security system. Use of any such unauthorized device may causedamage or compromise the performance of your security system and affect the validity of your Honeywelllimited warranty. When you purchase devices that have been manufactured or approved by Honeywell,you acquire the assurance that these devices have been thoroughly tested to ensure optimumperformance when used with your Honeywell security system.About This ManualThis manual is a step-by-step guide that will acquaint you with the system's features and benefits. It definesthe components and their functions, describes their operation, and provides clear step-by-step instructionsfor normal and emergency procedures. Keep this manual in a convenient place so that you can refer to itas necessary.Congratulations on your ownership of a Honeywell Security System. You have made a wise decision inchoosing it, for it represents the latest in security protection technology today, including microcomputertechnology to monitor all system status. Honeywell is the world's largest manufacturer of securitysystems and millions of premises are protected by Honeywell systems.–2–
TABLE OF CONTENTSSystem Overview. 5General . 5Keypads . 5Zones . 5Alarms. 5Fire Protection . 6Burglary Protection . 6Memory of Alarm. 6Pager Notification . 6About the Keypad . 7Keypad Styles . 7Keypad Functions . 8Summary of System Status Displays . 8Summary of Keypad Functions . 9Security Codes . 11General . 11Duress Code . 11Quick Arming . 11Assigning, Changing or Deleting User Codes . 12Entry/Exit Delays . 13General Information . 13Checking for Open Zones . 14Using the 6 READY Key . 14Arming The System . 15Using The 3 STAY Key . 15Using The 7 INSTANT Key . 16Using The 2 AWAY Key . 17Using The 4 MAXIMUM Key. 18Disarming and Silencing Alarms . 19–3–
(continued)TABLE OF CONTENTSUsing the 1 OFF Key. 19To Disarm the System . 19To Silence a Burglary Alarm . 19Bypassing Protection Zones . 20Using The 6 BYPASS Key . 20Quick Bypass . 21Using the Keyswitch. 22General . 22Arming . 22Disarming . 22Chime Mode. 23Using the 9 CHIME Key . 23Panic Keys . 24Using Panic Keys . 24Testing the System . 26Using the 5 TEST Key. 26Trouble Conditions . 27"Check" and "Battery" Displays . 27Power Failure . 27Other Displays . 28Fire Alarm System . 29General . 29In Case of Fire Alarm. 29Silencing Fire Alarms . 30National Fire Protection Association Recommendations on Smoke Detectors . 31Emergency Evacuation . 32Quick Guide to Alarm System Functions . 33Summary of Audible/Visual Notification . 34Protection Zones List . 35Owner's Insurance Premium Credit Request . 36Regulatory Statements and Warnings . 38In The Event of Telephone Operational Problems . 40Limitations of this Alarm System . 41Servicing Information . 42Two Year Limited Warranty . 43–4–
System OverviewGeneralThis system offers you three forms of protection: burglary, fire and emergency. Yoursystem may consist of at least one keypad which provides full control of systemoperation, various sensors such as motion detectors and door and window sensingdevices, plus a selected number of strategically placed smoke or combustion detectorsdesigned to provide early warning in case of fire. Your system may also have beenprogrammed to automatically transmit alarm or status messages over the phonelines to a central alarm monitoring station.KeypadsAll system functions are controlled by your keypad(s). The keypads feature atelephone style (digital) keypad and a Liquid Crystal Display (LCD) which shows thenature and location of all occurrences. Their built-in sounder will sound during alarmand trouble conditions.For additional information, see the following section: ABOUT THE KEYPAD.ZonesYour system's sensing devices have been assigned to various zones. For example, thesensing device on your Entry/Exit door may have been assigned to zone 01, sensingdevices on windows in the master bedroom to zone 02, and so on. These zone numberswill appear on the display when an alarm or trouble condition occurs.AlarmsWhen an alarm occurs, both the keypad and external sounders will sound, and a message at the keypad will identify the zone(s) causing the alarm. In addition, if yoursystem is connected to a central monitoring station, an alarm message will be sent.To stop the alarm sounding, you simply disarm the system.–5–
System Overview (cont’d)Fire ProtectionThe fire protection portion of your security system (if used) is always on and willsound an alarm if a fire condition is detected. Refer to the FIRE ALARM SYSTEMsection for important information concerning fire protection, smoke detectors andplanning emergency exit routes from your premises.Burglary ProtectionThe burglary protection portion of your system must be turned on or "armed" beforeit will sense burglary alarm conditions and sound an alarm. Your system can bearmed in one of four modes: STAY, AWAY, INSTANT and MAXIMUM. Refer to theARMING THE SYSTEM sections for instructions in using these modes of operation.Your system also provides a CHIME mode for alerting you to the opening and closingof doors and windows while the system is disarmed.Memory of AlarmWhen an alarm or trouble condition occurs, the keypad displays the number(s) of thezone(s) that caused the problem, and displays the type of alarm or trouble (ex. FIRE,ALARM, CHECK). The display remains until it is cleared by entering the OFFsequence (security code OFF key) twice.Pager NotificationIf you have chosen to be notified of alarms or other system conditions by pager, thefollowing codes will be sent to your pager by the control:1811 Trouble1911 Alarm1001 Open1002 Close–6–
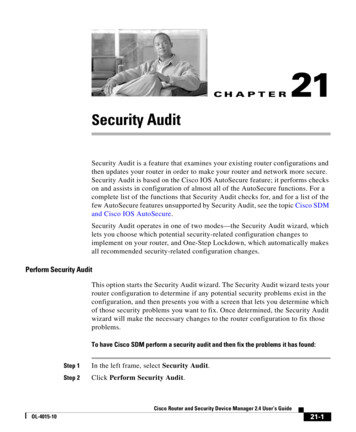
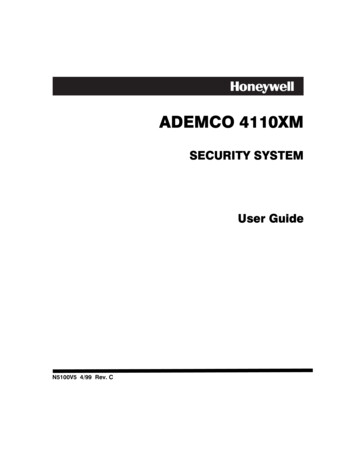
About the KeypadKeypad StylesThe 6150 is a Fixed-Word keypad. The keys on the keypads are located behind a flip-downdoor which can be removed, if desired.ARMED1OFF2 AWAY3READY4MAX5TEST6 BYPASS8 CODE9 CHIME0#7 INSTANT6150-00-001-V0READYSTAYSHOWN WITH DOOR REMOVED–7–
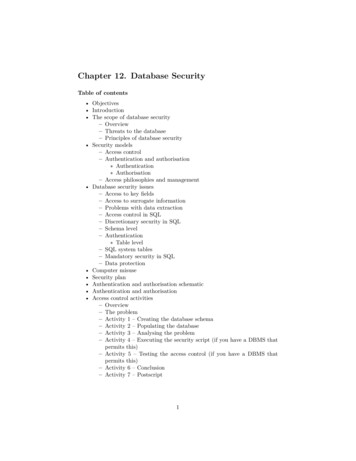
About the Keypad (cont’d)SUMMARY OF SYSTEM STATUS DISPLAYSAWAYAll burglary zones, interior & perimeter, arearmed.STAYPerimeter burglary zones, such as windowsand doors are armed.INSTANTPerimeter burglary zones armed and entrydelay is turned off.BYPASSOne or more burglary protection zones havebeen bypassed.NOT READYAppears when burglary portion of the systemis not ready for arming (due to one or moreopen protection zones).READYThe burglary portion of the system is ready tobe armed.NO ACAppears when AC power has been cut off.System is operating on backup battery power.ACCHIMEBATAppears when AC power is present.Appears when the CHIME feature is ON.Low system battery.ALARMAppears when an intrusion has been detectedand the system is armed (also appears duringa fire alarm). Accompanied by the ID # of theprotection zone in alarm.CHECKAppears when a malfunction is discovered inthe system at any time or if a fault is detectedin a FIRE zone at any time or in a DAY(Trouble)/NIGHT (Alarm) burglary zoneduring a disarmed period. Accompanied by adisplay of zone number in trouble.FIREAppears when a fire alarm is present.Accompanied by a display of the zone inalarm.–8–00 AWAYSTAYNO ACBYPASS NOT READYALARMFIRE CHECKCHIME BATINSTANTstyle B disp.FIXED-WORD KEYPADDISPLAY
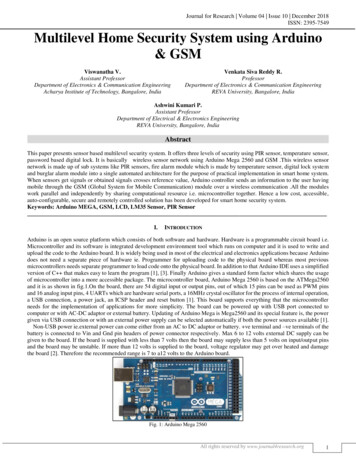
Keypad FunctionsSUMMARY OF KEYPAD FUNCTIONS1. DISPLAY WINDOW: Displays protectionzone ID and system status messages.2.1235.46.57.69.8CODE KEY: Used to assignadditional user codes for other usersof the system.10.9CHIME KEY: Turns CHIME mode onand off. When on, the opening ofwindows or doors while the system isdisarmed will sound 3 beeps at thekeypad(s).STAY KEY: Arms perimeter portionof burglary system only. Interiorprotection is not armed, whichallows movement within premiseswithout causing alarm.INSTANT KEY: Arms in mannersimilar to STAY mode, but withoutthe entry delay feature. Entering viathe entry/exit door will cause aninstant alarm.AWAY KEY: Arms the entireburglary system, perimeter andinterior.4.7OFF KEY: Disarms burglary portionof the system, silences alarms andaudible trouble indicators, andclears visual display after problem'scorrection.3.8.11.6READY KEY: Displays all openprotection zones.MAXIMUM KEY: Arms in manner12. # KEY: "Quick Arm" key permitssimilar to AWAY mode, but withoutARMING of the system without use ofthe entry delay feature, thus provida security code (if so programmed).ing maximum protection. An alarm13. KEYS 0–9†: Used to enter your securitywill occur immediately uponcode(s).opening any protection point,14. READY INDICATOR: (GREEN) Lit whenincluding the entry/exit door.the system is ready to be armed (no faultsTEST KEY: Tests the system andpresent). While the system is disarmed,alarm sounder if disarmed. Refer tothis indicator will go on and off asTESTING THE SYSTEM sectionprotection zones are closed and opened.for test procedures.Note: On some keypads a POWER INDICATOR(GREEN) is lit when AC power is present. Ifthe indicator is off, the system may still beoperating, but on its backup battery power.See Power Failure in TROUBLE CONDITIONSsection.BYPASS KEY: Removes individualprotection zones from beingmonitored by the system.–9–
Keypad Functions (cont’d)15. ARMED INDICATOR: (RED) Lit whenthe system has been armed (STAY,AWAY, INSTANT or MAXIMUM).16. INTERNAL SOUNDER: The built-inkeypad sounder mimics the alarmsounder during alarms, and will also"beep" during certain system functions.(see SUMMARY OF AUDIBLE/VISUAL NOTIFICATION).17. EMERGENCY KEYS:Individual keys A, B, and C (key D notused). On some keypads, these keys arenot present, and the following key pairsmay be available, instead, foremergency functions:432116155ARMEDA1OFF2 AWAY3READYB4MAX5TEST6 BYPASSC7 INSTANT8 CODE9 CHIME0#STAY614READY71012178111396150-007-V06 & # , 6 & 1 , # & 3Some or all of these keys/pairs may beprogrammed for panic functions by yourinstaller (see PANIC KEYS section).IMPORTANT! When entering codes andcommands, sequential key depressions mustbe made within 2 seconds of one another. If 2seconds elapses without a key depression,the entry is aborted and must be repeatedfrom its beginning.†Note:Keys 1 through 9 each perform their associated companion functions (OFF, AWAY, STAY,etc.) when preceded by an entry of the security code (as described later).– 10 –
Security CodesGeneralAt the time of installation, your installer programmed a personal four-digit Mastercode, known only to you and yours. This code is used to perform most systemfunctions, including arming and disarming of the system. As an additional safetyfeature, temporary user codes can be assigned (see next page) for use by those nothaving a need to know the Master code. Note that the Master code remains in effecteven when other user codes are
When you purchase devices that have been manufactured or approved by Honeywell, you acquire the assurance that these devices have been thoroughly tested to ensure optimum performance when used with your Honeywell security system. About This Manual This manual is a step-by-step guide that w