Transcription
RAINBIRD PREFERRED BY PROFESSIONALS WORLDWIDEInstallation,Programming,& s on purchasing a Rain Bird ESP solid state controller. This manual describes how to install, operate, and maintain your controller. Please read these instructions carefully. For your convenience, we have included a Quick Reference Guide below, so you can quickly find instructions for common tasks.Quick Reference GuideIf you want to: Change the time of day.page 4 Turn the controller off and on(for example, because of rain).page 8 Adjust watering times for all stations(for example, during a hot or cool period).page 9 Start the sprinkler system manually.page 9 Run the test program.page 10 Install a new battery.page 14 Troubleshoot a controller problem.page 14Technical Support: 1-800-RAIN BIRD1
Special Upgrade OfferSave an extra 15% off new sprinkler timers andirrigation controllers at the Rain Bird Online Store.*Still struggling with your old sprinklertimer? Having a hard time complyingwith local watering restrictions?Upgrading to a new Rain Bird sprinklertimer is easier than you might think.New timers are easier to program thanever before, with powerful features tohelp save you time and water whilekeeping your yard healthy and vibrant.There are lots of models to meet yourneeds, including indoor and outdoorversions, flexible modular timers andeven smart controllers thatautomatically adjust themselvesbased on the weather.Shop Now at store.rainbird.com andenjoy exclusive upgrade savings!Enter discount code:UPGRADE15at checkout to save an extra 15% off** Additional discount not valid on clearance items, bundles or store specials.Discount applies to controller products only. Cannot be combined withother store discount codes. Valid at the Rain Bird Online Store only.Subject to change without notice. Registered trademark of Rain Bird Corporation.
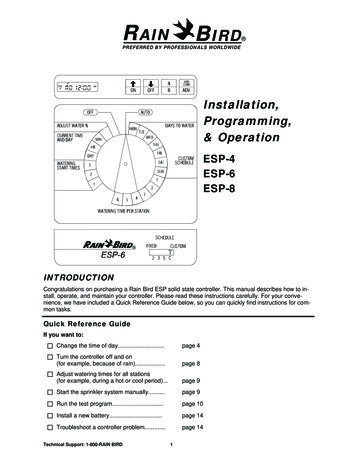
Controller StationsThe controller has several stations as shown in the illustration below. Each station is connected to a remote control sprinkler valve. The valve opens when it receives a signal from the controller, and thesprinklers connected to the valve turn on. When these sprinklers have run for their allotted time, thecontroller shuts off the valve and opens the next valve in sequence.For example, the illustration shows that station 1 is currently watering. When station 1 is finished, thecontroller will shut it off and start station 2. In the same way, station 3 will begin watering when station 2is finished.Sample Station LayoutControls and SwitchesThe illustration shows the programming controls onthe face of the ESP. These controls include:Œ LCD Display — during normal operation, displaysthe time of day; during programming, shows theresults of your commands; during watering,shows the station that is running and the minutesremaining in its run time. Arrow ON-OFF Buttons — used to set times anddays, and to make program changes.Ž A / B Program Button — used to select wateringprogram A or B. (On some ESP models, this button is labeled PGM.) Manual Start / Advance Button — used to startthe irrigation program manually or to manuallyadvance watering from one station to the next. Programming Dial — used to turn controller offand on, and for programming.‘ Schedule Slide Switch — used to select one ofthe fixed-interval watering schedules or a customwatering schedule.Technical Support: 1-800-RAIN BIRD2
PROGRAMMING THE CONTROLLERYour ESP controller is an electronic clock that controls when your sprinkler system turns on, and howlong the sprinklers run.Programming is the process of telling the controller exactly when and how long you want to water. Thecontroller opens and closes the remote control valves according to the program you set.Each program contains:n Watering days — the specific days of the week on which watering takes place (for example, Monday, Wednesday, Friday), or the watering interval (for example, every third day).n Start time — the time of day that the program begins; this is the time that the first station in the program begins watering; all other stations then follow in sequence.n Run time — the number of minutes that each station runs.Programming ChecklistTo program the ESP- controller for the first time, we recommend that you complete the following stepsin order:Fill out Program Schedule Sheet.page 3Select watering schedule.page 4Set the current time.page 4Set the current day.page 5Select the program (A or B).page 6Set station watering days.(custom schedule only).page 6Set station run times.page 7Set watering start times.page 7Set controller to automatic operation.page 8Fill Out Program Schedule SheetBefore you begin programming, fill out the ESP Controller Program Sheet and attach it to the label on the inside of the controller door. A sample Program Sheet isshown in this illustration.Œ Enter a brief description of each station on the controller. In the Program A column, mark the watering schedule. Either circle one of the fixed intervals, or fill in thewatering days in the “Custom” row.Ž Enter the starting time(s) for Program A. You mayhave up to three separate start times for each program. Enter the run time for each station assigned to Program A. Enter “0” for stations that are not used in Program A. Repeat steps 2 - 4 for Program B. If you are using afixed schedule, Program B will have the same watering days as Program A.Technical Support: 1-800-RAIN BIRD3
Select Watering ScheduleThe ESP has two types of watering schedules, eitherfixed or custom. The fixed schedule sets watering to occur every second, third, or fifth day. The custom schedule lets you select specific days of the week on whichwatering is to occur.The type of schedule you select applies to both programs, A and B. For example, you cannot set Program A to a fixed schedule and Program B to a custom schedule.Œ To use a fixed schedule, move the Schedule SlideSwitch to one of the FIXED positions:2 every other day3 every third day5 every fifth day To use the custom schedule, move the ScheduleSlide Switch to the “C” position.Set Current TimeŒ Turn the dial to “HR.” The display shows the hour that is currently set,either AM or PM.Ž Press ñ or ò to set the current hour. Turn the dial to “MIN.” The display shows the minute currently set.‘ Press ñ or ò to set the current minute.Technical Support: 1-800-RAIN BIRD4
Set Current Day3Setting the current day varies somewhat depending onwhether you are using a custom schedule or a fixedschedule.4DAYPGMACustom ScheduleONOFFOFFŒ Make sure the Schedule Slide switch is set to “C.” Turn the dial to “DAY.”TUEWEDMINTHUHRFRIDAY Press ñ or ò to change the display to the current day of the week.ADV.DAYS TO WATERMONCURRENT TIMEAND DAYWATERINGSTART TIMESMANSTARTBAUTOADJUST WATER %2Ž The display shows the day of the week that iscurrently set (for example, “MO” for Monday).ACUSTOMSCHEDULESAT3SUN21126543WATERING TIME PER STATIONSCHEDULEFIXEDESP-6Si1Fixed ScheduleŒ Make sure the Schedule Slide switch is set to afixedday schedule: 2, 3, or 5. Turn the dial to “DAY.”Ž The display shows “1” for the first day of the wateringcycle. Day 1 is always the watering day. Press ñ or ò to change the current day from1. If you want tomorrow to be the watering day,change the current day to the last day in yourfixed schedule.For example, if you’re using a two-day schedule andyou want to start watering tomorrow, set the current dayto “2.” If you’re using a three-day schedule and youwant to start tomorrow, set the current day to “3.”Technical Support: 1-800-RAIN BIRD52 3 5 CCUSTOM
Select ProgramThe ESP controller has two programs, A and B. Eachprogram operates independently.If you are using the custom watering schedule, eachprogram can have different watering days. For example, Program A might run on Monday, Wednesday, andFriday; Program B on Tuesday, Thursday, and Saturday.If you are using a fixed watering schedule, both programs will have the same “ON” days. For example, ifyou are using the three-day fixed schedule, Program Aand Program B will both run every third day.You can assign any station to Program A, Program B,or both.Œ The program that is currently selected appears inthe far left corner of the display. The display willshow either “PGM A” or “PGM B.” To select the program, press the A / B (or PGM)button until the program you want appears in thedisplay. Pressing the A / B button switches back andforth between the two programs.Set Station Watering DaysNOTE: You must set station watering days only ifyou are using the CUSTOM Schedule. If you areusing one of the FIXED schedules, skip to the stepsin Set Station Run TimesŒ Turn the dial to “MON.” The display shows the day of the week (for example, “MO” for Monday) and either “ON” or “OFF.”ON means the selected day is a watering day. OFFmeans watering doesn’t take place on the selectedday.Ž Press the ON or OFF button to set the selectedday of the week on or off. Turn the dial to the next day of the week. Repeatsteps 2 and 3 until you have set each day of theweek either on or off.Technical Support: 1-800-RAIN BIRD6
Set Station Run Times23Œ Turn the dial to Station 1.PGM The display shows the selected station and itsrun time. If you are programming the controllerfor the first time, or after a long power outage,the built-in run time of 10 minutes will appear.ASTATIONONWATER TIMEOFFOFFTUEWEDMINTHUHRFRIDAYWATERINGSTART TIMESADV.DAYS TO WATERMONCURRENT TIMEAND DAY Turn the dial to the next station in sequence.Repeat steps 2 through 4 until you have set therun time for each station.STARTBAUTOADJUST WATER %Ž Press ñ or ò to change the display to the runtime you want (up to 99 minutes). Set any unused stations to 0 G TIME PER STATIONSCHEDULEFIXEDESP-6SiSet Watering Start Times1Each program on the ESP can have up to threewatering start times, which tell the controller whento begin the watering program. The start time applies to all watering days for that program.CUSTOM2 3 5 C34AMPGMAONOFFIf you want to water more than once a day, you canset the second and third watering start times. Forexample, if you are growing new lawn seed, youmight want to water several times a day. To do so,you could set a program to run at 6:00 A.M., 11:00A.M., and 4:00 P.M.OFFMONCURRENT TIMEAND DAYŒ Make sure the program you want appears in thedisplay. Either “PGM A” or “PGM B” will appear.To switch to the other program, press the A / B(or PGM) button.DAYS TO WATERWEDMINTHUFRIDAYSUN1126 Turn the dial to 1 in the “Watering Start Times”section.543WATERING TIME PER STATIONŽ The display shows the start time currently set forthis program.SCHEDULEFIXEDESP-6Technical Support: 1-800-RAIN BIRDCUSTOMSCHEDULESAT322ADV.TUEHRWATERINGSTART TIMESSTARTBAUTOADJUST WATER %5MANA72 3 5 CCUSTOM
Set Watering Start Times(Continued)1 Press ñ or ò to change the start time. Thetime setting moves forward or backward in 15 minute increments.To eliminate a start time, press ñ or ò untilthe blank setting between 11:45 PM and 12:15AM appears.AMAONOFFOFFMONCURRENT TIMEAND DAYADV.DAYS TO WATERWEDMINTHUFRIDAYWATERINGSTART TIMESSTARTBTUEHR5MANAAUTOADJUST WATER %If you are following the programming checklist onpage 6, you have now completed all programmingsteps for Program A. At this point, you may:n4PGM If you want to set additional start times for thisprogram, move the dial to 2 or 3 in the“Watering Start Times” section. Then repeatsteps 3 and 4.n3CUSTOMSCHEDULESAT3SUN212126Enter Program B by following the steps thatbegin on page 3, or543WATERING TIME PER STATIONSet the controller to automatic operation, asdescribed on page 8.SCHEDULEFIXEDESP-6OPERATING THE CONTROLLERTurn Controller On and Off1DAYPGMAŒ To set the controller to automatic operation, turnthe dial to AUTO. The display will show the current day and time until the next scheduled automatic start. When a program is running, the display will show the station currently turned onand the minutes remaining on its run time.When the entire program is complete, the display will change back to the current day andtime.AMONOFFOFFADV.DAYS TO WATERMONTUECURRENT TIMEWEDMINAND DAYTHUHRFRIDAYSTART TIMESMANSTARTBAUTOADJUST WATER %WATERINGACUSTOMSAT3SCHEDULESUN21123645WATERING TIME PER STATIONIf you forget to turn the dial to AUTO, the controller will eventually set itself to automatic operation. The only setting that prevents automatic operation is OFF (see step 2).SCHEDULEFIXEDESP-6CUSTOM2 3 5 CDAYPGMA To turn the controller off and prevent all watering, set the dial to OFF. The display will showthe current day and time. In addition, the righthand minute digit will blink to show that the controller has been turned off.AMONOFFAMANSTARTBADV.2OFFAUTOADJUST WATER %DAYS TO WATERMONCURRENT TIMEAND DAYTUEWEDMINTHUHRFRIDAYWATERINGSTART TIMESThe OFF setting can be used during rainyweather, seasonal shutdown, or system maintenance.CUSTOMSAT3SCHEDULESUN21123654WATERING TIME PER STATIONSCHEDULEFIXEDESP-6Technical Support: 1-800-RAIN BIRD82 3 5 CCUSTOM2 3 5 CCUSTOM
Adjust Water Budget PercentThe Water Budget feature on the ESP lets you increase ordecrease the run times of all stations by a selected percentage. You may adjust the run times as low as 10 percent and as high as 200 percent. Adjustments must bemade in increments of 10 percentage points.The percentages are calculated on the normal programmed run times for each station. For example, if a station is programmed to run for 10 minutes, and you set thewater budget percent to 80%, the station will run for 8 minutes (80% of 10 minutes). If you set the water budget to120%, that same station will run for 12 minutes (120% of10 minutes).The water budget feature can be useful for cutting backwatering during cool winter months, or for increasing watering during periods of unusual heat. Keep in mind thatthe percentage you set applies to all stations on both programs.Œ Turn the dial to ADJUST WATER %. The display shows the current water budget setting(between 10% and 200%). A setting of 100% meansthat all stations will run according to their normal programmed run times.Ž Press ñ or ò to increase or decrease the percentagein 10-point increments.When water budgeting is set above or below 100 percent,the words WATER BUDGET PERCENT will appear in thetop of the display.To turn off water budgeting, repeat steps 1 to 3, and setthe percentage to 100%.Use Manual Start / AdvanceŒ Select the program you want to start. Press theA / B (or PGM) button to switch back and forthbetween the two programs. Press the MAN START / ADV. button to begin the program with the first assigned station. To advance throughthe stations in the program, press MAN START / ADV.repeatedly until the station you want is displayed.Technical Support: 1-800-RAIN BIRD9
Run Test ProgramThe ESP controller has a built-in test program thatwill run each station in sequence for two minutes.You can use this program to check out the operation of all the sprinklers in the system.Œ Turn the dial to AUTO. Press both arrow buttons at the same time andhold them down.Ž The display shows the first station number andtwo minutes of watering time remaining. Thecontroller will run each station for two minutesand then return to AUTO mode to await the nextscheduled start time. Any station that has beenset to a 0 run time will be skipped during thetest program.REPLACING THE BATTERYThe ESP controller features a rechargeable batterybackup, which will preserve the controller's program in the event of a power failure. A fullycharged battery will maintain the controller's program and keep current time for up to three days.However, the battery cannot operate the system.To replace the battery:Œ Open the controller door and swing the facepanel out on its hinges from right to left. Remove the old battery from the battery holderand disconnect it from the battery clip. Connecta new 9-Volt rechargeable, NiCad battery to thebattery clip. Then insert the battery into the battery holder.CAUTION: DO NOT use 9-Volt alkaline batteries.They may burst or leak when subjected to the continuous charging circuit of the ESP. Use NiCad batteries only.Technical Support: 1-800-RAIN BIRD10
INSTALLING THE CONTROLLERSelect LocationThe plastic, weatherproof cabinet of the ESP controller is suitable for mounting outdoors or indoors. For bestresults, mount the controller at eye level in a sheltered location.Allow approximately 7 1/2" of clearance to the left side of the controller so the controller door can swing fullyopen. In addition, mount the controller so that 117-Volt AC power is readily accessible.The ESP controller has three "keyhole" slots on the back of the cabinet. Use these slots to mount the controllerto a flat wall or vertical stud. Always use lower mounting hold "D" to secure the bottom of the controller.Mount ControllerŒ Open the controller door and swing the face panel out on its hinges from right to left. Place the open controller on the mounting surface and mark through the upper slots of the keyholes. (Usekeyholes A and C for wall mounting. Use keyhole B for mounting on a stud.) Then mark the location of holeD.Ž Remove the cabinet. Drive appropriate fasteners into the wall or stud at the upper keyhole marks (A, B, C).Leave slightly more than 1/4" between the head of the fastener and the wall surface. Do not drive a fastenerinto location D at this time. Hang the controller on the upper keyhole slots. Make sure the shafts of the fasteners are in the upper, narrowportion of the slots. Then drive a fastener through lower mounting hole D. The controller should now be secure.Technical Support: 1-800-RAIN BIRD11
Connect Field WiringThe ESP's terminal strip, shown in this illustration,provides fast screw connections for field wires.Œ Wires connected to the terminal strip should bestripped to expose 1/2" of conductor at the end. To connect field wires, loosen the screw terminal.Insert the stripped wire around the base of thescrew. Then tighten the screw terminal to grip thewire.ŽTug gently on each wire to make sure it's securelyconnected.Station Valve WiringConnect each valve by its own separate power wireto one of the numbered terminals on the ESP terminal strip, as shown in the illustration.Connect a common wire to one of the leads on eachvalve. Connect the other end of the common wire tothe COM terminal on the ESP terminal strip. Wireused to connect the valves must be code-approvedfor underground installation. Bring all wires upthrough the right-hand hole in the bottom of the cabinet.Master Valve / Pump Start RelayWiringNOTE: Complete this section only if your systemrequires a master valve (an automatic valve installed on the mainline pipe upstream from thestation valves) or a 24-Volt pump start relay.Connect the master valve / pump start relay wiring tothe MV terminal and COM terminal as shown in theillustration.Technical Support: 1-800-RAIN BIRD12
Jumper Settings for UnusedStationsCAUTION: To prevent pump damage when usinga pump start relay, use a jumper to connect unused stations to a station that is being used. If program information is lost during a prolonged poweroutage, the ESP will automatically run a "default"program when power is restored. This programruns all stations for 10 minutes. If unused stationsare not jumpered, the pump will operate with noflow (dead-head) during this 10-minute period.Dead-heading may
the face of the ESP. These controls include: „ LCD Display — during normal operation, displays the time of day; during programming, shows the results of your commands; during watering, shows the station that is running and the minutes remaining in its run time. “Arrow ON-OFF Buttons — used to set times and days, and to make program changes.File Size: 794KB