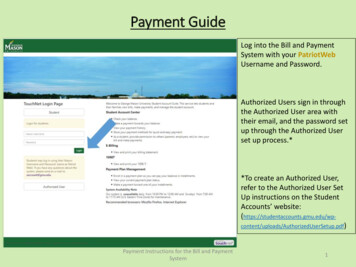
Transcription
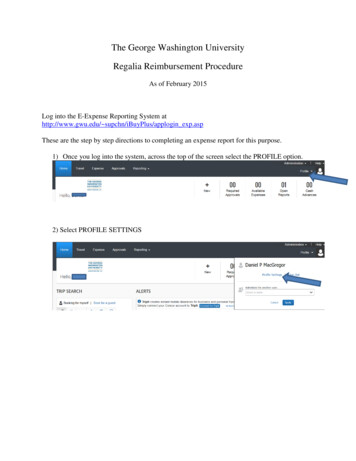
The George Washington UniversityRegalia Reimbursement ProcedureAs of February 2015Log into the E-Expense Reporting System athttp://www.gwu.edu/ supchn/iBuyPlus/applogin exp.aspThese are the step by step directions to completing an expense report for this purpose.1) Once you log into the system, across the top of the screen select the PROFILE option.2) Select PROFILE SETTINGS
3) In the left hand column under a heading Expense Settings select EXPENSEPREFERENCES4) A series of options appear to the right. One is labeled PROMPT, Please make sure thecheck box below PROMPT is checked and then hit SAVE at the top of the page. Thiswill prompt you to name the expense report approver at the appropriate time. Then selectEXPENSE at the top of the screen.
5) Select Create New Report.
6) The Report HEADER screen appears You can call the report Regalia, FY xxxxReport date current dateTravel Destination / Business Purpose RegaliaStart date and End date the date of the purchase and todayGrant / non-Grant Non-GrantOracle Alias should be changed to 403106Select NEXT at the bottom right hand side of the screenChange this to 403106
7) The next screen is split into 2 halves. The right hand side has a tab labeled new expenseand a search field for an expense type. Use the Expense type 52612 SPECIAL EVENT /BUSINESS RELATIONS8) Complete the required fields for the transactions including the attendee field. The transaction date is the date on your receipt.The business purpose is RegaliaThe vendor name is who you purchased the Regalia fromThe city is the city they are located in.The expense type is OUT of POCKETThe maximum reimbursement is 200.00.The Attendee is you - there is a search field next to the option "FAVORITE". If youenter your email address there your name will appear and you can select yourself as anattendee.Select ATTACH RECEIPTS, then BROWSE to find the image of your receipt on yourdesktop. Once you select the image click on the word ATTACH. This will attach yourreceipt to this transactionSelect SAVE at the bottom right hand side of the screen. This will move the transactionto the left hand side of the screen.
After entering the information requested, attaching a receipt and selecting save the screen willlook like this9) SUBMIT the report. This will prompt you to acknowledge the university policy. SelectACEPT & SUBMIT
10) The next prompt is for your approver. If a name appears, please overwrite it withVAFIDES. An option will appear for "Tim Vafides". Please select Tim. He isauthorized to approve these expenses. Select SUBMIT REPORT.Your report should now be submitted.The report requires Tim’s approval and AP’s processing. You are able to track the reportsprogress from the screen described in item 5 above.
7) The next screen is split into 2 halves. The right hand side has a tab labeled new expense and a search field for an expense type. Use the Expense type 52612 SPECIAL EVENT / BUSINESS RELATIONS 8) Complete the required fields for the transactions including the attendee field. The transaction date is the date on your receipt.