Transcription
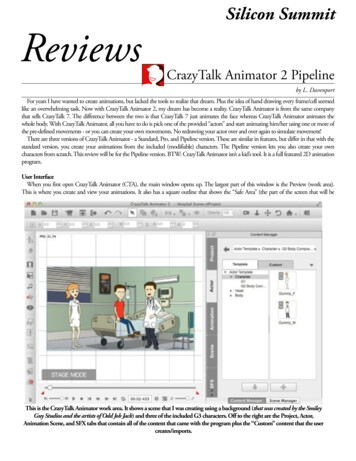
Silicon SummitReviewsCrazyTalk Animator 2 Pipelineby L. DavenportFor years I have wanted to create animations, but lacked the tools to realize that dream. Plus the idea of hand drawing every frame/cell seemedlike an overwhelming task. Now with CrazyTalk Animator 2, my dream has become a reality. CrazyTalk Animator is from the same companythat sells CrazyTalk 7. The difference between the two is that CrazyTalk 7 just animates the face whereas CrazyTalk Animator animates thewhole body. With CrazyTalk Animator, all you have to do is pick one of the provided “actors” and start animating him/her using one or more ofthe pre-defined movements - or you can create your own movements. No redrawing your actor over and over again to simulate movement!There are three versions of CrazyTalk Animator - a Standard, Pro, and Pipeline version. These are similar in features, but differ in that with thestandard version, you create your animations from the included (modifiable) characters. The Pipeline version lets you also create your owncharacters from scratch. This review will be for the Pipeline version. BTW: CrazyTalk Animator isn’t a kid’s tool. It is a full featured 2D animationprogram.User InterfaceWhen you first open CrazyTalk Animator (CTA), the main window opens up. The largest part of this window is the Preview (work area).This is where you create and view your animations. It also has a square outline that shows the “Safe Area” (the part of the screen that will beThis is the CrazyTalk Animator work area. It shows a scene that I was creating using a background (that was created by the SmileyGuy Studios and the artists of Odd Job Jack) and three of the included G3 characters. Off to the right are the Project, Actor,Animation Scene, and SFX tabs that contain all of the content that came with the program plus the “Custom” content that the usercreates/imports.
Silicon Summitexported when the animation is complete). This allows you to have objects and characters “Off screen” but ready to enter the stage/safe area.Various tools line the top and left side of the main window, A timeline crosses the bottom, and the Content and Scene Manager tabs sit to theright of the main window. The Content Manager groups together all of the content that comes with the program plus the custom content andanimations that you create. The Scene Manager lists all of the characters and objects that you have added to the current project.Adding objectsYou can import objects into CTA. These include: Actors that you have created, props, image layers, backgrounds, text, and effects. Thesupported file types are (BTW: some are PC only formats): Image: BMP, JPG, TGA, PNG, Gif, SWF Others: popVideo (Reallusion’s file format)Actors/CharactersAn animation would be very boring if there weren't some sort of person, creature, or object moving around on the screen. Enter stage-left, theactor. CTA comes with a good selection of G1 and G2 actors. FYI: G1 stands for Generation 1, e.g. actors that were created for the previousversion of CrazyTalk Animator. They are basically flat 2D actors that only have one view or body angle. G2 actors were created for the latestversion of CTA. Each one comes with 10 different anglesthat you can rotate their body to. This means you canswitch between the 0, 45, 90, 135, 180, 225, 270and 315-degree angles plus the top, and bottom views.With these 10 angles, the actors are able to perform both2D flat motions and 3D dimensional motions.Don’t misunderstand. Though they are called actors orcharacters, they don’t have to be living representations. Youcan also animate objects. For example, you can give anThese are a few of the available G1These are a few of the G2 actors.umbrella eyes and a mouth and have it talking and hopping actors. They only have one directionThey can be rotated in 8 directionsall over the screen. There is even one stock actor that isor angle.plus be viewed from the top andcomposed from vegetables!bottom.Modifying Your ActorsContent ManagerCTA comes with a library of ready-made complete actors and body parts. You can use theactors as-is, or mix-and-match their body parts. There are:Characters (complete actors with interchangeable hair and clothes): 14 G1 Characters (or modifications of the same actor)This is the same actor, except I switched 11 G2 Characters (this includes a G2 Reference Guy - made up of connected square blocks, out the shape of his jaw line, his hair, eyes,and character made up from vegetables)eyebrows, nose, and mouth to give himthree different looks.Bodies (clothed and unclothed): 13 G1 bodies 10 G2 bodiesHeads: 9 Sprite-based (more about Sprites later) heads 3 Morph-based heads 1 Hybrid headIn addition to the actors and their interchangeable body parts, the Content Manager Libraryincludes a variety of Props. This is everything from shoes and clothes to backdrops, chairs, tables, etc.Everything you would need to get started in creating your first scene (what good is it to have amoving actor if all it is doing is moving around on a white background? BORING!) Also if you lookaround the Internet, you can find various sites that have background and other props that can be usewith CTA.You can further modify the look ofyour actor by changing its bodyproportions.
Silicon SummitSpritesMost of the CTA actors and props are sprite-based. This means the actors, their body parts, and the propsare all composed of one or more sprites - that are interchangeable.Definition: A sprite is a group of different media files that make up your character’s different body parts.The different Sprite media formats are (BTW: some are PC only formats): Image: .jpg, .jpeg, .bmp, .gif, .png, .tga. Video: .swf, .avi, .wmv, .mpg, .mpeg, .mpe, .flv, .rm, .rmvb, .mp4, .asf, .asx, .wm Reallusion Specific Format: .popVideoWhen you want to change a sprite, you simply call up the Sprite Editor, select the body part you want toreplace (from the silhouetted dummy), and then choose a replacement sprite. BTW: The screen shot shownto the right, shows all of the replacement sprites for the actor's right hand.Head typesThere are three types of heads: Sprite based, Morph-based, and Hybrid (a combination of the previoustwo). We have already talked about Sprites and how they are interchangeable, so lets talk about Morphbased heads. These are heads that were brought into CTA from a photo or or other image.Face CreatorYou need bring your photo or image (of a face) into CTA using the Face Creator so that you can have itsmouth move while it speaks, roll its eyes and have facial expressions.When you click on the “Create Face” button, an “Image Processing”window appears. After choosingyour face photo or image, Face Creator steps you through the process of identifying the locations of the eyes You can use the Sprite Editor toreplace any part of your actor’sand other parts of the face.body. In this example, I amAfter the Face Fitting process, your face is placed on top of a stick-figure body. But before proceeding, it’s agood idea to modify the face further. There are buttons that let you replace the eyes with movable eyes and a replacing the actor’s right hand.add teeth so when you actor speaks, he/she won’t look like a toothless-wonder.CrazyTalk Animator needs to know where the eyes andmouth are located on your actor (especially helpful if itisn't a human). So you start by placing four dots at thecorners of the eyes and mouth.Once the facial features are located, a wire frame and extradots appear for fine tuning the outline of the face, eyes,mouth, eyebrows, and hair. Buttons (to the right) let youtest the head, eye, and mouth movements.TeethCTA’s content library has around 30 different types of teeth that you can choose from. Everything from white or yellowed teeth to goldcapped, vampire, and animal teeth. Do you want your actor to have braces? No problem. Need decayed and missing teeth for a zombie? Again no problem.There are preferences that let you change the rotation and size of the teeth (to match the rotation and size of the face). You can also change theteeth’s Brightness, Hue and Saturation.
Silicon SummitVivid EyesWhat is one of the firstthings that you notice whenyou meet a new person or lookat a photo? The eyes. They tellyou a lot about the person - isshe happy, sad, energetic, etc.So CTA lets you replace theeyes of your image-based facewith “Vivid Eyes”. VividEyesare divided into six layers - theIris, White of the eye, Eye light(sparkle in the eye), EyeShadow, Eyelash, andMakeup. Each of these has its Once you have imported your new face, Crazyown set of parameters that you Talk Animator places it on top of a stick figure waiting for you to add a body to the head.I have replaced my character’s simplistic eyes withCrazyTalk Animator’s VividEyes. Notice how theyimprove the look of the actor.can modify the get the exact look that youwant.There are five Vivid Eye Template groups:Animal, Anime, Cartoon, Comic, andHuman (enough styles to cover all of thedifferent types of imported images). Exceptfor Comic (which is only black and white),all of the other template groups come with avariety of iris shapes and colors.Once you have added Vivi Eyes and teeth,it is time to save your head to the CustomLibrary so you can use it over and overagain.This is my finished You can stop here, or continue on withActor named Alice.adding a body to you headto create a completec h a r a c t e r. T h i s i saccomplished by simplydouble-clicking on one ofthe pre-defined bodies inthe Content Library.This is the 3D Motion Key Editor. Iused it to place the young man (in thefirst screen shot) in a sitting position.3D Motion Key EditorThere are five different types of VividOne of the ways toEyes that can be applied to yourThis screen shot shows 21position your actor is byactor: Normal (human), Animal,or the 30 available teethusing the 3D Motion KeyAnime, Cartoon, and Comic. Oncethat you can add to yourEditor. Its bottom half hasapplied, you can make them roll andactor.a silhouette of a humanmove around just like real eyes.shaped dummy with all ofthe linked bones/joints represented by small teardrops. When you click on one of the linked joints say the knee joint - that joint becomes active in the stick figure that is standing in the 3D View(located at the top of the window). Then by using the X, Y, Z axis arrows you can bend and movethat joint. Notice (in the previous screen shot) that I used this process to make my actor appear to besitting (as seen in my first screen shot).At the middle of the window is a degrees slider (from 0 to 315) that you can use to rotate your G2
Silicon Summitactor. Notice that my sitting actor is pointing at the 45 degree angle.HumanIK Motion EngineCTA’s core motion engine uses HumanIK. So when you move one body part - likethe hand that is reaching for something - CTA will automatically calculate the pose forthe rest of the body.You can also instruct CTA to “Lock” or “Pin” body parts so they don’t move with therest of the body. This would be handy for instances (such as climbing a ladder) when youwant one hand and one foot to remain pinned to a ladder step as you raise the body toYou can specify whether your movement will onlythe next step.effect the chosen body part or effect the Full body.MotionCTA includes a variety of 2D and 3D motions that you can add to your actor. The 2Dand 3D motions are divided into six categories: Move, Idle, Talk, Perform, Dance, andWorking. So if you want your actor to cry, simply double-click on the “Cry” motion.Instantly your actor will raise her hands to her eyes and her body would bob up anddown. It’s that easy.Puppet EditorIn addition to coming with pre-defined motions, dances, etc. CTA, also lets youmanually create your facial and body motions using the Body or Face PuppeteeringPanels. These panels contain real-time puppeteering controls with easy-to-usefacial expression commands.SpeechIn addition to making your actor move around the screen, you can also make him orher speak. CTA is set up to automatically lip-sync to audio that you import or create usingCTA’s “Create Script” tool. You can leave the lip-syncing set as-is or fine-tune the mouthshapes for the individual words using CTA’s “Lip Editor”.There are three ways to add dialog: You can type the dialog into CTA’s “Text to Speak” editor and have one of Apple’sdefault voices vocalize the text. You can bring in pre-recorded dialog. BTW: You can even bring in a song and haveYou can manually create your facial and bodyyour person or animal sing the lyrics.motionsusing the Body or Face Puppeteering You can use CTA’s Record tool to record your voice as you speak - provided you have aPanelconnected microphone.3D ViewThere is an option to view the work area (or Stage) in 3D. This way you can rotate the stage to seethe Z-depth relationship of each object or character that you have placed in the stage. This also letsyou drag these items back and forth to place them in the exact location (in relation to the others) thatyou want.CameraYou can customize your camera views withpan, zoom, and rotate tools. You can also createperspective orbit effects by changing characterangles and moving props in Z-depth order.Since your objects are layered in your 3Dstage, you can create a camera move that willapproach and then pass your objects (likemoving through a group of trees). Just like youwere filming in the real world.Both of these images are of the same scene. The one on the left is the normal front view,whereas the one on the right is the 3D view. You can use the 3D view to reposition youractors and props within 3D space (using the X Y Z axis arrows).
Silicon SummitTextYou can add text to your animation using one (or more) of the three available textstyles: Comic - for adding cartoon style text bubbles; Realistic - for adding text tosigns etc; and Subtitle for adding onscreen subtitles. Using the timeline, you can syncthe text to the audio so they appear and disapp
Title: CrazyTalk Animator 2 Created Date: 8/3/2014 3:32:18 PM