Transcription
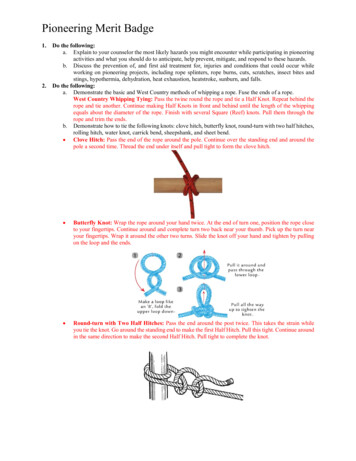
Pioneering Merit Badge1.2.Do the following:a. Explain to your counselor the most likely hazards you might encounter while participating in pioneeringactivities and what you should do to anticipate, help prevent, mitigate, and respond to these hazards.b. Discuss the prevention of, and first aid treatment for, injuries and conditions that could occur whileworking on pioneering projects, including rope splinters, rope burns, cuts, scratches, insect bites andstings, hypothermia, dehydration, heat exhaustion, heatstroke, sunburn, and falls.Do the following:a. Demonstrate the basic and West Country methods of whipping a rope. Fuse the ends of a rope.West Country Whipping Tying: Pass the twine round the rope and tie a Half Knot. Repeat behind therope and tie another. Continue making Half Knots in front and behind until the length of the whippingequals about the diameter of the rope. Finish with several Square (Reef) knots. Pull them through therope and trim the ends.b. Demonstrate how to tie the following knots: clove hitch, butterfly knot, round-turn with two half hitches,rolling hitch, water knot, carrick bend, sheepshank, and sheet bend. Clove Hitch: Pass the end of the rope around the pole. Continue over the standing end and around thepole a second time. Thread the end under itself and pull tight to form the clove hitch. Butterfly Knot: Wrap the rope around your hand twice. At the end of turn one, position the rope closeto your fingertips. Continue around and complete turn two back near your thumb. Pick up the turn nearyour fingertips. Wrap it around the other two turns. Slide the knot off your hand and tighten by pullingon the loop and the ends. Round-turn with Two Half Hitches: Pass the end around the post twice. This takes the strain whileyou tie the knot. Go around the standing end to make the first Half Hitch. Pull this tight. Continue aroundin the same direction to make the second Half Hitch. Pull tight to complete the knot.
Pioneering Merit Badge Rolling Hitch: Pass the end around the main rope to make a Half Hitch. Continue around going over thefirst turn. Tuck the rope between the standing end and the first turn. Tighten to make it secure (thisintroduces a slight dog-leg in the main rope). Continue around to add a final Half Hitch. Water Knot: Tie a loose overhand knot in the end of the strap. Thread the other strap in the reversedirection following the exact path of the first overhand knot. Pull the knot tight.
Pioneering Merit Badge Carrick Bend: With one rope, form a loop with the tail under the standing end. Pass the other ropeunder the first loop and then over and then under. Thread the tail of the other rope across the loop passingunder itself. Then pull both standing ends to tighten the knot. Sheepshank: Fold the rope to approximately the desired new length. Form a Half Hitch in one standingend, drop it over the adjacent bight, and tighten it. Form a Half Hitch in the other standing end, drop itover its adjacent bight, and then tighten it too. Apply the load carefully.
Pioneering Merit Badge Sheet Bend: Form a bight in the thicker rope and hold it in one hand. Pass the thinner rope through thebight and behind the thicker rope’s tail and standing ends in that order. Finally, tuck the smaller ropeunder itself to finish the knot.c. Demonstrate and explain when to use the following lashings: square, diagonal, round, shear, tripod, andfloor lashing.Square Lashing: Used for joining sticks at right angles. Diagonal Lashing: Used for joining sticks at angles.
Pioneering Merit Badge Round Lashing: Used to form a rigid joint between parallel poles to make a longer or stronger pole. Shear Lashing: Used for joining parallel sticks that need to bend outward Tripod Lashing: Used to make a tripod to suspend something, making a support for a beam of a largerstructure, or to start the basis of a raft.
Pioneering Merit Badge Floor Lashing: when building any kind of raised surface for a: platform, deck, raft, table, bench, chair,or Chippewa kitchen.3.Explain why it is useful to be able to throw a rope, then demonstrate how to coil and throw a 40-foot length of1/4- or 3/8-inch rope. Explain how to improve your throwing distance by adding weight to the end of your rope.4.Explain the differences between synthetic ropes and natural-fiber ropes. Discuss which types of rope are suitablefor pioneering work and why. Include the following in your discussion: breaking strength, safe working loads,and the care and storage of rope.The main differences between synthetic and natural fiber ropes are the materials used during construction. Eachmaterial can greatly affect the use and longevity of each product, making material selection an important decisionbefore purchasing and using.Materials: Synthetic rope is constructed of materials such as polypropylene, polyester, and nylon. Most natural fiberropes are constructed from cotton, sisal, and hemp fibers. There are ropes with blends of both fibers.Longevity: Synthetic rope has a 30 percent longer life span than natural fiber rope. It is stronger than natural fiberrope and is resistant to water, mildew, and UV rays.Durability: Synthetic rope is lightweight and has a 20-percent stronger tensile strength than natural fiber ropes.Synthetic rope does not shrink when wet, like natural fiber ropes. It will melt though when exposed to heat, unlikenatural fiber ropes that are damaged only by direct contact with fire.Uses: Synthetic rope has higher elasticity rating and increased shock absorbency, making it ideal for towing, lifting,and marine applications. Natural rope is designed for lightweight applications like packaging and has a better grip,making it ideal for tying and knotting, unlike synthetic that is prone to slipping.Environmental Effects: Synthetic rope is created using plastics with dangerous chemical byproducts, while naturalfiber ropes are woven from jute, sisal, and, hemp--all renewable and biodegradable resources with no chemicalbyproduct.
Pioneering Merit Badge5. Explain the uses for the back splice, eye splice, and short splice. Using 1/4- or 3/8-inch three-stranded rope,demonstrate how to form each splice.Back Splice: Form a Crown Knot by passing each strand over its neighbor and then tighten the knot. Splice eachstrand into the rope by passing it over and under alternate strands in the standing end. Complete a second and athird set of tucks to complete the back splice. Eye Splice: Tape (or whip) rope. Unravel enough for 5 tucks. Arrange strands. Pass center one under a standingstrand. Pass lower one under lower adjacent standing strand. Pass the upper strand under the upper adjacentstanding strand. Repeat the process for the remaining sets of tucks. Remove the tape (or whip). Short Splice: Tape (or whip) the rope. Unravel enough for about 5 tucks. Push the ends into each other and tapethe middle. Make the first complete set of tucks, and then another. Repeat this using the other end. Remove thetapes (or whip), tighten, and complete the remaining tucks.6.Using a rope-making device or machine, make a rope at least 6 feet long consisting of three strands, each havingthree yarns. Whip the ends.Explain the importance of effectively anchoring a pioneering project. Describe to your counselor the 1-1-1anchoring system and the log-and- stake anchoring methods.1-1-1 Anchoring System: As the name implies, the 1-1-1 anchor is made by driving stakes in a series of singlestakes to form the anchor. First drive in the set of three single stakes in the ground about 12 inches apart. Connectthe stakes by tying a rope from the top of the first stake to the bottom of the middle stake, and then from the topof the middle stake to the bottom of the single stake. Use at least two loops of 1/4 inch manila rope, or six to eightloops of binder twine. Then twist the rope tight using a small stick as a tourniquet. After the rope is twisted tight,push the end of the stick in the ground to keep it from unwinding. Depending on the strain the anchors need towithstand, you can use other configurations, such as 3-2-1, 2-1-1, or even 1-1 for a light strain.Log-and-Stake Anchoring System: This type of anchor is easy to make and can hold a considerable amount ofpull. You can tie the line directly to the log, or you can use a ring with a rope grommet as shown in the photobelow. To make the log-and-stake anchor, place a log 4 to 6 inches in diameter perpendicular to the pull of theline. Then drive in four large stakes in front of the log. Next, slip the rope grommet through the ring and then slipthe ends of the grommet around the log. Drive a second row of stakes 24 inches behind the front stakes. Thenanchor the front stakes to the rear stakes with a tourniquet made of binder twine or rope.With the approval of your counselor, demonstrate and use a rope tackle. Be sure the rope tackle is securedproperly. Explain the advantages and limitations of using a rope tackle. Describe the potential damage that frictioncan do to a rope.7. 8.The Rope Tackle is the go-to method for putting strain on a line and assuring that the strain is maintained. We applya rope tackle, (also known as the Trucker’s Hitch, Lineman’s Hitch, Load Binder, and Harvester Hitch) where theguylines meet the anchors for pretty much all our pioneering projects. For safety reasons, Taut-Line Hitches should
Pioneering Merit Badgenever be used in any pioneering work, because if the tension is eased the knot can slip. The rope tackle is one of themany skills learned for pioneering that can be used in a variety of situations for many years to come. Frequently, weuse a rope tackle when creating a ridge line between two trees for dining flies and tarps, and love using them wheneverthere’s an appropriate need to hold the strain on a line being tightened. When you want to lift or pull more than yourown strength will permit, or when you want to make a heavy lifting job a little easier, the rope tackle is a device thatcan be used. The idea behind a rope tackle is similar to that of a tackle using blocks and pulleys. In a rope tackle, onelead (end) of the rope has to be fixed. That is, it has to be anchored around a spar or tied through a ring or other pieceof hardware that doesn’t move.Making a Rope TackleUsing a butterfly knot (or bowline), make a fixed loop in the standing part of the line, and then pass the running endof the line through the loop to start pulling the hauling end against a pre-set anchor. Once the threshold of tension hasbeen reached, tie two half hitched with the remainder of the rope to secure the tension. *NOTE: Where there is a lotof line, form a bite in the running end of the line, feed it through the fixed loop, tighten, and then secure the tensionwith two half hitches. This will ensure you have additional line if you need it.Advantages and LimitationsThe rope tackle works on the same principles as any other tackle using mechanical blocks or pulleys. The riggingmethod develops twice the lifting or pulling power that’s applied to the hauling end. In other words, you can lift afifty-pound weight using only twenty-five pounds of force on the hauling end. To determine how much force is neededto lift a weight, the general rule is that you count the number of ropes passing through the ring where the object (load)is, and then divide the number into the weight being lifted. Let’s assume that the weight being lifted is fifty pounds.The answer is twenty-five pounds, which is the amount of pull required to lift the fifty pounds with the rope tackle.*NOTE: When you take into consideration the friction of the ropes rubbing together, you will have to apply a bit morethan the twenty-five pounds to make the lift. But even with the loss caused by friction, the rope tackle is quite effective.Pioneering Uses9. To adjust the strain on the guylines of a pioneering project or a flagpole (see figures 98 and 99) To put the strain on a picket line used for tying up horses or canoes To tie down and secure your equipment on a trailer or truck (see figure 100) To hoist or lower equipment in rock climbing To tie a line to air your sleeping bag or to make a clothesline for wet clothes To tighten hold-down ropes on large tents and fliesBy yourself, build a trestle using square and diagonal lashings. Explain why trestles are used when constructingpioneering projects.A trestle is the basic component for building a bridge in apioneering project. It is used to support the walkways. The mostbasic form of a trestle is an H-frame. It consists of two legs, twoledgers, and two cross braces. When building a bridge, the topledger is also called a transom. This is the part that supports thewalkways.To make an H-frame trestle, the two ledgers are lashed near thetop and bottom of the legs and the cross braces are added, lashingthem to the legs.All of the lashing on the H-frame trestle is done with two typesof lashings: a square lashing and a diagonal lashing. The ledgersare lashed to the legs with square lashings. Although it might notlook like it, the cross braces are also lashed to the legs with squarelashings, not a diagonal lashing. A diagonal lashing is used to lashthe two cross braces together where they cross in the center.When setting out to build an H-frame trestle, choose the two sparsfor legs first. These spars can be most any length, depending onthe type and height of the structure you’re building.
Pioneering Merit BadgeTo build a basic H-frame, lay the two legs on the ground with the two butt ends of the spars at the same end and evenwith each other. Then add the ledgers.Ledgers: The ledgers are spars that are typically 2 to 2-1/2 inches in diameter. They are lashed to the legs with squarelashings. Any of the three (3) square lashings (shown in this pamphlet) can be used. The position of the ledgers on thelegs will depend on the structure you’re building. There are a couple of general rules to keep in mind.First, always keep the legs parallel and the butt ends of the legs even with each other as you’re lashing on the ledgers.*If you don’t, the trestle will stand crooked when you stand it up. As you add the ledgers, they should not stick out toofar beyond the legs. You must leave enough room at the ends to tie the lashing, Any more will get in the way.When using a Traditional Square Lashing or a Modified Square Lashing to tie the ledgers to the legs, be sure thestarting clove hitch is placed on the leg so it’s beneath the ledger. When the clove hitch is below the ledger it willsupport it when the trestle is stood upright. As you tie the lashings, make sure they ar all very tight.If you use a Japanese Mark II Square Lashing, you can start this lashing with a clove hitch in the middle of the ropeto help support the ledger.Cross Braces: Next, the cross braces are added. The cross braces are spars that are usually 2 inches in diameter. Theyare lashed to the legs in a particular sequence.First, flip the trestle over and work on the opposite side from the ledgers. Lash one cross brace to the back side of bothlegs. As mentioned before, use a square lashing (not a diagonal lashing) to attach the ends of the cross braces to thelegs.The second cross brace is added so that the bottom end is on the same side as both ends of the first cross brace. Theother end is placed on the front side, the side with the ledgers. This is done so that the cross braces are standing slightlyapart. There will be a gap where they cross at the center.Diagonal Lashing: After the ends of the ledgers and the cross braces are lashed to the legs, stand the trestle up onend. Adjust the trestle so that the legs are parallel. Also check to see that the top ledger is parallel to the ground. If itis not, lower the trestle, untie the lashing, and adjust it.When the legs are parallel, and the top ledger is parallel to the ground, you’re ready to tie the diagonal lashing to thecross braces while the trestle is standing upright. This lashing is very important to the strength of the trestle.The diagonal lashing creates triangles that are important to stiffen the arrangement of the spars and to keep the trestlefrom racking. Look around at steel towers, bridges, or buildings being erected and you will see the triangle used inmany places for the same reasons as we use it to build a trestle.When the cross braces are lashed to the legs, there is a slight gap between them where they crossed at the center. Adiagonal lashing is used here because it starts out with a timber hitch. The timber hitch pulls the cross braces tightlytogether. This adds strength to the whole trestle. You have to keep a strain on the lashing rope as you complete thediagonal lashing with three wraps in each direction around the X. Then make two frapping turns between the crossbraces to pull the wraps tight. Finally finish by tying another clove hitch on one cross brace.Once the possibility of racking has been taken care of with the diagonal lashing, the trestle’s vertical legs providesupport for a large downward load. Since this is a downward force, also known as a shearing force, the legs don’t haveto be very big. In fact, the overall shape of the trestle is an engineered structure that is able to support quite a bit ofweight with rather small-diameter spars for legs.10. With the approval of your counselor and using appropriate lashings and pioneering techniques, build and use onefull-size pioneering project from either group A or group B. Your project must comply with the requirements ofthe Guide to Safe Scouting. (Requirement 10 may be done at summer camp, at district or council events, or on atroop camp outing.) Group A: Tower OR bridgeo Anchor your project as appropriate and necessary. Explain how your anchoring system works.o Group A projects may be worked on in a group and with others. Group B: Camp chair OR camp tableo Group B projects must be worked on individually.
Pioneering Merit Badge 1. Do the following: a. Explain to your counselor the most likely hazards you might encounter while participating in pioneering . Discuss the prevention of, and first aid treatment for, injuries and conditions that could occur while working on pioneering projects, including rope splinters, rope burns, cuts, scratches .