Transcription
The Whole Scale ThingByRandy WimerWith profoundest thanks to John Nicholas who has proofread, edited, occasionally ridiculed and overall been a tremendous friend and supporter as I’ve triedto put on paper some of the things I’ve learned in five decades of teaching guitar.1
The Whole Scale ThingIntroductionWhat is a scale? Is it the “Do, a deer, a female deer; Re, a drop of golden sun” stuff? (Have I just destroyed my street cred by quoting a Rogers and Hammerstein tune in the opening paragraph?) Why do guitarists get to a certain point in their development and start to obsess about these things?A scale, according to the American Heritage Dictionary, is “an ascending or descending collection ofpitches proceeding by a specified scheme of intervals”. (Anyone who has survived a college ear-trainingclass understands those scheming intervals.) So, a scale is indeed the Do, a Deer stuff, and it is much more.“Scheme of Intervals” just means an organized pattern of intervals, or musical spaces, which can repeatover several octaves. Guitarists, as well as some people who play real musical instruments, obsess overscales because blasting through a scale pattern at near relativistic speed is a great way to display one’s technical superiority, humiliate the competition and attract a mate, thus ensuring the survival of the geneticline. The poor creatures have no choice – it’s in their DNA.Before we get to the serious fun, let’s cover some basics , just to makes sure we have a common vocabulary.Basic TheoryThe space between two notes is called an interval. The smallest space you can have between two notesis a half-step, one fret on the guitar. I like to think about note relationships spatially. Start with the chartbelow listing the chromatic scale from C to C. Each box represents a single half-step.CC#DbDD#EbEFF#GbGG#AbAA#BbBCTo understand the way we name the intervals we must first look at a major scale. Below we’ve removed the sharps and flats and we’re left with the notes of a C major scale.CDEFGABCIntervals are named with numbers. If we want to know the interval between a C and an E, we simplycount: C, D, E; 1, 2, 3; the interval is a third. How far is it between C and A? C, D, E, F, G, A; 1, 2, 3, 4, 5,6; This interval is a sixth. What is the interval between D and F? It’s another third. But notice it’s fartherfrom C to E than from D to F.CDEDEFThere are 4 half-steps between C and E and 3 half-steps between D and F. The larger interval is called amajor 3rd and the smaller is a minor 3rd. The chart on the next page shows the interval names and the associated number of half-steps between C and all the notes in the octave above C.2
Notice that the sharps have been removed from the preceding chart. There are other considerations besides the number of half-steps when identifying intervals: C to D# is not the same as C to Eb. Yes, D# andEb are the same pitch, but when identifying intervals you also have to consider the letter names of the notes.Count the letters from C to D# - it’s still C, D; 1, 2 - a second of some kind even though it’s a D#. We callthat space an augmented second. The chart below uses the sharps and the alternate names of the tedunisonMajor2ndAug2ndMajor3rdPerfect4thAug 4thPerfect5thAug5thMajor6thAug 6thMajor7thPerfectoctaveunisonSo, you’ve got this interval thing covered, right. Not quite. There is one (only one, I promise) morething to consider when naming intervals: mixed accidentals - the use of sharps in a flat key signature (orvice-versa). Consider the following:The first note is an F sharp (note the key signature) and the second is an Aflat. That’s a distance of 2 half-steps, or one whole step. But, again, wehave to consider the letter names of the notes, F and A. That’s F, G, A; 1,2, 3, so the interval has to be a kind of third. A major third is 4 half-steps, aminor third is 3 half-steps. This new beast is called a diminished third. Itend to relate this stuff back to the intervals derived from the major scale. In the C major scale, C to A is amajor sixth; C to A flat is a minor sixth. We can make that interval smaller (diminished, get it?) by eitherraising the the C to a C sharp or lowering the A flat to an A double-flat. Either case would be called a diminished sixth. Will you need to understand diminished intervals to complete your knowledge of chordsand scales? Not really - where it becomes relevant is in formal music theory study, generally around thesecond semester of college music theory. If that’s not your path then consider it knowledge for knowledge’ssake. Not a bad thing.3
A Brief Word About Modes and Naming Scale FingeringsThe reason most of you are embarking on this study of scales is to find some new, cool sounding thingsto play when you’re soloing. When we start discussing the application of scales to chords we’re talkingabout modes. A veritable cottage industry has grown out of making the study of modes complex. It’s not.Simply put, the same scale takes on a different sound when played against different chords. A C major scalecan be used over a C major 7 or an F major 7. Even though the notes are the same, the effect of the C scaleis different depending on which chord is being played. These effects are given names, sometimes exoticsounding like lydian, sometimes just a number, the 2 mode of a harmonic minor, for example.One of the confusing thing about studying scales on the guitar is the lack of a standard set of names forthe different fingerings. Many, many books try to solve this problem by applying modal names to fingerings, based on the first note of the scale shape. This is stupid. In improvisation, the modal designation isdependent upon the chord being played. A single fingering can be used against numerous chords, with adifferent modal name for each chord. So, a fingering pattern is not a mode!We will have a much more detailed discussion of modes when we talk about applying major scales atthe end of the next section of this book.I’ve applied a naming convention to the scale shapes (patterns) that is borrowed from Leon White inhis excellent book on developing good reading skills, Sight to Sound. The pattern is named by the locationof the lowest root note of the key; the number is the finger that plays the note and the letter is the string it’son.4
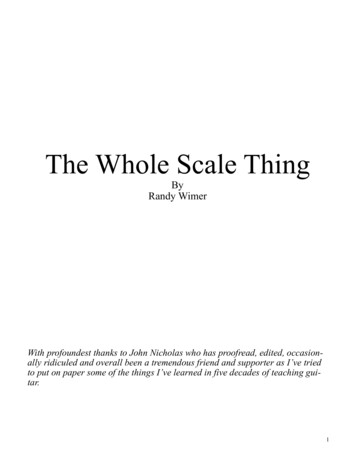
All the notes of a C scale, fromthe nut to the 13th fret. Numbersare the scale degree.54E2D4A2E2AThe Five basic major scale patterns derived from thechart at left. These shapes may be played anywhere on the guitar neck; the keywill change depending on the position.
There are no shortcuts - you must simply take the time to memorize the material on the preceding page.Keep in mind as you learn a pattern, also learn how it overlaps the patterns above and below it. This willmake it easier to move smoothly over the entire length of the neck. In this chapter we’ll take each of thefive shapes and apply a series of exercises to it.Exercises are created by applying a repeated series of intervals to the scale fingering. Some of the exercises will be labeled by an interval name, thirds or sixths, for example.thirdssixthsThese interval based exercises can be played simply, as above, or they may have variations, as below.Thirds played together (harmonic intervals)Thirds alternating ascending and descendingExercises are also created by playing the scale in groups or 3 or 4.6
Scale Position StudiesNumber one, Pattern 2E, Key of GNumbers are left hand fingers.ThirdsHarmonic intervals7
AscendingDescendingAlternating ascending and descending8
FourthsPlaying some harmonic intervals can present technical issues on the guitar. For this reason I’ve includedtwo fingerings here, the first uses one left hand finger to cover two strings in a “mini bar”, and the otherwhich avoids that technique.Harmonic intervalsAscendingDescending9
Alternating ascending and descendingFifthsFrom this point forward, unless given alternate fingerings, try to use the same left hand fingering you usedto play the scaleHarmonic intervals10
AscendingDescendingAlternating ascending and descending11
SixthsHarmonic intervalsAscendingDescendingAlternating ascending and descending12
SeventhsHarmonic intervalsAscendingDescending13
Alternating ascending and descendingOctavesHarmonic intervalsAscendingDescending14
Groups of 3AscendingDescending15
Alternating ascending and descendingGroups of 4Ascending16
DescendingAlternating ascending and descending17
18
Pattern 2DWe’re going to work up the neck, initially staying in the key of G. The next pattern will be 2D, startingat the fifth fret. Memorize the shape and pay attention to how this fingering and the first pattern, 2E, overlap.Learning how the shapes overlap makes transitioning from one to another much easier. In this example,notice that on strings 5, 4 and 3, pattern 2D adds only one note to the pattern 2E. These make easy shiftpoints. Try playing 2E through the 4th string. On the last note simply shift up a whole step with the littlefinger and you’re in pattern 2D.After you’ve memorized pattern 2D remember to work through all the exercises you did for the firstshape. Here’s a check list: Play the scale ascending and descendingPlay thirds ascending, descending, then alternate ascending and descendingPlay fourths ascending, descending, then alternate ascending and descendingPlay fifths ascending, descending, then alternate ascending and descendingPlay sixths ascending, descending, then alternate ascending and descendingPlay sevenths ascending, descending, then alternate ascending and descendingPlay octaves ascending, descending, then alternate ascending and descendingPlay groups of threePlay groups of four19
Pattern 4AAgain remaining in the key of G, for simplicity’s sake, the next pattern will be 4A starting at the seventh fret. Remember to study the overlap between it and the preceding shape.Using the same logic as the previous page, the best transition points from 2D to 4A are the 3rd, 2nd and1st strings. For this example I chose the 3rd string - slightly more problematic than the other choices since itcreates two position shifts. The first is the little finger moving up a whole step on the 3rd string and the second with the 1st finger moving to the seventh fret on the 2nd string.Here is your exercise check list for pattern 4A: Play the scale ascending and descendingPlay thirds ascending, descending, then alternate ascending and descendingPlay fourths ascending, descending, then alternate ascending and descendingPlay fifths ascending, descending, then alternate ascending and descendingPlay sixths ascending, descending, then alternate ascending and descendingPlay sevenths ascending, descending, then alternate ascending and descendingPlay octaves ascending, descending, then alternate ascending and descendingPlay groups of threePlay groups of four20
Pattern 2AWe’ll stay in G for a minute, just to study the overlap, but we’ll end up moving to the key of C to playthe exercises.So, can you spot the transition points? Try strings 6, 5, 4 or 1. I’ll use the 4th string for this example.Before you proceed through the exercises, let’s move the patternto the second fret, changing the key to C. I have two reasons forthis: 1) it allows this pattern and the next to be played downwhere the frets are farther apart and you’re not squeezing yourelbow next to your torso; 2) you need to start getting used toplaying the patterns in different places.Here’s the checklist: Play the scale ascending and descendingPlay thirds ascending, descending, then alternate ascendingand descending Play fourths ascending, descending, then alternate ascendingand descendingand descending Play fifths ascending, descending, then alternate ascendingPlay sixths ascending, descending, then alternate ascending and descendingPlay sevenths ascending, descending, then alternate ascending and descendingPlay octaves ascending, descending, then alternate ascending and descendingPlay groups of threePlay groups of four21
Pattern 4EThe last of the five basic shapes has two possible fingerings. Choose the one that feels most comfortable to you. I’ve kept this in the key of C.Here is your exercise check list for pattern 4E: Play the scale ascending and descendingPlay thirds ascending, descending, then alternate ascending and descendingPlay fourths ascending, descending, then alternate ascending and descendingPlay fifths ascending, descending, then alternate ascending and descendingPlay sixths ascending, descending, then alternate ascending and descendingPlay sevenths ascending, descending, then alternate ascending and descendingPlay octaves ascending, descending, then alternate ascending and descendingPlay groups of threePlay groups of four22
Pattern 2E revisitedTo finish up let’s return to the first pattern, 2E, this time at the 7th fret, the key of C. We can look at theoverlap between 4E and 2E, completing a network of overlapping patterns that will cover the entire fretboard.***There is another organizational schema for constructing scale fingerings: keeping an equal number ofnotes on each string. The usual number for major scales is 3 notes per string. As you look at these patterns,note how they are nothing but combinations of the five patterns you’ve already learned.Combines patterns 2E and 2D.23
Combines patterns 2D and 4A.Combines patterns 4A and 2A.Combines patterns 4A, 2A and4E.24
Combines patterns 2A and 4E.Combines patterns 4E and 2E.Combines patterns 2E and 2D.25
Applying Major Scales: Scale/Chord Connections and ModesNo one spends the hours of practice time mastering the scales and exercises presented so far just so theymight boast about how well they can p
is different depending on which chord is being played. These effects are given names, sometimes exotic sounding like lydian, sometimes just a number, the 2 mode of a harmonic minor, for example. One of the confusing thing about studying scales on the guitar is the lack of a standard set of names for the different fingerings. Many, many books try to solve this problem by applying modal names to finger-