Transcription
Portable Proportional Braking SystemOwner’s ManualEntire contents of manual must be read by ownerPart number 9400Time Tested Time ProvenROADMASTER, Inc. 6110 NE 127th Ave. Vancouver, WA 98682800-669-9690 Fax 360-735-9300 roadmasterinc.com853203-2109/21 2005-2019 ROADMASTER, Inc. All rights reserved.
Welcome to the ROADMASTER family!This manual has been prepared to acquaint you with the installation, operation, care and maintenance of your Even Brake, and to provide you with important safety information.Read your owner’s manual cover to cover. Understand how to install and operate your EvenBrake, and carefully follow the instructions and safety precautions.We thank you for your patronage and greatly appreciate your discerning taste.Statement of FCC complianceThis device complies with part 15 of the FCC Rules. Operation is subject to the following two conditions: (1) thisdevice may not cause harmful interference, and (2) this device must accept any interference received, includinginterference that may cause undesired operation.Even Brake specificationsHeight.12 inchesWidth. 11.25 inchesLength.16 inchesWeight. 17.5 poundsVoltage. 12 volts DCOperating temperature range.-2 to 150 F (-19 to 66 C)Length of standard power cord.42 inchesMaximum amperage draw. 10.8 ampsIdle amperage draw. 47mAApproximate maximum air pressure. 60 psiMaximum force extendedon brake pedal. 106 poundsMinimum space Even Brake can fit.16 inchesSave this manualSave this manual for future reference. It containsimportant sections relative to safety, use, parts replacement and other information. Therefore, make sure thismanual is always with you when you're towing.You may download or print a copy of the most currentmanual at www.roadmasterinc.com (under ‘Support').Even Brake serial numberYour Even Brake serial number is on a label on theunderside of the unit. You will need this number whenyou fill out your product registration card.Write down the serial number in the space belowand retain for future reference Serial number:All illustrations and specifications contained herein are based onthe latest information available at the time of publication. ROADMASTER, Inc. reserves the right to make changes, at any time, withoutnotice, in material, specifications and models, or to discontinue models.IMPORTANT NOTICE!Safety DefinitionsThis manual contains information that is very important to know and understand. This information is providedfor safety and to prevent equipment problems. To help recognize this information, observe the followingsymbols:CAUTIONWARNING indicates a potentially hazardous situation which, if not avoided, could result in propertydamage, serious personal injury or even death.CAUTION used without the safety alert symbolindicates a potentially hazardous situation which,if not avoided, may result in property damage.CAUTION indicates a potentially hazardous situation which, if not avoided, may result in propertydamage, or minor or moderate personal injury.NOTERefers to important information and is placed in italictype. It is recommended that you take special noticeof these items.
Table of ContentsEven Brake specifications.inside front coverSafety definitions.inside front coverEven Brake components. 2OperationAttach the pedal clamp. 3-4Adjust the feet and the seat pad. 4-5Connect Even Brake to the ICX transmitter. 5Plug in the power cord.5-6Plug in the motorhome monitor. 6Test and adjust positioning;deplete the vacuum in the power brakes. 6-7Set braking preferences. 7-8Read all instructions before installing or operating your Even Brake. Failure to understand how toinstall or operate Even Brake could result in property damage, personal injury or even death.CAUTIONNot for use on older vehicles without powerbrakes. Even Brake is designed to work with vehicles that have a power brake system (even thoughthe power brakes are not activated while towing).Using Even Brake on vehicles that do not havepower brakes will result in over-braking and severenon-warranty brake damage.CAUTIONDo not install Even Brake in a vehicle with an‘active’ braking system.‘Active’ (or, ‘continuous power assist’) brakingsystems are a safety feature on some new vehicles. This feature allows the brakes to always havepower, even with the ignition off. There are twosupplemental braking systems that ROADMASTERmanufactures for these vehicles: InvisiBrake (recommended) and BrakeMaster, with the addition ofa Brake Pressure Reducer (part number 900002).If any ROADMASTER supplemental braking system other than an InvisiBrake or a BrakeMaster witha Brake Pressure Reducer is installed, the vehiclewill brake with excessive force, which will damage the tires. Other non-warranty damage may alsooccur.It is the owner’s responsibility (or if professionally installed, the installer’s responsibility) to determine if the vehicle being equipped with supple-Connect the break away cableand test the break away system. 8Quick reference checklistConnecting Even Brake. 9Disconnecting Even Brake. 9-10Monitor communicationsConnection and braking.11Overview.12-13Reference chart. 14Vehicle-specific components. 15mental brakes has an active braking system — refer to the owner’s manual or call the dealership.ROADMASTER expressly disallows any and allclaims relating to tire damage, brake damage orany other damage to vehicles with ‘active’ brakingsystems caused by: 1) installation of any ROADMASTER supplemental braking system other thanInvisiBrake or BrakeMaster; or 2) failure to installa Brake Pressure Reducer with the BrakeMaster.If the towed vehicle has a keyless ignition system(a.k.a. ‘push button start’) AND a Brake-Lite Relayhas been installed, the motorhome parking lightsmust be turned on when towing. This will supplycurrent to the Brake-Lite Relay. If the parking lightsare not turned on, the Brake-Lite Relay will notfunction, which will prevent the towed vehicle’sbrake lights from operating properly.The Even Brake 12-volt power cord is always“last in, first out.” Never plug in the power corduntil Even Brake is completely installed, accordingto the instructions in this manual.Once it receives power, any movement of the boxcould cause Even Brake to activate unexpectedly.Similarly, never disconnect Even Brake withoutfirst unplugging the 12-volt power cord.Failure to install and operate Even Brake as instructed may cause property damage, personalinjury or even death.1
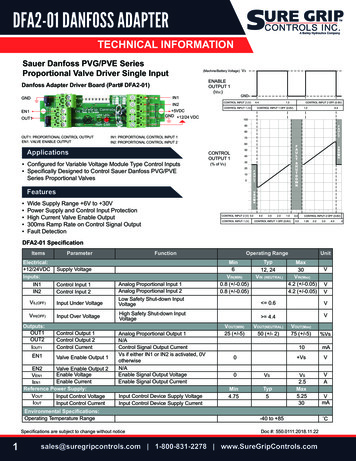
Componentspartnumberpartdescriptionnumber1 9329.brake pedal clamp2 n/a.air cylinder shaft3 n/a.touch pad control panel4 450098.air relief button5 650996.adjustable seat pad(handle assembly)6 450952.adjustment knob7 450105.adjustable feet8 450103.12-volt power cord9 9420.ICX transmitter10 9410.motorhome monitor11121314description650898.break away switch650900.break away wiring harness8602.break away cable88400.Brake-Lite Relay564123Items not shownto scale.Optional equipmentis listed in the“Vehicle-SpecificComponents” section.87109111412132
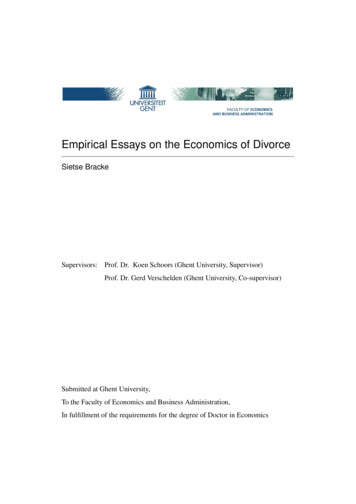
CAUTIONIf the towed vehicle’s engine must be started periodically Always deplete the vacuum in the vehicle’s power brake system BEFORE YOU RESUME TOWING.If the vacuum is not released, Even Brake will apply excessive force when it is activated, which willcause severe tire and/or brake system damage to the towed vehicle. Refer to the caution statementon page 9 for further information.OperationThis section contains detailed operating instructions. Refer to this section until you become familiar witheach step. (Before connecting or disconnecting Even Brake, also refer to the “Quick Reference Checklist” foradditional warnings and cautions.)Step AAttach the pedal clamp1. First, connect the tow bar to the motorhome andthe towed vehicle.Then, according to the manufacturer, make all adjustments necessary to prepare the vehicle for towing.These adjustments may include: turning the ignitionkey to the 'tow' position; pulling fuses; disconnectingthe battery; and setting the transmission to a particulargear or in a particular sequence.Refer to the owner's manual or call the dealershipfor vehicle-specific information.CAUTIONTo prevent the towed vehicle from rolling, connect and attach the tow bar to both vehicles beforeshifting the towed vehicle’s transmission into theproper gear for towing.2. Remove Even Brake from the box, using the adjustable seat pad as a handle.3. Slide the driver’s seat back, as far as it will go.4. Position Even Brake between the driver’s seat andthe brake pedal, at the approximate position it will sitwhen connected to the brake pedal.Note: if the towed vehicle has a steering wheel tiltlatch, it may be easier to position Even Brake with thesteering wheel tilted up.Note: rubberized floor mats will cause Even Brake to“climb” the driver’s seat. If the vehicle has a rubberizedfloor mat, remove it when towing.Figure 1Note: the adjustable seat pad at the back may beremoved, if that provides the best fit.Seat and/or pedal positioning systems may affectthe towed vehicle braking system.Determine if the vehicle to be towed is equippedwith pedal presets and/or automatic seat adjustments. Proper installation of the braking systemmay be affected by these presets; if the vehicleis so equipped, note the original installed position and return to that position before towing thevehicle.If the seat and/or brake pedal are not at the original installed position when the vehicle is towed, thebrake pedal may apply unnecessary braking force,which will damage the brake system and/or electrical system, causing brake system failure, electricalsystem failure or other non-warranty damage.5. Press the air relief button (Figure 1) to make certainthat all of the air in the Even Brake air reservoir hasbeen released. If there is air in the reservoir, continueto hold the button down until the air is released — airin the reservoir will prevent the cylinder from extendingwhen you connect the brake pedal clamp to the brakepedal.6. Continue to hold the air relief button down and pullforward on the pedal clamp, to extend the air cylindershaft. Release the air relief button.7. Verify that the pedal clamp is right side up, as shownin Figure 2 — the arrow on the sticker will point “Up”when the pedal clamp is properly positioned.8. Pull the hairpin clip (Figure 2) out, then lift the slotted arm (Figure 2) up and out of the way.9. Move the pedal clamp over the brake pedal. Then,hold the clevis (Figure 3) and pull back on the springpost (Figure 3) until the tabs under the pedal clampare wide enough to clear the brake pedal.10. Fit the pedal clamp onto the brake pedal, so that allfour tabs are hooked around it (Figure 4). Then,releasethe spring post.Note: the Even Brake pedal clamp will not fit thecontinued on next page3
Attach the pedal clampcontinued from preceding pagebrake pedals of asmall number of latemodel Volkswagenvehicles, such asthe 2007 VolkswagenGolf. A photo of the2007 Golf brake pedal is shown above.Use the optional 9329-VW replacement pedal clampfor these vehicles.Note: on the initial fitting, it may be necessary toadjust the tabs on the pedal clamp — use pliers to bendany or all of the tabs so that they hook around andunder the towed vehicle’s brake pedal.Figure 2Once the tabs have been adjusted to a specificbrake pedal, no further adjustment to the pedal clampis necessary for that vehicle.For every subsequent vehicle, inspect the pedalclamp on the initial fitting. Verify that all four tabs arehooked around and under the brake pedal. If necessary, bend the tabs to fit, as described above.CAUTIONMake certain that all four tabs on the pedal clampare securely hooked around the brake pedal (Figure4). If the tabs are loose, the pedal clamp can rotateout of position and hold the brake pedal down,even when Even Brake is not activated, which willcause brake damage or other consequential, nonwarranty damage.11. Swing the slotted arm back over the spring post, fitthe spring post through one of the slots, and reattachthe hairpin clip (Figure 4).Note: the spring post may be bent slightly with apair of pliers, if necessary, in order to fit it through oneof the slots.Step BAdjust the feet and the seat pad1. Now that the pedal clamp is in place, move EvenBrake forward, until the air cylinder shaft is fully retracted. (Figure 5). Make certain that Even Brake isnot depressing the towed vehicle’s brake pedal.Figure 3Do not move Even Brake too far forward, to theextent that the pedal clamp is depressing the brakepedal. If the brake pedal is depressed, the brakeswill be applied continuously, which will cause severe tire and/or brake system damage, as well asother consequential, non-warranty damage.Figure 42. If necessary, adjust the feet on the bottom ofEven Brake (one at each corner — Figure 6) up ordown, by turning them clockwise or counterclockwise. Make certain that all four feet are making contact with the floor of the vehicle, and that Even Brakeis stationary — it should not rock back and forth.(It may be necessary to remove one or more of thecontinued on next pageFigure 54
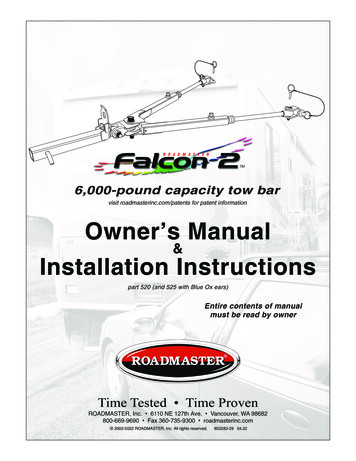
Adjust the feet and the seat padconsequential, non-warranty damage.continued from preceding pagefeet for some vehicles, or it may be necessary to addone or more optional extensions — see the “VehicleSpecific Components” section in this manual.)3. With a wrench, tighten the lock nut at the top ofeach foot extension (Figure 6).CAUTIONUnless the lock nuts are tightened with a wrench,the feet may vibrate loose during towing, and EvenBrake may shift from the installed position. UnlessEven Brake is properly positioned, it will not function at full capacity — the pedal clamp will not apply the proper braking pressure against the brakepedal.4. Find a bracing point on the front of the driver’s seatfor the adjustable seat pad — the seat pad stabilizesEven Brake, keeping it down as it presses against thebrake pedal. Press the front of the seat to find thefirmest point for the seat pad.Note: do not brace the adjustable seat pad againstplastic trim. The plastic will crack when Even Brake isactivated.Now that you have selected a bracing point for theadjustable seat pad, loosen the adjustment knob (see“Components,” page two) at the back of the seat pad,and move the seat pad up or down until the top of theseat pad matches the height of the bracing point.Once the height is adjusted, tighten the knob onthe seat pad.Note: the seat pad may be rotated 180 degrees orremoved entirely for a better fit. There are also twoanchor holes that the knob on the seat pad may bethreaded into, for additional fit options.5. Next, slide the driver’s seat forward, until it justtouches the adjustable seat pad. If necessary, allow asmall gap, rather than allowing Even Brake to depressthe brake pedal.Make certain that Even Brake is not depressing thetowed vehicle’s brake pedal.The driver’s seat must not be too far forward,to the extent that the Even Brake pedal clamp isdepressing the towed vehicle’s brake pedal.If the brake pedal is depressed, the brakes willbe applied continuously, which will cause severetire and/or brake system damage, as well as otherFigure 6Step CConnect Even Brake to the ICX transmitter1. Connect the ICX transmitter cord from Even Braketo the ICX transmitter (Figure 7).CAUTIONThe ICX transmitter and the motorhome monitorare programmed as a set. If a replacement monitor,a replacement ICX transmitter or a second vehiclekit is to be installed, follow the instructions thatare included with the kits.If both units are not programmed as a set, themotorhome monitor will not receive the signal fromthe ICX transmitter.Step DPlug in the power cordThe Even Brake 12-volt power cord is always“last in, first out.” Never plug in the power corduntil Even Brake is completely installed.Once it receives power, any movement of the boxcould cause Even Brake to activate unexpectedly.Similarly, never disconnect Even Brake withoutfirst unplugging the 12-volt power cord.Failure to install and operate Even Brake as instructed may cause property damage, personalinjury or even death.CAUTIONCheck the 12-volt outlet socket before pluggingin the Even Brake 12-volt power cord, to make certain that the socket has been wired correctly. Thecontact point at the bottom of the socket shouldbe positive, and the outer shell around the top ofthe socket should be negative.If the positive and negative connections havebeen reversed, the fuse in the Even Brake powercord will blow when the cord is plugged into the12-volt outlet.1. Plug the 12-volt power cord into the 12-volt outletand secure it by pressing the cord lock into the 12-voltoutlet (Figures 8 and 9).continued on next pageFigure 75
Plug in the power cordcontinued from preceding pageCAUTIONPush the cord lock forward, into the 12-volt outlet, to properly secure the 12-volt power cord. If thecord lock is not over the 12-volt outlet, the 12-voltpower cord may vibrate loose, causing a loss ofpower or an intermittent power supply.Even Brake will not function without a continuous power supply.2. Now, the red light on the 12-volt power cord shouldilluminate. If not, there is no power.Some vehicles only have power at the outletwhen the engine is running.If there is no power, you can install ROADMASTER’soptional 12-volt outlet kit (part number 9332; refer tothe “Vehicle-Specific Components” section). When installed, this outlet will provide power even when theengine is off.3. When the power cord is plugged in, the air compressor will run, until the air reservoir is filled. Wait forthe air reservoir to fill before pressing the “Test” button (Step F, “Test and adjust positioning; deplete thevacuum in the power brakes”).Step EPlug in the motorhome monitorCAUTIONThe motorhome monitor and the ICX transmitterare programmed as a set. If a replacement monitor,a replacement ICX transmitter or a second vehiclekit is to be installed, follow the instructions thatare included with the kits.If both units are not programmed as a set, themotorhome monitor will not receive the signal fromthe ICX transmitter.1. Now that the power cord is connected, plug themotorhome monitor power cord into the motorhome’s12-volt outlet.Note: press the cord lock on the motorhome monitorpower cord into the motorhome’s 12-volt outlet — follow the instructions in the preceding section (step oneunder “Plug in the power cord”) to properly secure the12-volt power cord.2. Start the motorhome engine.Figure 86The motorhome monitor LCD text display will read“Even Brake ready to test ” (Figure 10), and the yellow LED will be illuminated, to confirm that the monitoris receiving the signal.CAUTIONIf the green LED is illuminated and the LCD textmessage reads “Even Brake,” the motorhome monitor is not receiving a signal from the ICX transmitter. The motorhome monitor will not report brakingactivity or system status information.Severe damage to the towed vehicle can occur ifthe driver of the motorhome is unaware of brakingactivity at the towed vehicle.Follow the appropriate instructions in the “Troubleshooting” or “Communications” sections (“Overview” and “Reference Chart”) in this manual, untilthe monitor LCD text display reads “Even Brakeready to test .”Step FTest and adjust positioning;deplete the vacuum in the power brakesBefore towing, always press the “Test” button down,then release it — Even Brake will cycle the pedal clampup and down three times.This test cycle is necessary for two reasons: 1) toensure that Even Brake is positioned correctly; and 2)to deplete any stored vacuum in the towed vehicle’spower brake system.CAUTIONAlways deplete the stored vacuum in the towedvehicle’s power brake system before towing — pressthe “Test” button down, then release it, to cyclethe pedal clamp up and down three times.continued on next pageFigure 9Figure 10
Test and adjust positioning;deplete the vacuum in the power brakescontinued from preceding pageDepending on the make and model of the towedvehicle, it may be necessary to repeat the test cyclea second time.If the vacuum is not released, Even Brake willapply excessive braking force when it is activated,which will cause severe tire and/or brake systemdamage to the towed vehicle.1. Press the green “Test” button (Figure 11) on thetouch pad control panel. Even Brake will begin a selfdiagnostic test.As part of the test, Even Brake will cycle the pedalclamp up and down three times.If Even Brake moves excessively, or interferes withseat position controls, adjust its position. Check theadjustable seat pad and readjust it, if necessary.Note: rubberized floor mats will cause Even Brake to“climb” the driver’s seat. If the vehicle has a rubberizedfloor mat, remove it when towing.CAUTIONIf the adjustable seat pad is not properly positioned, Even Brake can “climb” up the driver’sseat. This will cause the rear of the box to rise upoff the floor, making Even Brake more sensitive.If this occurs, the towed vehicle will brake excessively and unnecessarily, which may cause nonwarranty brake damage.Check the adjustable seat pad after the pedalclamp has cycled during a test. If the rear of thebox has “climbed” the driver’s seat, readjust theseat pad so that Even Brake cannot “climb.”2. After Even Brake has completed the self-diagnostictest, the test light (Figure 11) will illuminate green toindicate the system is ready, or red to indicate thesystem is not ready.If the test light is green, proceed to the next step —programming brake force and sensitivity.If the test light is red, check the motorhome monitorLCD text display for detailed information. You can alsorefer to the “Communications” sections (“Overview” and“Reference Chart”) in this manual.is the default value.It is also not necessary to select braking preferences every time you connect Even Brake. It will alwaysrevert to the last preferences selected (or the defaultvalues, if none were selected), when you connect it tothe towed vehicle.1. Set the braking force. This setting tells Even Brakehow hard to apply the brakes. There are three choices:“less;” “average;” or “more” force.Press the red “Force” button on the touch pad control panel (Figure 12). One of the three LEDs next tothe “Force” button will illuminate. The LED furthestaway from the “Force” button indicates “less” force;the center LED indicates “average” force; and the LEDclosest to the “Force” button indicates “more” force.Continue to press the “Force” button until the appropriate LED illuminates to confirm your choice.If you are unsure which setting to select, set EvenBrake to “average” and readjust it later, if you find thatyou prefer more or less braking force.2. Set the braking sensitivity. This setting tells EvenBrake when to apply the brakes. There are three choices: “less;” “average;” or “more” sensitivity. If Even Brakecontinued on next pageFigure 11Figure 12Step GSet braking force andbraking sensitivity preferences(Even Brake is a proportional system, and will always brake the towed vehicle in tandem with the motorhome. The range of its response to the motorhome isvirtually infinite. Setting braking preferences will program Even Brake to respond with the appropriate forceand sensitivity within that range.)It is not necessary to set braking force and sensitivity preferences — if no preferences are selected, EvenBrake will revert to the “average” setting for both, whichFigure 137
Set braking preferencescontinued from preceding pageis “more” sensitive, it will brake more often; if EvenBrake is “less” sensitive, it will brake less often.Press the yellow “Sensitivity” button on the touchpad control panel (Figure 13). One of the three LEDsnext to the “Sensitivity” button will illuminate. The LEDfarthest away from the “Sensitivity” button indicates“less” sensitivity; the center LED indicates “average”sensitivity; and the LED closest to the “Sensitivity” button indicates “more” sensitivity. Continue to press the“Sensitivity” button until the appropriate LED illuminatesto confirm your choice.If you are unsure which setting to select, set EvenBrake to “average” and readjust it later, if you find thatyou prefer more or less braking sensitivity.Step HConnect the break away cableand test the break away system1. Clip the steel break away cable (Figure 14)to the break away pin (Figure 14), then clipthe other end of the steel cable to the rear of the motorhome, close to the center.2. Periodically, test the break away system — pull thebreak away pin out of the break away switch. EvenBrake should activate when the pin is pulled — the pedalclamp will extend. Insert the pin back into the switch.The Even Brake pedal clamp will retract.To clear the break away message from the motorhome monitor, unplug the motorhome monitor, thenplug it back in.When connecting the break away system, alwayscheck the following: Connect the cable at the rear of the motorhome,close to the center. Connecting the cable towardeither side of the motorhome may cause the breakaway pin to be pulled when the motorhome turns,activating the break away system.Figure 148 Be sure there are no obstructions which wouldprevent the cable from pulling freely away from thebreak away switch. Do not wrap the cable aroundanything — doing so could keep the cable from pulling the break away pin, preventing the system fromactivating in a break away. Make certain the cable is the correct length The cable must be long enough to preventthe break away pin from being pulled outduring normal towing — make certain thereis enough slack to allow for sharp turns. Ifthe cable is not long enough, the break awaysystem will activate even though the towedvehicle has not detached. The break away cable must be longer thanthe safety cables. This will prevent the breakaway system from activating if a componentof the towing system has separated, but thetowed vehicle is still held by the safety cables. Make certain that the cable is not too long —it should not hang down to the extent it maycatch on obstructions, or drag on the ground.This much slack could allow the cable to bepulled inadvertently, activating the break awaysystem. If you have a telescoping tow bar, allowenough slack for the tow bar arms to be fullyextended. Except to test the break away system, leave thebreak away pin in place, even when the vehicle isnot being towed. If Even Brake is connected andthe break away pin is pulled, the break away systemwill be activated. The air cylinder will extend; it willnot retract until the pin is replaced.Additionally, the Even Brake compressor will runconstantly, which will damage the compressor anddrain the vehicle’s battery.As long as the pin is removed, the ICX transmitter will send a break away signal. This signal mayinterfere with or disrupt keyless entry systems orother remote controlled devices.Removing the pin will also expose the interiorof the break away switch to damage from the elements. If the components of the switch are corroded, the switch may only function intermittentlyor not at all.Additionally, Even Brake will not pass its diagnostics test if installed while the breakaway pin isremoved.
Quick reference checklistConnecting Even Brake1. Slide the driver’s seat back, as far as it will go.2. Position Even Brake between the driver’s seat andthe brake pedal, at the approximate position it will sitwhen connected to the brake pedal. (The adjustableseat pad can be used as a handle.)3. Press the air relief button (Figure 1) to make certainthat all of the air in the Even Brake air reservoir hasbeen released.4. Attach the pedal clamp to the brake pedal.5. Move Even Brake forward, until the air cylinder shaftis fully retracted (Figure 5).6. Slide the driver’s seat forward, until it just touchesthe Even Brake adjustable seat pad. If necessary, allow a small gap, rather than allowing Even Brake todepress the brake pedal.The driver’s seat must not be too far forward,to the extent that the Even Brake pedal clamp isdepressing the towed vehicle’s brake pedal.If the brake pedal is depressed, the brakes willbe applied continuously, which will cause severetire and/or brake system damage, as well as otherconsequential, non-warranty damage.7. Connect the ICX transmitter cord.8. Connect the 12-volt power cord, and secure it withthe cord lock.9. Plug in the motorhome monitor, and secure it withthe cord lock.10. Release the stored vacuum in the towed vehicle’spower brake system by pressing the “Test” button (Figure 11) down. Then release it. Even Brake will cyclethe pedal clamp up and down three times.Depending on the make and model of the towedvehicle, it may be necessary to repeat the test cyclemultiple times.After the pedal clamp has been cycled up and downthree times, verify that the “Test” light
MASTER supplemental braking system other than InvisiBrake or BrakeMaster; or 2) failure to install a Brake Pressure Reducer with the BrakeMaster. If the towed vehicle has a keyless ignition system (a.k.a. 'push button start') AND a Brake-Lite Relay has been installed, the motorhome parking lights must be turned on when towing. This will supply