Transcription
2002-2022 ROADMASTER, Inc. All rights reserved.852283-29 04.22
WELCOME TO THE ROADMASTER FAMILY!This manual has been prepared to acquaint you with the installation, operation, care and maintenance of your tow bar, and to provide you with important safety information.Read your owner’s manual cover to cover. Understand how to install and operate your towbar, and carefully follow the instructions and safety precautions.We thank you for your patronage and greatly appreciate your discerning taste.Table of ContentsSave this manualSafety definitions. inside front coverInstaller’s safety checklist.1Safe towing practices.1-2Connecting and disconnectingConnecting the tow bar.3-4Disconnecting the tow bar.5Safety cablesHow to use safety cables.5-6Proper installation of safety cables.6Stay within the ‘Safe Zone’.7Care and cleaning.8Tow bar components.9Save this manual for future reference. It contains important sections relative to safety, use, maintenance, partsreplacement and other information. Therefore, make surethis manual is always with you when you’re towing. Youmay download or print a copy of the most current manualat www.roadmasterinc.com (under ‘Support').Read all instructions before installingthe tow bar, or before towing a vehicle.Failure to understand how to properly install or operate the tow bar could resultin property damage, personal injury oreven death.Your tow bar serial number is located on a label on the inside of the passenger’sside tow bar arm. You will need this number when you fillout your product registration card.Write down the serial number in the space below andretain for future reference.Serial number:All illustrations and specifications contained herein are based on the latestinformation available at the time of publication. ROADMASTER, Inc. reservesthe right to make changes, at any time, without notice, in material, specifications and models, or to discontinue models.IMPORTANT NOTICE!Safety DefinitionsThis manual contains information that is very important to know and understand. This information is provided forsafety and to prevent equipment problems. To help recognize this information, observe the following symbols:WARNING indicates a potentially hazardous situation which, if not avoided, could result in propertydamage, serious personal injury or even death.CAUTION indicates a potentially hazardous situationwhich, if not avoided, may result in property damage,or minor or moderate personal injury.CAUTION used without the safety alert symbol indicates a potentially hazardous situation which, if notavoided, may result in property damage.NOTERefers to important information and is placed in italictype. It is recommended that you take special notice ofthese items.
INSTALLER'S SAFETY CHECKLIST Show the owner how to properly operate the towbar. Familiarize yourself with the features of the tow bar.Demonstrate them to the owner and ask the owner to connect and disconnect the tow bar and other componentsof the towing system, until the owner is comfortable withits operation. Advise the owner to always use safety cables whentowing. The safety cables must connect the towed vehicleto the towing vehicle, frame to frame.The capacity of the safety cables must meet orexceed the towed weight, or the safety cables will fail. The tow bar must be attached to a baseplate whichis bolted to the towed vehicle’s frame or unibody. Read the instructions thoroughly before installingthe tow bar and its components. If the tow bar is notproperly aligned, centered and positioned on the towedvehicle, then excessive tire wear and other consequential,non-warranty damage may result. The installer must NOT use the tow bar as a groundfor welding. Connecting a ground to the tow bar will causecurrent to flow through the locking spring, which will detemper the spring and destroy the locking mechanism. Under no circumstances should the tow bar bewelded to the vehicle, nor should any of the pre-punchedmounting holes be altered. Any welding or altering of thetow bar will void the owner’s warranty.Failure to follow these instructions may cause property damage, personal injury or even death.SAFE TOWING PRACTICESCAUTIONDo not back up the motorhome with the towed vehicle attached.Backing up with the towed vehicle attached willcause the towed vehicle to “jackknife,” which will damage the tow bar, the baseplate, the receiver hitch, thetowed vehicle’s front end and/or the rear of the motorhome. Backing up with the towed vehicle attachedis the primary cause of tow bar damage and will voidthe warranty. Be sure the vehicle can be towed before taking it onthe road. Some vehicles must be equipped with a transmission lube pump, an axle disconnect, driveline disconnector free-wheeling hubs before they can be towed. Failureto properly equip the vehicle will cause severe damageto the transmission.Check the vehicle manufacturer’s instructions for theproper procedure(s) to prepare the vehicle for towing. The tow bar must be within the ‘Safe Zone’ — nomore than three inches above or below level. Towing withan out-of-level tow bar will cause significant wear and tearand may result in non-warranty failure and damages. (Seethe section titled “Stay within the ‘Safe Zone’” for furtherinformation.) The steering wheel must be unlocked and free toturn when towing. Failure to do so can cause severetire and equipment damage. Check the manufacturer’sinstructions for the proper towing procedure(s). The towed vehicle and all its contents cannot exceed 6,000 pounds. The Falcon All Terrain tow bar is ratedat a maximum of 6,000 pounds carrying capacity; thereforethe towed vehicle and all its contents cannot exceed 6,000pounds. In addition, the receiver hitch, the safety cablesand all supplementary towing equipmentmust be rated at noless than the weight of the towed vehicle and all its contents. The tow bar must be secured with linch pins (oroptional padlocks) before towing. Unless the tow baris secured to both vehicles with all appropriate pins (orpadlocks), the towed vehicle will detach. Inspect the system before towing — check the mounts,brackets, fasteners, bolts, wiring, the safety cables and allother components each time before towing. Additionally,check the baseplate every 3,000 miles — inspect for anyfractures or cracks in the steel or any visible damage. Donot tow if the baseplate is damaged.Additionally, check the torque on all bolts. (To findthe torque ratings, refer to the installation instructions forthe baseplate and the tow bar.) This tow bar is designed for use on paved roadsonly. ROADMASTER does not recommend off-road towing, nor does ROADMASTER warrant the tow bar for offroad use. Never tow a vehicle with one of a comparableweight. The towed vehicle’s weight should never exceed40 percent of the towing vehicle’s weight.Towing a vehicle with one of similar weight will causethe towed vehicle to override the towing vehicle, resulting in “jackknifing,” “leapfrogging” or “fishtailing.” Seriousdamage to both vehicles, as well as the towing system,could result. Always stand to one side and as close to the motorhome as possible when releasing the tow bar locking mechanisms. Never stand between the adjustablearms, or put any part of your body between the adjustablearms when releasing the tow bar — always stand to oneside.Because the towed vehicle may jerk forward when thelocking mechanisms are released, face the towed vehicleand stand as close to the back of the motorhome as possible before releasing the locking mechanisms, to keepfrom being hit by the towed vehicle.continued on next page1
Safe towing practicescontinued from preceding page Do not drill a second hole in the shank of any towbar or hitch accessory. If the hole in the shank doesnot align to thehole in the hitchreceiver: 1) purc hase a hitc haccessory ofthe appropriatelength; or 2) callROAD M ASTERte c hni c al sup port.D r i l l i n g asecond hole willweaken the steel. The shank may break during towing, which will cause the towed vehicle to separate. Always use safety cables when towing. The safetycables must connect the towed vehicle to the towing vehicle frame to frame.Use only 6,000 pound or heavier rated safety cables.Additionally, check to ensure that the safety cables arethe proper length. Refer to the sections titled “How to usesafety cables” and “Proper installation of safety cables”for further information. Check the motorhome turning radius. Some motorhome chassis have such a tight turning radius that youcan damage your motorhome, towed vehicle or tow barwhile turning too sharply. Before getting on the road withyour towed vehicle, you should test your turning radiusin an empty parking lot.With the towed vehicle attached, have someone watchas you slowly turn sharply to see whether you have thispotential problem. If you do, note how far you can safelyturn the motorhome’s steering wheel and be sure not toturn it further when towing. Damage that results from turning too sharply is not covered by warranty. Never use the tow bar to tow more than one vehicle. In some states it is legal to have one vehicle towingmore than just one vehicle (for example, a truck which istowing a trailer which is towing a boat). However, whenusing a tow bar, never tow more than one vehicle or nonwarranty damage or injury may result. The tow bar stinger fits motorhome hitch receiverswith two-inch inner diameters. If the motorhome hitchreceiver is a larger size, attach a two-inch adaptor sleeve(not supplied) to the hitch receiver.Damage to the tow bar stinger or other components ofthe tow bar, abnormal wear patterns on the towed vehicle’stires, as well as other, consequential damage may resultif an adaptor sleeve is GAPnot used. Keep the tow bar clean and well-lubricated. As isthe case with most precision equipment, frequent cleaning and care results in better performance and longevity.Refer to the section titled “Care and cleaning” for furtherinformation.2Failure to follow these instructions may cause non-warranty property damage, personal injury or evendeath.Towing vibrations will force the linch pins out unlessthey are properly locked in place. Refer to Figure 1.Figure 1GAPIf the ring does not snap against the pin, spinthe pin around and flip the ring to the other side. SNAPFailure to properly attach and lock all linch pinswill result in the loss of the towed vehicle, which maycause property damage, personal injury or even death.
CONNECTING THE TOW BARUse caution when handling the tow bar — if yourhands, fingers or any part of your body are caughtbetween moving components, they can be pinched,cut or otherwise injured.Figure 2the baseplate (Figure 4 — next page).Attach the tow bar arm to the baseplate with one ofthe included base pins (Figure 4). Attach the arm so thatthe head of the shoulder bolt (Figure 4) is facing up. Lockthe base pin with a linch pin (Figure 4) or optional padlock— part number 301 (one padlock) or 302 (two padlocks).The linch pin must be locked. The ring (Figure 1) isspring-loaded — it must be snapped over the pin, as shownin Figure 1, with the curved side of the linch pin touchingthe ring, in order to keep the base pin secure.Both tow bar arms must be attached to the baseplate and locked with a linch pin. Towing vibrationswill force the linch pins out unless they are properlylocked in place over the base pins on both baseplates.Failure to properly install and lock both base pinswill result in the loss of the towed vehicle, which maycause property damage, personal injury or even death.5. Now, swing the other arm to the opposite side andconnect it in the same manner.1. Drive the vehicle within three or three-and-a-half feet ofthe motorhome hitch receiver. The vehicle does not haveto be perfectly centered to the hitch receiver, just close.Then, put the vehicle in gear (park), set the emergencybrake and chock one of the wheels.2. With the tow bar in the folded position (Figure 2), insertthe stinger into the motorhome hitch receiver and secureit with the hitch pin and clip (Figure 2).3. Hold both tow bar arms firmly and rotate them up, sothat they are vertical, as shown in Figure 2.Never release the tow bar arms when they are in thevertical position. The arms can fall and cause severepersonal injury.CAUTIONAttach the tow bar so that the Autowlok buttons andthe release latch (Figure 6) are pointing up. Components of the tow bar may be damaged if the tow baris attached with the release latch and the Autowlokbuttons pointing down.4. Push the release latch(Figure 3) forward, to bringboth arms down to a horizontal position.Standing to one side,swing both arms away fromyou. Then, align the holes inthe outermost arm with theholes in one of the tabs onFigure 36. Attach the safety cables and plug in the electrical wiringcord (not included), according to the supplier’s instructions.Before towing the vehicle, be sure the steering is unlocked, the transmission is in the proper setting and theemergency brake is released. Remove the wheel chock.Check the owner’s manual for the proper towingprocedure(s) or requirement(s) for towing.Do not tow the vehicle until the tow bar is attachedwith all pins or padlocks. Unless the tow bar is secured to both vehicles with all appropriate pins orpadlocks, the vehicle will detach, which may causeproperty damage, personal injury or even death.7. When you drive away, steer briefly to the left and thento the right, to extend, self-center and lock each tow bararm.Always stop at this time. Check the tow bar to ensurethat both arms are locked before towing further. Additionally, check the other components of your towing system.Both tow bar arms must be locked before towing. If they are not, the momentum of the towed vehicle will apply excessive force to the tow bar armsand other components of the towing system, whichmay cause the towing system to fail, resulting inproperty damage, personal injury or even death.continued on next page3
Connecting the tow barcontinued from preceding pageSTEP 6Figure 4baseplateshoulder bolthead mustface uplinch pinbase pintowbarside viewIf the spring-loaded ring onthe linch pin does not snapagainst itself, spin the linchpin around and flip the ringto the other side.GAPSNAPside viewDo not tow if the tow bar is more than three inchesout of level. See “Stay in the Safe Zone” on page 7.Towing out of level creates excessive strain on thetow bar, baseplate and frame, which can cause thetowing system to fail, causing property damage, personal injury or even death.Both tow bar arms must be attached to the baseplate and locked with a linch pin. Towing vibrationswill force the linch pins out unless they are properlylocked in place over the base pins on both baseplates.Failure to properly install and lock both base pinswill result in the loss of the towed vehicle, which maycause property damage, personal injury or even death.Do not tow a vehicle using a tow bar baseplate,safety cables or a hitch receiver rated less than theactual weight of the towed vehicle or failure may occur during towing, causing property damage, personalinjury or even death.4
DISCONNECTING THE TOW BAR1. Disconnecting the tow bar is essentially the reverseof connecting it. First, always try to park on level ground,with the towed vehicle in line with the motorhome. Thiswill eliminate most of the tension between the vehicles,allowing for an easier disconnect.2. Disconnect the electrical wiring harness, safety cablesand any other towing system accessories.3. Press down on the Autowlok buttons on each tow bararm (Figure 6 — next page) to release the locking mechanisms.(Usually, one of the Autowlok buttons will require morepressure to release. This is the arm that has the majorityof the tension between the two vehicles.)If the lock is bound and the button will not release A. turn the towed vehicle’s steering wheel as faras it can go in both directions then recenter the steering.This will usually release the tension, and/ orB. use an optional release tool (ROADMASTERpart number 066).CAUTIONNever use a hammer or mallet to disconnect theAutowlok buttons. The tow bar arms will not automatically lock if the Autowlok buttons are damaged.Always put the towed vehicle in gear (park), setthe emergency brake and chock one of the wheelsafter lifting the release handles, and before removingthe base pins. Failure to do so may result in a ‘runaway’ vehicle or may crush you between the towedvehicle and the motorhome, causing property damage,personal injury or even death.4. Put the towed vehicle in gear (park), set theemergency brake and chock one of the wheels.5. Remove the base pins and store the towbar on the motorhome by reversing the connection procedure (under “Connecting the tow bar”).Figure 5Note: if you must park on an uphill incline, you may findthat you cannot remove the base pins even with the towbar arms released. The weight of the towed vehicle tryingto roll back (Figure 5) is binding the pins in place.Allow the towed vehicle to idle forward just enough totake the tension of this weight off the pins. Then hold thevehicle in position by first applying the emergency brake,then shifting into park.Once the tension is off, lift the release handles againand the pins will be removed more easily.ROADMASTER recommends replacing at least oneof the linch pins with a padlock (part number 301, 302 or308) to prevent accidental release or theft.CAUTIONThe tow bar can be stored on the motorhome withthe arms rotated to the left or the right. To avoid thepossibility of damage to the bushings, rotate the armsaway from the engine exhaust.The bushings at the end of the tow bar arms can bewarped by heat from the exhaust. If the bushings arewarped, the tow bar arms will not slide easily, or theymay not slide at all — it may be difficult to connect ordisconnect the tow bar until the bushings are replaced.HOW TO USE SAFETY CABLESSafety cables are an integral part of your towing system.They are a secondary safety device, required by law inmany states. This section and the following section willacquaint you with how to use them properly. The safety cables must connect the towing vehicle tothe towed vehicle, frame to frame. Choose safety cables based on the weight of the towedvehicle. The weight capacity of the safety cables mustmeet or exceed the towed weight, or the safety cableswill fail. Refer to page one for further information. Pull the safety cables so that all the slack is at themotorhome. Make sure there is enough slack in thecables to allow for sharp turns — if there is not enoughslack, the towing system will be severely damaged whenthe motorhome turns a sharp corner. Make sure the cables are not too short — if you usea receiver hitch extension or other equipment that extends the distance between the towed vehicle and themotorhome, the standard cables may be too short. If thecables are too short, the towing system will be severelydamaged when the motorhome turns a sharp corner.(Safety cable extensions in a wide variety of lengthsare available from ROADMASTER.) Make sure the cables are not too long — the cablesshould not hang down to the extent they may catch onobstructions or drag on the ground. This much slack couldcause damage to the towing system, the towed vehicleor the motorhome.If the cables are too long, wrap the excess cablearound the tow bar to take up the slack.continued on next page5
How to use safety cablescontinued from preceding pageMake sure there is enough slack in the cables at the motorhome to allow for sharp turns. Damage caused by using safety cables of an incorrect length is not covered under warranty. Always cross the cables under the hitch receiver, as shown in Figure 6 under “Proper installation of safety cables.”In the unlikely event the tow bar separates from the motorhome, crossing the cables will help prevent the tow barfrom dragging on the ground, which can cause the tow bar to “pole vault” the towed vehicle.PROPER INSTALLATION OF SAFETY CABLESCross the safety cables under the hitch receiver, asshown in Figure 6.Unscrew the connecting nuts on each quick link toconnect the safety cable loops. Finger-tighten the nutsfirmly, until the loop is completely closed, to secure theattachment. Do not substitute carabiners or other devicesfor the quick links — the quick links are designed to holdthe weight of a towed vehicle; carabiners are not.Option 1If the tow bar baseplate is similar to the one shownin Figure 6 and the safety cables are long enough, connect the snap hook to the safety cable anchor built intothe baseplate.Option 2If the tow bar baseplate has removable arms and yoursafety cables are long enough to bypass them with enoughslack, then connect as shown in Figure 7 using shortsafety cables.Figure 7Option 2removablearmFigure 6Option 1(Safety cable anchor is not present on all baseplates.)The safety cables must be carefully routed so thatthey cannot become pinched, frayed, scraped or otherwise damaged, and so they will not drag when goingover dips or low spots. Do not use the cables if theyshow any signs of wear or damage — immediatelydiscontinue towing and replace the cables.Failure to follow these instructions will result incable failure, which may cause property damage, personal injury or even death.If the quick links are not completely tightened, withthe loop closed, the safety cables may detach. In theevent of a towing system failure, the towed vehicle willdetach, which may cause property damage, personalinjury or even death.6
STAY WITHIN THE ‘SAFE ZONE'Towing with a motorhome-mounted tow bar which hasan upward or downward slope puts undue strain on theentire towing system. For that reason, do not tow if thetow bar is not within the ‘Safe Zone’ — no more thanthree inches above or below level.Towing a vehicle with a tow bar that is not within theSafe Zone will result in significant wear and tear on thetow bar and baseplate, significant wear and tear on thevehicle’s suspension and frame, and the eventual failureof the towing system.To determine if the tow bar is within the Safe Zone —first, connect the motorhome and towed vehicle on levelground. Next, measure the distance from the center of themotorhome receiver down to the ground. Then measurethe distance from the center of one of the base pins downto the ground.Compare these two measurements. To be within theSafe Zone, they cannot be more than three inches apartif the base pin is above or below the motorhome hitchreceiver. See Figure 8If the tow bar is not within the Safe Zone, you mustpurchase a hitch accessory to raise or lower the hitchreceiver. ROADMASTER has two accessories available— Hi-Low Hitches and Dual Hitch Receivers — which willraise or lower the hitch receiver from two to 10 inches,depending on the model.Towing with the tow bar more than three inches aboveor below level will void the ROADMASTER warranty.Failure to follow these instructions may cause property damage, personal injury or even death.Figure 87
CARE AND CLEANINGAs is the case with most precision equipment, frequentcleaning and care results in better performance and longevity. Use the following guidelines to keep your tow barclean and well-lubricated.Always clean the tow bar before lubricating. Use awater-soluble cleaner such as ROADMASTER Tow BarCleaner (part number 9932).Clean all moving parts, paying special attention to thetow bar arms and the locking mechanisms. No matter whatpart is being cleaned, the method is the same — 1) spraya liberal amount of cleaner over it; 2) flex the componentback and forth to work out any accumulated dirt; 3) wipeit down; and 4) repeat until clean.To clean one of the tow bar arms — with the tow bar onthe motorhome, remove the black cap at the end of thetow bar arm. (It may be necessary to move the tow bararm to the left or right to gain clearance.)Note: the inside of the cap is beveled on three sides,and straight on one side. It must be reinserted into thetow bar arm with the straight side parallel to the notch atthe end of the tow bar arm. See Figure 9.Next, raise the arm and spray cleaner at the top of theinner/outer arm assembly (Figure 10). Move the inner arm(Figure 10) up and down to flush out dirt from the bottomof the assembly. Wipe the dirt off and repeat until the armis clean. Repeat for the other arm.CAUTIONDo not use petroleum-based products to clean orlubricate the tow bar. Petroleum will attract dirt anddust, which will impede the operation of the slidingarms and/or other components. Certain petroleumproducts may also corrode non-metallic components.Damage caused by using a petroleum-based product to clean or lubricate the tow bar is not coveredunder warranty.After cleaning the tow bar, wipe any remaining cleaneraway.To clean one of the locking mechanisms, firstspray cleaner into the mechanism, then raise thetow bar arm. Push the Autowlok button up and downto flush out dirt from the bottom of the assembly.Close the arm. This will bring the internal lockingcomponents close to the opening that was covered bythe black cap.Spray cleaner through the opening and over the locking mechanism, then use a wire brush to remove any dirt.Repeat until the locking mechanism is clean. Allow themechanism to air dry.Repeat for the other locking mechanism.Now that you have a clean, dry tow bar, use a drysilicone lubricant, such as LubeMaster (part number 747),to lubricate the tow bar — spray a liberal amount of thesilicone into all moving parts. Flex the tow bar components, to work the lubricant in. LubeMaster sprays on wet,then dries in seconds, so it won’t attract dirt or debris.(Using a silicone lubricant on the base pins will makethem easier to pull out, and also creates an oxygen barrierwhich helps prevent corrosion.)Spray silicone lubricant inside both of the lockingmechanisms. After the lubricant has dried, push theAutowlok buttons up and down to work the lubricant in.CAUTIONAlways clean the locking mechanisms, as describedabove, before lubricating them. Silicone coats and covers in a thin layer. If it is not removed, it will reducethe clearance for the locking mechanisms, preventingproper operation.Extended storage —before storing your Falcon2 tow bar for an extendedperiod of time, be sure toclean and lubricate it asabove.Store the tow bar in itscover (optional, part number 055-3), to protect itfrom the elements.Note: to remove scratches and restore luster on thestainless steel arms, wesuggest that you use extra fine (0000) steel wool,3M “Scotch Brite” (finepad) or a similar product.Figure 10Figure 98
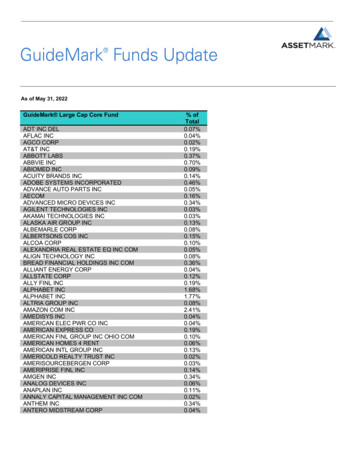
FALCON 2 artnumber1 baseplate arms (not included)2 base pin, cable and linch pin(two each; color-coded blue). 9100293 collar assembly, complete(one each; color-coded red).9200-43a ½" nylon washer (one).350356-004 round nut (color-coded black).650004-805 inner arm assembly(one; color-coded blue). C0001726 inner locking mechanism repair kit(two sets; color-coded red — includes two Autowlokbuttons; two button pins, two plungers, two springs;two flat white acetyl washers; and one epoxy gluekit with stick).910003-807 outer arm cap (color-coded blue).200140-408 finger guard (one; color-coded black).A0064059description1210partnumber9 yoke (color-coded red).replacement finger guard/yoke combo: 910011B10 stinger assembly (color-coded black). 91050010a storage latch (color-coded red).B00135311 hitch pin and clip (color-coded blue). 91002712 ¾" nylon washer (one each;color-coded green).350358-00Note: seven needed for complete tow bar nylonwasher repair13 ¾" bolt (one each; color-coded blue).350184-6014 ¾" nut (one each; color-coded red).350267-0115 ¾” bolt (one each; color-coded blue).350199-0016 inner/outer arm assembly,complete (color-coded green)driver's side.910021-70passenger side.910021-80
retain for future reference. Serial number: Table of Contents Read all instructions before installing the tow bar, or before towing a vehicle. Failure to understand how to properly in-stall or operate the tow bar could result in property damage, personal injury or even death. Save this manual Save this manual for future reference. It contains .