Transcription
ANIMATION HELP GUIDEUser ’s Guide - Premiere DnxHD Mastering WorkflowSchool of Cinematic Arts www.cinema.usc.edu 900 West 34th Street Los Angeles, CA 90089-2211 Help Desk 213 821 2638
TABLE OF CONTENTS1Setting Up your ProjectCopy the Template from Hal . . . . . . . . . . . . . . . . . . . . . . . . 3Import your clip into the project . . . . . . . . . . . . . . . . . . . . . . 4Replace the “Put Your Film Here” placeholder with your film . . . . . . . . . . 5Line up all elements . . . . . . . . . . . . . . . . . . . . . . . . . . 6-8Edit the Title . . . . . . . . . . . . . . . . . . . . . . . . . . . . . 9-10Do your Temp Mix . . . . . . . . . . . . . . . . . . . . . . . . . . . . 11Export your Quicktime for Editing in Audition . . . . . . . . . . . . . . 11-132Adobe Audition WorkflowAudition Set Up . . . . . . . . . . . . . . . . . . . . . . . . . . . 14-15Create New Session . . . . . . . . . . . . . . . . . . . . . . . . . . . 16Importing your Quicktime File . . . . . . . . . . . . . . . . . . . . . 17-19Importing Sound FX and other Sound Files . . . . . . . . . . . . . . . . . 20Exporting the OMF File for Sound Mixing in Pro Tools . . . . . . . . . . . . 212Final HD Export from PremiereImport your final Sound Mix into Premiere. . . . . . . . . . . . . . . . . 22Line up all elements. . . . . . . . . . . . . . . . . . . . . . . . . 23-25Export your Final DnxHD Quicktime File . . . . . . . . . . . . . . . . . 26-31Upload your File to Hal. . . . . . . . . . . . . . . . . . . . . . . . . . 32
1 Premiere Mastering WorkflowPART 1: Setting Up Your Project COPY THE TEMPLATE FROM HAL-Go to \\Hal\ DADA Standards-Copy The USCMasterTemplate 1080p 23.976 DnxHD175 10bit folder to your Local Drive.-Open the DnxHD175 10bit.prproj fileFor questions, email animsupport@cinema.usc.edu
1Premiere Mastering Workflow IMPORT YOUR CLIP INTO THE PROJECT.-You can Double-click in the project bin areaORFor questions, email animsupport@cinema.usc.edu-You can go to File-Import
1Premiere Mastering Workflow REPLACE THE “PUT YOUR FILM HERE” CLIP WITH YOUR FILM.-Drag the Tail Pop to the right to make space for your film, and then snap the Tail Pop back on the end of yourfilm by dragging it while holding the Shift key.For questions, email animsupport@cinema.usc.edu
1Premiere Mastering Workflow LINE UP ALL ELEMENTS.-Select the “Put Your Film Here” placeholder-Delete it-Drag the Tail Pop to the right to make space for your filmFor questions, email animsupport@cinema.usc.edu
1Premiere Mastering Workflow-Drop your film right after the countdown leader, the start time should be 01:00:00:00For questions, email animsupport@cinema.usc.edu
1Premiere Mastering Workflow-Snap the Tail Pop back on the end of your film by dragging it while holding the Shift key.-Finally, there is one transparent video layer that contains the Time Code Burn-In to assure synch with the Sound Mix, adjustthe end of the Time Code transparent video track to match the end of the film’s video track, including the Tail Pop.The end of all layersshould line upFor questions, email animsupport@cinema.usc.edu
1Premiere Mastering Workflow EDIT THE TITLE-Double-Click the Title clipFor questions, email animsupport@cinema.usc.edu
1Premiere Mastering Workflow-Using the Text Tool, edit the title and replace the placeholder values: Title, Your Name, Running Time-Example:For questions, email animsupport@cinema.usc.edu
1Premiere Mastering Workflow(***IF YOU ALREADY HAVE A SOUND MIX, SKIP TO PART 3 ON PAGE 22***) DO YOUR TEMP MIX-At this point you can start adding your sound files: Temp Dialog, SFX, Temp Music Track, Etc.OR-You can export the Low Rez movie file for Sound Editing in Adobe AudtitionThis is in preparation for your sound mix.REMEMBER!: THE -20DB SOUND TONE & THE HEAD AND TAIL 2 POPS ARE THERE TO ENSUREPROPER LEVELS AND SYNCH WHEN EXPORTING YOUR FILE FOR SOUND MIXING. EXPORT YOUR QUICKTIME FOR SOUND EDITING IN AUDITION-Click on the timeline to activate it-Go to File-Export-MediaFor questions, email animsupport@cinema.usc.edu
1Premiere Mastering Workflow-Select Quicktime in the Format drop box-Select the USC ForSoundMix 720x405 PhotoJpg preset from the Presets drop boxFor questions, email animsupport@cinema.usc.edu
1Premiere Mastering Workflow-Click on the Output Name link and name your file: “YourName Title ForSoundEdit 720x405 pjpg.mov”For Example: LambChamberlin TheLastStop ForSoundEdit 720x405 pjpg.movFor questions, email animsupport@cinema.usc.edu
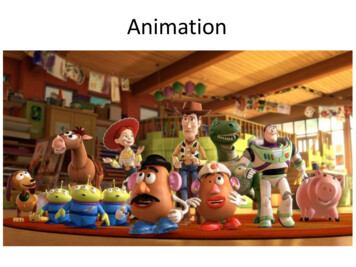
1 Premiere Mastering WorkflowPART 2: Adobe Audition Workflow AUDITION SETUP-Launch Audition-Go to Edit-Preferences-Time Display-Select Decimal (mm:ss:ddd) from the Time Format dropdown box***Audition doe not support 23.976 fps so the Time code will notmatch the Time Code burned in the Sound Edit quicktime file.That’s why it is better to select Decimal Time format, to preventconfusion***For questions, email animsupport@cinema.usc.edu
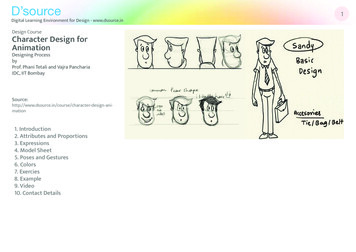
1Premiere Mastering Workflow-Now Select the Multitrack option on the left.-Set the Panning Mode to Left/Right Cut(logarithmic) VERY IMPORTANT-AND Enter 00:58:30:00 in the Default Start Time textbox VERY IMPORTANT TOO!!!-Press OKFor questions, email animsupport@cinema.usc.edu
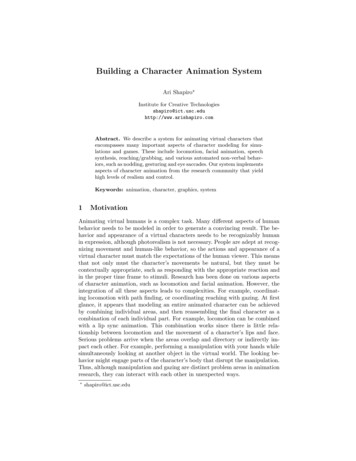
1Premiere Mastering Workflow CREATE NEW SESSION-Go to File-New-Multitrack Session-For Session Name Enter:Class number as CTAN ### YourName Title SoundEdit-For Example:CTAN 582 LambChamberlin TheLastStop SoundEdit-Press OKFor questions, email animsupport@cinema.usc.edu
1Premiere Mastering Workflow IMPORTING YOUR QUICKTIME FILE-Go to File-Import-File-Double-click in the Files window and select importORDouble-Click hereFor questions, email animsupport@cinema.usc.edu
1Premiere Mastering Workflow-Your quicktime file will be split into Audio and Video, you can see it in the Files WindowFor questions, email animsupport@cinema.usc.edu
1Premiere Mastering Workflow-Select them both (Audio and Video) and Drag them to the beginning of the top Track.For questions, email animsupport@cinema.usc.edu
1Premiere Mastering Workflow IMPORTING SOUND FX AND OTHER SOUND FILES-Follow the same procedure from pages 17-19 to import additional sound files.-You should now have all your files in the Files Window-Drag and drop your sound files (Sound FX, Temp Music, Dialog Foley, etc.) into different tracks and start editing the soundtracks for your project.***THIS FILE IS NOT AN AUDITION TUTORIAL AND DOES NOT INTEND TO TEACH EDITING IN AUDITION.THERE ARE MULTIPLE RESOURCES TO LEARN ADOBE AUDITION FOR THOSE OF YOU WHO HAVE NOT RECEIVED TRAINING FROM BETHANY.***A VERY GOOD RESOURCE TO LEARN AUDITION IS:http://tv.adobe.com/product/audition/For questions, email animsupport@cinema.usc.edu
1Premiere Mastering Workflow EXPORTING THE OMF FILE FOR MIXING IN PRO TOOLS-Go to File-Export-OMF-Name your file the same way as before but with the .OMFextensionCTAN ### YourName Title SoundEdit.OMF-For Example:CTAN 582 LambChamberlin TheLastStop SoundEdit.OMF-Select “Use Entire File” in the Media Options drop down box-Press OK Give the OMF file to Bethany for Mixing in Pro ToolsFor questions, email animsupport@cinema.usc.edu
1 Premiere Mastering WorkflowPART 3: FINAL HD EXPORT FROM PREMIERE IMPORT YOUR FINAL SOUND MIX INTO PREMIERE-Follow the procedure from Page 4 to import your final Sound Mix File-Drag your sound file to the beginning of a new Sound TrackFor questions, email animsupport@cinema.usc.edu
1Premiere Mastering Workflow LINE UP ALL ELEMENTS-Click on the Timeline Scrubbing Tool and drag it to the beginning of the actual film.For questions, email animsupport@cinema.usc.edu
1Premiere Mastering Workflow-Use the Zoom Slider to zoom in your view and make sure the Head Pop matches the original Head Pop from the template-Drag your filnal Sound track to match it if necessary, this has to be precise to the frame and THE FRAME 2 FROM THECOUNTING LEADER SHOULD SHOW UP ON THE SCREEN****Make sure the 2Pops MatchZoom SliderFor questions, email animsupport@cinema.usc.edu
1Premiere Mastering Workflow-Use the Zoom Slider to zoom out and drag the Timeline Scrubbing Tool to the Tail Pop-IF THE TAIL POP DOESN’T LINE UP WITH THE ORIGINAL TAIL POP FROM THE TEMPLATE IT MEANSYOU HAVE A SYNCHRONIZATION PROBLEM. REVISE YOUR WORKFLOW AND MAKE SURE YOUFOLLOWED ALL THE STEPS PROPERLYFor questions, email animsupport@cinema.usc.edu
1Premiere Mastering Workflow EXPORT YOUR FINAL DnxHD QUICKTIME FILE-Mute Audio Track 1, all the necessary audio, the Tone, 2Pops and your sound track should be contained in Track 2-Now you should be ready to export your final quicktime file-Your project should look something like this:Mute Track 2For questions, email animsupport@cinema.usc.edu
1Premiere Mastering Workflow-One last step before exporting, turn off the visibility of the transparent Time Code video layer.-Now you should NOT see the Time Code on the Preview Screen, SAVE YOUR PROJECTFor questions, email animsupport@cinema.usc.edu
1Premiere Mastering Workflow-Click anywhere on the Timeline and Go To File-Export-Media OR press Ctrl M to exportFor questions, email animsupport@cinema.usc.edu
1Premiere Mastering Workflow-Select the Quicktime Option from the Format drop down boxFor questions, email animsupport@cinema.usc.edu
1Premiere Mastering Workflow-Select the USC MasterFormat 1080p 23.976 DnxHD175 10bit Option from the Preset drop down boxFor questions, email animsupport@cinema.usc.edu
1Premiere Mastering Workflow-Click on the Output Name link, select a location to save your file at and name your file in the following format:YourName Title 1080p 23.976 DnxHD175 10bit.mov-For Example:Lamb Chamberlin TheLastStop 1080p 23.976 DnxHD175 10bit.mov-Click ExportFor questions, email animsupport@cinema.usc.edu
1Premiere Mastering Workflow CONGRATULATIONS!@# %-You deserve a prize for getting this far.-You should now have a master file of your film in the DNX HD 10 bit format which is broadcast quality.-Now the very last step (You didn’t think we were done did you? ) :-)-Upload your file to \\HAL\ HD Layback Drop Box\Master DnxHD175 10bit DropBox\-YOU ARE DONE!!!!!!!-FEEL FREE TO CONTACT US AT ANIMSUPPORT@CINEMA.USC.EDU IF YOU HAVE ANY QUESTIONS ORREQUIRE ADDITIONAL SUPPORT WITH THIS WORKFLOW.TILL NEXT TIME!For questions, email animsupport@cinema.usc.edu
PART 2: Adobe Audition Workflow 1 Premiere Mastering Workflow AUDITION SETUP-Launch Audition-Go to Edit-Preferences-Time Display-Select Decimal (mm:ss:ddd) from the Time Format drop down box ***Audition doe not support 23.976 fps so the Time code will not match the Time Code burned in the Sound Edit quicktime file. That’s why it is better to select Decimal Time format, to prevent .