Transcription
Virtual Reality (VR)USER MANUALv.1.0A step-by-step guide to installing a virtual reality systemon a Windows PC
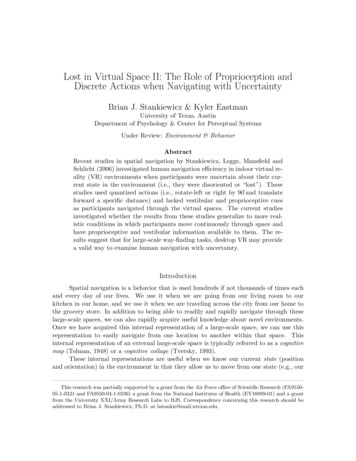
Contents1Installing and setting up the “Mixed Reality Portal” . 32Setting up controllers . 83Installing BIMserver.center Virtual Reality . 114The BIMserver.center Virtual Reality Application . 155Known errors . 18
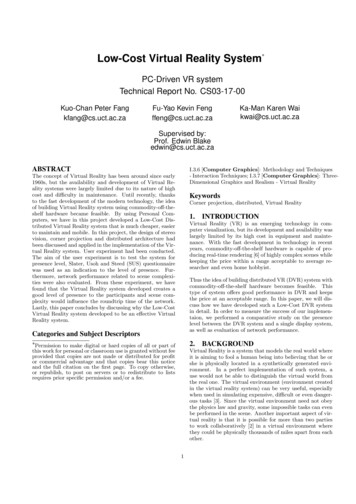
1Installing and setting up the “MixedReality Portal”After connecting the VR headset to the computer via USB 3.0 and HDMI, a screen willappear prompting the user to install an application called “Mixed Reality Portal”, whichmanages Microsoft’s virtual environment.Clicking “Get the app” (*) redirects the user to the Microsoft Store, where the “Mixed RealityPortal” application can be installed.(*) Note: If the window prompting the user to install “Mixed Reality Portal” and the“Get the app” button do not appear upon connecting the device to the computer,the user must go to the Microsoft Store directly, search for the application andinstall it.Installing the virtual reality system on a Windows PC / 3
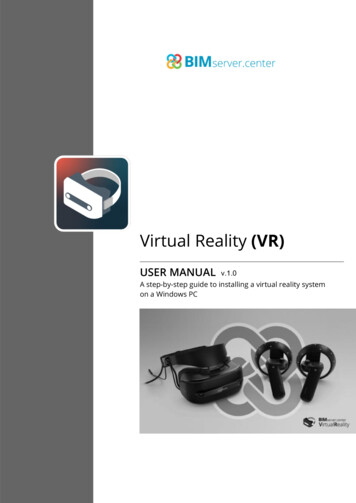
Once installed, open the application and the following screen will appear where the usermust set up Windows Mixed RealityAfter accepting the terms and conditions, the first thing that will take place is a systemcheck, to ensure the system is compatible with Microsoft’s virtual reality environment. Todo this, the user’s computer hardware will be analysed.Installing the virtual reality system on a Windows PC / 4
In the best of circumstances, the machine will be fully compatible with the technology(“Good to go”). This occurs when all of the test points pass the test without any problems orwarnings.In cases where the computer is not 100% compatible with the technology (“Supports somefeatures”), the system will work, but the user may experience bugs as the hardware doesnot meet all the requirements.Installing the virtual reality system on a Windows PC / 5
Finally, there is the possibility that the computer is incompatible with the technology (“Can’trun mixed reality”), and, therefore, will not be able to run any virtual reality applications.Once the hardware compatibility check has been completed, the user can proceed to setup the virtual reality environment space.Installing the virtual reality system on a Windows PC / 6
The user should select the type of setup according to the position of the device. To followthis example, click the option “Set me up for seated and standing”, which allows the user tostay in one place, either seated or standing.To use this setup the user should point the headset towards the screen and click on the“Center” button so that the angle of the device can be calibrated correctly. If this process isnot done correctly, the user may see the virtual environment in a different angle to that atwhich the headset is worn. For example, having the headset resting on a table at 0º andseeing the virtual reality environment inclined 90º to the right. If this problem occurs, theway to fix it is by performing a headset recalibration from the “Settings” menu in the mixedreality portal.Once the internal tools required by the system have been installed and set up, thewelcome screen appears and the user can begin using the portal.Installing the virtual reality system on a Windows PC / 7
2Setting up controllersWhen launching the portal for the first time, there is no bluetooth remote or controllerlinked to the application to be able to start interacting with the environment.In order to set up a controller, go to options in the lower left corner and select “Set upcontrollers”.Installing the virtual reality system on a Windows PC / 8
Depending on the type of virtual reality headset, the user will be asked to download anapplication from the Microsoft Store or a different store in order to set up and linkcontrollers. In this case, since it is a Samsung HMD Odyssey , the user is prompted toinstall the following application.In this application, the user is shown, step by step, how to pair the controllers with themixed reality portal.Installing the virtual reality system on a Windows PC / 9
Once the controllers are linked, click “Next”. A screen will appear with an image whichbriefly outlines the features of the controllers and how they interact with the mixed realityportal.Once the pairing process has been succesfully completed, the controllers can be used forviewing and interacting with the mixed reality portal.Installing the virtual reality system on a Windows PC / 10
3Installing BIMserver.center VirtualRealityOnce the entire setup process has been completed and the mixed reality portal is ready foruse, the user can then proceed to install the BIMserver.center virtual reality projectvisualisation tool.To access the Windows menu, press the button on the controller bearing the Windowssymbol. Once the menu is visible, click on the “All” button using the rear trigger on thecontroller and the user will be able to see all installed applications in the portal.Installing the virtual reality system on a Windows PC / 11
Using the rear trigger and the various options on the menu, the user can browse the menuuntil they locate the “Microsoft Store”, where the application can be installed.Installing the virtual reality system on a Windows PC / 12
Using the search bar, find the “BIMserver.center Virtual Reality” application.Clicking on the application will display its description, where the user can “Get” and “Install”the application and start the process.Installing the virtual reality system on a Windows PC / 13
Once finished, the user will have the application installed in the portal and will be able toopen it by clicking the “Launch” button.The BIMserver.center Virtual Reality application will also appear in the Windows menu as ashortcut to launch the application.Installing the virtual reality system on a Windows PC / 14
4The BIMserver.center VirtualReality ApplicationHaving installed the application, we are now going to show a little bit about how it works.Upon launching the tool the first thing the user will see is a login panel for the platform, tobe able to access all the information of their projects stored on BIMserver.centerInstalling the virtual reality system on a Windows PC / 15
After logging in, a screen appears with a button in the upper left corner that takes the userto a list of all their projects.In the project list, the user can browse all their projects stored on the platform and selectthe one they would like to examine in this new virtual reality environment that the platformhas to offer.Installing the virtual reality system on a Windows PC / 16
After selecting and loading the project, the user will be able to view all the layers in theproject, with the ability to toggle visualisation of not only the layers, but they can also viewthe set of the model’s animations (if there are any).Installing the virtual reality system on a Windows PC / 17
Once the user has selected the visible layers, a help panel is always accessible from thelower left side, where a brief explanation of how to interact with the visible model in virtualreality is provided in a direct and concise manner.5Known errors"I get an error asking me to check the display cable even though I have the USB cable in a USB3.0 port and the HDMI cable plugged in."If what you are seeing is a screen with the following error message, the system is trying toindicate that you have the USB cable properly connected to a USB 3.0 port, but the HDMIcable is plugged into a HDMI port without a direct connection to the computer’s graphicscard, meaning the system will not work properly. In order to fix this problem, simply tryremoving the HDMI cable from its current port and plugging it into one which has thisdirect connection to the computer’s graphics card.Installing the virtual reality system on a Windows PC / 18
3 Installing B IMserver.center Virtual Reality . 11 4 The BIMserver.center Virtual Reality Application . 15 5 Known errors. 18. Installing the virtual reality system on a Windows PC / 3 1 Installing and setting up the "Mixed Reality Portal" After connecting the VR headset to the computer via USB 3.0 and HDMI, a screen will .