Transcription
DigitalPatternsDesigned by Steve GoodHundreds of free PatternsStencil PrinterJigsaw Puzzle TemplatesDVD’sKey Chain Pattern PrinterVideo TutorialsReviewsCommunity Forum and more.If you would liketo donate clickhere. No Paypalaccount needed.Note to commercial print employees: I give my permission to print as many of this pattern book as your customer requires.steve@stevedgood.comCopyright Steve Good 20182017
General Pattern InformationYou may use this pattern to make as many ofthe project as you like. You are free to use anytechnique including mass production to buildthe project. The pattern may be copied andgiven to others provided the entire book is keptintact. You may not sell the pattern or include itin another commercial package of any type.Steve Good retains the right to the pattern. Ifyou have any questions about the use of thispattern please contact me atsteve@stevedgood.comWhen printing this pattern it is important to printit full size. When you bring up the print dialogbox look in the “Page Sizing & Handling”section. Make sure the “Actual Size” is selectedbefore you hit print.You also only need to print the page/s youneed. After the print dialog opens look for the“Pages to Print” section. You can print thecurrent page or a range of pages. This will helpsave ink by not printing the title/instructionpages.Printing Instructions
Fretsaw Scroller Whirligig Guy
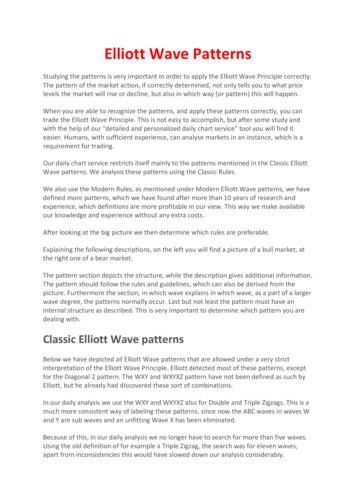
Setting the depth of the blade to cut the slot for the steel.
Cut a slot in the edge of the main board deep and wideenough to hold the steel rod. I used a table saw set to a depth ofabout 3/8”. I made two passes until the slot was wide enough fora loose fit.
You want the slot deep and wide enough for a loose fit.
I used 1/8” steel rod from Home Depot. The green wire is floralwire. I used that to connect the arm to the steel rod.
I am marking the main board for the steel rod bend are cutout.It’s easier to cut this after the steel rod is bent. The planscall for the cut out to be 7 inches from the front but you canslightly readjust this measurement to match the bent steel rod.
Wire Bend GuideThe amount of up and down movement of the cutting arm isdetermined by the bend in the steel rod. I had to make a coupleof rod bends until I got the correct motion. I still ended up witha little more motion than I wanted.
Here is the wind mill section with the steel rod installed.
I drilled a center hold and an offset hole for the steel rod. Pushthe rod through the hub. Bend it at two right angles and pushthe rod back into the hub to lock it in place. You can add a littleepoxy to hold it in place.
I tapered the ends of the main board and top board to givethe fins clearance and to add a more pleasing look.
This cut is for the slot to hold the tail fin. Set the tablesaw to 1/4” high and make a stop cut long enough for thetail fin. This slot need to be 1/8” wide so it may take twopasses to get a good fit.
Tail Fin slot.
Tail fin glued in to the slot.
These two pieces were added to keep the connectingwire from moving too far forward or backward. If I buildanother one I will just make the cutout smaller.
It took me a few attempts to get the correct length for theconnecting rod. Try to get it long enough so that when atthe lowest point the fret saw blade is just under thefret saw table.
I cut a small section of a real scroll saw blade and glued itinto the end of the fret saw. I cut small slots for it to fit into.
Here is the connecting rod wound around the steel rod.Just one small wrap holds it in palace.
If you plan to leave this whirligig outside you need to protect it.Use waterproof glue like Titebond III. You will need to pain orseal the wood with outdoor rated finish.
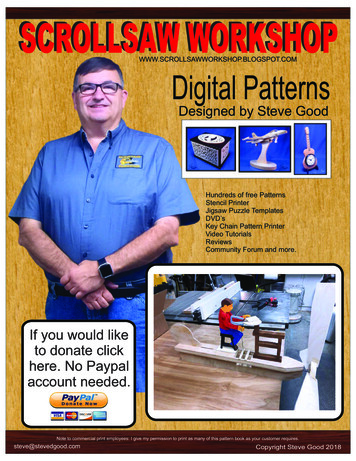
Tail Fin1/8” ThickManBody3/4” Thick1/4” ThickArms1/4” Thick
The cross is a positional guidefor the fins. I cut the 45 degreeslots on the band saw. I set thetable angle to 45 degrees andnibbled out a slot 1/8” wide andabout 1/3” into the hub.3/4” ThickWorkbench3/4” ThickFretwork Table1/8” Thick
Fins1/8” Thick
Fins1/8” Thick
2.5”3/4” Thick20 inches3/4” Thick20 inches7”7”NOT FULL SIZE2.5”
Cut a slot in the edge of the main board deep and wide enough to hold the steel rod. I used a table saw set to a depth of about 3/8”. I made two passes until the slot was wide enough for