Transcription
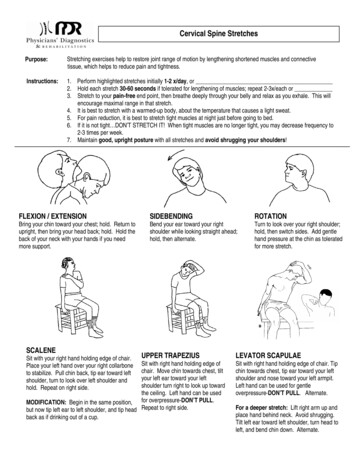
Cervical Spine StretchesPurpose:Stretching exercises help to restore joint range of motion by lengthening shortened muscles and connectivetissue, which helps to reduce pain and tightness.Instructions:1. Perform highlighted stretches initially 1-2 x/day, or2. Hold each stretch 30-60 seconds if tolerated for lengthening of muscles; repeat 2-3x/each or3. Stretch to your pain-free end point, then breathe deeply through your belly and relax as you exhale. This willencourage maximal range in that stretch.4. It is best to stretch with a warmed-up body, about the temperature that causes a light sweat.5. For pain reduction, it is best to stretch tight muscles at night just before going to bed.6. If it is not tight DON’T STRETCH IT! When tight muscles are no longer tight, you may decrease frequency to2-3 times per week.7. Maintain good, upright posture with all stretches and avoid shrugging your shoulders!FLEXION / EXTENSIONSIDEBENDINGROTATIONBring your chin toward your chest; hold. Return toupright, then bring your head back; hold. Hold theback of your neck with your hands if you needmore support.Bend your ear toward your rightshoulder while looking straight ahead;hold, then alternate.Turn to look over your right shoulder;hold, then switch sides. Add gentlehand pressure at the chin as toleratedfor more stretch.SCALENESit with your right hand holding edge of chair.Place your left hand over your right collarboneto stabilize. Pull chin back, tip ear toward leftshoulder, turn to look over left shoulder andhold. Repeat on right side.UPPER TRAPEZIUSSit with right hand holding edge ofchair. Move chin towards chest, tiltyour left ear toward your leftshoulder turn right to look up towardthe ceiling. Left hand can be usedMODIFICATION: Begin in the same position, for overpressure-DON’T PULL.but now tip left ear to left shoulder, and tip head Repeat to right side.back as if drinking out of a cup.LEVATOR SCAPULAESit with right hand holding edge of chair. Tipchin towards chest, tip ear toward your leftshoulder and nose toward your left armpit.Left hand can be used for gentleoverpressure-DON’T PULL. Alternate.For a deeper stretch: Lift right arm up andplace hand behind neck. Avoid shrugging.Tilt left ear toward left shoulder, turn head toleft, and bend chin down. Alternate.
Thoracic Spine & Postural StretchesPECTORALSHEAD AND SCAPULAR RETRACTIONPull chin straight back (without tucking it down). Squeeze shoulderblades down and together, then rotate palms outward and hold.Stand either in a doorway or facing a corner. Place yourpalms/forearms on each side of the corner or doorframe. Placeone foot in front of the other and lean your chest forward andhold. Support your body with your legs, not with your arms.Keep your head and chest up in a good posture.THORACIC TOWEL ROLL STRETCHTRIGGER POINT RELEASELie on your back with knees bent, and place a towel roll acrossshoulder blades. Relax for as long as tolerated up to 5 minutes,1-3 times per day. As this becomes more tolerable, raise armsabove head and tuck chin for a better stretch. To stretch chestmuscles, tuck chin and place arms at sides, elbows bent andpositioned at 90 degrees. ALTERNATE: Place towel vertically.Using a Theracane, tennis ball, or trigger ball,give gentle direct pressure to tight muscles and knots.Hold or gently massage areas 60-90 seconds each, oncedaily. Tip: Placing two tennis balls in a sock works well torelease the suboccipitals and improve headaches; use thetennis ball against the wall for knots along shoulder blades.LOWER TRAPEZIUS MOBILIZATIONStep 1: Sit, stand orlie on your backPlace your elbows,forearms and palmstogether in front ofyour chest.Step 2: Keep yourelbows as closetogether as possiblewhile you raise yourelbows over head.Step 3: Turn yourpalms up then out. Iflying, try to loweryour arms to thefloor.Step 4: Lower your elbowsdown the sides of yourbody. If lying, continue tokeep your elbows in contactwith the floor. Keep palmsturned out as if you’reopening curtains.Step 5: Straightenyour elbows and pullyour hands down alongyou sides. Pause andrelax while breathingslowly. Repeat thestretch 2-3 times.
Daily Cervical Stabilization ExercisesPurpose:The most common muscles to become weak for those with neck dysfunction are the cervical flexors. The deepneck flexors are significant contributors to the stability of the cervical spine. These exercises will strengthen thedeep flexors to improve posture and decrease strain on the spine, which can decrease neck pain and headaches.Instructions:1.2.3.4.5.6.7.Hold 10 seconds & Repeat 10 times.Maintain DLC.Complete 1-2 times per day.This should be pain-free. Drop back at least one level and consult your therapist if this causes pain.Progress to the next exercise when you can complete a 10 second hold for 10 repetitions without fatigue.Once able to perform level 3 easily, decrease frequency to 1x/week to maintain strength.If participating in circuit program, you may discontinue this exercise.LEVEL 1: SEATED HEAD NODSit upright with good posture. Hold your neck with your handsor sit or stand against a wall with the back of your head againstthe wall for some support. Gently nod head by bringing yourchin toward your Adam’s apple. You should feel the back ofyour neck stretch and the front of your neck tighten.DO NOT ALLOW THE LARGE MUSCLES IN THE FRONT OFYOUR NECK TO TIGHTEN (you can place your fingers on thefront of your neck to make sure.) Focus on the small musclesaround your throat.Hold 10 seconds, repeat 10 times.ALTERNATE: Complete while sitting in your car with yourhead against the head rest.LEVEL 2: SUPINE HEAD NODLEVEL 3: SUPINE HEAD LIFTLie on your back with your head on a firm surface and a towelroll under your neck. Gently nod your head by bringing yourchin towards your Adam’s apple. Do not lift your head off of thetable, and maintain contact with the towel roll. Feel the back ofyour neck lengthen and the front of your neck tighten.Lie on your back with your head on a firm surface and a towelroll supporting your neck. Gently nod your chin toward yourAdam’s apple and lift your head up slightly. Do not losecontact with the towel roll. Feel the back of your necklengthen and the front of your neck tighten.
Cervical Isometric ExercisesPurpose:To strengthen muscles in the neck and/or maintain strength gained in the MedX machines.Instructions:1. Do only the exercises instructed by your therapists.2. Remember to hold the DLC, then begin the exercises.3. Hold each exercise for a total of 10 seconds. Ramp up the pressure into your hands (or ball) for 2 seconds,push at maximum pressure for 6 seconds, then slowly release the pressure for the final 2 seconds.4. Repeat the sequence for a total of three to six repetitions, trying different joint angles if instructed to do so.5. Exercise 2-3 times per week, not 2 days in a row, performing instructions from your therapist.6. There should be no movement of your head while pushing; however, your therapist may instruct you on how todo each exercise in various positions throughout the range of motion.HAND ISOMETRICSEXTENSIONSIDEBENDROTATIONClasp both hands behind your head,use a towel sling, or furnitureheadrest. Attempt to tip your headback to look up at the ceiling whileresisting with your handsPlace your right hand above your rightear. Attempt to tip your right ear towardyour right shoulder while resisting withyour hands. Repeat on the other side.Place the heel of your right hand againstthe side of your forehead. Attempt to turnyour head to the right while resisting withyour hand. Repeat on the other sideBALL ISOMETRICS(ALTERNATE EXERCISE)EXTENSIONSIDEBENDCradle ball at base of skull.Push head back into the ballthen tip your head back as iftrying to look at the ceilingPlace the ball on your rightshoulder. Push head inand down against the ballas if toward your shoulderROTATIONPlace ball at right side offorehead. Push cheek intoball and turn your head inthe direction of the ball. Donot turn your body.
Core Stabilization ExercisesPurpose:These exercises will strengthen and improve coordination of the trunk muscles which is needed to help maintainactive balanced posture and lumbar stability. Core strength helps decrease strain on the spine and ultimately helpsto decrease back pain.Instructions:1.2.3.4.5.6.7.Do only the exercises indicated and instructed by your therapists.Remember to hold Deep Layer Contraction Muscles (DLC) then start the stabilization exercise.Exercise 3 times per week, not 2 days in a row, performing instructions of your therapist.Stop if pain symptoms significantly worsen or radiate and consult your therapist.Slowly repeat each exercise for a maximum of 2 minutes.Progress to the next level of exercise when able to complete 2 minutes without maximal fatigue.1. Lower Abdominal Exercise: Maintain DLCPosition on your back with knees bent. Maintain a deep core contraction, and neutral, balanced low back curve throughout; donot arch or move your back while moving the legs. Repeat each exercise for 20 repetitions or up to 2 minutes.Level 1: Either bring one leg uppast 90 degrees (easier), or stop at90 degrees (harder). Lower it slowlyback down to the floor. Alternateand repeat.Level 4: Bring one leg up to 90 degrees,and then bring the other one up to meet it.Straighten one leg out and drop slightly(less than 45 degree angle). Return tostarting position. Alternate and repeat.Level 2: Bring one leg up to 90 degrees,and then bring the other one up to meetit. Lower one leg down to the floor.Lower the other leg down to the floor.Alternate lead leg and repeat.Level 5: Bring one leg up to 90 degrees,and then bring the other one up to meetit. Straighten one leg out and drop downto just above floor. Return to startingposition. Alternate and repeat.Level 3: Bring one leg up to 90 degrees,and then bring the other one up to meetit. Lower one leg down and just tap yourtoe on the floor, and return back up to 90degrees. Alternate and repeat.Level 6: Bring one leg up to 90 degrees,and then bring the other one up to meet it.Straighten both legs and drop slightly (lessthan 45 degree angle). Return to startingposition and repeat.
Core Stabilization Exercises – Page 22. Level 1: Alternate Arm or Leg Lift: Maintain DLCPosition on hands and knees. Maintaining a deep core contraction, lift one arm out in front of you. Hold this position for 10 seconds.Repeat with the other arm. Return arm to floor and lift one leg behind you, keeping a level pelvis and tight core. Hold this position for10 seconds and then repeat with the other leg. Repeat up to 12 repetitions (2 minutes).MODIFICATION: This exercise can also be performed on your stomachif you have a wrist, shoulder or knee problem.Level 2: Alternate Arm and Leg Lift: Maintain DLCMaintaining a deep core contraction, simultaneously raise one arm out in front of you, and raise the opposite leg. Hold thisposition for 10 seconds. Alternate sides, and keep your pelvis level. Repeat up to 12 repetitions (2 minutes).ALTERNATE: Perform on ball, placing ball under abdomen and help balance on toes and hands (don’t put all of your weightthrough your hands and toes).MODIFICATION: This exercise can also be performed on your stomachif you have a wrist, shoulder or knee problem.Level 3: Alternate Arm and Leg Lift: Maintain DLCPerform on ball, balancing on toes and abdomen. Perform aswimming motion with arms, i.e. as right arm is out in front ofyou, left arm is at your side and your left leg is raised behindyou. Repeat on the other side. Hold each position for 10seconds, repeat up to 12 repetitions (2 minutes).
Core Stabilization Exercises – Page 33. Level 1 Bridge: Maintain DLCPosition lying on back with legs bent, and arms at sides. Placing palms up aids in facilitation, so do this if able. 1st Set: Lift hips off of floor using abdominal muscles (not buttocks), rolling up one vertebra at a time. Hold 10 seconds.Lower hips slightly and lift again focusing on abdominals to do the work. Repeat up to 6-12 repetitions (1-2 minutes). 2nd Set: Lift hips off floor using hips and buttock muscles this time, rolling up one vertebra at a time. Hold 10 seconds.Lower hips slightly and lift again using buttocks to push hips up. Repeat up to 6-12 repetitions (1-2 minutes).ALTERNATE: Perform on ball, placing ball under legs below the knee.Level 2 Bridge: Maintain DLCHold arms to the ceiling and complete as in level one.Complete the two sets described in level 1.Level 3 Bridge: Maintain DLCIn an extended bridge, lift one leg off the floor or ball and hold for10 seconds, while maintaining a level pelvis. Repeat with theother leg, keeping hips up from the floor. Continue for up to 12reps (2 minutes).4. Level 1 Trunk Extension: Maintain DLCLie on stomach over the ball with your feet against the wall, arms atyour side or behind you. Lift your trunk or chest off the ball.Maintain spine in a neutral position, careful not to arch your back.Hold for 10 seconds, lower slowly and repeat up to 12 repetitions(2 minutes).ALTERNATE: Perform exercise on the floor, lifting both legs.Level 2 Trunk Extension: Maintain DLCProgress By: Positioning arms out in front of you Holding weights in your hands as armsare out in front of you Increase hold time
Active Balanced Posture: 4-Step Deep Layer Core ContractionPurpose:The core is where the body’s center of gravity is located and where all movement begins. A strong, efficient core isnecessary for building and maintaining proper muscle balance and posture throughout the entire body.Instructions:1. These exercises should be pain-free. You will feel a deep sense of fatigue after completion.2. Hold all 4 contractions for 10 seconds, and repeat 10 times. Once you can perform this easily, you will beready to progress to performing movements while you hold the contractions, but you must master the 4-stepdeep layer contraction first.3. Goal is to hold 5 minutes, 3-5x/day while incorporating into daily, functional activities, such as sitting,standing, lifting your child or laundry basket, vacuuming, etc.Step 1: Pelvic Floor Contraction (Kegel Exercise) Performed in sitting, supine (lying on back) with knees bent, quadruped (on hands andknees), & standing.Lightly contract the muscle as if you were going to cut off the flow of urine midstream.Do not perform a maximal contraction, only contract at 50% – pretend your pelvic floor isan elevator, contract slightly for the first floor, and a little harder for the second floor, anda maximal contraction for the third floor. For the exercise, stop at the second floor (or50%) contraction and hold, then move to step #2. Avoid squeezing your buttocks together, squeezing your legs, tilting your pelvis,or holding breath.Step 2: Lower Abdominal (Transversus Abdominis) Contraction Can best be performed in quadruped (on hands and knees); but can also be performedin standing, sitting, and supine with knees bent.While maintaining your pelvic floor contraction, draw in or pull your lower abdomen inand up toward your spine (bringing your belly button toward your spine), or think ofdrawing your abs in and away from the elastic of your pants.You can feel this contraction by pressing your fingers just inside of your front hip bones. Avoid tilting your pelvis, holding your breath, using your upper abs, or suckingin your stomach.Step 3: Spinal (Multifidus) Contraction Can best be performed in prone (lying on stomach); but can also be performed in sittingand quadruped (on hands and knees).While maintaining your pelvic floor contraction and your lower abdominal contraction,swell your back muscles by squeezing them together.Imagine the muscles along your spine are your buttocks. Gently squeeze your “backbuttocks” together.You can feel this contraction by wrapping your hands around your rib cage with yourthumbs placed on either side of your spine.If you are having difficulty, you can lightly push your fingertips into your thighs to assist Avoid extending your back (leaning back), tilting pelvis, or holding your breath.Step 4: Scapular Retraction Can be performed sitting, standing, supine and prone.Bring your ears over your shoulders into balanced posture.While maintaining your pelvic floor, lower abdominal and spinal contractions, squeezeyour shoulder blades down and together. Avoid holding your breath or shrugging your shoulders.
Pain Management – Flare up ControlPurpose:Pain management techniques are aimed at reducing daily pain and inflammation and/or expediterecovery from a flare up or exacerbation.Instructions:1. If you are flared up, try not to panic, and practice pain management techniques as described below.2. If flare-up pain is not improving over the course of a few days, consult your therapist or MD.3. Practice Therapeutic Breathing Techniques (see additional handout).Control InflammationThe inflammatory response is the body’s universal response to injury. After an injury, blood vessel pores will dilate and allow fluid(inflammation) to spill around the injured area. This inflammation, or swelling, has the ability to attack disease and clean up damagedtissue and create scar tissue. Although it has it’s good purpose, a prolonged inflammatory response can lead into a chronic paincycle. Inflammation, therefore must be controlled. Avoid using heat. Heat increases inflammation by dilating blood vessel pores. Ice Pack the area for 15-20 minutes, up to once an hour. (4-5 times a day when flared-up), and make sure to ice morningand evening before bed. Anti-inflammatory medicine can be helpful if allowed by your MDICING DIRECTIONSTo avoid skin irritation and achieve maximal benefit from ice treatments, ice properly.1. Apply the cold pack to the affected area using a towel layer over the skin.2. Icing will create four progressive sensations: COLD — BURNING — TINGLING — NUMBING3. Once reaching the numbing stage you will want to continue icing no more than 10 additional minutes. Use ice approximately15-20 minutes per session. You can apply several times per day, but leave the ice off at least twice as long as you had iton before using it again.Maintain Range of MotionDuring your recovery period it is important to maintain your mobility. Do not stay in bed if you can tolerate the upright position.Modify your activity so that you don’t increase your pain levels. Try and go through your normal daily activities as tolerated using good body mechanics Do your stretching exercises gently (without increasing pain) 2-3 times per day, followed by icing. If you are unable to do your stretching exercises without increasing pain, then do the following: For LOW BACK PAIN: do 5 repetitions of a pelvic tilt. Hold for 1-2 seconds. Make the tilt small enough that itdoes not increase pain. For NECK PAIN: do 5 slow repetitions of neck rotation while lying down. Avoid pain at the end range. Progress back into your stetching routine as tolerated Avoid strength training and heavy activity until the flare-up is resolved. You may need to decrease the repetitions and/orweight when strengthening is resumed. A flare-up should be under control within three days. You might not feel 100%, but on the mend.Use Proper & Protective Body Mechanics Bend at the hips, not at the spine; keep your spine in a balanced position. Maintain Deep Layer Core (DLC) muscle contraction during movements. Use pillows to support your neck, back and/or legs while sitting or lying down. Lean onto your arms for support while bending your hips if the pain is in your low back. Allow extra time, but try and do your daily needs. Wear slip on shoes, dress lying down on your back, and wear a backbrace very temporarily if needed.
Lumbar Spine & Related Hip StretchesPurpose:Stretching exercises help to restore joint range of motion by lengthening shortened muscles andconnective tissues, which help to reduce pain and tightness.Instructions:1. Perform highlighted stretches initially 1–2x/day , or2. Hold each stretch 30 – 60 seconds if tolerated for lengthening of muscles; repeat 2-3x each or3. Stretch to your pain-free end point, then breathe deeply through your belly and relax as you exhale. This willencourage maximal range in that stretch.4. It is best to stretch with a warmed up body, about the temperature that causes a light sweat.5. For pain reduction, it is best to stretch tight muscles at night just before going to bed.6. If it is not tight DON’T STRETCH IT!7. When tight muscles are improved, you may decrease frequency to 2-3 times per week.HIP FLEXOR STRETCHKneel with weight on one knee and the opposite foot. Tuck yourhips under, squeeze buttocks, lean slightly forward and hold.Avoid arching your back. You should feel stretch to the front ofthe trunk or hip, not in your lower back.MODIFICATION: Lay on back with buttocks at very edge of tableand knees bent. Stabilize lower back by hugging both knees tochest, and then drop one leg down toward bed and hold.SINGLE KNEE TO CHESTLie on your back, knees bent and feet flat on floor. Bring oneknee toward your chest pulling gently with your hands, hold,and alternate.SIJ MODIFICATION: Extend one knee flat to the ground.Gently push the knee at your chest into your hands and countto five. Relax, and pull the knee up and slightly outward closerto your chest. Repeat this cycle 3-5 times on each leg.TRUNK ROTATIONLie on your back with your knees bent, feet flat on the floor.Slowly lower both bent knees to the floor. Return to center,and then lower to the other side. Hold, or gently rock sideto side.DOUBLE KNEE TO CHESTLie on your back, knees bent and feet flat on floor. Bring bothknees toward your chest pulling gently with your hands and hold.
Lumbar Spine & Related Hip StretchesPIRIFORMIS STRETCHITB / LATERAL HIP STRETCHLie on you back with knees bent and feet on the floor. Crossright ankle onto left knee. Grasp left thigh and bring your leftknee toward your chest and hold. Repeat on the other side.MODIFICATION: May also be performed by pulling kneetoward opposite shoulder or can be done in seated position.Lie on you back with knees bent and feet on the floor. Placeleft ankle over the outside of right knee and use left leg topush right leg toward the floor until a stretch is felt to theoutside of the right hip. Hold, and repeat on other leg.TRIGGER POINT RELEASE: Using a Foam Roller, tennisball, or trigger ball, give gentle direct pressure to tightmuscles and knots. Hold or gently massage areas 60-90seconds each, once daily.HAMSTRING STRETCHPRONE ON ELBOWSLying on your back, bend your hip and grasp your thigh justabove your knee. Slowly straighten your knee with your footin a relaxed position and hold. If able, flex your ankle severaltimes. Modify by keeping other leg bent as needed.MODIFICATION: May also be performed in standing orsitting with leg straight and elevated on a stool. With uprightposture, bend forward at hips until stretch is felt.Lie on you stomach with your weight on your elbows andforearms. Keep your pelvis in contact with the floor. Allowyour low back and buttocks to relax. Extend elbows andpress up as able. Hold, or gently repeat movement severalrepetitions. Hold x RepsCAT BACKOn hands and knees, slowly round pelvis and hips uptowards ceiling to arch back like a cat. Drop pelvis and hipstoward the floor. Avoid rocking forward and backward onknees. Hold each position, or gently repeat movementseveral repetitions.ROCK BACK WITH A “V”On hands and knees, sit back on you heels and tuck your hipsunder. Stretch your arms straight in front of you until a stretch isfelt in your mid to low back and hold.QUADRATUS MODIFICATION: Shift weight diagonally overhip, and sidebend to the opposite side, elongating the side ofthe back and hold. Repeat to the other side.
Midback Stabilization ExercisesPurpose:These exercises will strengthen the midback (between and underneath the shoulder blades) which will contribute toimproved posture and decreased pain by decreasing strain on the spine.Instructions:1.2.3.4.5.6.7.Do only the exercises indicated and instructed by your therapist.Maintain the DLC.Do not allow your shoulders to shrug up while doing the exercises.Exercise 3x/week, not 2 days in a row, performing instructions from your therapist.Stop if pain symptoms significantly worsen and consult your therapist.Complete 20 slow repetitions of each exercise or a maximum of 2 minutes as indicated with good control.Progress to the next level when able to complete 20 repetitions or 2 minutes without high fatigue.1. Straight Arm Push-ups: Maintain DLCLevel 1: Place your hands on the wall and feet away fromthe wall enough that you are leaning forward slightly. Keepelbows straight but not locked. By moving only the shoulderblades, allow your chest to move toward the wall, pause, andthen push your chest as far away from the wall as you can.Do not allow shoulders to shrug up. 20 reps.MODIFICATION: Keep your hands fisted and wrists neutralif you have wrist/thumb pain or carpal tunnel.Level 3: Position yourself on your hands and knees.Keep your spine in a neutral position. Keep elbowsstraight but not locked. Allow your chest to movetoward the floor, pause, and then push your chest as faraway from the floor as you can. 20 reps.Level 2: Use Level 1 positioning but place hands on a Swiss ballagainst the wall at shoulder level. Keep elbows straight but notlocked. By moving only the shoulder blades, allow your chest tomove toward the wall, pause, and then push your chest as faraway from the wall as you can. Do not allow shoulders toshrug up. 20 reps.MODIFICATION: Hold your hands with palms flat on the sides ofthe ball so that wrists are neutral if you have wrist/thumb pain orcarpal tunnel.Level 4: Place your hands on the floor directly beneathyour shoulders. Keep your spine in a neutral position.Keep elbows straight but not locked. Allow your chestto move toward the floor, pause, and then push yourchest as far away from the floor as you can. 20 reps.ADVANCE by adding a full push-up with each rep.
Midback Stabilization Exercises- Page 22. Reverse Wall Push-ups: Maintain DLCLevel 1: Stand with your head and back against the wall and your feet 8-12 inches away fromthe wall (or further away for more challenge) and your knees slightly bent. You should beleaning back slightly into the wall. Hold your arms at your sides with you elbows bent to 90degrees. Push your elbows into the wall. Your elbows should not slide on the wall.Hold for 10 seconds. 6-12 reps.Level 2: Begin in the same position, now push your body forward by pushing your elbowsinto the wall. Your hips should be in line with your shoulders. Your elbows should not slideon the wall. Hold yourself away from the wall for 10 seconds. 6-12 reps.Level 1Level 23. Scapular Depression: Maintain DLCLevel 1: Sit or stand (one foot forward if standing) with good posture.Bend your elbows to 90 degrees and push your elbows straight downtoward the floor. Hold for 10 seconds. 6-12 reps.Level 2: Sit with your forearms on a table in front of you.Squeeze shoulder blades down and push your arms into thetable as if attempting to lift your body. Hold for 10 seconds.6-12 reps.4. Postural Exercises: Maintain DLCExercise A Stand against the wall with feet 6”-8” away from wall. Keep elbows straight and arms/hands against the wall. Maintaining a slight backward pressure against the wall,slowly raise arms out the side until reaching the positionsof 10 o’clock and 2 o’clock STOP raising your arms if you cannot keep your shouldersfrom shrugging, and complete in a shorter motion. Repeat 12-20 reps.Exercise B Stand against the wall as in exercise A Press head, back, and hips against the wall Place arms/hands against the wall at shoulder level,and avoid shoulder shrugging. Keep contact with the wall, by maintaining a slightbackward pressure with your arms, as you bend yourelbows to 90 degrees then straighten. Repeat 12- 20 reps.
Pain Management – Muscle Release TechniquesTrigger Point Release: Trigger point release or self-massage techniques help with daily pain management byincreasing circulation and blood flow that aids in the healing process, and breaking scar tissue adhesions that develop aspart of the secondary pain cycle.Instructions:1.2.3.4.Use a tennis ball, trigger ball, or massage tool to gently provide light pressure to a tight muscle.Work into a pressure that feels strong, but does not create intense pain.Hold pressures 30-90 seconds, or gently move across the point in a massaging motion.Combine self release with stretching techniques for best results.ITB release using foam rollerSuboccipital Release using twotennis balls in a sockTheracane or tennis ball against thewall for knots in shoulder bladesPiriformis and gluteal release usingtennis or trigger ball under buttock
Proper Body Mechanics with Household ActivitiesPower PositionLaundry Keep basket at waist height when sorting laundrySquat or half kneel to get clothes in and out of front loading washer or dryer, avoid bending at waistUse golfer’s lift to get clothes out of top loading washerUse squat or power position to lift laundry basket from floor.Sweeping and Vaccuuming Use long handle equipment to avoid stooptingKeep broom or vacuum close to your bodyStay upright, step or lunge with your legs to push thevacuumAvoid bending at the waist or reaching with your armPivot with your feet, don’t twist your trunk
Sitting Posture & Computer ErgonomicsFunctional Sitting PositionsForward ready position: perch on the edge of the chair, lean into desk while maintaining low backarch and avoid rounding shoulders forward. This position works especially well for writing.Upright functional ready position: the typical upright posture with the back supported or, if the seatis tilted, sitting for short periods of time without using the backrest to work on postural endurance.Semi-reclining position: use if the chair has a reclining feature. This position may work best w
Hold each stretch 30-60 seconds if tolerated for lengthening of muscles; repeat 2-3x/each or _ 3. Stretch to your pain-free end point, then breathe deeply through your belly and relax as you exhale. This will encourage maximal range in that stretch. 4. It is best to stretch with a warmed-up body, about the temperature that causes a light sweat.