Transcription
78-1444-25011/15LionelTMCC Tie-JectorOwner’s Manual
Congratulations!Congratulations on your purchase of the Lionel TMCC Tie-jector. This classic model has beenupgraded with TrainMaster Command Control. You can now drop ties anywhere on your layoutwithout the need for trackside trippers. Additional improvements include enhanced slow speed performance, the ability to run and drop ties in reverse as well as forward, conventional and commandcontrol operation, directional lighting, ElectroCoupler and a plug to improve electrical pick upwhen used with our Tie Work Cars (sold separately.)Contents of your Tie-jector box1 Tie-jector20 Wood Ties1 Replacement Traction TireTable of contentsRunning your Tie-jectorLoading ties Command operations Conventional operationsAttaching the tie work car 33-789Maintenance and ServiceServicing the headlight 10Replacing the traction tire 10Lubrication 11Lionel Warranty 12The following Lionel marks are used throughout this Owner’s Manual and are protected underlaw. All rights reserved.Lionel , LionChief , LionChief Plus ,TMCC , LEGACY , FasTrack , TrainMaster , Odyssey ,RailSounds , CrewTalk , TowerCom , DynaChuff , StationSounds , Pullmor , ElectroCoupler ,Magne-Traction , CAB-1 Remote Controller, American Flyer , Lionel ZW , ZW , MagniVision ,TMCC , Lionelville , Wireless Tether , Powerhouse , LionMaster , Conventional Classics , PostwarCelebration Series , TruRail , PH-1 Powerhouse , Powermaster , Powerstation-Powerhouse ,Accessory Motor Controller , AMC , Accessory Switch Controller , ASC , Action RecorderController , ARC , Track Power Controller 300 , TPC 300 , Track Power Controller 400 , TPC400 , Block Power Controller , BPC , Operating Track Controller , OTC , FatBoy , LionelLines , Joshua Lionel Cowen Series , Lockon , TrainSounds , MultiHorn , MultiWhistle ,Choo-Choo , SensorTrack , Plug-n-Play , Imagineering 2
Running your Tie-jectorNote! Power your Tie-jector with an alternating-current (50-60Hz AC) transformer only.Powering your Tie-jector with a direct-current (DC) transformer, or in excess of 19 voltsAC, may result in damage to sensitive electronic components.Note! Your Tie-jector requires Lionel or Lionel-compatible O-27 or larger track curves.Loading tiesThe top of your Tie-jector has two bins. The bin at the front is for storage of extra ties. Ties placedin the rear bin will be deposited around the layout when the Tie-jector is activated.Load wood ties in the bin as shown.Tie ejection binTie storage binTies eject from hereFigure 1. Loading tiesLEGACY/TrainMaster Command Control (TMCC/Command Control)operationsFor the finest operating experience, your Tie-jector is fully compatible with Lionel’s TMCC andLEGACY control systems. You can operate your TMCC Tie-jector with your TMCC Cab 1 or yourLEGACY Cab-1L or Cab-2 controller.Your commands are sent by the remote controller to the Command Base, which sends a wireless RF signal through the rails to your Tie-jector. Your Tie-jector will not respond until itrecognizes its unique ID#, so you can operate multiple Command-equipped locomotives onthe same track at the same time.3
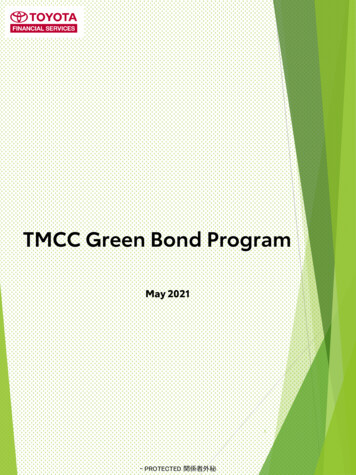
Running your Tie-jectorThe LEGACY CAB-2 Remote ControllerFor operation using the CAB-2 remote, you must set the Tie-jector to either TMCC or CAB-1 mode.Note! LEGACY mode will NOT operate your Tie-jector.Note! See page 7 for TMCC mode command buttons.8Use with CAB-1 Mode.Turns the ejector off.9Use with CAB-1 Mode.Turns the ejector on to unload ties.AUX-1Press to view the ControlPanel while operating.Multi ControllerBoost, Brake, and Directioncontrol. Rock forward for Boost,rock backward for engine brake,and press down for directionchange.Emergency Halt ButtonStops everything onlayout.AUX-2Toggles the headlight onand off.Rear Coupler ButtonFire the rear coupler.Velocity ThrottleThrottle control overengines, also used tonavigate thru info/options.4
Running your Tie-jectorCAB-1 Remote Controller commandsThe CAB-1 Remote Controller commands are detailed below.Releases the ElectroCoupler on the rear of the TiejectorActivates the numeric keypad.Toggles headlight on/off.Accelerates the Tie-jector with a clockwiserotation. Decelerates the Tie-jector with a counterclockwise rotation.Changes the Tie-jector's direction. The Tie-jectordecelerates to a stop and continues in the oppositedirection when you increase the throttle.Increases the Tie-jector's speed while the button ispressed. Release the button to return to the initialspeed.Decreases the Tie-jector's speed while the button ispressed.Shuts down all PowerMasters on your railroad.Stops all TrainMaster Command Control-equippedlocomotives and tie-jector's in operation. Use HALTonly in emergency situations. Turns tie ejection on. Turns tie ejection off.5
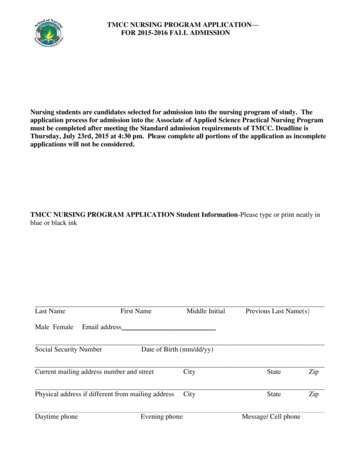
Running your Tie-jectorNote! Power your Tie-jector with an alternating-current (50-60Hz AC) transformer only.Powering your Tie-jector with a direct-current (DC) transformer, or in excess of 19 voltsAC, may result in damage to sensitive electronic components.Note! Your Tie-jector requires Lionel or Lionel-compatible O-27 or larger track curves.Assigning your Tie-Jector a new ID#For operation in the LEGACY or Command Control environment, you will want to give your tiejector a unique ID#. It will respond to commands associated with its ID# while all other unitswill disregard these commands. This procedure is not necessary for conventional(non-Command) operation.1. Slide the program run switch on your Tie-jector to the PGM position. SeeFigure 2.2. Place the Tie-jector on the track.3. Connect the Command Base and plug it in.4. Power up the track.5. Press ENG on the CAB-1, CAB-1L, or CAB-2 remote.Note! The Tie-jector will accept an ACC or ENG address! Must be set to TMCC or Cab-1 modeunder the engine menu (will not respond to Legacy 9-bit commands).6. Enter the unique ID#. Choose any number from 1 to 98 that has not beenassigned to another locomotive or tie-jector (ENG). We recommend using apart of your Tie-jector's road number.Note! All LEGACY locomotives, Tie-jectors, etc. respond to ENG 99. We recommend that youreserve ID# 99 as a "universal" ID#.7. Press SET.8. Slide the program run switch back to the RUN position.The Tie-jector's ID# has been set. Be sure to record the new ID# for your reference.FRONTUNDERSIDE OF TIE-JECTORProgram/RunswitchREARFigure 2. Switch location6
Running your Tie-jectorNote! Power your Tie-jector with an alternating-current (50-60Hz AC) transformer only.Powering your Tie-jector with a direct-current (DC) transformer, or in excess of 19 voltsAC, may result in damage to sensitive electronic components.Note! Your Tie-jector requires Lionel or Lionel-compatible O-27 or larger track curves.CAB Remote Controller numeric keypad commandsWhen you press the AUX1 button on your CAB-1, CAB-1L, or CAB-2 Remote Controller, youturn the numeric keypad into ten command buttons. After you press the AUX1 button,you will be able to press any numbered button until you address a different product.Dumping TiesTo unload ties, use the keys on your remote controller.CAB-2 RemoteCAB-1 mode Unload ties. Stop unloading ties from anywhere on your layout.Fire the ElectroCoupler on the rear of the Tie-jector.TMCC mode -Unload ties.Stop unloading ties from anywhere on your layout.Fire the ElectroCoupler on the rear of the Tie-jector.CAB-1 or CAB-1L Remote Unload ties. Stop unloading ties from anywhere on your layout.Fire the ElectroCoupler on the rear of the Tie-jector.7
Running your Tie-jectorConventional transformer operationsNote! For Conventional operation, a Command Base must not be powered up anywherein the area, even if it is not connected to the track. If a base is detected, your Tie-jectorwill default to Command mode.Note! Power your Tie-jector with an alternating-current (50-60Hz AC) transformer only.Powering your Tie-jector with a direct-current (DC) transformer, or in excess of 19 voltsAC, may result in damage to sensitive electronic components.Note! Your Tie-jector requires Lionel or Lionel-compatible O-27 or larger track curves.Your Tie-jector requires a conventional transformer with a bell button toactivate the tie unloading feature.1. With track power off, place your Tie-jector on the track.2. Power up the track. If a circuit breaker trips when you turn on the Lionel power supply,check the wheels of your tie-jector to make sure they are all securely on the track. Check tomake sure the track is free of all metals that may cause a short circuit.3. Move ‘em out! When the Tie-jector’s headlight illuminates, press the DIRECTION buttonon your transformer to sequence your Tie-jector through the repeating pattern of operations:neutral, forward, neutral, reverse, neutral, and so on. You may also briefly turn off track powerto advance the tie-jector to the next operating state. Adjust the throttle until your tie-jectormoves at your desired speed.Note! When placing your Tie-jector on your layout for the first time and after powerinterruptions lasting longer than five seconds, it will start out in neutral.Note! When the Program/Run switch underneath the Tie-jector is put in the Program position,the Tie-jector will be locked into the direction it was in when the switch was switched. Itwill now always start up in that direction and will not go through the Neutral-ForwardReverse-Neutral cycle.Dumping TiesTo eject ties in conventional operation, press the bell button on your transformer. Press thebell button for three seconds to start unloading and again to stop unloading ties anywhereon your layout.8
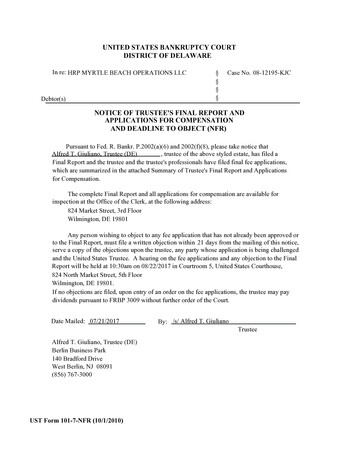
Running your Tie-jectorNote! Power your Tie-jector with an alternating-current (50-60Hz AC) transformer only.Powering your Tie-jector with a direct-current (DC) transformer, or in excess of 19 voltsAC, may result in damage to sensitive electronic components.Note! Your Tie-jector requires Lionel or Lionel-compatible O-27 or larger track curves.Using the Tie Work CarYour TMCC Tie-jector is equipped with a working ElectroCoupler on the rear. The Tie-jectoris powerful enough to pull one or two additional cars around your layout if you desire.We recommend adding a Tie Work Car (sold separately in paint schemes to match each ofthe TMCC Tie-jectors.) This car is equipped with a wired plug and electrical pick ups on thetrucks. Using this car will give your Tie-jector more electrical contacts with the rails for morereliable operation over dirty track, switch frogs and gaps.To attach the Tie Work Car, plug in the wire connector to the plug on the back of the Tiejector. Couple the cars normally.Note! When firing the ElectroCoupler, the wired tether will remain attached. This can beremoved manually by grasping the plug at the connector. Do not pull on thewires themselves.Wire ConnectorTie-jectorFigure 3. Attaching the work car9Tie Work Car
Maintaining and Servicing your Tie-jectorWith proper care and maintenance, your Tie-jector should provide years of enjoyment.Servicing the LED headlightYour tie-jector's headlight is illuminated by an LED. The LED is expected to last for thelife of the tie-jector and is not user serviceable. Contact Lionel Service if your LED needsreplacing.Replacing the traction tireYour Tie-jector is equipped with a single traction tire (Lionel part no. 6208815206) to increasethe tractive effort of your tie-jector.During the course of normal operations, the traction tire may become worn out. Removethe worn tire, then slip the replacement around the wheel.10
Maintaining and Servicing your Tie-jectorLubricating your Tie-jectorHelp your Lionel Tie-jector lead a long and productive life on your railroad by maintaining it properly. To keep your tie-jector lubricated, we recommend that you purchase a Lionel Lubricationand Maintenance Kit (6-62927), available from your authorized Lionel dealer.When you find that the lubrication points illustrated in Figure 4 appear dry, lubricate yourTie-jector after you have removed any accumulated dirt and dust. There are two basic rules tokeep in mind when you are lubricating your Tie-jector: use only a small amount of lubricationand avoid getting grease or oil on your Tie-jector’s wheels, roller pick-ups, or the track.FRONTGrease SparinglyOil SparinglyOil SparinglyREARFigure 4. Lubricating your Tie-jector11
Lionel Limited Warranty Policy & Serviceproduct, including all mechanical and electrical components, moving parts, motors and structural components, with the exception of LIGHT BULBS,ToriginalhisLED’sLionel& TRACTION TIRES are warranted to the original owner-purchaser for a period of one year from the original date of purchase againstdefects in materials or workmanship when purchased through a Lionel Authorized Retailer*.This warranty does NOT cover the following: Normal wear and tear Light bulbs or LED’s Defects appearing in the course of commercial use Damage resulting from abuse/misuse of the productTransfer of this product by the original owner-purchaser to another person voids this warranty in its entirety. Modification of this product in any way; visually,mechanically or electronically, voids the warranty in its entirety.Any warranted product which is defective in original materials or workmanship and is delivered by the original owner-purchaser (this warranty is nontransferrable) to Lionel LLC or any Lionel Authorized Service Station MUST be accompanied by the original receipt for purchase (or copy) from an AuthorizedLionel Retailer*, will at the discretion of Lionel LLC, be repaired or replaced, without charge for parts or labor. In the event the defective product cannot be repaired,and a suitable replacement is not available, Lionel will offer to replace the product with a comparable model (determined by Lionel LLC), if available. In theevent a comparable model is not available the customer will be refunded the original purchase price (requires proof of purchase from the Authorized LionelRetailer* it was originally purchased). Any products on which warranty service is sought must be sent freight or postage prepaid (Lionel will refuse any package whenpostage is due). Transportation and shipping charges are not covered as part of this warranty.NOTE: Products that require service that do not have a receipt from an LIONEL AUTHORIZED RETAILER* will be required to pay forall parts required to repair the product (labor will not incur a charge) providing the product is not older than 3 years from date ofmanufacture and is within 1 year from date of purchase. A copy of the original sales receipt is required.In no event shall Lionel LLC be held liable for incidental or consequential damages.not allow the exclusion or limitation of incidental or consequential damages, so the above exclusion may not apply to you. This warranty gives youSomespecificstateslegaldorightsand you may have other rights which vary from state to state.Instructions for Obtaining Servicef service for this Lionel LLC product is required; bring the item, along with your DATED sales receipt and completed warranty information (at the bottom of thisIwww.lionel.com.page) to the nearest Lionel Authorized Service Station. Your nearest Lionel Service Station can be found by calling 1-800-4-LIONEL or by accessing the website atIf you prefer to send your Lionel product directly to Lionel, for repair you must FIRST call 586-949-4100 extension 2 or write to Lionel Customer Service, 6000 VictoryLane, Concord, NC 28027. Please have the 6-digit Lionel product number, the date of original purchase, the dealer where the item was purchased and what seems to bethe problem. You will receive a return authorization (RA) number to ensure your merchandise will be properly tracked and handled upon receipt at Lionel LLC.Once you have your Return Authorization (RA) number, make sure the item is packed in its original Styrofoam inner container which is placed inside the originalouter display box (this will help prevent damage during shipping and handling). This shipment MUST be prepaid and we recommend that it be insured with thecarrier of your choice.Please make sure you have followed all of the above instructions carefully before returning any merchandise for service. You may choose to have your product repairedby one of Lionel LLC’s Authorized Service Stations after its warranty has expired. A reasonable service fee should be expected once the product warranty has expired.Warranty Informationcomplete the information below and keep it, along with your DATED ORIGINAL SALES RECEIPT. You MUST present this form AND your DATEDPleaseSALES RECEIPT when requesting warranty service.*A complete listing of Lionel Authorized retailers can be found by calling 1-800-4-LIONEL or by visiting our website at www.lionel.com.Products that are more than 3 years old, from date of manufacture, are not applicable for warranty coverage, even if they have never been sold prior to this date. (Underno circumstance shall any components or labor be provided free of charge.)NameAddressPlace of PurchaseDate of PurchaseProduct Number12 2015 LIONEL L.L.C.6301 Performance Dr., CONCORD, NC 28027UNITED STATES OF AMERICAPRINTED IN CHINA
1. Slide the program run switch on your Tie-jector to the PGM position. See Figure 2. 2. Place the Tie-jector on the track. 3. Connect the Command Base and plug it in. 4. Power up the track. 5. Press ENG on the CAB-1, CAB-1L, or CAB-2 remote. The Tie-jector will accept an ACC or ENG address! Must be set to TMCC or Cab-1 mode