Transcription
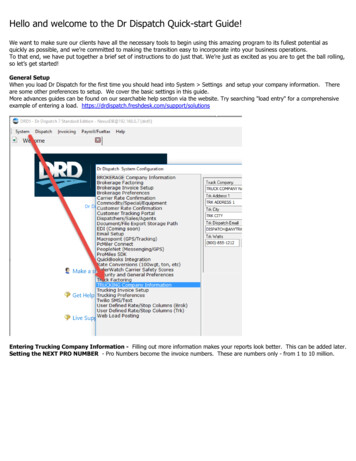
Hello and welcome to the Dr Dispatch Quick-start Guide!We want to make sure our clients have all the necessary tools to begin using this amazing program to its fullest potential asquickly as possible, and we’re committed to making the transition easy to incorporate into your business operations.To that end, we have put together a brief set of instructions to do just that. We’re just as excited as you are to get the ball rolling,so let’s get started!General SetupWhen you load Dr Dispatch for the first time you should head into System Settings and setup your company information. Thereare some other preferences to setup. We cover the basic settings in this guide.More advances guides can be found on our searchable help section via the website. Try searching "load entry" for a comprehensiveexample of entering a load. Entering Trucking Company Information - Filling out more information makes your reports look better. This can be added later.Setting the NEXT PRO NUMBER - Pro Numbers become the invoice numbers. These are numbers only - from 1 to 10 million.
NOTE: Always have a large GAP in number between trucking & brokerage. For instance, start brokerage at 5000 and trucking at75000. This makes it simple to identify which side a Pro # belongs to at a glance.IMPORTANT: QUICKBOOKS USERS! The Pro Numbers in DRD are the INVOICE numbers. These need to START ABOVE whatevernumbers you have been using in QB. Otherwise the DRD invoice numbers will catch up and QB will not ALLOW duplicate pronumbers!!Recommended Trucking Preferences - On the left list of options, If you move two options down from the company informationoptions you will find the Trucking Preferences.The screen shot shows our most common and recommended options to start out. We recommend limiting what you turn on and turnoff until a need arises.
An advance list of all options is found here: /articles/184397-trucking-preferencesDr Dispatch Screen Navigation - Getting around Dr Dispatch is easy. Dr Dispatch has a tabbed interface that identifies each partof the dispatch area.Looking for more advanced information? These clickable links will open to the correct area on our website.
To add a customer to the system, follow these instructions below: Adding a Customer in Trucking DispatchTo add a load to the Trucking system, follow the instructions below: Trucking Load EntryTrucking Load Entry To add a load to the Trucking system, follow the instructions below:1. Open Dr Dispatch and go to the Trucking system.2. Go to the Dispatch tab at the bottom of the screen.Once you have the PRO #'s set to start where you want. go to 'Truck Dispatch'- make sure you are on the 'Dispatch' tab.* Please reference Changing Pro Number Sequence for how to set your Pro #.1) Press the 'New' button in the upper left corner.
2) TAB through the fields using the TAB key(above caps lock). if you do not know a piece of info, leave it blank and come back to fillin when you get it.Tip: Tabbing through fields is a very quick way to enter in new loads.3) First you must select a customer. If you do not see your choice in the drop down list, then you can select ' NEW CUSTOMER '.This will open a form to ADD a NEW CUSTOMER. **Fill out ALL the fields on the new customer so you have an address to sendinvoice etc.** You can also go to the CUSTOMER tab and enter directly there if you wish, then come back & select the new customer.4) After you select/add a customer tab on through the 'Special', 'Commodity' and 'Equipment' fields(setup info here). these fields areNOT required.5) The 'REF #' field is important to most. this will print on the INVOICE and should be whatever unique number your customer wantsto see on invoice to get you paid faster.6) A field to tab each load with a dispatcher, to track revenue, sort loadboard for just THEIR loads etc. (setup info here).7) We provide a huge area to make any notes/comments you feel needed through life of the load. (Unlimited size.) Notes will onlyprint on loadsheet (internal copy).
8) Now we tab to the STOPS at bottom of load entry. You can have one pick & one drop or you can have many of each. When youpress NEW you always get a P(ick) and D(rop).9) Shippers and receivers can ALSO be added-on-the-fly, the same as customers. Simply select NEW SHIPPER or NEWRECEIVER to add a new facility on the fly. Again, you can also stop- goto appropriate TAB and enter there- come back and selector change later.10) Tab on through to the pick date, fill in DATES! They must be there for many reasons!! After the DATE field, if you wish to SKIPlast column- press END key, then tab on down to the DROP. tab through it same as shipper, you can add a new receiver if needed aswell.11) Once you tab through the last drop, DRD will ask you if you need another stop. When done and you answer NO, the CUSTOMERBILLING RATE screen opens. This is where you fill out the rate you will be billing the CUSTOMER. You can come back and changeANY PART, at ANY TIME! Fill in what you need, then when you press OK, it will add it all up and save it! This is the rating that printson the invoice. ( You can also access the rate screen by clicking the 3 dots next to the rate )
Once you press OK to save the rate, you have basically completed the load. You can go back and CHANGE or ADD any info, at anytime.The load will have a STATUS of 'Available' if NO trk was assigned. If a unit was ASSIGNED, notice the status - 'Assigned'.The status has to be changed to "DISPATCHED" by a human, a CHECK CALL will be entered AUTOMATICALLY when DISPATCHED.This way, if you do NOTHING more we have a times stamp on that load, as to WHEN it was dispatched. (press TRACKING toview/add checkcall)*All loads can be monitored via the 'LoadBoard' from here.***If you have a CUSTOMER, A RATE greater then ZERO and a UNIT assigned, that load will SHOW IN TRK INVOICING to bebilled at any time. what could be easier!!Dr Dispatch Driver Payroll - There are 2 ways to calculate driver payrollDr Dispatch has always had a driver payroll option, but the orginal method was to empty the load and have that fire off the payrollrecord. Sometimes companies want to get an idea of what the payroll will be before the load is emptied. You can do that byenabling the "Use Driver Profit Field" option. With this you still must keep the "Calc Drv Payroll When Empty" option, however nowyou can can start creating them as needed.There are also those companies that just want to dispatch and don’t care about Driver Payroll. We recommend turning off bothoptions if this is the scenario that fits your scenario best.
Drivers must be setup with the proper type and pay rate. Drivers can be setup to be paid by Percent, Mileage, Flat, Weight, Hourly,or Template ( Advanced Percent Scenarios )Select the driver you want to set the rate for and then use the lower half of the screen to make your changes.The Driver Profit Field takes the payroll method that you have established on the driver profile and creates the payroll at that timebased on the information available.
If you want to update the payroll information and record created, you will need to clear out payroll and start over.After Payroll has been created, you can use the Dr Dispatch payroll application to process the Driver's settlement.Opening Driver Payroll: There are two ways to open Driver payroll1. On the Welcome Tab select Driver Payroll in the Trucking section. ( pictured below )2. In the menu at the top Select "Payroll/Fueltax" Select Driver Payroll.The driver payroll applicatino will launch. Select a driver to work on. His loads will show up at hte bottom half. Select the loads thatyou want to process payroll on, and then click on "Calculate Payroll"If everything looks correct in the Red Totals ( Middle section ) then you can proceed to Print and Process the payroll Settlement.
The final results will be a settlement sheet that details all of the payroll that you have selected to process for this period.This confirmation comes after the preview screen is closed.
*** After printing, you MUST must say yes to finish processing payroll in order to complete the entire process.Advanced Topics for Driver Payroll can be found in our searchable help website. Follow the clickable links below.Video Guide to Driver Payroll - Driver Payroll BasicsMake changes to driver payroll after processing the payroll record(s) -Reversing Driver PayrollDriver Payroll Expenses - Adding Expenses To Driver PayrollDriver Payroll Advances - Adding Advances To Driver PayrollReoccurring driver payroll deductions Reoccurring Driver DeductionsYear end 1099 Driver Info - Getting 1099 amounts for end of yearExporting 1099 Driver to Quickbooks 1099 Driver PayThis concludes our getting started guide. For more comprehensive guides, please visit1. Dr Dispatch Searchable help section - https://drdispatch.freshdesk.com/support/home2. Youtube Tutorial videos ( hosted on Youtube ) - https://www.youtube.com/playlist?list PLBC7D5A9732EBAC08Dr Dispatch provides Application troubleshooting and support - Monday thru Friday between 8AM - 5PM - as well as scheduled trainingsessions On Mondays.Find out more by emailing support@drdispatch.com or calling 800-879-7443 ( ext 2 )
1. Open Dr Dispatch and go to the Trucking system. 2. Go to the Dispatch tab at the bottom of the screen. Once you have the PRO #'s set to start where you want. go to 'Truck Dispatch'- make sure you are on the 'Dispatch' tab. * Please reference Changing Pro Number Sequence for how to set your Pro #. 1) Press the 'New' button in the upper left .


![Welcome [rdept.cgaux ]](/img/29/2022-20telecommsworkshop.jpg)
