Transcription
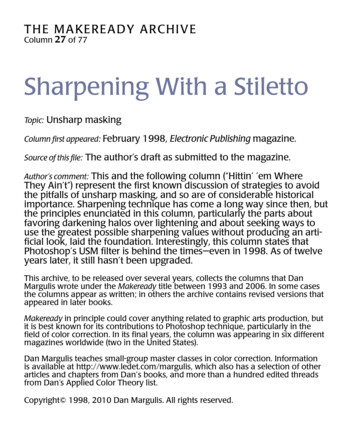
THE MAKE R E A D Y A R C H I V EColumn 27 of 77Sharpening With a StilettoTopic: Unsharp maskingColumn first appeared: February 1998, Electronic Publishing magazine.Source of this file: The author’s draft as submitted to the magazine.Author’s comment: This and the following column (“Hittin’ ’em WhereThey Ain’t”) represent the first known discussion of strategies to avoidthe pitfalls of unsharp masking, and so are of considerable historicalimportance. Sharpening technique has come a long way since then, butthe principles enunciated in this column, particularly the parts aboutfavoring darkening halos over lightening and about seeking ways touse the greatest possible sharpening values without producing an artificial look, laid the foundation. Interestingly, this column states thatPhotoshop’s USM filter is behind the times—even in 1998. As of twelveyears later, it still hasn’t been upgraded.This archive, to be released over several years, collects the columns that DanMargulis wrote under the Makeready title between 1993 and 2006. In some casesthe columns appear as written; in others the archive contains revised versions thatappeared in later books.Makeready in principle could cover anything related to graphic arts production, butit is best known for its contributions to Photoshop technique, particularly in thefield of color correction. In its final years, the column was appearing in six differentmagazines worldwide (two in the United States).Dan Margulis teaches small-group master classes in color correction. Informationis available at http://www.ledet.com/margulis, which also has a selection of otherarticles and chapters from Dan’s books, and more than a hundred edited threadsfrom Dan’s Applied Color Theory list.Copyright 1998, 2010 Dan Margulis. All rights reserved.
MAKEREADYSharpening With a StilettoHow much unsharp masking should you use? As much as you canget away with. Those who are accurate can get away with more.By Dan MargulisYou enter the boss’s office under thatmost tense of circumstances: youare about to ask for a raise. It is possiblethat negotiations will ensue, so you haveto be prepared with a number. Howmuch more money should you ask for?The stakes are all too clear. Ask fortoo little, and you may get it; ask fortoo much, and you may get nothing.It is also clear that the amount youcan get away with asking for is notfixed, but varies sharply depending onyour technique. People who, duringthe meeting, tell the boss what a kind,sweet individual he is and what a joy towork with, as a rule can ask for morethan those who imply that, were it notfor their own contribution, the boss’sboss would realize what an incompetent dolt he is.And it is also clear that it dependson the character of the boss. Shouldyou mention that another companymay make you an offer at a highersalary? Some bosses respond well tothis type of thing. Others, like myself,are of the crabby variety, and are apt tosuggest that, should you decide tochange jobs, you not allow the door tohit you in the backside on the way out.The fact remains, you should askfor as much as you can think you canUnsharp masking in action. When properly applied, it can make images muchmore lifelike, but when overdone,watch out. Left, the raw scan, right, asharpened version.get away with under the circumstances, but the circumstances arevery much under your control, provided you exercise shrewd judgment.This is exactly analogous to unsharpmasking, the topic I will be discussingin this column and my next.How USM fools the eyeUnsharp masking is an artificialmethod of making images appearmore in focus. It is useful in virtuallyall graphic scenarios, except where weare expecting someone else to rescanour work later, as when we are outputting color film from a high-resolution recorder. Whether we are preparing for a photographic print, alarge-format output device, a colorlaser or other digital proofer, aJPEGged file for Web use, or any typeof print work, accurate USM is a bigdeal, and the larger an image will print,also, the bigger a deal it is.Unfortunately, accurate USM is areal art. The settings used for one purpose, such as a desktop printer, wouldnot necessarily be applicable to, say, anad in a newspaper.Before discussing how USM works,let’s point out that it does work. Theonly difference between the two carimages below is the USM, but it’s a dramatic difference, and I remind youthat these are small images. The problem with most treatises on USM isthat, because of space limitations, theyUSM works through the judicious use oflight and dark halos in transition areas,shown in magnified versions of the carimages below.show postage-stamp size examples,and to really appreciate the propertechnique, we need to see its results ata fairly good size. (Please realize alsothat in this article I am sharpeningthroughout with a very heavy hand, inan effort to prove my points.)At top right, the process is put under a microscope. Where car hitsbackground, one would expect thesame nice, crisp line of demarcationbetween red and green we might perceive in real life. Instead, in the rawscan, top, we get several pixels that areneither fish nor fowl: dark, colorlessblurs caused by the real-life line oftransition being narrower than thescanner can resolve, possibly eventhan the film of the original photograph can resolve.The technical workings of unsharpmasking are not as important as theresult, which is an exaggeration oftransitions, such as where the car hitsthe background. USM, as the secondexample shows, puts the suggestion,the hint, of a black border, or halo, onthe exterior of the car. Furthermore, asecond, lighter halo appears aroundthe first. If done subtly enough, theviewer won’t notice these halos whenthe job is printed at the proper size.That this particular scam is highly
MAKEREADYThe four deadly USM sinsAs with asking the boss for a raise, theobjective is to do as much of it as possible without being so obnoxious as tobe counterproductive. USM is artificial, and if we overdo it, the image willlook artificial as well. Fortunately, if wepinpoint, and avoid sharpening, thethings that may look artificial, we canget away with more USM overall, muchto our advantage.The four problems that may limithow much USM we can apply appearin magnified form on the oppositepage. From top to bottom, they are:1) Color shift. The idea of USM isto make the image look more focused.The idea is not to change color. Butthat is just what is happening in thefirst example: note the brilliant, butfeatureless, reds breaking away fromthe more orange body of the car.2) Unreasonably wide haloes.USM only is believable when the characteristic haloing isn’t obvious to thenaked eye. Here, it would be.3) Intensification of an unwanteddetail. USM makes the picture lookmore focused, which is fine unless thethings that are being focused are notthings we want to see. Here, the plasticcar has some scratches in its roof. Although this is real detail and not merenoise, I cannot imagine why a clientwould want us to emphasize it.4) Exaggeration of grain or noise.Random pixels in the background arebeing made more prominent. If we allow the image to print this way, thebackground will look strangely grainy.All these problems can be finessed,provided we are willing to treat USMas a stiletto, not a shotgun. There is alot of flexibility in how to apply it, although every program has differentstrengths and weaknesses. Photoshopcan do everything we need, but sometimes requires kludgy two- or threestep operations. But before discussingspecific Photoshop settings, let’s attack the four sins in a conceptual way.Desiring to have Christ’s upper handstand out more from the cross, ElGreco (1540-1614) resorted to adouble-haloing maneuver indistinguishable from today’s unsharpmasking practices.EPeffective at hornswoggling people intobelieving they are seeing stronger transitions, and thus better focus, is not abig secret. Artists have been doing itfor centuries. El Greco didn’t usePhotoshop, but as you can see below,he knew all about unsharp masking.ELECTRONICPUBLISHINGTaking aim at the problemsThe brilliant reds of our first examplehappened because applying USM to anentire file actually applies it to eachchannel individually, as though eachwere a black and white image.(You should already be thinking: isthat really the best way of doingthings? Because we can certainly applythe filter to some channels and notothers, or apply it in a different colorspace altogether.)Recall that USM places a dark haloat the edge of the darker of two objects, and a light one at the edge of thelighter. This explains the color-shiftproblem: in the magenta channel, thecar is darker than the background, butin the cyan, the background is darkerthan the car. So, at the transition, USMdarkens the magenta but lightens thecyan. This is a recipe for bright reds.A partial solution, as hinted above,is to sharpen the weaker channel only.But for an image as soft as this one,the real answer is to eliminate channel-by-channel sharpening totally, infavor of an approach that only considers the lightness and darkness of theimage as a whole, not its color.This technique, luminosity-basedsharpening, is better than the defaultsof Photoshop and most other programs, though some, like Agfa’s ColorExact, are clever enough to always doit this way. The second example atright, for all its other problems, is a luminosity sharpen, and has none of thecolor shift of the top version.If you wish to sharpen by luminosity, and you should, there are two waysof doing so in Photoshop without getting into Layersville. Easiest is if thedocument is in the LAB colorspacerather than RGB or CMYK. Guess whatthe L in LAB stands for! Sharpeningthe L channel only is very powerful.If you are in RGB or CMYK, an undocumented Photoshop 4 feature allows the same thing, albeit in twosteps. After applying USM, choose Filter Fade, the main function of which,as the name suggests, is to reduce theimpact of the last filter applied,namely USM. But it also allows us toOctober 1997
MAKEREADYOctober 1997here? Even if the image can be sharpened overall, the weak channel canusually be sharpened more. Not sharpening the magenta would have virtually eliminated the problems in thefirst and third images, and gone a longway toward eliminating the grain inthe fourth. Meanwhile, reducing thelightening while holding the darkening aspect of USM constant wouldhave substantially improved all four ofour problems.To this point, all of our maneuverscould have been done with Photoshop’s kid stuff, the filters Sharpen,Sharpen More, and Sharpen Edges. Isuggest you discard these popguns infavor of the vastly greater control ofthe Unsharp Masking filter.So far I have discussed general concepts only, not specific USM settings.I’ll get to an extended review of thatin the next column, though it has tobe introduced here to deal with theproblem of excessive grain shown inour fourth image. But first, anothervariation on the weak-color theme.In sharpening, the key is the KSharpening the weak channel is so effective that it can become advantageous to work in CMYK, which oftenhas two weak channels, if you countthe black.Consider the bottle image on thenext page. The noise in the first sharpening attempt is worse even than inthe fourth version of the car image.One way to sidestep this problem isto sharpen a channel that has no noisein it, such as the black. This happensvery frequently, especially if we havegenerated the black plate using LightGCR or its equivalent. One should always take a look at the black plate tosee if it can be sharpened—even if onehas already applied sharpening to theimage as a whole.And one should always look at theweak CMY color as well, if there is one.Here, the image being so greenish, theweak color is magenta. Because thebackground magenta is so light (andthe background black nonexistent)these two plates will have much lessEPchange the application method of thefilter, such as to use it only to lightenor darken the original—or to act on luminosity. So, if we set the fade to 100%intensity, but the method to luminosity, we wipe out the color shift.The second sharpening sin that willdetour us from our goal of using asmuch USM as possible is the exaggerated haloing shown in the second example. Or rather, it is one of the halos.This points up an irritating Photoshopweakness.USM’s double haloing schemecauses a problem when, as here, one ofthe objects to be sharpened is relatively dark and the other is medium.The difficulty is, the car can absorb apronounced dark halo fairly well, butthe light halo at the edge of the background becomes painfully obvious.You can try fading the filter asabove using Darker mode, which willwipe out the white halo altogether, butif you are not inclined to waste time,let me tell you in advance that the image will look ridiculous if you try. No,we need to tone down the white halo,not blow it away.The ability to control white anddark sharpening independently is anassumed feature of any drum scanneror high-end retouching workstation.But it slipped through the cracks inPhotoshop, so to achieve it involvesanother kludge, which I will demonstrate at the end of this column.Reduction of white-line sharpeningwould also help deal with thescratches in the top of the car. Eventhough those scratches are real detailand not noise, we certainly don’t wantto emphasize them, as is done in thethird example.The better way, though, is simply toavoid sharpening the darkest channel,which here is green in RGB or magentain CMYK. That is where the scratchesare best defined, because the background of the car will be dark, but thescratches light. By comparison, thelightest channel—red in RGB or cyanin CMYK—will have very little difference between car color and scratch.Are you beginning to see a patternELECTRONICPUBLISHINGThe four deadly sharpening sins, topto bottom: an overall color shift;haloes that are too pronounced;enhancement of an unwanted detail(the scratches in the roof of the car);and exaggeration of simple noise(the background). Below, an undocumented Photoshop 4 feature, thevery desirable ability to sharpen byluminosity even when in CMYK.detail, and hence much less noise,than the dominant cyan and yellow.In addition to our God-given abilityto apply sharpening to specific channels and not others, an acceptableUSM implementation needs to give usfour things: Control over how strong the sharpening effect is, in other words, howdark and light the halos get. Control of how wide the halos are. Some means of suppressing noise. Independent control of lighteningand darkening.Every application has its own wayX
MAKEREADYof doing these things. Two things thatall seem to have in common are a dialog box incomprehensible to the typical user, and a failure to documenthow it works and for what types of images each option might be useful.They nevertheless have to be deciphered, and they can be, if one keepsin mind the purposes described above.Start with the obvious, the need tocontrol the strength of the sharpen. Inthe examples shown here, Photoshopuses the word Amount and VisuaLabIntensity. Both clear enough, except forPhotoshop’s insistence on using a percent sign, which seems designedspecifically to bluff people into neverusing a number higher than 100, when500 is the actual maximum. Anyway,with both applications, the larger thenumber, the stronger the sharpen.I doubt that most people would understand Radius or Size to refer to thewidth of the sharpening halos, butthat’s what they do. Again, the largerthe number, the wider the halos.Photoshop’s flexibility with this is topsThe sharpening menus ofPhotoshop, above, andVisuaLab, left.in the industry; note the paucity ofchoices in VisuaLab.Stopping USM from enhancingnoise as well as detail depends on allowing it to ignore small variationsand concentrate on big-ticket items.The higher the value in Threshold orStarting Point, the less likely the filteris to exaggerate noise—but it isn’t always possible to get this right. In theimage of the red car, setting a highThreshold indeed will kill the noise inthe background without harming thecar, but the detail in the bottle image isno more pronounced than the speckling in the background. Certain sharpening applications can solve this, butVisuaLab and Photoshop can’t: tosharpen the bottles correctly, you needto go channel by channel.As for independent control of lightening and darkening, VisuaLab has itand Photoshop should, but doesn’t.That doesn’t stop a determined sharpener, as we will now see.John of Cologne’s masterpiece, thespires of the great cathedral at Burgos,present a real sharpening challenge.The blurry original (we’re in CMYKhere) is in desperate need of our help.In Photoshop, the first step is tomake a copy of the file, and sharpenthat. These numbers seem frighteningly high to the uninitiated, but in animage like this, one can argue thatthey are justifiable—if we are careful.Applying these settings results inthe second version, which has a colorshift: brilliant blues and yellows at thebuilding edges That is fixed in thethird version by using Filter Fade Luminosity, but the cathedral still lookslike it’s falling apart because of the excessive whitening.We now return to our saved original, and put this third version on topof it, with Image Apply Image. But wechoose Darken as the method, resulting in version four: no white sharpening at all.When background noise is heavy, and detail light, a high USM threshold can’talways separate one from the other. In such a case, sharpen the weak colors—here, black and magenta. Top left, the original cyan plate has noise in the background, but the black has none. Bottom, left to right: the original; a careless allchannel sharpen, and a version with USM applied only to black and magenta.
Heavy sharpening is possible provided it is done stiletto- and not shotgun-style. Above, a five-step sharpen; enlarged fordetail below. From left: the raw image; heavily sharpened in CMYK; the sharpening reverted to luminosity; the thirdversion applied to the first in Darken mode; the third version applied to the fourth in Lighten mode, but at 50% opacity.Some sharply focused tipsAs we have finished most of the workhere, it’s time to apply a little USM tothis column, to make its points a littlecrisper and more sharply focused. Before doing anything, look ateach channel to see which have the detail you wish to sharpen, and alsowhich have the noise that you don’t. If you decide to sharpen the document as a whole rather than one ortwo channels, sharpen by luminosity. Think twice about about sharpening either the blue (RGB) or yellowOctober 1997(CMYK) channel. These don’t havemuch impact on overall contrast, yethave the most noise and are thus themost dangerous. But always think about sharpeningthe black, and the weak channel (ifthere is one), or at least sharpeningthem more than the others. This applies even if you’ve already sharpenedthe entire image. Sharpen after tone adjustment, ifconvenient. Applying a major adjustment to an image after USM can exaggerate the artifacts of sharpening.Master the Threshold setting. If youare having trouble, set your USMAmount all the way up to 500% whilepreviewing the image. This will makeit obvious on screen whether yourthreshold is suppressing the noise.Once you have found the properThreshold, you can adjust Amount tosomething more reasonable.EPFinally, we apply version three toversion four, using Lighten as themethod, but this time we set Opacityto only 50%. This preserves the darkareas of version four, and creates somewhite sharpening, but only half asmuch as the oversharpened versionthree.ELECTRONICPUBLISHING Be playful, especially if the image isa large one. There are few set rules. Ina large image, a little time set aside forexperimentation with ever-higherUSM settings can have a big payoff. Be conservative. If eventually youdecide to sharpen a little more, it won’tbe the end of the world. But if after aseries of corrections you discover thatthe image is oversharpened, you maywish to turn your stiletto on yourself—oversharpening is hard to fix. Be greedy. Remember the strategyof asking for a raise. There’s no fixedlimit. The best amount of sharpeningis, the largest amount you can getaway with.Dan Margulis can be reached in English orSpanish at 76270.1033@compuserve.com.For information on Dan’s color-correctiontutorials in Atlanta and Chicago, contactMichelle Anderson of PrimeSource at1-770-279-8900.X
Recall that USM places a dark halo at the edge of the darker of two ob-jects, and a light one at the edge of the lighter. This explains the color-shift problem: in the magenta channel, the car is darker than the background, but in the cyan, the background is darker than the car. So, at the transition, USM darkens the magenta but lightens the cyan.