Transcription
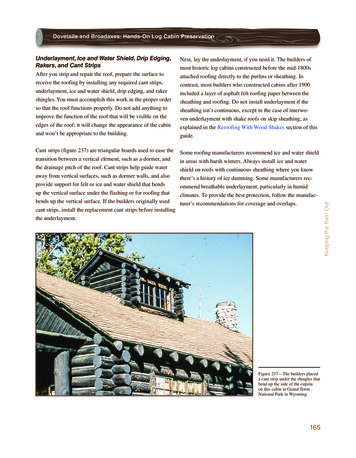
Underlayment, Ice and Water Shield, Drip Edging,Rakers, and Cant StripsAfter you strip and repair the roof, prepare the surface toreceive the roofing by installing any required cant strips,underlayment, ice and water shield, drip edging, and rakershingles. You must accomplish this work in the proper orderso that the roof functions properly. Do not add anything toimprove the function of the roof that will be visible on theedges of the roof; it will change the appearance of the cabinand won’t be appropriate to the building.Next, lay the underlayment, if you need it. The builders ofmost historic log cabins constructed before the mid-1800sattached roofing directly to the purlins or sheathing. Incontrast, most builders who constructed cabins after 1900included a layer of asphalt felt roofing paper between thesheathing and roofing. Do not install underlayment if thesheathing isn’t continuous, except in the case of interwoven underlayment with shake roofs on skip sheathing, asexplained in the Reroofing With Wood Shakes section of thisguide.Cant strips (figure 237) are triangular boards used to ease thetransition between a vertical element, such as a dormer, andthe drainage pitch of the roof. Cant strips help guide wateraway from vertical surfaces, such as dormer walls, and alsoprovide support for felt or ice and water shield that bendsup the vertical surface under the flashing or for roofing thatbends up the vertical surface. If the builders originally usedcant strips, install the replacement cant strips before installingthe underlayment.Some roofing manufacturers recommend ice and water shieldin areas with harsh winters. Always install ice and watershield on roofs with continuous sheathing where you knowthere’s a history of ice damming. Some manufacturers recommend breathable underlayment, particularly in humidclimates. To provide the best protection, follow the manufacturer’s recommendations for coverage and overlaps.Figure 237—The builders placeda cant strip under the shingles thatbend up the side of the cupolaon this cabin in Grand TetonNational Park in Wyoming.165Keeping the Rain OutDovetails and Broadaxes: Hands-On Log Cabin Preservation
Keeping the Rain OutDovetails and Broadaxes: Hands-On Log Cabin PreservationGenerally, replicating the original construction is the bestpractice, but you must sometimes upgrade to protect thecabin. Because underlayment isn’t visible after you apply theroofing, it is one area where you often can use modern materials. Upgrading to ice and water shield can prevent leakscaused by ice damming and provide extra insurance againstleaks in screw-down metal roofs. It also can provide a barrier that prevents bats from colonizing attics and depositingguano (figure 238). If a Federal or State government agencyowns the cabin, or if Federal or State sources provide someor all of the funding for the cabin preservation work, checkwith your heritage resource specialist or archaeologist todetermine if you must consult with or seek approval from theSHPO for the change.Some metal roofing manufacturers recommend installinga synthetic underlayment before installing any metal components. Sometimes, the building code requires additionallayers of underlayment on certain parts of the roof. In somecases when water and ice shield or synthetic underlaymentcover the entire roof, you don't need to apply asphalt roofingfelt underlayment to the roof. Following the manufacturer’sinstructions, especially with metal roofing, is extremelyimportant. Consult an engineer with experience in designingroofs to ensure that the underlayment won’t create condensation or other problems for the cabin, and to also ensure thatyou receive the right solution to the problem you are tryingto solve. For a leak-free roof, read and carefully follow themanufacturer’s directions and the engineer’s design.For ice-dam protection, ensure that the ice and water shieldextends from the eave edge completely across the overhangand at least 2 feet up the roof from the outside edge of thecabin walls. Also, apply ice and water shield at all valleys,extending the full length of the valley for about 2 feet fromeach side of the valley bottom.Most roofing extends beyond the edges of the roof sheathing to allow water to drain off the roofing without soakingthe sheathing and fascia (if any). Many 20th-century cabinroofs also had drip edging to help protect the sheathing andfascia. Companies manufactured historic drip edging usinggalvanized steel. When you’re replacing historic drip edging,Figure 238—Preservationcrewmembers covered the entireroof surface of the Office/Cookhouse building at the MooseCreek Wilderness Station (NezPerce National Forest, NorthernRegion) with ice and water shieldbefore reshingling it. The crewcompleted the reroofing betweenSeptember and May while thematernal colony of more than 500Yuma Myotis bats that inhabitedthe cabin’s attic was at its winterlocation in another part of theState. The ice and water shieldnot only protects the cabin fromroof leaks, it also keeps the batsout. Bat guano presented a significant hazard in the attic formany years. The district provideda large bat box nearby for thecolony’s use.166
Dovetails and Broadaxes: Hands-On Log Cabin PreservationIf you need to install asphalt roofing felt underlayment, doso after cant strips, water and ice shield, and eave drip edging are in place. Follow the accepted practice of laying 15- or30-pound roofing felt over the entire roof. Apply the roofing felt in rows, starting at the eaves and lapping each row atleast 4 inches over the row below it. Attach the underlaymentusing roofing nails or staples no more than 6 inches apart in aline about 1 inch below the top of each row.as explained in the Reroofing Using Wood Shakes sectionof this guide. It may be appropriate for you to duplicate thishistoric technique using shakes, but do not use the interwoven roofing felt technique with shingles or if the buildinghas continuous sheathing; the interwoven felt will trap wateragainst the wood and lead to moisture damage.Some shingle or shake roofs have raker shingles along thegable edges and along dormer walls. Raker shingles raisethe finished roof elevation enough to guide water back overthe main part of the roof instead of allowing it to run off thegable edge or down the joint where the dormer wall meetsthe roof. Lay raker shingles perpendicular to normal shingles,with the butts along the gable edge (figure 239) or adjacent tothe dormer wall. Lay the raker shingles on top of the roofingfelt or ice and water shield (if any) before installing the restof the roofing. As you install each course of roofing, overlaythe raker shingles with the finish roofing.If the builders used skip sheathing on your cabin, they mayhave interwoven roofing felt with each layer of wood shakes,Figure 239—The roofer at thetop of the photo is laying rakershingles. The other roofer islaying the starter course. Beforelaying any shingles, the crewcovered the entire roof with iceand water shield underlayment.167Keeping the Rain Outdo not use the standard preformed white drip edging commonly available today. Replace the drip edging in kind, butbe sure to use at least 20-ounce (copper) or 26 gauge (galvanized steel) flashing for durability. Lighter flashing may deteriorate faster than the shingles. If you use drip edging, installthe eave drip edging before the underlayment, but install thegable (sloping edge of the roof) drip edging after placing theunderlayment.
Dovetails and Broadaxes: Hands-On Log Cabin PreservationFlashingIf you replace roofing on a building that has a flue, chimney,vent pipe, dormer, or valley, you probably will need to addor replace flashing during the reroofing process. Flashingprotects the building against leaks around roof penetrations,at the joints between different materials, or where differentslopes meet.Keeping the Rain OutThe most important thing to consider when installing flashing is the path that water will take as it runs down the roof.Remember that water flows into any nooks and crannies andthat sealant materials eventually fail, but overlaps last nearlyforever. Likewise, the amount of overlap is important becausewind can drive rain uphill into small gaps.Use many overlapping pieces to construct flashing that protects gaps around large roof penetrations, such as chimneysand the joints between dormer walls and roofs. You must usemany pieces of the flashing because materials such as brick,metal, and wood expand and contract at different rates whenthe temperature changes and because wind or snow loadstend to move different parts of any structure somewhat independently. The multiple flashing pieces slide past each otherever so slightly to accommodate the different movementswithout opening gaps that would allow water to penetrate. Ifyou use shortcuts instead of installing flashing properly, youwill pay the price in leaks.Figure 240—The lead on the left is lead wool. You can use it to pack thejoints behind the mortar in a chimney and hold the flashing in place. Thelead on the right is used lead sheet flashing.When purchasing copper or lead-coated copper flashing,buy 20-gauge for a good balance of strength, durability, andFlashing can be made of sheet lead (figure 240), galvanizedworkability. For galvanized steel, 32-gauge is typical foror Galvalume steel (figure 241), copper, lead-coated copper,sheet or rolled flashing material and 26- or 28-gauge is typior aluminum. Aluminum is a modern material that usually iscal for preformed shapes. Steel and copper are both moreinappropriate for use on historic cabins. In most cases, userigid than lead, but copper is easier to form than steel. Leadthe same material as the original flashing.coated copper is stiffer than lead sheet, but easier to shapethan plain copper because the lead coating acts as a lubricant.Sheet lead used for flashing is approximately 1/16- to 1/8-inchSteel is quite rigid and you generally can only use it in flatthick. It is easy to shape into odd angles or curves becauseor folded sheets. Unlike lead and copper, steel flashing mayit is such a soft metal. Unfortunately, you can absorb leadcorrode when it contacts mortar, copper, lead, uncured wood,through your skin and it can cause serious health problems.or pressure-treated lumber. On the other hand, copper mayInformation about working safely with lead is available in thecorrode when in contact with wet cedar shingles or shakes.Forest Service Facilities Toolbox section on lead roofing andLead-coated copper combines copper’s durability with lead’sflashing http://www.fs.fed.us/eng/toolbox/haz/haz22.htm .acid rain resistance and nonstaining properties.Always use these safe-handling methods when you workwith lead and lead-coated copper.168
Dovetails and Broadaxes: Hands-On Log Cabin PreservationKeeping the Rain OutFigure 241—This roofer isinstalling galvanized steel stepflashing and valley flashingduring the reroofing of thiscomplex roof at the historicNinemile Ranger Station (LoloNational Forest, NorthernRegion).Install flashing using nails of the same or compatible materialto prevent galvanic corrosion. Do not use aluminum and steel,aluminum and copper, or copper and steel together. Stainlesssteel isn’t compatible with either galvanized or zinc-coatedsteel, so do not mix them. You can use hot-dipped galvanized,copper, or stainless steel fasteners with lead flashing. Wheninstalling flashing, use short nails with a broad head that willhold the flashing in place without going completely throughthe sheathing.Chimney FlashingThe first step for flashing a brick, stone, or cement blockchimney is to rake out all of the brick joints immediatelyabove an imaginary line 5 inches above the roof line (figure242). Raking out the joints means removing the mortar toabout a ¾-inch depth from the face of the bricks. Use a hammer and stone chisel, rock hammer, double jack, or similartools (figure 243). Be very careful. If you break any of themasonry, you will have to rebuild the chimney. Consider alsomaking any other needed repairs to the chimney while you’reat it. See the Fireplaces, Wood Stoves, Chimneys, and Fluessection of this guide.Figure 242—In preparation for reflashing, a preservation crewmemberraked out the mortar from the joints on the chimney of the house at the MainBoulder Station (Gallatin National Forest, Northern Region) built in 1905.Chimneys that extend through shake or shingle roofs needfour types of flashing (figures 244 and 245): base (sometimescalled apron flashing), step, counter (sometimes called capflashing, figure 246), and saddle (sometimes called cricketflashing). You can shorten the chimney-flashing task bymeasuring the chimney and cutting all the pieces of flashingbefore beginning installation.169
Dovetails and Broadaxes: Hands-On Log Cabin PreservationKeeping the Rain OutFigure 243—This preservationcrewmember is using a hammerand plugging chisel to rake thejoints on the chimney of a housebuilt in 1905 at the Main BoulderStation (Gallatin National Forest,Northern Region).Figure 244—This drawing showsthe base flashing, step flashing,and counter flashing aroundthe lower corner of a masonrychimney. Use the same flashingmethods at the lower corners ofdormers.170
Dovetails and Broadaxes: Hands-On Log Cabin PreservationKeeping the Rain OutFigure 245—This drawing showsthe saddle flashing, step flashing,and counter flashing at the upperside of a masonry chimney.Figure 246—This closeup viewof the chimney constructed in1905 at the Zortman GuardStation within the Bureau of LandManagement’s HiLine District inMontana shows how the builderused lead sheets to counter flashthe chimney. The builder stuffedlead wool into the masonry jointsto match the original method ofholding the counter flashing inplace. The step flashing underthe counter flashing is just barelyvisible.171
Dovetails and Broadaxes: Hands-On Log Cabin PreservationTo flash the chimney, first, cut the roofing below the chimney flush against the base of the chimney. Then, place baseflashing across the width of the downhill side of the chimney.Extend it a short distance up the chimney and down over thetop of the roofing that you cut to butt into the chimney. Foldit around the bottom corners of the chimney and tuck it upalong the sides.tightly to the masonry. Solder all the corners, being carefulto seal the pinhole opening at each corner where the base orsaddle, step, and counter flashing all come together. Be careful while soldering—you don’t want solder dripping onto theshingles, nor do you want to start a fire.Keeping the Rain OutNext, with each course of roofing, lay step flashing up alongthe sides of the chimney. Lay the lowest course of step flashing over the base flashing at the lower side of the chimney.When laying the roofing courses with the step flashing, don’tnail closer than 3 inches from the chimney. If you’re roofing with wood shingles or shakes, you may end up with nailsin the middle—instead of within 1 inch—of the edge of theshingles or shakes in your efforts to keep nails away from thechimney. This deviation is acceptable when you’re nailinginto flashing.When your roofing course work reaches the upper side ofthe chimney, lay saddle flashing across the uphill side of thechimney so that it extends up the chimney and overlays thestep flashing at the sides. Form saddle flashing into a peakat the middle to encourage drainage. Cut the roofing in thecourses crossing the saddle flashing to fit, as shown in figure245.If the uphill side of the chimney has a framed cricket, youdon't need saddle flashing. If necessary, rebuild the cricket tomatch the historic shape. Flash the joint between the chimneyand the roofing on the cricket using step and counter flashing,just like on the sides of the chimney. Flash the valley betweenthe main roof and cricket, as explained in the Valley Flashingsection of this guide.Finally, place counter flashing (figure 247) in the mortarjoints and fold it down to overlay the apron, step, and saddleflashing. To keep galvanized steel or copper counter flashingin the raked mortar joint while you work, crimp the end ofthe horizontal leg of the flashing into a “C” shape the samesize as the mortar joint or use lead wool or mortar to keepL-shaped flashing in place. Lead flashing is flexible enoughthat L-shaped flashing will stay in the joint if you press it172Figure 247—This detail drawing shows how to size and install step flashingand counter flashing on a masonry chimney.
Dovetails and Broadaxes: Hands-On Log Cabin PreservationVent FlashingBuying a premade combination vent boot or vent sleeve andflashing unit to slide over each vent stack and flue is mucheasier than hand-shaping and soldering a separate boot orsleeve and flashing sheet. Premade vent flashing is greatfor newly installed vents or to replace older premade flashing, but is not appropriate for replacing historic, individuallycrafted boots and flashing. If you use a premade flashing unit,install it so that the flat sheet runs over the lower course ofroofing and under the upper and side courses. Be sure to buyWhen you finish installing the flashing, the metal will surround the chimney (figure 248). The flashing will guide water a unit with a large flashing sheet so that the flashing extendsbeyond the vent boot at least 4 inches on all sides.away from the chimney and onto the surface of the roof sothat water, snow, and ice won’t penetrate the roof.Figures 249 and 250 show historic flashing methods forvents. The advantage of the historic sleeve and flashingConstruct chimney flashing for a metal, rolled asphalt, ormethod shown in figure 249 is that it doesn’t require sealantsod roof in a similar fashion. However, instead of step flashor exposed fasteners, and the pipe and cap can move sepaing, use one long piece of flashing that runs up the sloperately from the roof and flashing. Leaks commonly developof the roof for the entire length of the side of the chimney.Counter flash in the same manner as you would with shingles over time at sealant joints and fastener penetrations, so theolder, more difficult methods tend to be more durable. Figor shakes—in steps running up the courses of masonry toures 249 and 250 also show how the flashing sheet extendsapproximately match the angle of the roof.under the top and side shingles but lies over the shinglesbelow the vent, which is the same way you should installmodern, premade combination units. The folds in the flashing guide any water that penetrates the overlapping shinglesdown the flashing and out onto the roof surface so that theroof sheathing doesn’t get wet.Figure 248—Preservationcrewmembers replaced the flashingall around the chimney at the LostHorse cabin (Bitterroot NationalForest, Northern Region).173Keeping the Rain OutAfter you place all the counter flashing, repoint the joints thatyou raked out. If the builders originally filled the joints withmortar, match the original color and type of mortar using thesame method used for matching masonry daubing explainedin the Chinking and Daubing section of this guide. If thebuilders originally packed the joints with lead wool, repackthem with matching lead wool. Remember to pack the woolin tightly to keep out water.
Dovetails and Broadaxes: Hands-On Log Cabin PreservationKeeping the Rain OutFigure 249—This drawing showsa historic method for using leadflashing, a sleeve, and a caparound a roof vent.Figure 250—This drawing shows ahistoric method for using a lead andcopper boot and flashing around aroof vent.174
Dovetails and Broadaxes: Hands-On Log Cabin PreservationValley FlashingInstall valley flashing after installing the asphalt felt roofingpaper and before installing the roofing. On buildings withcontinuous sheathing, consider carefully installing a continuous layer of ice and water shield along the full length of thevalley before laying the asphalt roofing paper. This providesan extra measure of leak protection. Before laying the flashing, extend felt asphalt roofing paper from each side completely across and at least a foot beyond the center of the valley (figure 253).You can make valley flashing from flat metal sheets or rolls.You also can buy it preformed in a “V” shape (figure 254) ora “W” shape (figure 255) with or without hems (metal foldedback on itself) or crimps at the edges. The ridge in the middleof W-shaped valleys is called a splash rib. You can find metalflashing at most building supply stores in 10- or 20-footlengths and either 16- or 24-inch widths, which means it willextend 8 to 12 inches beyond the centerline of the valley.Figure 251—A preservation crewmember trimmed the shingles around thisbooted flue on the Moose Creek Wash House (Nez Perce National Forest,Northern Region).Figure 252—The shakes around this small vent in the Moose Creek Ranger'sHouse (Nez Perce National Forest, Northern Region) required little trimming.Valley flashing is easy to install, as long as you make sureto align the middle of the flashing along the low point of theroof valley. Just lay the flashing in place and nail it downalong the edges. Begin laying valley flashing at the roof eaveand work up the roof. If the valley requires more than onelength of flashing, overlap each section by at least 4 inches.Then, install the roofing shingles, lapping the shingles at least6 inches over the flashing and trimming the shingles to matchthe angle of the valley (see figure 254).175Keeping the Rain OutCut shingles around larger vents and flues to fit around theboot (figure 251). You won’t need to trim many shingles asyou lay them around smaller vent pipe sleeves (figure 252).
Dovetails and Broadaxes: Hands-On Log Cabin PreservationKeeping the Rain OutFigure 253—This drawing showshow to place roofing paper,valley flashing, and shingles overcontinuous sheathing. If you useice and water shield, install itunder the roofing paper directlyonto the sheathing.Figure 254—Preservationcrewmembers used V-shaped valley flashing while replacing theroof at the Phillipsburg RangerStation (Beaverhead-DeerlodgeNational Forest, NorthernRegion). Note how the crewcut the shingles that overlap theflashing on a diagonal to matchthe chalkline.176
Figure 255— Preservationcrewmembers used W-shapedvalley flashing when theyreplaced the roof on this buildingat the Ninemile Ranger Station(Lolo National Forest, NorthernRegion).Roof valleys on cabins in locations that frequently receiveheavy rainstorms often have a tapered run that is wider atthe bottom than at the top to accommodate the larger flow ofwater that accumulates near the bottom of the valley. To layout a typical tapered run, install the valley flashing as usual,using 24-inch-wide flashing. Measure and mark 3 inchesfrom each side of the center at the top of the valley. Next,measure and mark 4 inches from each side of the center at thebottom of the valley. Then, snap a chalkline from the marksat the top of the valley to the marks at the bottom. This givesyou a tapered line. Lay the roofing as you normally wouldand trim the roof material to match the chalkline.Rolled asphalt roofing valley flashing and woven asphaltshingle valleys tend to not be as durable as metal valleys.Over time, asphalt roofing tends to pull away from the roofsheathing and to crack where it bends, especially in climateswith hot summers and cold winters. Don’t give in to thetemptation to shortcut your roofing project by using either ofthese two methods, unless you must do so to retain the historic character of the building. If you must use one of thesemethods, lay ice and water shield the full length of the valleybefore placing the asphalt felt roofing paper and roofing.The best valleys have 4 to 8 inches of exposed metal in themiddle (called an “open valley”), a central splash rib, andeither a hem or a crimp near each side edge. You may need toinstall a different valley flashing from the one the cabin originally had. The SHPO probably will need to review or approvenoticeable changes in appearance if a Federal or State government agency owns the cabin, or if Federal or State sourcesprovided some or all of the funding for the cabin preservationwork. Check with your heritage resource specialist or archaeologist for the requirements.177Keeping the Rain OutDovetails and Broadaxes: Hands-On Log Cabin Preservation
Dovetails and Broadaxes: Hands-On Log Cabin PreservationRoof Pitch Transition FlashingWhere a porch or shed dormer roof with a shallow slopemeets a steeper slope on the main roof (see figure 228), orwhere the pitches meet on a gambrel roof, you probably needto install flashing to help deflect water. In these cases, installthe flashing after you lay the roofing on the lower sectionbut before you lay the roofing on the upper section. Lay theflashing over the roofing on the lower section of roof. Lay theflashing over the asphalt felt roofing paper but under the roofing of the upper section.Builders also frequently use flashing under the ridge shinglesof a Boston ridge on wood shake and shingle roofs. See theRidge Caps for Wood Shake and Shingle Roofs section ofthis guide to learn this method.Keeping the Rain OutDormer FlashingInstall dormer flashing (figure 256, and also see figure 228)on the lower edge and sides of the dormer in much the sameway you install chimney flashing. Where the roof of peakeddormers meets the main roof, install valley flashing asexplained previously. Handle flashing at the top of shed roofdormers the same way you would handle any other roof pitchtransition. Generally, use base and step flashing on the loweredge and sides of a dormer, exactly as you would a chimney.If the dormer is sided with shingles, shakes, or siding boards,install the upper portion of each piece of step flashing underthe siding and don’t use counter flashing; the siding functionsas counter flashing. Where the valley flashing for a peakeddormer meets on the ridge, fold the two pieces together andsolder them along the joint.Figure 256—The shed roofdormer on the back of the BigPrairie Ranger Station (Flathead National Forest, NorthernRegion) has flashing at thebase, sides, and top. The roofersinstalled base flashing where thelower side of the dormer meetsthe roof. The board and battensiding on the sides of the dormercovers most of the step flashing.The roofers also installed flashing at the transition betweenthe top of the dormer roof andthe main roof (not visible in thephoto).178
Dovetails and Broadaxes: Hands-On Log Cabin PreservationRoofing Fasteners and ToolsWe all love labor-saving building tools, but using a shinglehatchet (figures 257 and 258) or a lightweight smooth-facedhammer to drive nails flush with the shingle or shake surfacestill is the best way to attach wood or asphalt shingles to historic roofs. Do not use a wafflehead hammer for roofing on ahistoric building; it will leave a waffle mark around the nailheads. The marks are unsightly, don’t conform to the historicappearance of the building, and hold water, leading to rot.Use caution when you install metal roofing using powerscrewdrivers. Overdriving screws results in gasket or clipdamage and a leaky roof. Underdriving screws leaves tinygaps through which water can penetrate. Figure 259 showsthe difference between properly driven, underdriven, andoverdriven gasketed screws. If you use power screwdrivers,check and adjust the torque settings several times during theday as the temperature changes.Keeping the Rain OutDo not use nail guns to attach roofing. The common practice of using pneumatic nail guns can crack the roofing orshoot fasteners completely through it, leading to its premature failure. Using nail guns is the normal roofing practicethese days, but the author has spent too much time repairingrelatively new roofs that someone nailed using a nail gun torecommend this practice under any circumstances. If youplan to contract out the roofing work, contact the NorthernRegion Historic Preservation Team at ntal/HistoricPreservation/include home.htm#team or 406–329–3478 for copies ofshingle roofing specifications that have successfully requiredroofers to use hand nailing techniques.Figure 257—This older shingling hatchet serves the same function as newermodels—use the hammer end to drive nails, the hatchet end to trim shingles,and the notch in the hatchet to pry out nails.Figure 258—These newer shingling hatchets work exactly the same way asthe older hatchet shown in figure 257. Their steel handles are less likely tobreak, but the basic design hasn’t changed much in more than 100 years.179
Dovetails and Broadaxes: Hands-On Log Cabin PreservationFor metal roofs, follow the manufacturer’s recommendationsfor fasteners. If the manufacturer has not provided recommendations, use self-tapping metal-to-wood roofing screwswith gasketed flanges. Builders historically attached metalroofs using lead-headed nails, but nails are far more prone toleaking and popping than gasketed roofing screws; they nolonger are recommended for use.Keeping the Rain OutFigure 259—The drawing on the left shows an overdriven roofing screwwith a deformed gasket. The drawing in the center shows a roofing screwthat is driven correctly, with the gasket just barely visible around the edgesof the flange. The drawing on the right shows an underdriven roofing screw.The gasket is not visible around the edge of the flange and is not compressedenough for the gasket to seal properly.Roofing professionals disagree on the best location to placefasteners to attach corrugated and ribbed metal roofs. Manufacturer’s instructions usually say to drive screws in the valleys of corrugated roofing and on the flats of ribbed roofing.Because neoprene gaskets don’t last as long as the metal ofthe roof and water is more likely to leak around a wornoutgasket in the valley than in the peak, many long-time rooferssuggest fastening through predrilled hole
Most roofing extends beyond the edges of the roof sheath-ing to allow water to drain off the roofing without soaking the sheathing and fascia (if any). Many 20th-century cabin roofs also had drip edging to help protect the sheathing and fascia. Companies manufactured historic drip edging using Keeping the Rain Out galvanized steel.