Transcription
Table Of Contents1. Setting Up Condeco. 41.1 Logging In . 51.1.1 Log in . 51.2 The Welcome Page and Application Setup . 61.2.1 Application Setup . 71.3 Location Administration . 81.3.1 Countries. 81.3.2 Regions. 101.3.3 Locations. 101.4 Group Administration . 141.4.1 Different types of Groups in Condeco. 141.4.2 How to Create a New Group . 151.4.3 How to Edit a Group . 261.4.4 How to Delete a Group. 261.4.5 How to Activate a Group within a Location . 261.4.6 Setting up a Group’s Resources. 271.5 Vendor Administration. 281.5.1 How to Create a Vendor. 281.5.2 How to Edit a Vendor’s Details . 281.5.3 How to Delete a Vendor . 281.6 Resource Administration. 291.6.1 How to Add a Resource . 291.6.2 How to Edit a Resource. 341.6.3 How to Delete a Resource. 341.6.4 After you have Created Resources. 341.6.5 Linked rooms. 351.7 Floor Plan Administration . 371.7.1 How to Upload a Floor Plan. 371.7.2 How to Position Groups on the Floor Plan (hotdesks only) . 371.7.3 How to Position Desks or Parking Spaces on the Floor Plan. 371.8 Service Administration . 381.8.1 How to Add a Service. 381.9 Meta Administration. 411.9.1 How to Create Meta Categories . 411.10 User Administration . 431.10.1 How to Add a New User . 431.10.2 How to Edit a User . 441.10.3 How to Delete a User . 441.10.4 If a User has Forgotten their Login Details. 45Condeco Meeting Room and Resource SchedulingUser Guide 1
2. How to Use Condeco: Administrators. 462.1 The Welcome Page . 472.1.1 Room Booking Homepage . 482.1.2 Desk Booking Homepage. 502.1.3 Parking Home Page . 522.2 Room Booking . 542.2.1 Ways to make a Room Booking . 542.2.2 The Booking Form. 712.3 Managed Room Booking Requests . 792.3.1 How to View New Requests . 802.3.2 How to Reject a New Unconfirmed Request. 812.3.3 How to View Confirmed Requests . 812.3.4 How to Change a Confirmed Request . 812.4 Find a Room Booking . 822.4.1 To find a booking. 822.4.2 To include cancelled requests . 822.5 Delivery. 832.5.1 How to Create a Service Request . 832.5.2 How to Edit a Service Request . 852.5.3 How to Cancel a Service Request . 852.6 Visitors. 862.6.1 Visitor Setup. 862.6.2 How to Add a Visitor. 872.6.3 How to Find a Visitor . 912.6.4 How to Notify the Host. 912.6.5 How to Display Roll Call . 912.6.6 How to Include Cancelled Requests. 922.6.7 Visitor Direction Email . 922.7 Contacts . 932.7.1 How to Access your Contacts. 932.7.2 How to Find a Contact. 932.7.3 How to Edit a Contact. 932.7.4 How to Print your Contacts. 932.7.5 How to Add a Contact . 942.8 Desk Booking . 952.8.1 How to Book a Desk through the Floor Plan . 952.8.2 How to Book a Desk through Find a Desk . 982.8.3 How to Book a Desk through the Desk Booking Grid. 992.8.4 How to Book a Desk through the Quick Desk Search. 1012.8.5 How to View and Edit your Desk Bookings. 1022.8.6 How to Cancel a Booking . 1022.8.7 How to Release a Fixed Desk . 1022.8.8 How to Find a Desk User. 104Condeco Meeting Room and Resource SchedulingUser Guide 2
2.9 Parking Spaces . 1052.9.1 Reserve Scheme. 1052.9.2 Rota Scheme . 1072.10 Reports . 1082.10.1 How to View a Report. 1083. How to Use Condeco: Users . 1103.1 The Welcome Page . 1113.1.1 Room Booking Homepage . 1123.1.2 Desk Booking Homepage. 1143.1.3 Parking Homepage. 1163.2 Room Booking . 1183.2.1 Ways to make a Room Booking . 1183.2.2 The Booking Form. 1353.3 Managed Room Booking Requests . 1433.4 Delivery. 1443.4.1 How to Create a Service Request . 1443.4.2 How to Edit a Service Request . 1463.4.3 How to Cancel a Service Request . 1463.5 Visitors. 1473.5.1 How to Add a Visitor. 1473.5.2 How to Find a Visitor . 1483.6 Contacts . 1493.6.1 How to Access your Contacts. 1493.6.2 How to Find a Contact. 1493.6.3 How to Edit a Contact. 1493.6.4 How to Print your Contacts. 1493.6.5 How to Add a Contact . 1493.7 Desk Booking . 1503.7.1 How to Book a Desk through the Floor Plan . 1503.7.2 How to Book a Desk through Find A Desk. 1533.7.3 Quick Desk Search. 1543.7.4 How to View and Edit your Desk Bookings. 1553.7.5 How to Cancel a Booking . 1553.7.6 How to Find a Desk User. 1554. Vendors. 1564.1 Vendor Inbox . 1574.1.1 How to View the Vendor Inbox . 1574.1.2 How to View Details of an Order. 1574.1.3 How to Change the Status of an Order. 1574.1.4 How to Add Notes . 157Condeco Meeting Room and Resource SchedulingUser Guide 3
1. Setting Up CondecoFOR ADMINISTRATORSCondeco Meeting Room and Resource SchedulingUser Guide 4
1.1 Logging InADMINISTRATORS ONLYelcome to Condeco. To get started, please visit the Condeco Login page. If you don’tknow where your login page is located, please talk to your system administrator. It isadvisable that you bookmark the page in your browser (for example MicrosoftInternet Explorer).W1.1.1 Log inIf you get automatically logged in to Condeco using your active directory login (the login you usefor your computer), you don’t need to read this paragraph. Otherwise, enter your user name andpassword in the login pane and click on the arrow to enter Condeco. It is advisable to changeyour password on your first login. You can do this by going to the Profile section in the top righthand corner of the Welcome Page.Condeco Meeting Room and Resource SchedulingUser Guide 5
1.2 The Welcome Page andApplication SetupADMINISTRATORS ONLYThe Condeco Welcome Page is your main starting point to perform a task in Condeco.What’s displayed on the Welcome Page depends on what you can book at a selectedlocation: Room Booking, Desk Booking, or Parking. The Welcome Page is in fact theRoom Booking homepage, with the title ‘Welcome to Condeco Room Booking’ and the RoomBooking navigation menu on the left hand side of the screen (If Room Booking is not part ofyour Condeco software, you will see the navigation menu for either Desk Booking or Parking).To change this menu to Desk Booking or Parking (if available in your software) click on thecorresponding button on the lower left-hand corner of the screen.Condeco Meeting Room and Resource SchedulingUser Guide 6
1.2.1 Application SetupThe button labelled Application Setup on the lower left hand corner of the screen will take youto the Application Setup navigation menu used to set up Condeco software for your company.When you click on Application Setup, you will see the navigation menu on the left-hand side ofthe screen. This menu contains all the divisions used to set up Condeco. The first three itemson this menu are important for initially setting up the Condeco software: LocationsGroupsResourcesIt is important to understand that first you will set up Locations, andthen you will set up Groups within a location, then Resources within agroup.All of the information you program into each of these divisions createsthe room booking and desk booking grids where users can bookworkspaces.Condeco Meeting Room and Resource SchedulingUser Guide 7
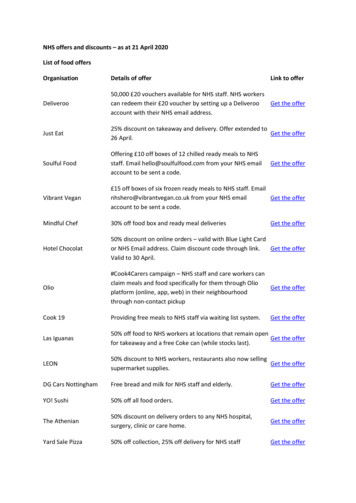
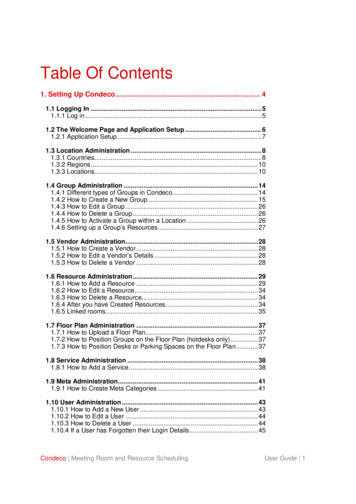
1.3 Location AdministrationADMINISTRATORS ONLYCondeco supports three levels of location information; countries, which are important fortime zones and time and date formats, regions which allow you to split up a largeamount of locations for easier administration and display, and the actual locations (i.e.office spaces, parking areas) which split up into floors.1.3.1 CountriesYou can program multiple countries into your Condeco software depending on your company’sneeds. For example, if you have offices in London and New York City, you will create separatecountries for England and the United States of America.1.3.1.1 How to Add a New CountryClick on Application Setup in the lower left-hand corner of the Welcome Page. Next, click onLocations at the top of the Application Setup navigation menu located on the left-hand side ofthe screen. This will bring you to the Location Admin page. Next, click on Add New Country.This will direct you to this page where you will fill out a form:Condeco Meeting Room and Resource SchedulingUser Guide 8
CountryType in the name of the country you are creating here.Currency symbolA) To select the currency symbol that represents the country you are creating, click on asymbol from the drop down menu. All cost associated items will now be displayed with thesymbol you have chosen.B) If the required symbol is not on the list, select Other in the drop down menu and type inthe preferred text in the Other pls specify field. For example, if you are creating Norwaytype in NKR for Norwegian Kroner.International calling codeWhen adding the country’s calling code, type in the whole number including 0’s.Time formatA) The time format you select determines which way times will be displayed throughoutCondeco.B) When selecting the 12hr Clock and check the AM/PM box, the times will be displayedaccordingly.Date formatA) The date format you select determines which way dates will be displayed throughoutCondeco.B) When selecting Date / Month / Year, the dates will be displayed this way.When you are finished filling out this page, click Save. This will direct you to Add New Region /Edit Country Details.1.3.1.2 How to Edit an Existing Country’s DetailsTo edit a country’s details, click on Locations in the Application Setup menu, specify thecountry that you would like to edit, then click Edit Country Details. Make required changes andclick Save.1.3.1.3 How to Delete an Existing CountryTo delete an existing country, click on Locations in the Application Setup menu, specify thecountry that you would like to delete, then click on Edit Country Details. Click Delete. A screenwill appear asking if you are sure you would like to permanently delete this country. Click OK ifyou would like to continue and delete the country, click Cancel if you would like to keep thecountry.NOTE: Deleting a country is irreversible. Once the country is deleted, allinformation pertaining to this country, such as regions, locations, and groups, willbe lost.Condeco Meeting Room and Resource SchedulingUser Guide 9
1.3.2 RegionsAfter you create a country you will add a region to it, for example, London is a region ofEngland. Click on Add New Region, type in the name of the region you are creating and thenclick Save.1.3.2.1 How to Add a New RegionYou can have multiple regions within each country. To add another region, click on Locationsin the Application Setup menu, specify the country you would like to add the region to, then clickon Add New Region. Enter the name of the new region. Click on Save.1.3.2.2 How to Edit an Existing RegionIf you would like to edit the name of a region you already created, click on Locations in theApplication Setup menu, specify the country that contains the region that you would like to edit,then specify the region you would like to edit. Once you are on the next screen, click on theoption Edit Region Details. Make the required changes and click Save.1.3.2.3 How to Delete an Existing RegionIf you would like to delete a region, click on Locations in the Application Setup menu, specifythe country that contains the region that you would like to delete, then specify the region youwould like to delete, Once you are on the next screen, click on Edit Region Details and thenclick Delete. A screen will appear asking if you are sure you would like to permanently deletethis region. Click OK if you would like to continue and delete the region, click Cancel if youwould like to keep the region.NOTE: Deleting a region is irreversible. Once the region is deleted, all informationpertaining to this region such as locations and groups will be lost.1.3.3 LocationsFor each region you will create a location (i.e. office space, car park) or multiple locationsdepending on your company’s needs. The information you add when creating a new Locationwill be displayed to the user in the description of the location. After you create a region, click onAdd New Location. This will direct you to this screen, where you will create a profile for yourlocation:Condeco Meeting Room and Resource SchedulingUser Guide 10
Location nameType in the name of the location you are creating.TypeChoose the type of location you are creating from the drop down menu. If you arecreating an office, choose Office Space. If you are creating a Car Park (if available inyour Condeco software), choose Parking.AddressType in the address to the Office Space or Cark Park you are creating.Time zoneChoose a time zone corresponding to your location from the drop down menu.FloorsA) To indicate the number of floors in a building, fill in the Above Ground and BelowGround boxes.B) To name a floor click on [Define floor names] and type in the name of the floor.N.B: Do not click [Close] after typing in the names; this will delete the floor names.Additional informationTo add any additional information, type it in the Additional Information box.Condeco Meeting Room and Resource SchedulingUser Guide 11
GroupsYou will not see this section if you have not created Groups yet. After you have createdGroups (See next section on Groups), you will see a group section appear on this page.This section is split into two parts, a right side and a left side as you see here:A) The location can have one or more Groups within it, all depending on yourrequirements for the location. To select a Group, highlight the unit and use the arrows tomove the unit to the selection box on the right where it will be activated within thelocation. If you would like to deactivate a group within a location, move this group fromthe right to the left, using the arrows.N.B: To select all the units, click on the ALL button.If you are creating a Parking Location:Auto Allot SpaceCheck this box if you would like to have Condeco assign available parking spaces tousers instead of the user picking out a specific one.Vehicle RegistrationYou can require that the user booking a parking space provide their vehicle registrationby checking this box.When you are finished filling out this page, click Save.1.3.3.1 How to Add a New LocationIf you would like to create a new location, click on Locations in the Application Setup menu,specify the country that you would like to add the location to, on the next page specify the regionthat you would like to add the location to, then click Add New Location. Fill out the pageaccordingly and click Save.1.3.3.2 How to Edit an Existing LocationIf you would like to edit an existing location, click on Locations in the Application Setup menuand specify the country that contains the location you would like to edit. Next, specify the regionthat contains the location you would like to edit, then specify the location for editing and makerequired changes to the form on that page. When finished, click Save.Condeco Meeting Room and Resource SchedulingUser Guide 12
1.3.3.3 How to Delete an Existing LocationIf you would like to delete an existing location, click on Locations in the Application Setup menuand specify the country that contains the location you would like to delete. Next, specify theregion that contains the location you would like to delete, then specify the location to delete. Atthe bottom of the form that appears on the next page, click Delete. A screen will appear askingif you are sure you would like to permanently delete this location. Click OK if you would like tocontinue and delete the location, click Cancel if you would like to keep the location.NOTE: Deleting a location is irreversible. Once the location is deleted, allinformation pertaining to this location will be lost.Condeco Meeting Room and Resource SchedulingUser Guide 13
1.4 Group AdministrationADMINISTRATORS ONLYAGroup is a group of Meeting Rooms or Desks that have Resources and Users assignedto them. A Group is initially setup in the category Groups and then later modified underResources where specific Meeting Rooms or Desks are added to it. Users are assignedto Groups afterwards under User Administration (See more on this topic in User Administration).It is important to understand what a Group is and how to set them up and use them. It would bebest to read this section first and then read the next section on Resources to see how the twowork together.Note: You cannot create a Group without first creating a Location (see previous section onLocation Administration.)1.4.1 Different types of Groups in CondecoYou can create three different types of Groups in Condeco. You can create a Group of MeetingRooms, a Group of Desks, or a Group for Delivery points. A Delivery Point is a location withinyour Office Space where deliveries can be dropped off. We will see more on Delivery Points inResources. 1.4.1.1 Meeting RoomsYou can create groups of meeting rooms. A group of meeting rooms can be either:Managed: Where users need to request from an administrator to use a room. Theadministrator then needs to approve the request for the user to be able to use that room.ORSelf-Managed: Where any user within this group can book rooms from this group straightfrom the room booking grid or room booking search and not have to send a request.After setting up a group of meeting rooms in Groups, you will name and set up each individualmeeting room in Resources. 1.4.1.2 DesksYou can create a group for Desks and name each group of desks according to your company’sneeds. There are three different types of Desks in Condeco that are important to know now, butwill be seeing more of later in Resources:Bookable Desks: Is a desk that is bookable by any user, users can be required to checkin or not.Condeco Meeting Room and Resource SchedulingUser Guide 14
Flexible Desks: Is a desk that is assigned to an individual for a designated amount oftime. The individual can be required to check in or not.Fixed Desks: Is a desk associated to someone, however, if they book a desk in anotherCondeco location, their Fixed desk will be available to another user during the time theyare away. The individual does not have to check in.Example: If you have a group of desks available to be booked by anyone, you can name thegroup ‘Bookable Desks,’ or whichever name you would like to associate with Bookable Desks. Ifyour company has departments or a project, you can create a group of desks assigned to adepartment or project. 1.4.1.3 Delivery PointsYou can create a group solely for deliveries. This option will come up again in Resources underResource type, where you can create delivery drop off locations within your Office Space.1.4.2 How to Create a New GroupClick on Groups in the Application Setup menu. This will direct you to the Group Administrationpage. Select a country that you would like to add a group to from the Specify a Country dropdown menu. If you have not created any groups yet, you will be directed to a page where youtype in the name of the first Group you are creating. For example, if you are setting up a groupfor Managed Conference Rooms, you can type in ‘Managed Rooms’. Next you will have achoice of check boxes: Meeting Rooms/DesksCheck off this box if you are creating a group of Meeting Rooms or Desks Delivery PointsCheck off this box if you are creating a Group for Delivery Points.Next, you will be asked to choose Default Permissions for this group. Default Permissions arethe permissions users have that are in this group, these will appear later in User Administrationwhere you can specify the permissions for each user, which will override the defaultpermissions:All users can access this groupTick this box if you would like all the users in your system to be able to access thisgroup.Make bookingsTick this box if you would like users to be able to make bookings in this group.View other people’s bookingsTick this box if you want users to be able to view other people’s bookings in this group.Condeco Meeting Room and Resource SchedulingUser Guide 15
Edit other people’s bookingsTick this box if you want users to be able to edit other people’s bookings in this group.Delete other people’s bookingsTick this box if you want users to be able to delete other people’s bookings in this group.Check off the boxes for the default permissions you would like for this Group. When you arefinished click Save.You will need to continue editing the Group to make it fully functional, so from this point you willneed to select that Group again from the Specify a Group drop down menu. Next, you willselect a resource type, depending on what is available in your Condeco software:Meeting Rooms: Choose this option if you are creating a group of Meeting RoomsDesks: Choose this option if you are creating a group of Desks.1.4.2.1 Meeting RoomsIf you are creating a group of Meeting Rooms you will be asked to Select an Action:1.4.2.1.1 Edit name / DeploymentThe Edit Name / Deployment section allows you to change the name of an existingGroup and to change a Group from Managed to Self-Managed or vice versa. UnderManaged you can:Request specific room (via grid)Condeco Meeting Room and Resource SchedulingUser Guide 16
If you check this box, a user in this group can fill out a booking request for anymanaged room they choose right from the managed room booking grid. Whenthis box is unchecked, the user cannot book a specific room right from the gridand is instead directed to a request booking form asking the room specificationsthey desire. When the user is finished filling out this form, Condeco then placesthe booking in a room that fits these specifications. An administrator must thenapprove this booking request.Show booking details (on grid)If you check this box, it displays the booking details for a room on the bookinggrid for other users to see.You can edit Default Permissions for the group on this page. Click on Save to completethe editing.1.4.2.1.2 Colour codesColour Codes are created so different types of room bookings appear in different colourson the grid so they can be identified as such by other users. Each colour coderepresents a certain type of meeting and each Group can have a limitless number ofcolour codes.Note: When creating a booking, the user must choose a booking type (colour code) fromthe booking form in order to complete the booking.To add a new colour codeClick on the colour you wish to add. A colour reference will automatica
Condeco Meeting Room and Resource Scheduling User Guide 9 Country Type in the name of the country you are creating here. Currency symbol A) To select the currency symbol that represents the country you are creating, click on a symbol from the drop down menu. All cost associated items will now be displayed with the