Transcription
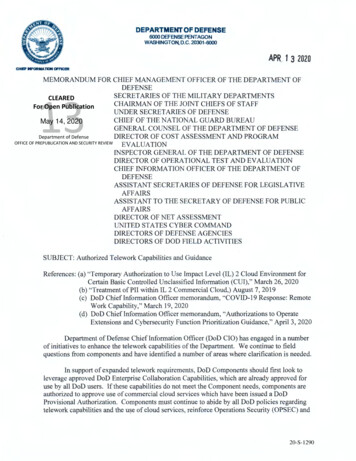
Defense PERGO Defense Install InstructionsTools Required for InstallationOther Tools and SuppliesFinishingPuttyALLY DEVEL OersPEMAD321dlfwej dlfwe vtraalskdjfvmwjcD FOR LAIUMPREM IUMEMPREMSYST EM ENTSYSTPON ENTCOM PONCOMTE FL OIN AOac5mmsIcer5mmMSpNG SPE CSpaWoodGlueRICommon ToolsSE IN THE UMoistureMeterA1 FL OZ (33.5ml)Carbide40T BladeONNon Destructive MoistureLaminate floor tappingblock and 5mm AULKSILICONECAULKONESILIC LKCAU100% SiliconeSealantFelt furniturepadsPE FoamBacker RodSite RequirementsJob SiteLaminate is a durable floor covering, not intended as structural material.Laminate requires a clean, dry, secure subfloor that meets building codes.The following requirements are not intended to supersede federal, state orlocal building codes, but as with many other interior finish products, mayrequire modifying existing structural components for successful installation.Owner assumes responsibility for compliance with all building codes.Laminate floor is suitable for use in climate controlled (35-65% RH and 6085 F) indoor installations only and should not be installed over any floor witha sump pump or in a room with a floor drain. Laminate floor can be installedabove, on or below grade. 5" (130 mm)10' (3 m) 8" (200 mm)ground6 mil (0.15 mm) virginpolyethelene vapor barrierA moisture test is strongly recommended to determine if high moisture existsin the subfloor. When using a calcium chloride moisture test for concretesubfloors (ASTM F1869), values must be 5 lbs/1000ft²/24-hr or 80% RHwith an in-situ probe (ASTM F2170). Moisture readings of wood subfloorsmust be 12%.Acceptable job site conditions, including relative humidity and subfloormoisture conditions, must be maintained throughout the lifetime of theflooring.Laminate flooring is installed as a floating floor and requires the use ofT-moldings in doorways 4 ft (1.22m) or less and in rooms 40 feet (12.2 m) orlarger in length or width. Floor movement must not be constrained by glue,nails, screws, hardware or other fixed obstructions.This product must be installed in accordance with these installationinstructions.For more information, call 1-800-33-PERGO12021 11 DP LAM
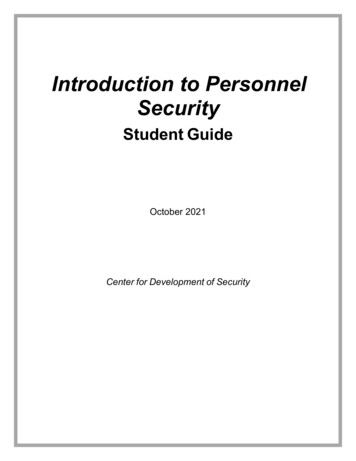
PERGO Defense Install InstructionsSite and Material PreparationABWallbaseDoorFrameCasingCutting Line1 inchDC%48 hoursE60 – 85 F35% – 65% RHGF 8" (200 mm)subfloor6 mil (0.15 mm) virginpolyethelene vapor barrierSite and Material PreparationA.) Remove carpet and padding. Also remove any wood flooring installed on concrete. Do not remove products unlessthey are asbestos-free.B.) Undercut door frame and wallbase. Slide the flooring at least 1/4" underneath the door frame and wallbase. Alsoleave a concealed 3/8" minimum expansion space under each.C.) Remove bumps or peaks in subfloor and fill depressions with floor leveling compound to ensure no more than 3/16"unevenness per 10-foot span.D.) Acclimate unopened product before installation. If there is no time for acclimation, there should be no more thana difference of 25 F and 20% relative humidity between the stocking/transportation environment of theflooring and the final installation environment of the flooring.E.) Clean debris from subfloor before installation.F.) For concrete subfloors, install vapor barrier with overlapped seams of 8" or more.G.) For planks without attached underlayment, install over single layer of underlayment appropriate for laminatefloors. For planks with attached underlayment, it is acceptable to install Pergo FloorMate underlayment prior toflooring installation if desired. Make sure to follow the Pergo FloorMate installation instructions, taking special careto seal all foam edges with sealing tape and repair all rips and perforations in the underlayment vapor barrier prior toflooring installation. A separate vapor barrier should not be used in conjunction with Pergo FloorMate .22021 11 DP LAM
PERGO Defense Install Instructions132546Left26Right15345665 12 in79834121014111513121617WOODGLUE32021 11 DP LAM
PERGO Defense Install Instructions1819MoldingSilicone sealantMoldingPE foam backer rodSilicone sealantPE foam backer rodSilicone sealantFlooring Installation1. Inspect each plank. Floor should be installed blending planks from several cartons at the same time to ensure goodcolor and shade mixture throughout the installation.2. For the first row along straight walls, remove the tongue on all long side joints and on the short side of the 1st plankonly.3. For uneven walls, trace contour on tongue-side of plank and cut.4. Assemble the first row tongue side toward wall. Insert the end tongue into the end groove and rotate downward toassemble. Keep the planks aligned and the joints closed.5. Two spacers thick side to thick side 3/8".6. Provide a 3/8" space for expansion on all sides. First piece must be at least 8" long. Start new rows with piecestrimmed from previous row. Ensure at least a 12" end joint offset.7. At a slight angle, insert the tongue of plank 2 into the groove of plank 1 until the laminate edges meet, and then rotatedown until the joints lock.8. Join the short end of the plank first. There will be a gap on the long side joints when the plank is rotated down.9. Raise the outside edge of the plank upward approximately 1". Maintain this angle as you push the plank in untilthe laminate edges meet. Rotate downward on the plank until the joint locks. Repeat these steps to complete theinstallation. Installation Tip: Place a carton of planks across the end of the row being installed to keep installedplanks in place during installation.10. Alternate Tap Method: Align the tongues into the grooves of the long and short sides of the planks. Install the longside first by placing a tapping block no closer than 8" from either end and tap lightly along the long side until the jointis closed tightly. Then tap the end using the tapping block into a locked position. Note: Uneven tapping or use ofexcessive force may damage the joint.11. Ensure there will be a 3/8" gap (after the joint is closed) to the wall for expansion.12. For the last row, align the plank to be used on top of the 2nd to last row. Using a full width plank as a spacer, trace wallcontour and cut plank.13. For the last row, install the long side tongue into the groove with the end joint aligned. Using a pull bar and hammer,work evenly along the length of the plank and lightly tap the joint closed.14. After tapping the long side joint closed, tap the short side closed, using a tapping block or a pull bar.Installation Under Doorway Frames15. Slide plank under pre-cut door frame.16. Tap the long side joint closed first. Then tap the end joint closed.Installation Around Fixed Objects (such as Pipes)17. Allow 3/8" expansion space around pipes or other fixed objects.Finishing the Installation18. Remove all spacers.19. Create a watertight seal by applying flexible 100% silicone sealant to the entire perimeter of the installation. DO NOTuse acrylic sealant. First fill all expansion spaces with 3/8" compressible PE foam backer rod and cover with silicone sealant. Prior to installing the moldings, apply silicone sealant to the portion of the molding or transition that will contactdirectly with the laminate flooring surface. Install moldings and immediately wipe away any excess silicone sealant. Apply silicone sealant at connections to doorframes or any other fixed objects.42021 11 DP LAM
PERGO Defense Install InstructionsABCCare and CleaningA)Place felt floor protectors under legs of moveable furniture. Chair casters should be rubber – not plastic or metal.B)Place walk-off mats at entrances.Dust mop as primary cleaning method. Occasionally wet mop with water only, using a well wrung out mop; DO NOTpour liquid directly on floor or use an excessively wet mop that will puddle or leave moisture standing on the floor. If needed,use a solution of 1 cup of vinegar per gallon of water OR 1/3 cup non-sudsing ammonia per gallon of water. DO NOT usedetergents, abrasive cleaners, soaps, waxes or polishes. A residential steam mop may be used provided the steam isapplied to a microfiber pad and not applied directly to the floor. Make sure to set the temperature of the steam mop to theappropriate setting for laminate floors, or to the lowest setting. Steam mop in the length direction of the planks only. Usecorrect hard surface vacuum tools. DO NOT use rotating beater bars, floor scrubbers, jet mops or similar products. Wipeup spills immediately. DO NOT allow topical moisture to remain on the floor longer than the time specified in theproduct warranty.C)52021 11 DP LAM
PERGO Defense Laminate Flooring on Wall Install InstructionsAlthough originally designed as a durable floor covering, many consumers have started using Pergo laminate flooring onwalls to give their rooms more character and to create a feature or accent wall.Laminate can be utilized as a decorative covering over an existing clean, dry, secure and vertical wall that meetsbuilding codes. The wall substrate should be primed or painted drywall (gypsum board) only. Do not install directly overwallpaper or paneling. Laminate is not intended to be used on ceilings, countertops or as any type of structural material.The installation wall should only run vertical to the floor. Sloping walls and surfaces that are parallel to the floor, such asceilings or soffits, should not be selected. Limit installations to a maximum of 40 feet in length and a maximum of 1 planklength in height.Laminate is suitable for an accent wall when used in climate controlled (35-65% RH and 60-85 F) indoor installationsonly. Acclimate unopened product lying flat in the room where it is to be installed for at least 48 hours. Mix planks fromdifferent cartons as you install to maximize the natural appearance.Check wall for moisture, visible water stains or leaking windows. Do not install laminate over a wall with known moisturedamage. Do not install in areas near water sources such as a backsplash over a sink or bathtub. Acceptable job siteconditions, including relative humidity and wall moisture conditions, must be maintained throughout the life of thelaminate application.Check wall for flatness within 3/16" over 10 feet. Correct any unevenness before installing to allow the laminate planks tolie flat without rocking.The following requirements are not intended to supersede federal, state or local building codes, but as with many otherinterior finish products, may require modifying existing structural components for successful installation. Owner assumesresponsibility for compliance with all building codes, including maintaining the required distance from heat sources suchas fireplaces.WARNING: For a safe and secure installation, this product MUST be installed in accordance with these installationinstructions.6Tools Required for Installation:Materials Required for Installation: Caulk gun 11/2" - 13/4" brad nails Utility knife 100% silicone adhesive caulk (clear) Stud finder (electronic) Carpenters level or laser level11/2" - 13/4" dry wall screws (for horizontal installationonly) Chalk line Painters tape (for horizontal installation only) 18 gauge brand nail guin (electric or air) Tape measure Pencil Step ladder (for horizontal installation only) Screw gun or drill driver (for horizontal installationonly) Hammer Uniclic appropriate tapping block Safety glasses Pull bar Dust mask Saw for cutting laminate planks Gloves Pry bar (for removing existing base or trim) Chair rail (for vertical installation only), wall base andquarter round moldings (to fame out accent wall)Other Tools and Materials:2021 11 DP LAM
PERGO Defense Vertical Wainscot Style Wall Install Instructions1.Measure the length of your laminate plank and the length of the wall area to determine the total square footagearea. Order that amount of flooring plus an additional 10% for incorrect cuts.2.Remove all base and trim from accent wall. Measure from the floor a distance equal to your laminate plank plusone inch then level and mark the wall with a chalk line. With an electronic stud finder locate and mark wall studs.(Figure 1)3.Turn off power while working around wall outlets and light switches. Pay special attention to avoid contact withelectrical wiring.4.Inspect each plank for damage before installing. (Figure 1a) Do not install damaged planks. You can use laminateplanks with or without an attached pad. There is no need to remove the pad, so treat the installation the same forboth types of planks.5.Start from the left side with the short side tongue up and long side groove toward the wall. Place one plank againstthe wall and align at the top to test fit. You will want a 1" gap at the bottom of the plank. (Figure 2a)6.Determine the appropriate number of vertical planks to fill the wall. For the best appearance, the first and lastplanks should be approximately the same width. Cut them as needed based on the width of your installation andthe width of your planks.7.If you don’t need to cut the first plank, remove lower extension of long side groove with saw or utility knife. (Figure2b)11aLevel Line55"1" Gap54"2a2b1" GapbeforeCut offextension7afterInstalltowardswall2021 11 DP LAM
PERGO Defense Vertical Wainscot Style Wall Install Instructions8.Apply silicone adhesive to the back side of the plank in an “S” pattern. If you’re using a laminate plank with anattached pad, apply the silicone directly to the pad on the back of the plank. (Figure 3)9.Adhere the plank to the wall leaving a 3/16" gap (A) from the corners of the wall and a 1" gap (B) at bottom. Drivebrad nails ½" from the top and bottom of each plank to secure to wall. Place nails where the trim will cover.10. Continue with the installation for each subsequent plank by first applying silicone adhesive to the back side of theplank in an “S” pattern. Then angle the groove over the tongue of the previous plank and wiggle into place. Tightenjoints as needed with a tapping block or pull bar. Finally, drive brad nails ½” from the top and bottom of each plankto secure to wall. Place nails where the trim will cover. Be sure to drive the brad nails into a stud whenever possible.(Figure 4)11.Finish wainscot accent to ending wall. (Figure 5)12. Install trim (chair rail) over the top edge. Install quarter round in the corners. Finish by installing the baseboard ofyour choice. (Figure 6)43A3/16"GapLevel Line1" GapSilicone in“S” pattern653/16"Gapr roundQuarteTrim (chair rail)3/16"GapWainscot AccentLaminateFloorBase Detail82021 11 DP LAM
PERGO Defense Horizontal Accent Wall Install Instructions1.Measure the length and width of the wall area to determine the total square footage area. Order that amount offlooring plus an additional 10% for incorrect cuts.2.Remove baseboards from the accent wall and locate the wall studs using the stud finder tool. Mark vertical linesover all studs. Use painters tape to extend stud location to ceiling if needed. (Figure 1)3.Turn off power while working around wall outlets and light switches. Pay special attention to avoid contact withelectrical wiring.4.Inspect each plank for damage before installing. (Figure 1a) Do not install damaged planks. You can use laminateplanks with or without an attached pad. There is no need to remove the pad, so treat the installation the same forboth types of planks.5.Lay the planks on the floor with the décor side up and the groove side toward the wall. Assemble the short ends ofthe planks together and measure length to fit the first row (bottom).6.Cut the last piece as needed leaving a 3/16” gap against any adjoining walls, if applicable, and click it into place.(Figure 2)NOTE: You may need to adjust placement of the first plank row to account for any floor unevenness so that the firstrow is perfectly straight and all end joints remain square and tight.7.Carefully flip the connected row of planks over so the décor side is now face down and the tongue side is towardthe wall. You may need assistance to flip the connected row of planks over, depending on the length of yourinstallation. Make sure that the first row is perfectly straight and the aligned joints remain square and tight. Applya bead of 100% silicone adhesive caulk to the back side of each laminate plank in the first row. If you’re using alaminate plank with an attached pad apply silicone directly onto the pad on the back of the plank. (Figure 3)8.Carefully tilt the row of connected planks against the wall with the tongue side toward the floor, re-level and pressto the wall. (Figure 3a)PaintersTape11aAccent WallExisting Dry Wall TypicalWall Studs Marked3a23/16"GapCheck floorlevelness3/16"Gap3/16"Gap3/16"Gappieces will cover entire length92021 11 DP LAM
PERGO Defense Horizontal Accent Wall Install Instructions9.Drive a brad nail into each plank at each wall stud through the shallow area of the extended groove (see insetdiagram). Take care that the brad nail heads are not raised, but also don’t force them all the way through thegroove. This will allow easy connection of the next row of planks. You must also place drywall screws every 16” intothe wall studs or sill plate along the bottom edge of the first row of planks where they will be covered by the wallbase. (Figure 4)10. Start the second row from the right side. Cut and glue with silicone adhesive caulk the first plank. Fit plank byangling tongue into groove and wiggle into place. Use tapping block as needed. Drive a brad nail into each plankthrough the shallow area of the extended groove at each wall stud. (Figure 5)NOTE: A joint “stagger” of 8 to 12 inches looks most natural. Avoid allowing plank ends to align.11.Plank 2 of row 2 (and each plank thereafter in row 2) will be modified by removing the short end tongue. Score thetongue with a utility knife 3 – 4 times to remove. You will now have a square end. (Figure 6)12. Apply silicone adhesive caulk in an “S” pattern and install modified boards by tilting into place. Tighten joints asneeded with a tapping block or pull bar. Drive a brad nail into each plank through the shallow area of the extendedgroove at each wall stud. (Figure 7)45bradnailstagger8-12"67removePlank 3 Row 2102021 11 DP LAM
PERGO Defense Horizontal Accent Wall Install Instructions13. Repeat this process for each plank working your way up to the last row. (Figure 8)14. For the last row of the installation, use painters tape to mark the stud location for brad nailing. Cut all planks in thelast row to the required width to complete the installation. Complete the installation as you have the earlier rows.(Figure 8a)15. Use quarter round for inside corners and ceiling. Finish with wall base board of your choice. (Figure 9)8a89Quarter roundQuarter round11Wall baseQuarter round2021 11 DP LAM
PERGO Defense Laminate Flooring on Wall Install InstructionsCare and CleaningDry wipe as primary cleaning method. Occasionally damp wipe with water only. NO wet washing. If needed, use 1 cupof vinegar per gallon of water OR 1/3 cup non-sudsing ammonia per gallon of water. DO NOT use detergents, abrasivecleaners, soaps, waxes or polishes. Wipe off spills immediately. DO NOT allow moisture to remain on the productsurface for longer than 30 minutes.DO NOT attach objects such as pictures, shelves or television mounts directly to the laminate wall. DO NOT applyadhesive backed hooks or install screws or nails into the laminate wall for hanging objects. Instead, drill clearanceholes through the laminate and mount these objects directly to wall studs with screws or nails. Drill the clearance holesthrough the laminate at least ¼" larger than the diameter of the fastener that will be used.Precautionary MeasuresPower tools should be equipped with a dust collector. If high dust level are encountered use an appropriate NIOSHdesignated dust mask. Avoid dust contact with skin and eyes. First Aid Measures in case of irritations: In case ofirritation flush eyes and skin with water for at least 15 minutes.ATTN: Installers Caution: Wood DustSawing, sanding and machining wood products can produce wood dust. Airborne wood dust cause respiratory, skin andeye irritation. The International Agency for Research on Cancer (IARC) has classified wood dust as a nasal carcinogen inhumans.IMPORTANT HEALTH NOTICE FOR MINNESOTA RESIDENTS ONLY:THESE BUILDING MATERIALS EMIT FORMALDEHYDE. EYE, NOSE, AND THROAT IRRITATION, HEADACHE NAUSEAAND A VARIETY OF ASTHMA-LIKE SYMPTOMS, INCLUDING SHORTNESS OF BREATH, HAVE BEEN REPORTED AS ARESULT OF FORMALDEHYDE EXPOSURE. ELDERLY PERSONS AND YOUNG CHILDREN, AS WELL AS ANYONE WITHA HISTORY OF ASTHMA, ALLERGIES, OR LUNG PROBLEMS, MAY BE AT GREATER RISK. RESEARCH IS CONTINUINGON THE POSSIBLE LONG-TERM EFFECTS OF EXPOSURE TO FORMALDEHYDE. REDUCED VENTILATION MAYALLOW FORMALDEHYDE AND OTHER CONTAMINANTS TO ACCUMULATE IN THE INDOOR AIR. HIGH INDOORTEMPERATURES AND HUMIDITY RAISE FORMALDEHYDE LEVELS. WHEN A HOME IS TO BE LOCATED IN AREASSUBJECT TO EXTREME SUMMER TEMPERATURES, AN AIR-CONDITIONING SYSTEM CAN BE USED TO CONTROLINDOOR TEMPERATURE LEVELS. OTHER MEANS OF CONTROLLED MECHANICAL VENTICLATION CAN BE USEDTO REDUCE LEVELS OF FORMALDEHYDE AND OTHER INDOOR AIR CONTAMINANTS. IF YOU HAVE QUESTIONSREGARDING THE HEALTH EFFECTS OF FORMALDEHYDE, CONSULT YOUR DOCTOR OR CALL LOCAL HEALTHDEPARTMENTS.122021 11 DP LAM
flooring installation. A separate vapor barrier should not be used in conjunction with Pergo FloorMate . PERGO Defense Install Instructions Site and Material Preparation A Door Frame Cutting Line Wallbase Casing 1 inch B % 48 hours 60 - 85 F 35% - 65% RH C D G subfloor 6 mil (0.15 mm) virgin polyethelene vapor barrier 8" (200 mm) E F