Transcription
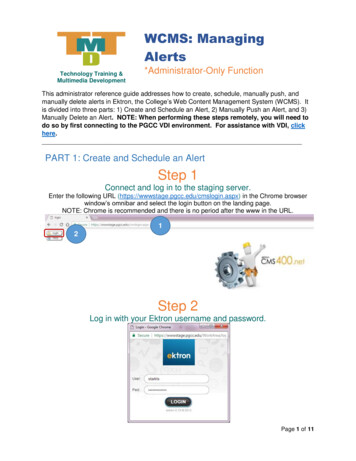
WCMS: ManagingAlertsTechnology Training &Multimedia Development*Administrator-Only FunctionThis administrator reference guide addresses how to create, schedule, manually push, andmanually delete alerts in Ektron, the College’s Web Content Management System (WCMS). Itis divided into three parts: 1) Create and Schedule an Alert, 2) Manually Push an Alert, and 3)Manually Delete an Alert. NOTE: When performing these steps remotely, you will need todo so by first connecting to the PGCC VDI environment. For assistance with VDI, clickhere.PART 1: Create and Schedule an AlertStep 1Connect and log in to the staging server.Enter the following URL (https://wwwstage.pgcc.edu/cmslogin.aspx) in the Chrome browserwindow’s omnibar and select the login button on the landing page.NOTE: Chrome is recommended and there is no period after the www in the URL.12Step 2Log in with your Ektron username and password.Page 1 of 11
Step 3Navigate to the work area by selecting the “workarea” button.After logging in, a few additional buttons will appear on the left of the landing page. Select the“workarea” button to navigate to the work area. NOTE: The landing page with the buttonsshown below will remain open in the background.Step 4Select the Content tab.Once you select the work area, by default you will be in the Desktop tab. Select the Contenttab to view, access, and create content.Page 2 of 11
Step 5Expand the Content folder by selecting the plus sign (turns into a minussign once expanded), then select the Alert folder.Step 6Select the New button, then scroll down the drop down menu thatappears, and select Alert.Page 3 of 11
Step 7Edit the alert.1) Give the alert a title. The title does not appear to the end user.2) Enter a headline for the alert. The alert does appear to the end user and is what youwant the alert to communicate to the end user.Step 8Schedule the alert by selecting the Schedule tab on the Content tab’s submenu, then selecting the Publish button.Use the calendar icons to enter start and end dates then click publish. Start and End Datesmust be entered in order for the content to appear on the PGCC website.312Page 4 of 11
After you select Publish, the following page will appear allowing you to view the content.Step 9Select Collections to begin adding the alert to the staging site.Page 5 of 11
Step 10Expand the Collections menu, select Alerts, and then select Add Items.132Step 11Select the Content folder.Page 6 of 11
Step 12Select the Alert folder.Step 13Select the checkbox next to the Alert to be added to the staging site andthen select the Add button.21Page 7 of 11
Step 14Open the PGCC staging site (http://wwwstage.pgcc.edu) in a new browserwindow to view the alert. NOTE: If the staging site was already open in adifferent browser window while editing in the staging server, then refreshthe page to see the alert.The alert will appear as a bright orange banner atop the page. Alerts are automaticallypublished every hour on the quarter of the hour. E.g 1:15pm; 2:15pm, etc.If you need to publish the alert right away, pleasecontinue to the next section.Page 8 of 11
PART 2: Manually Push an AlertSometimes alerts need to be published right away. If so, follow these steps.Step 1Go back into the staging server where you left off, select Settings from theworkarea menu, expand the Configuration folder, then expand theSynchronization folder, and then select Profiles.123Page 9 of 11
Step 2Select the circular green and red Sync arrows next to the Actions icon for“Push to Production-Database” then select OK to begin the sync.21Page 10 of 11
PART 3: Manually Delete an AlertAn alert may need to be deleted before it is scheduled to expire. If so, follow these steps.Step 1Repeat Part 1: Steps 1-5 if you have logged out, then click directly on thealert’s title.Step 2Select the “X” to delete the alert and OK when prompted to confirm thedeletion process.1231Page 11 of 11
manually delete alerts in Ektron, the College's Web Content Management System (WCMS). It is divided into three parts: 1) Create and Schedule an Alert, 2) Manually Push an Alert, and 3) Manually Delete an Alert. NOTE: When performing these steps remotely, you will need to do so by first connecting to the PGCC VDI environment.